


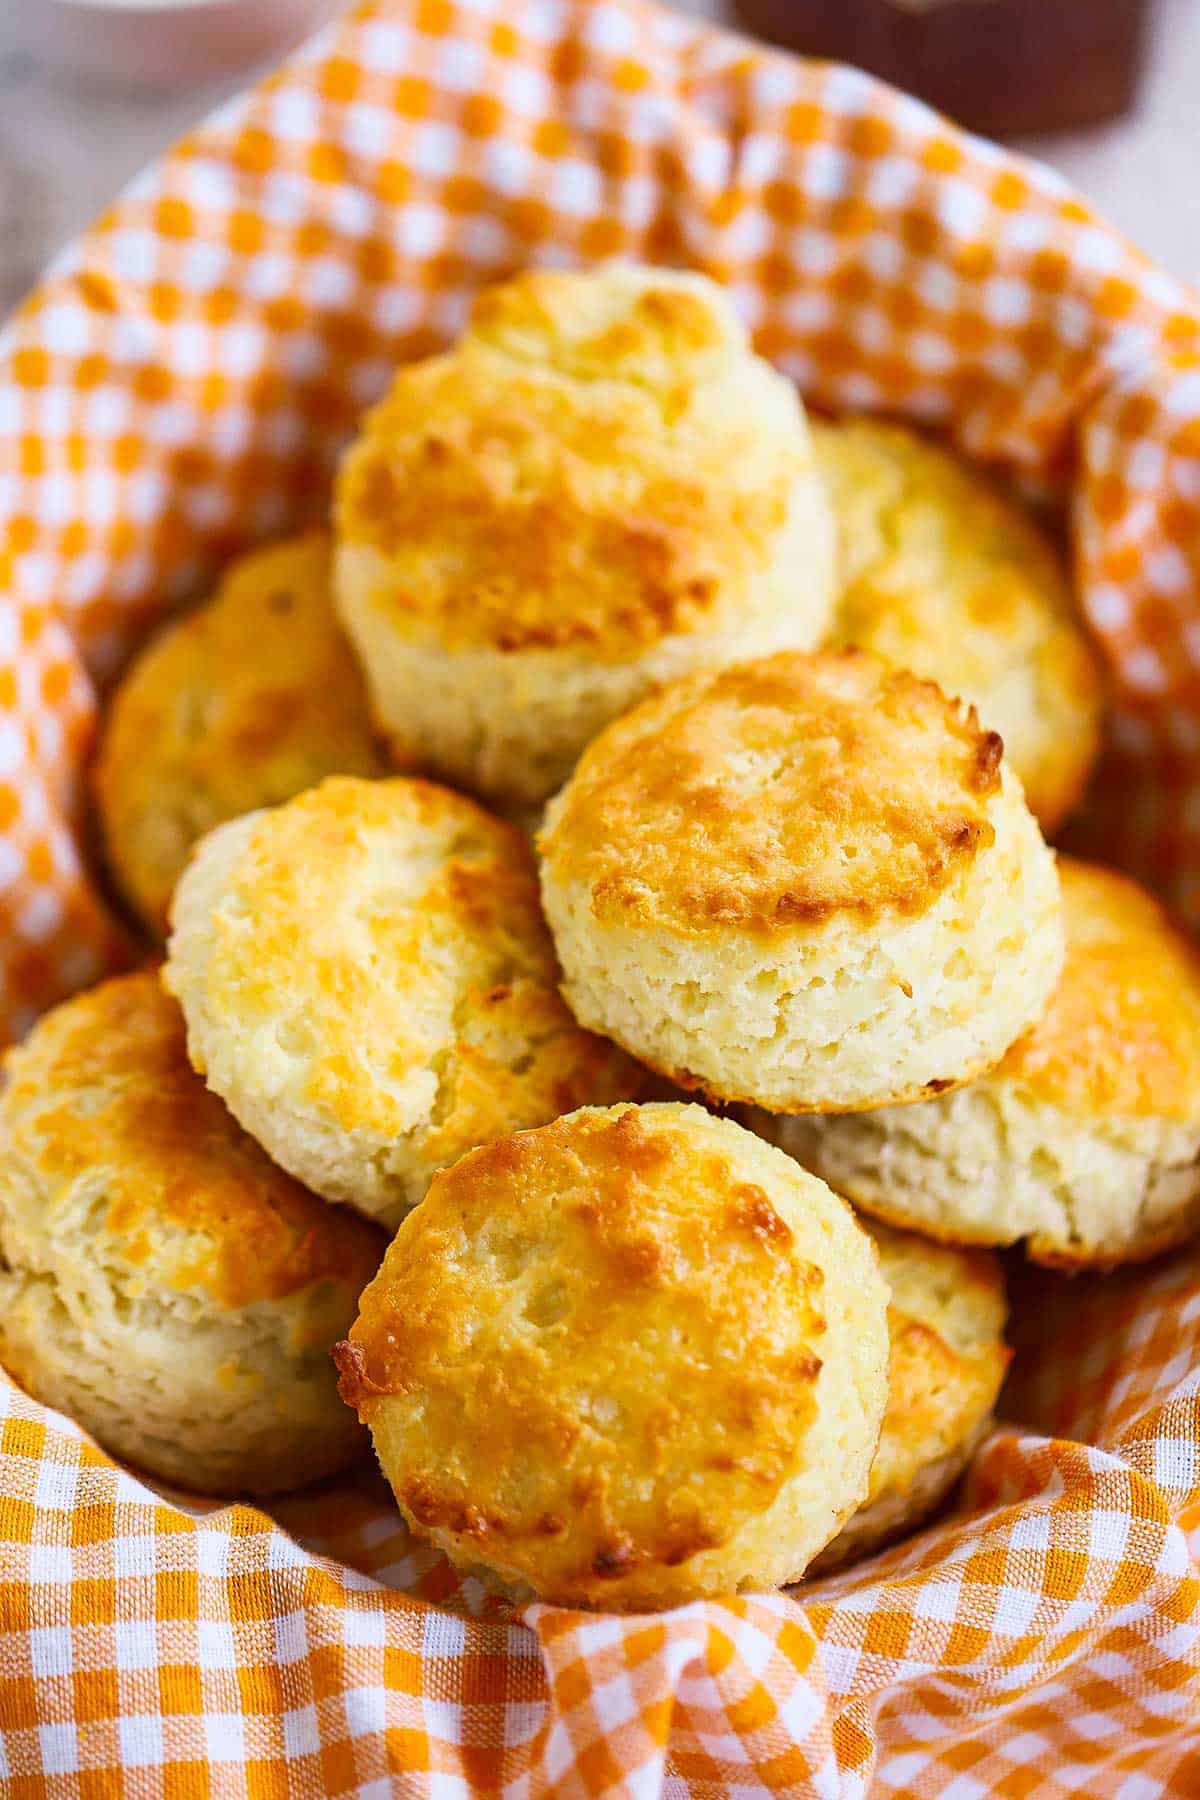
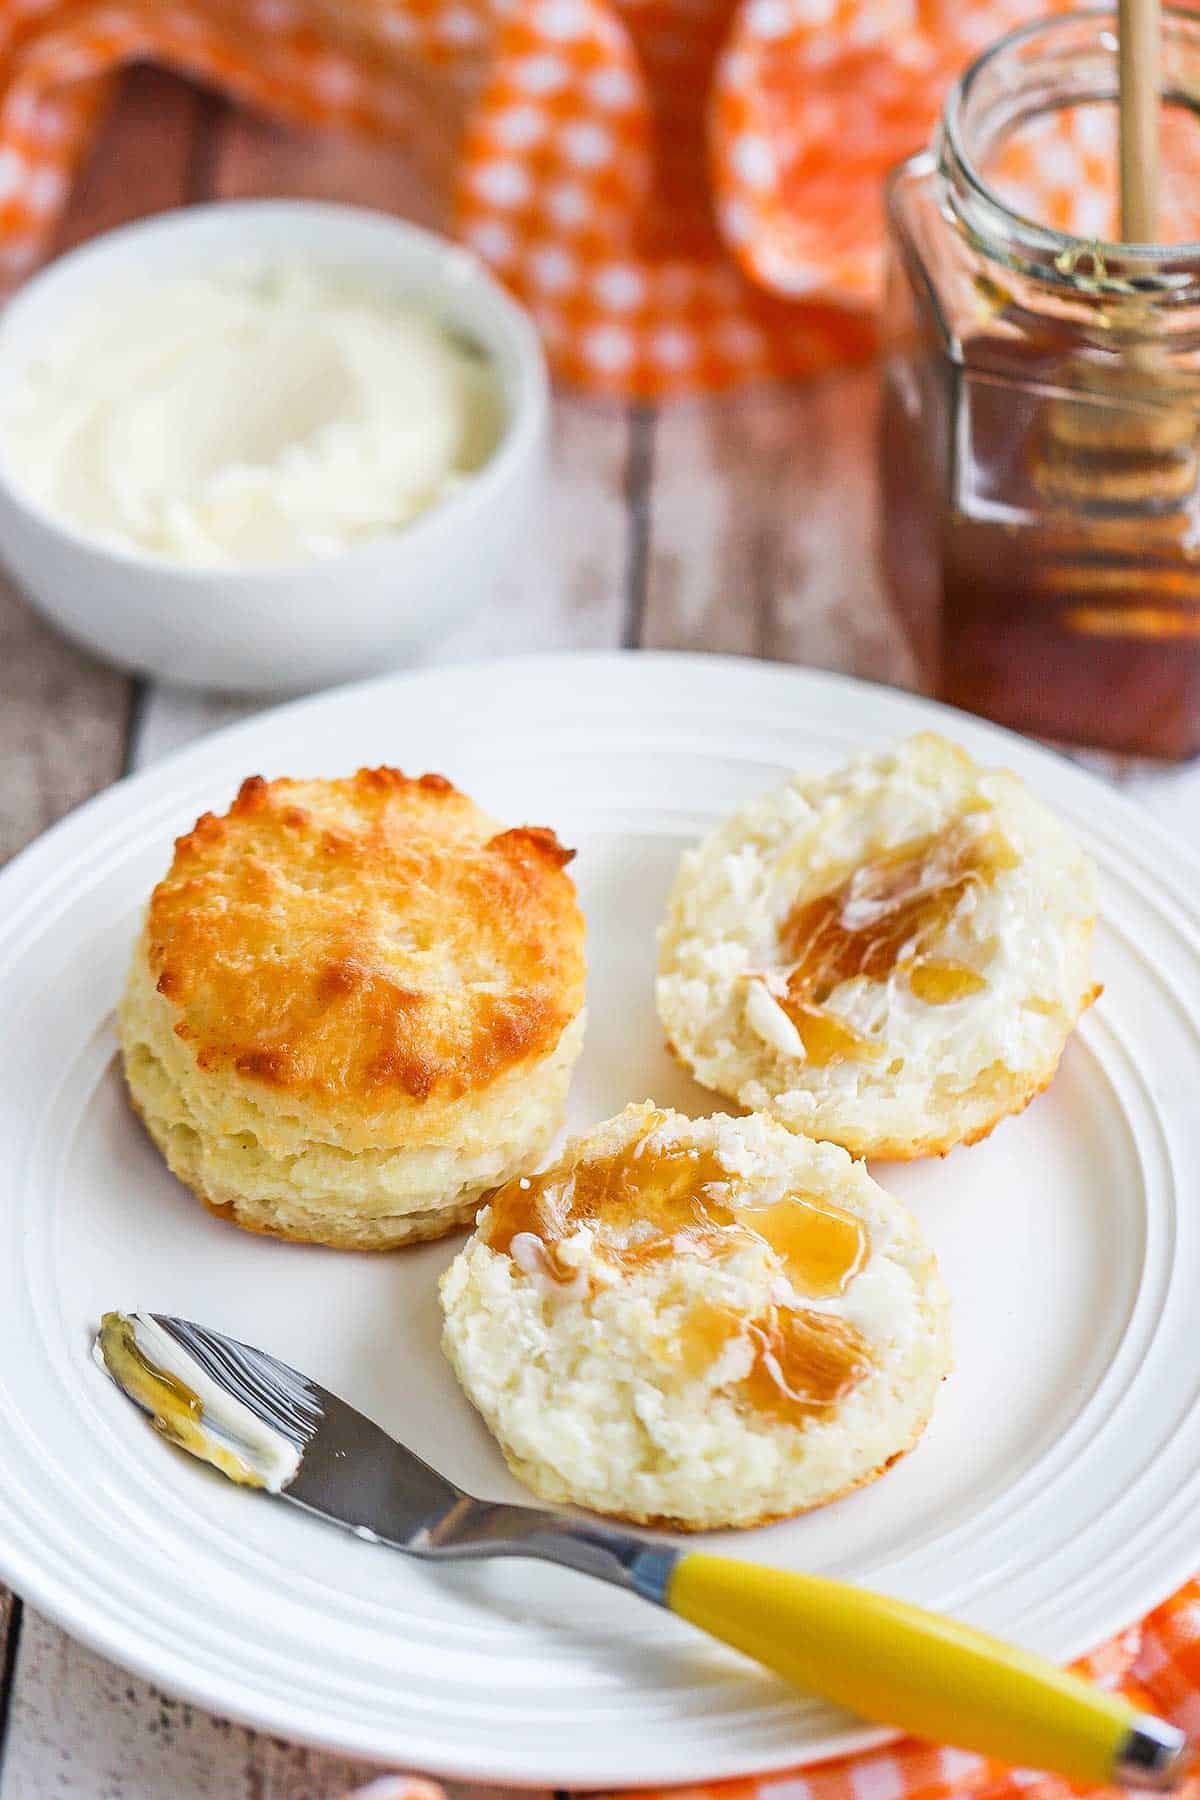
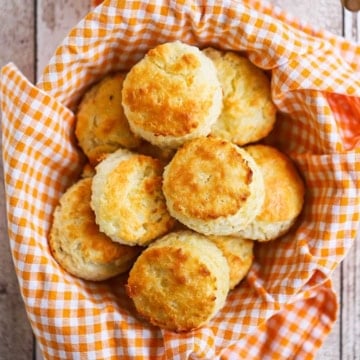
Southern Buttermilk Biscuits are so light, flaky, and just downright delicious. We’ll show you the tricks to making the best country biscuits ever! And it’s much easier than you might think! And, of course, you’ll want to whip up a batch of homemade biscuits and gravy!
Jump to:
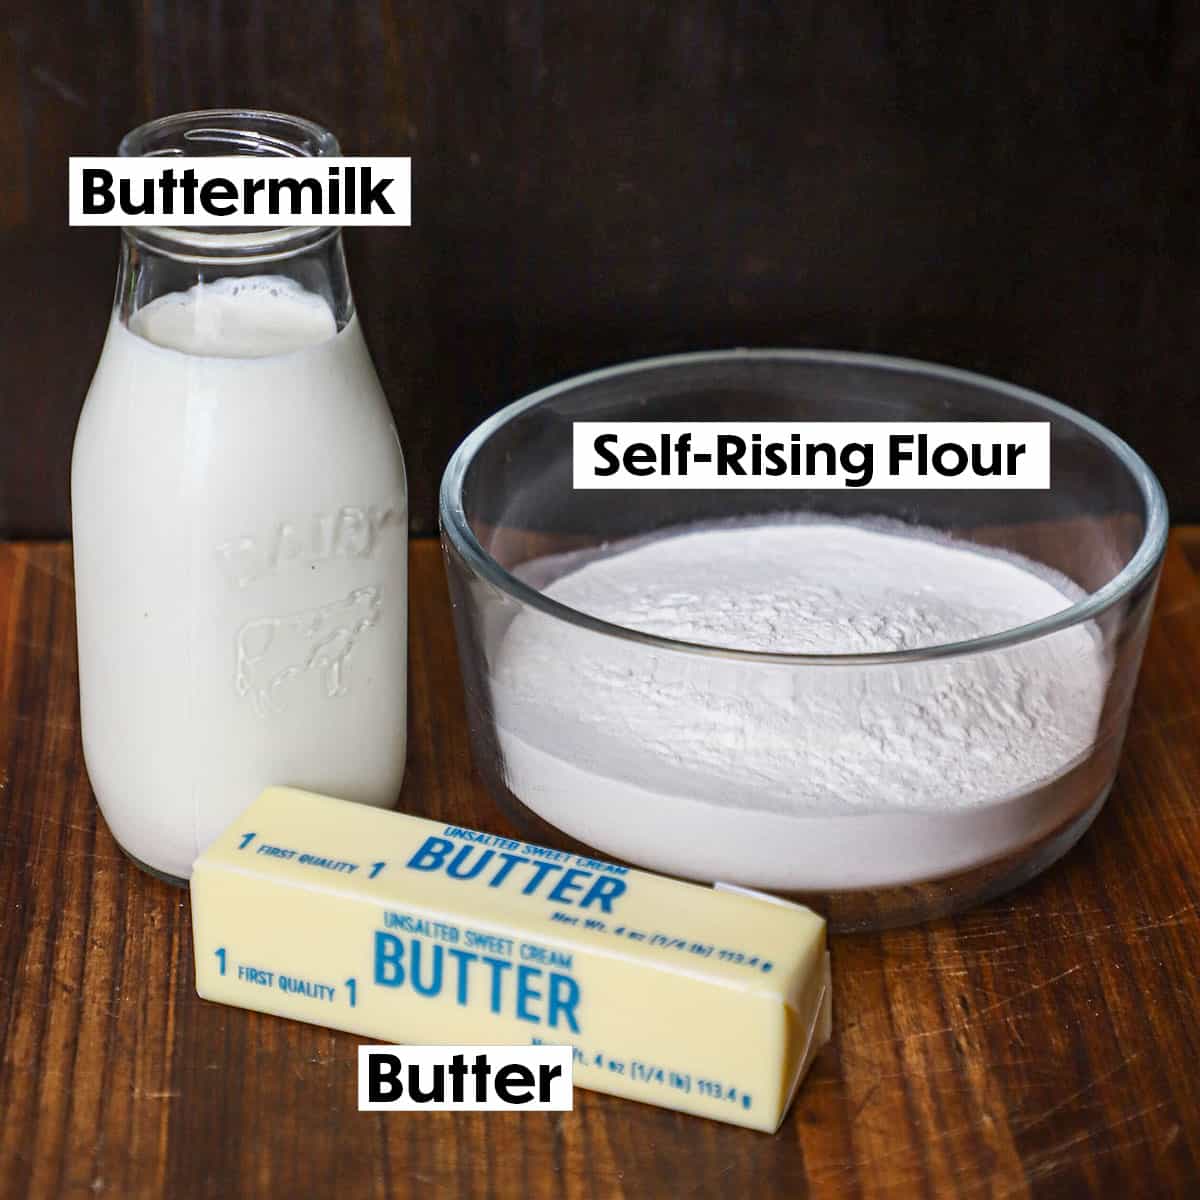
🧈 The Ingredients
One of the most amazing things about these classic biscuits is that there are only 3 ingredients in them! But, it’s the way you bring those 3 humble ingredients together that makes all the difference! Find ingredient notes (including substitutions and variations) below.
🍶 Substitutions and Variations
- Flour – We highly recommend White Lily self-rising flour. This can be found in many well-stocked supermarkets throughout the U.S. If you can’t find self-rising flour (any brand), substitute all-purpose flour and whisk 3¼ teaspoon baking soda and ½ teaspoon salt.
- Buttermilk – Go with a quality brand, if possible. Check the expiration date and make sure it’s fresh. In a pinch, you can substitute milk and add 1 tablespoon of lemon juice. Let it rest for about 30 minutes (chilled), until slightly thickened.
- Butter – There is no substitute for this ingredient. We recommend unsalted, because you want to control the amount of salt in the biscuits. However, if you use salted butter, you’ll still get good results.
See the recipe card (with video) below for a full list of ingredients and measurements.
Expert Tip
To achieve the ideal texture for the ice-cold butter is to grate it with a box grater. It will create ribbons of cold butter. You’ll just need a total of 8 tablespoon (1 stick), but using half of two sticks makes it easier!
👩🏼🍳 How To Make Southern Buttermilk Biscuits
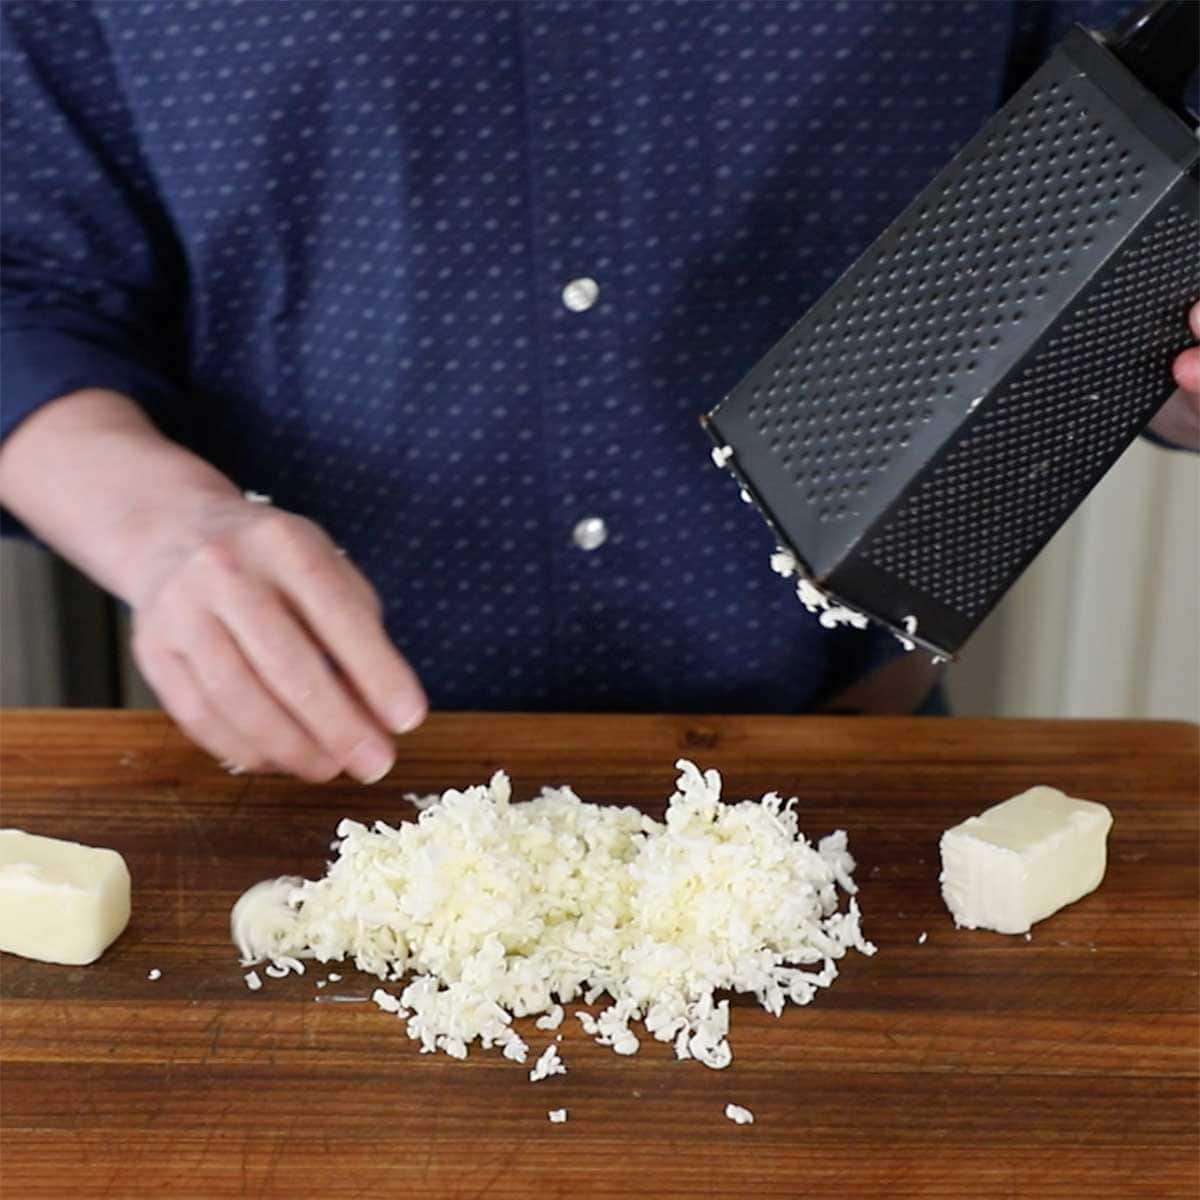
- Step 1: Grate the partially frozen butter with a box cutter. Two sticks make it easier (just grate them both halfway).
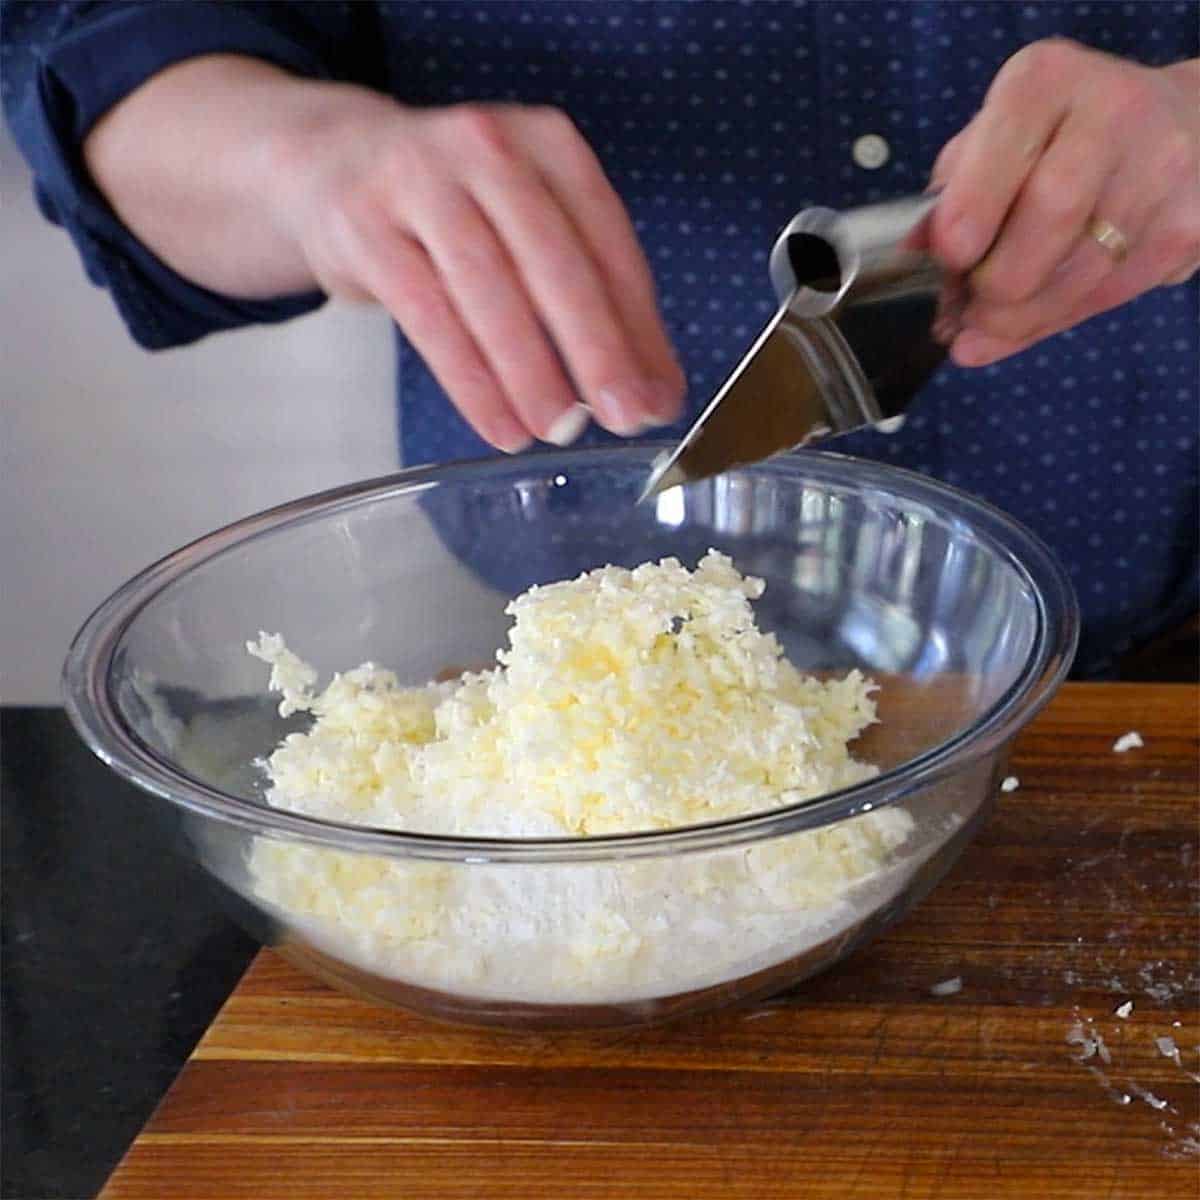
- Step 2: Toss the butter with the flour in a bowl and then chill.
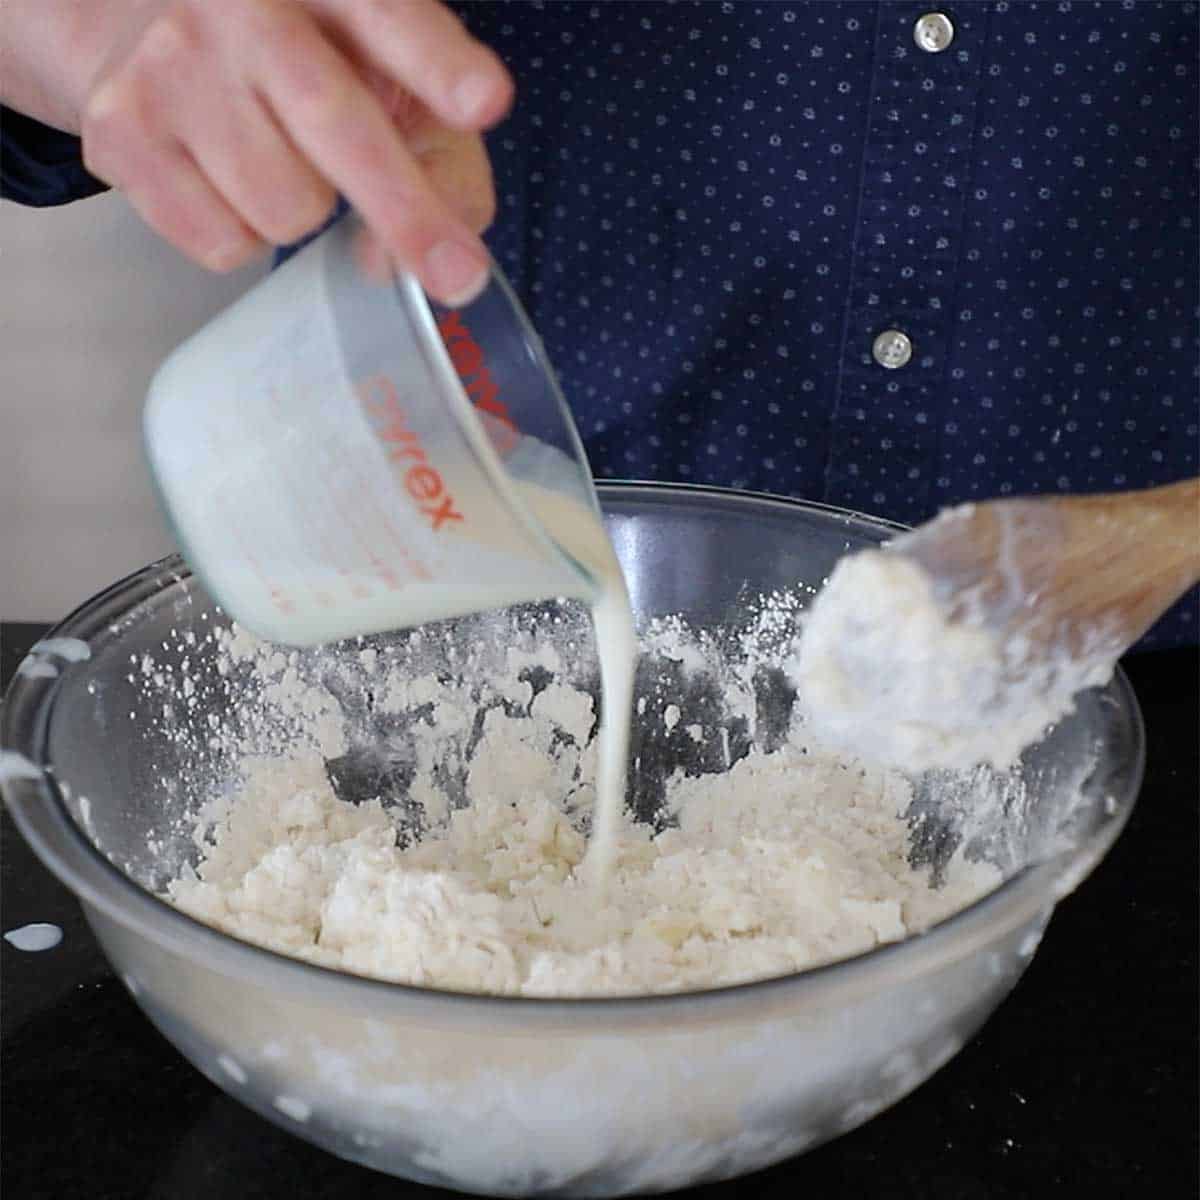
- Step 3: Gently stir in the buttermilk.
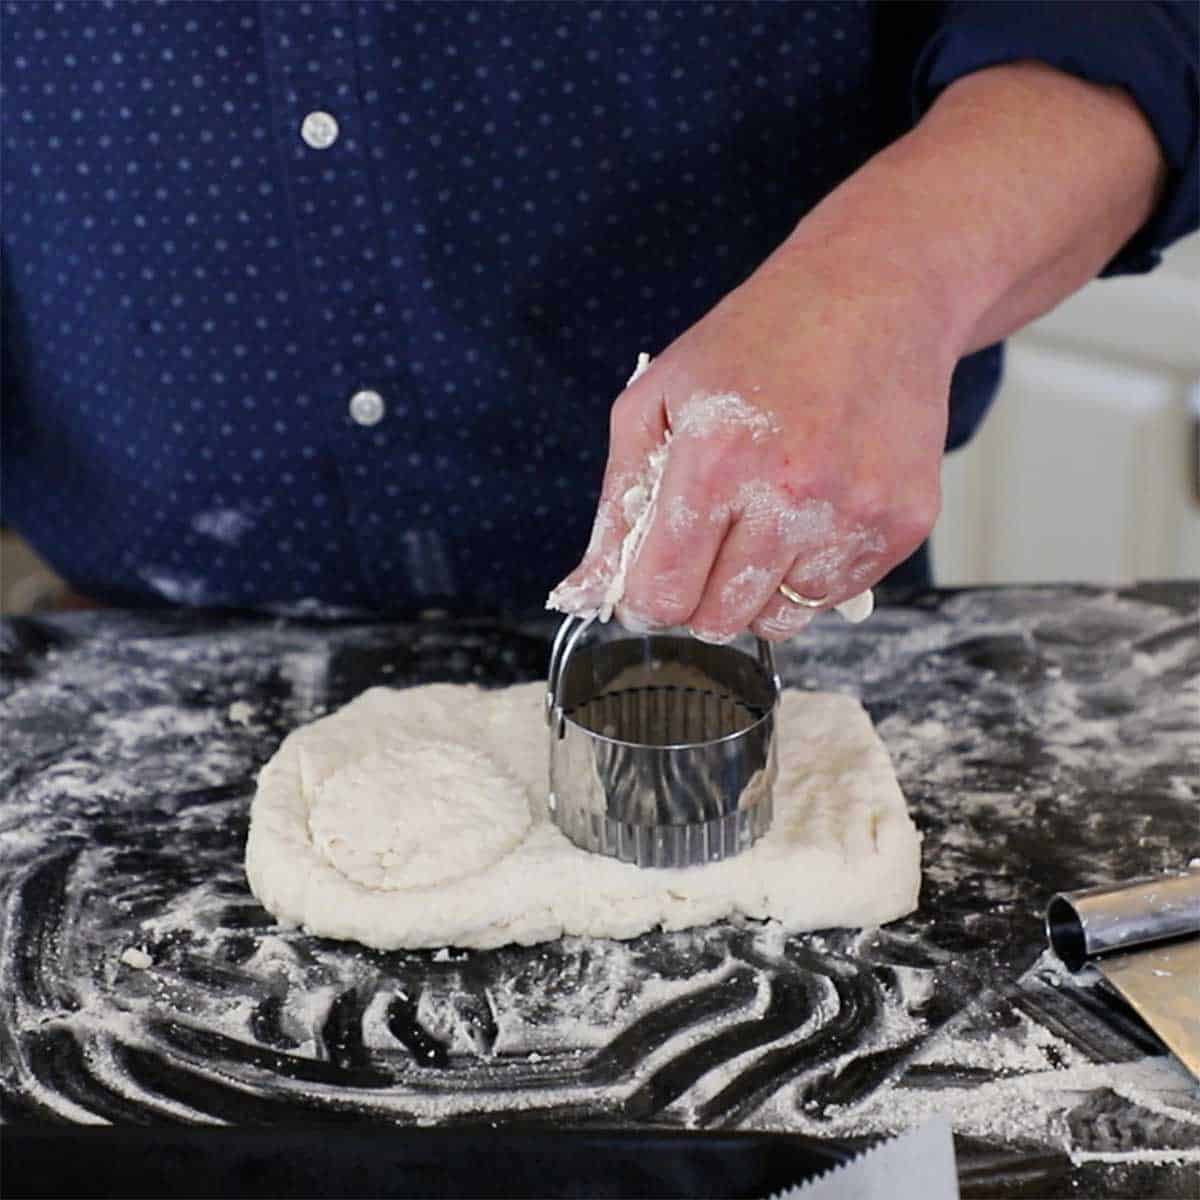
- Step 4: Roll the dough into rectangles, stack them, and then use a cookie cutter to form the biscuits.
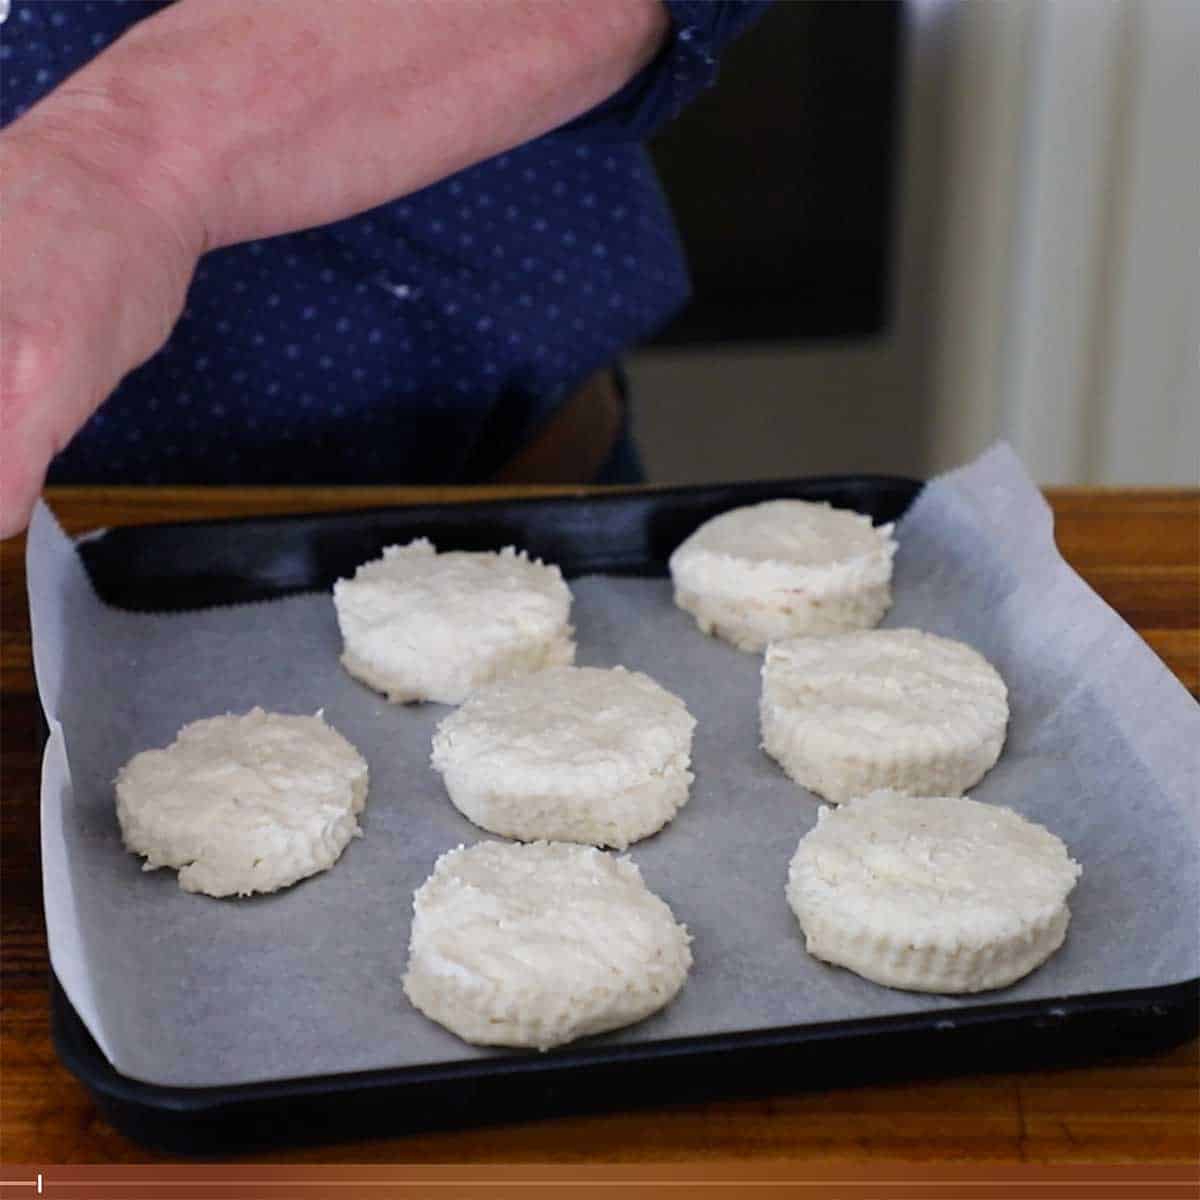
- Step 5: Place in a small pan lined with parchment, chill, and then bake for 20 minutes.
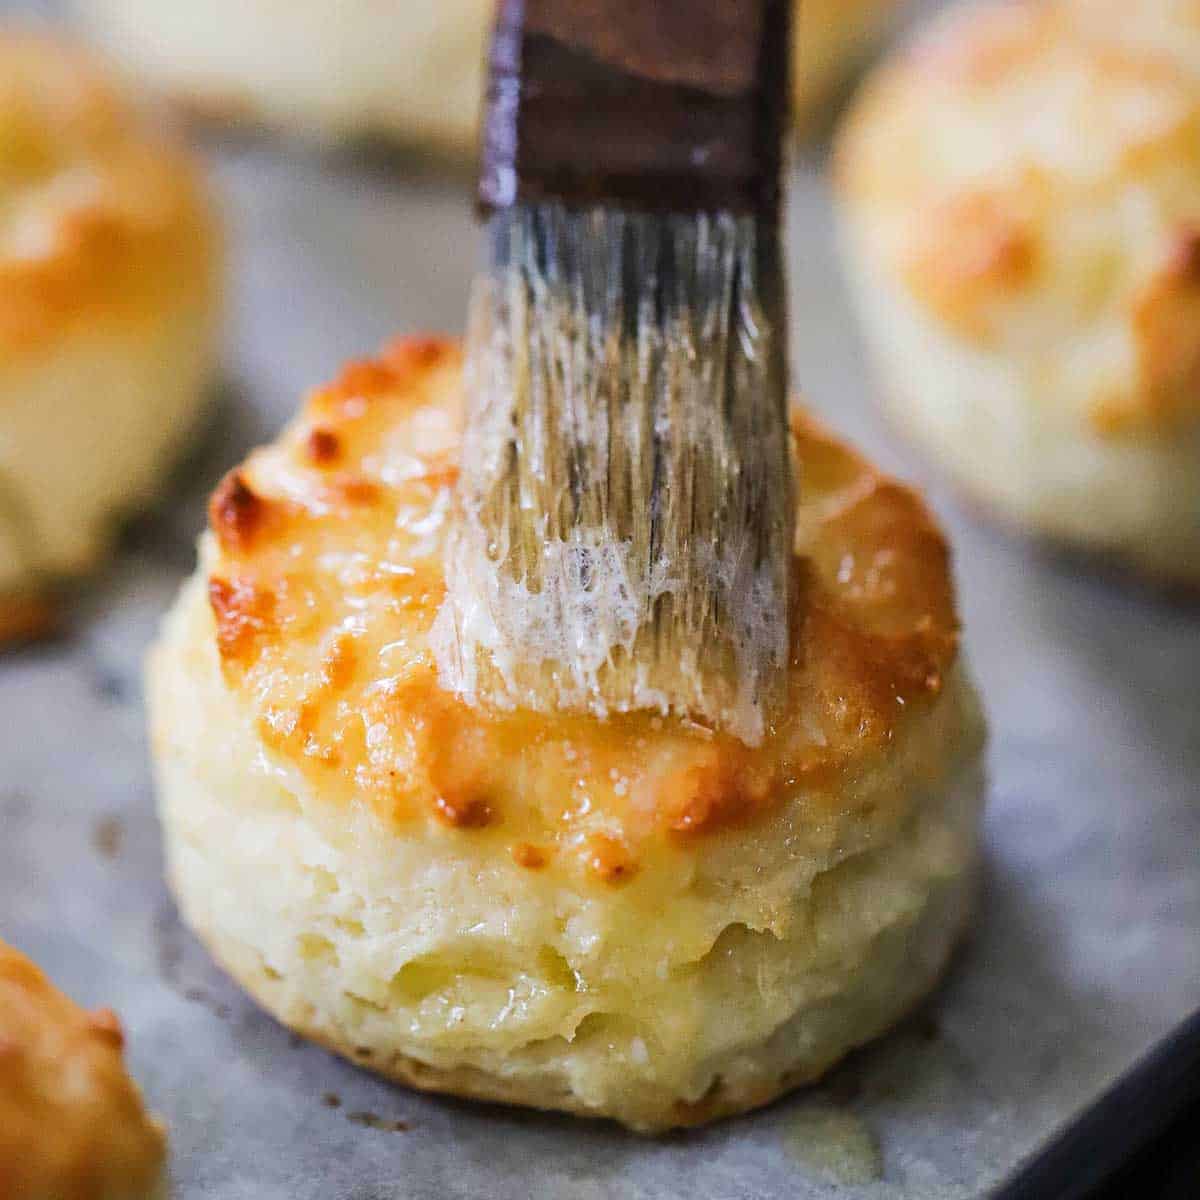
- Step 6: Brush with melted butter and serve warm!
👉 Tips For Perfect Biscuits
- Keep It Cold – Make sure all of your ingredients are ice-cold. The butter needs to be nearly frozen. After each step, place in the freezer to keep all ingredients super cold. Once they hit the high heat in the oven, steam will release and create those desired flaky layers.
- Sticky Is Best – Do your best not to overwork the dough. You don’t want to break down the gluten, and your hands will warm the butter. The dough should be sticky, but still pliable enough to form a rectangle.
- Forming the Biscuits – It’s important that your dough has height when you cut the biscuits. The dough should be about ¾-inch to 1-inch in height. Push the biscuit cutter straight down. Don’t twist and turn the dough, this will keep the biscuit from rising as it bakes.
😋 How To Serve and How To Reheat
- Of course, these glorious biscuits are magnificent for a breakfast feast. Right alongside the fluffiest scrambled eggs, crispy bacon, and diner-style hash browns is nothing short of breakfast perfection.
- But these are wonderful served at lunch or dinner time. For the ultimate Southern-style feast, make a batch of Southern Fried Chicken, buttery mashed potatoes with cream gravy, slow-cooked green beans, and then biscuits. It just doesn’t get much better than that.
- Keep leftover biscuits in a large plastic baggie and then gently reheat them in the microwave for about 10 seconds. You can also reheat them in your air fryer.
🙋🏽♂️ Frequently Asked Questions
Yes, you can prepare the biscuit dough ahead of time and store it in the refrigerator for up to 24 hours before baking, which can actually help develop flavor and improve texture. Just bring the dough back to a cool temperature before baking.
Use cold butter and handle the dough gently, avoiding overmixing, to create flaky layers and a tender crumb.
Yes, you can use the rim of a glass or simply cut the dough into squares with a knife for rustic-style biscuits.
🍞 Other Bread Baking Recipes

Ready to make the best Southern biscuits this side of Savanah, Georgia? Go for it!
And when you do, be sure to take a photo of them, post it on Instagram, and tag @HowToFeedaLoon and hashtag #HowToFeedaLoon!
Homemade Southern Buttermilk Biscuits
Video
Equipment
- 2- or 3-inch biscuit cutter or inverted jar (or jar lid)
Ingredients
- ½ cup unsalted butter 1 stick, frozen
- 2¼ cups self-rising flour (We love White Lily)
- 1 cup buttermilk cold
- 2 tablespoon butter melted
Instructions
- Preheat oven to 450°F. Take butter out of the freezer and let thaw for about 5 to 15 minutes.
- Using the large holes of a box grater, grate the butter. (Using half of two partially frozen sticks of butter is easier than grating all of just one).
- Add the butter to the flour and toss together with spoons (or briefly with your hands). Place back in the freezer for another 15 minutes.
- Pour the buttermilk into the flour/butter mixture and stir until just incorporated. The batter will be sticky.
- Turn the dough out onto a lightly floured cool surface and add a little more flour, if too wet. Working quickly, use your hands to press the dough into a rectangle that is about ¾" to 1" thick.
- Use a bench scraper, or a large knife and slice the dough into quarters. Stack the quarters on top of each other and quickly, again, press the dough into a thick rectangle (¾" to 1"). Repeat this process two more times.
- Use a 2 to 3-inch biscuit cutter to gently cut the biscuits. Be sure to press straight down, don't twist and turn the cutter. You may need to pull the dough away from the biscuits. Carefully transfer them to a small baking sheet lined with parchment paper, about 1 inch apart from each other. Form excess dough into another square and form another biscuit or two. You should yield about 6 to 7 biscuits. Place the biscuits back in the freezer for another 15 minutes.
- Brush a little melted butter over the tops of each of the biscuits. Bake for 13 to 15 minutes until lightly golden on top, turning the pan around halfway through. Remove from oven and brush more melted butter over the tops.
Notes
- Everything should be super cold
- White Lily self-rising flour is best (there is a link in the blog post)
- Don’t over-knead the dough, at all – just gently press it into a rectangle about ¾-inch thick
- Be sure to press the cutter straight down and don’t twist it when cutting the biscuit.
Nutrition
POST UPDATE: This recipe was originally published in June 2018, but was updated with improved tweaks to the recipe with new tips and photography and a fabulous new video in February 2023!

Law says
I made this recipe as you first suggested the were ok then add salted butter much better more like grand mamas then third time made without butter milk instead used heavy cream much better results
John H Matthews says
I need to make these biscuits for 36 to 40 people for breakfast. Any suggestions on how to scale up the recipe?
krislongwell says
Hi John, the way I would do it is to double the recipe and then make two batches of the dough. That will get you in the range of 40 biscuits. You can make the dough, and refrigerate it, and then make another batch and refrigerate it, too. When you’re ready, divide the dough into 4 batches, and roll out the dough according to recipe directions. Maybe get 4 pans, so you can bake them all at once, or, just put them all on a large baking sheet. That should do the trick. Let us know how they turn out! You should have 36 to 40 very happy people once you brings these warm biscuits to the table!! Best, Kris & Wesley
Theresa says
Depending on how many biscuits the recipe makes build it up by that. Such as I be biscuit per persons add it up till it’s suffice
Amanda says
Yesss to all of this! This is how I make my biscuits too, with the White Lily flour, grated butter, and buttermilk. Once I tasted southern buttermilk biscuits in college, there was pretty much no going back to anything else! I was so happy to see Wegmans carrying the White Lily up here. Though, I would’ve been totally willing to drive down south just to stock up!
krislongwell says
Thank you so much!! We couldn’t agree more…once you try homemade Southern biscuits, you never go back to anything else! I go through a bag of White Lily almost on a monthly basis (thank goodness for delivery!). xoxo
Sarah says
My granny always used the rim of a drinking glass to cut her biscuits instead of a cutter! I miss her biscuits– yours look perfect! They’d be perfect with some apple butter 😀
krislongwell says
Thanks, Sarah! I can see my grandma doing the exact thing! Apple butter – divine. xo
Dana says
Hi! Dweller of the South here! And I’ve got to say, these look perfect. I’ve only lived in the South for 2.5 years, but I’ve seen my share of biscuits and these look so much like my fave biscuits from Tupelo Honey. My husband has made biscuits from scratch a few times, but it’s been a long time and after seeing this, I think we’re due 😉 Gorgeous recipe!
krislongwell says
Thank you, Dana! Doesn’t get much better than Southern cuisine, and Southern biscuits always are near the top of our lists. Hope you guys make a batch soon!! xo Kris & Wesley
Julia says
So many useful tips! I love the idea of grating the butter. I can almost taste how light and flakey the ribbons of butter will make these biscuits. And oh, thank you for the tip about not twisting the cookie cutter. I had no idea that it would prevent the biscuits from rising. I will definitely keep this trick in mind for the future.
krislongwell says
Thank you, Julia! Give ’em a try…I’ve never had a faulty batch since I started making them this way. 🙂
Amanda says
Your biscuits are perfect. I keep on twisting my cutters so they always end up lopsided and I hate it. But they never seem to come apart from the dough if I dont! So frustrating. Maybe it’s the recipe base I am using, so I will definitely see if this is the one for me!
krislongwell says
Thank you, Amanda!! We hope you like them as much as we do. Thanks again for the nice comment. We appreciate it a lot!! xo Kris & Wesley
Jennifer Bigler says
Thank you, thank you! All of this time I was doing it wrong. I can’t wait to make these and some homemade sausage gravy for biscuits and gravy. Grating the butter is the trick I was missing. I also will be trying putting in the freezer like you suggested.
Pat says
Can I refrigerate the biscuits between mixing and cooking? I want to make them for a dinner party and can’t be doing it at the last minute. Thanks so much!
Kris Longwell says
Hi Pat! Yes, you can definitely made the dough ahead of time. We recommend bring the dough back to room temperature. And I would also suggest may making a practice round, first. Biscuits can be a little tricky, and just giving yourself a practice round will hopefully ensure perfect biscuits for the party!! Good luck and let us know if you haven any other questions, and let us know how it turns out!! Best, Kris & Wesley
Tina says
I didn’t know that little gem about grating frozen butter, that’s genius! Definitely going to make these biscuits, they look amazing, especially with that brushed on butter at the end, seriously.
Kathy McDaniel says
You are absolutely right! Nothing is better than homemade biscuits. They look so delicious and flaky. I love the tip about grating the butter – I will have to try that for sure. Sooner than later, I mean I really feel like jumping out of bed right now and making these amazing biscuits – OK I may have to wait until tomorrow morning….. yum!
Gloria says
YESSS!!! Nothing beats homemade biscuits. I LOVE making them….and LOVE eating them more. I find them more addictive than dessert…but I am a bread lover. These are perfect all by themselves (slathered in butter) or alongside soup, chili or salad.
Stef says
Love the biscuit cutter tip. I’m going to have to try that. I’ve seen it done with a food processor, but this looks really easy. Thanks!
krislongwell says
Love the biscuit cutter (no twist!). Thanks much!! xo Kris & Wesley
Lisa Lotts says
First, I love your biscuit cutter — mine doesn’t have those fluted ridges — gonna have to invest in some. Great idea to shred the butter on a box grater. I’ve always cut the butter in with a pastry blender and they never seem to puff as much. I’m definitely going to give your method a go… and I’ll also brush them with butter — ’cause that’s the Southern way! Wish you were my neighbor…
krislongwell says
We need a visit and feed each other! xoxo. Thank you!!
Retta says
These came out perfect but I had to guess how many to cut out by trying to figure it out from the photos. It looks like 8? Seven in a circle and one in the middle?
krislongwell says
Hi Retta! That’s so great. I usually do 7 on the outside and 1 in the middle. Depends on the thickness of your biscuits and of course, the size of your pan. Sometimes I have some dough scrapes that I form another biscuit or 2 to bake separately. So glad you liked them. We think they are just the best, and really hope you did, too. And thank you so much for letting us know. Please stay in touch! Best, Kris & Wesley
Lindsay says
I’ve been searching for a good biscuit recipe for ages! Unfortunately no one had the good sense to ask my grandma for hers before she passed. Yours looks yummy! Gonna give it a whirl this week. Thank you!
krislongwell says
Hi Lindsay! I had similar situation with all of grandma’s amazing recipes…none were written down. We’re pretty sure you’re going to like this one, though. Please let us know when you make them and how they turn out, or if you have any questions. Best, Kris & Wesley
dina says
they look delicious!
Wesley Loon says
Thanks Dina! They are “melt in your mouth” good!
Wesley Loon says
Love your blog BTW!