• About Us
  • Recipe Index
    • Appetizers
    • Asian
    • Breads and Doughs
    • Cajun / Creole / Louisiana
    • Breakfast / Brunch
    • Comfort Food
    • Delectable Desserts
    • Entrees / Mains
    • Instant Pot
    • Italian
    • Pizza
    • Rubs, Spices and Sauces
    • Soups & Salads
    • Sides
    • Seafood
    • Southern
    • Mexican / Tex-Mex / Cal-Mex
    • Thanksgiving
    • Vegetarian
  • Videos
    • Recipe Videos
    • Web Stories
  • Work With Us
  • Contact
  • **Premium Access**
  • Recipes
menu icon
go to homepage
  • Thanksgiving
  • Recipes
  • About Us
  • Work With Us
  • Premium
subscribe
search icon
Homepage link
  • Thanksgiving
  • Recipes
  • About Us
  • Work With Us
  • Premium
×
Home » Recipe Index

Grilled Pulled Pork Pizza with BBQ Sauce

June 5, 2022 by Kris Longwell 2 Comments

An overhead view of a grilled pulled pork pizza that has been cut into slices on a cutting board.

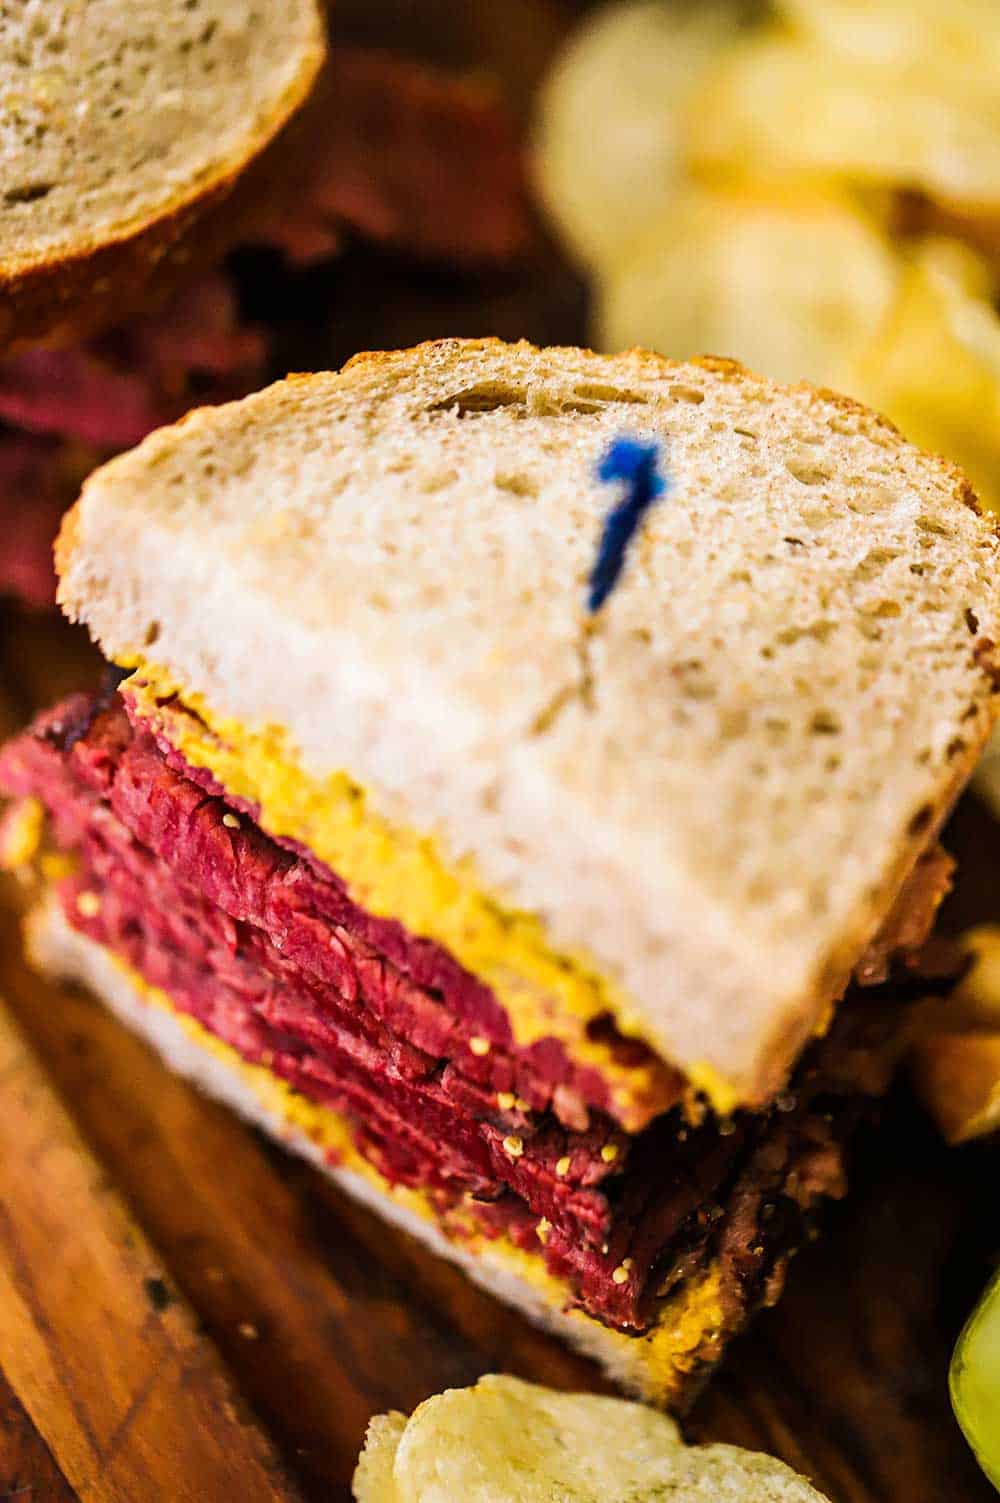
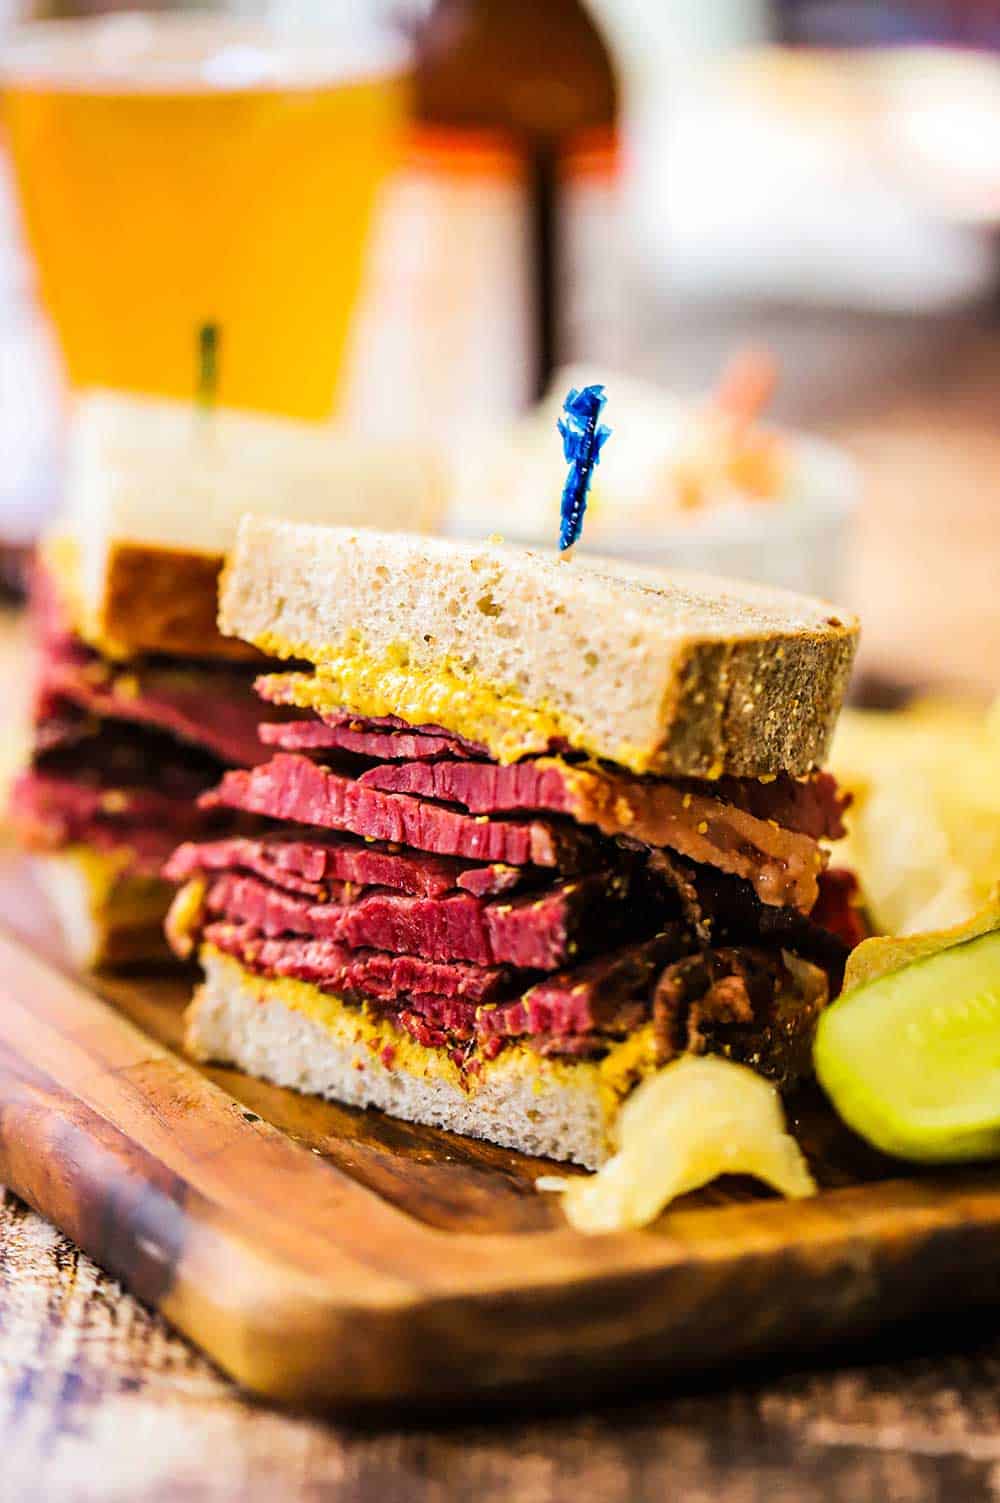
Grilling pizza is not only fun, it’s easy and incredibly delicious.

We love all kinds of pizza including Chicago-style Deep Dish, Thin Crust Soppressata and Mushroom, and BLT Pizza with Pesto. But there is something unbelievably delicious about grilled pizza. Make it easy yourself and pick up some pulled pork from your favorite BBQ joint and grab some good-quality pizza dough. It all comes together in no time at all! Epic!

An overhead view of a grilled pulled pork pizza that has been cut into slices on a cutting board.

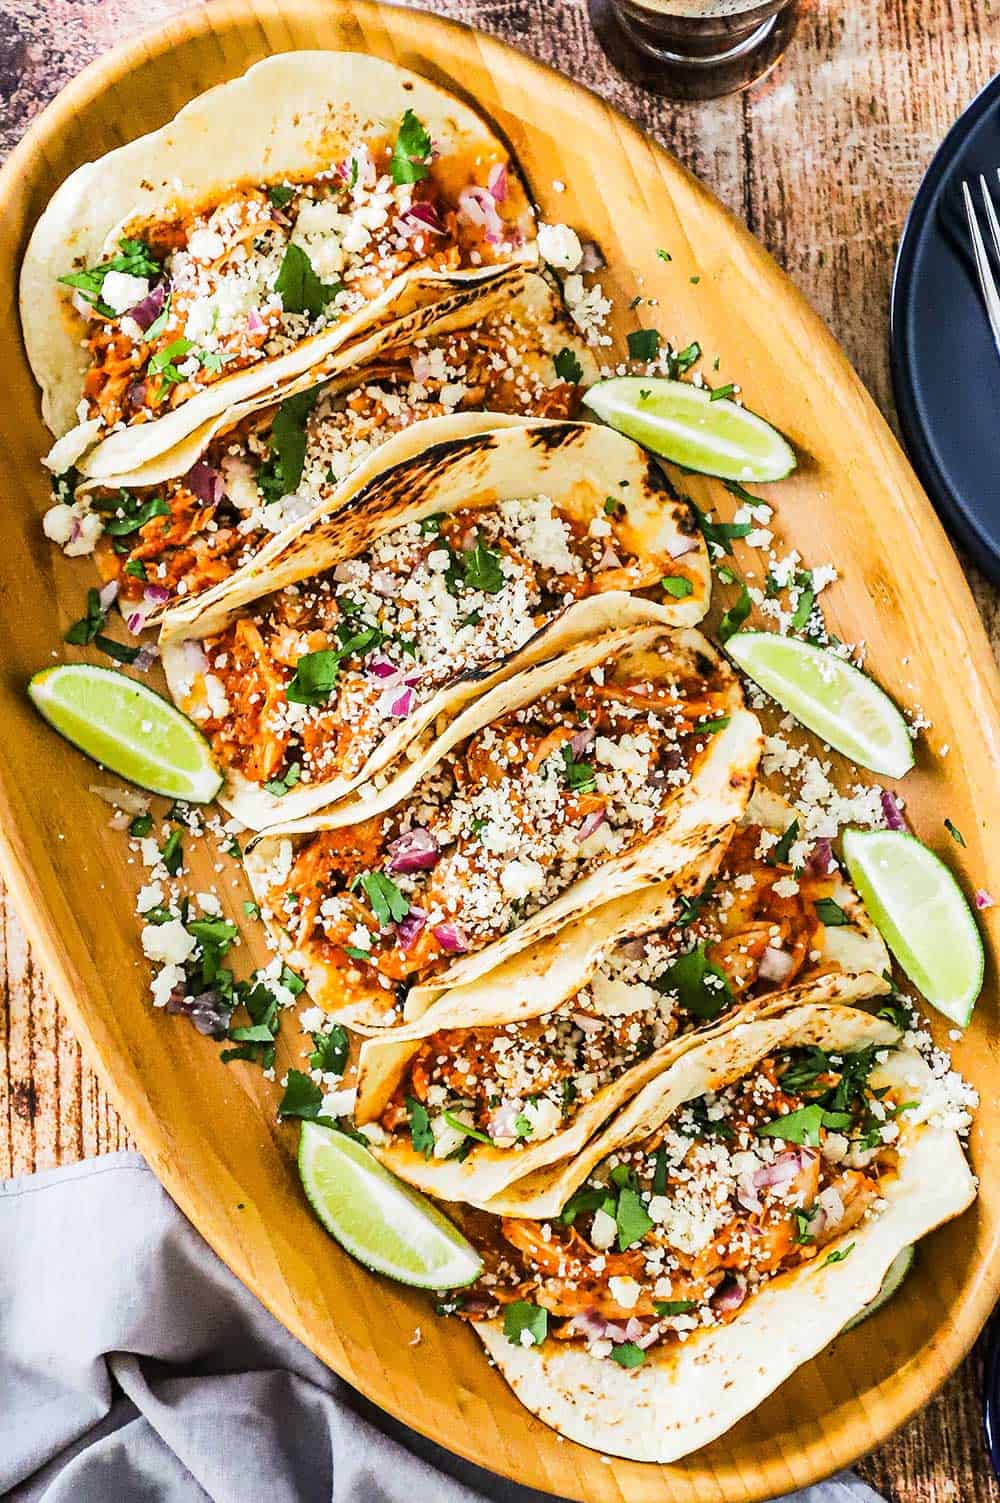
How To Make Grilled Pulled Pork Pizza with BBQ Sauce

If you have the time and want to make everything from scratch, then go for it!

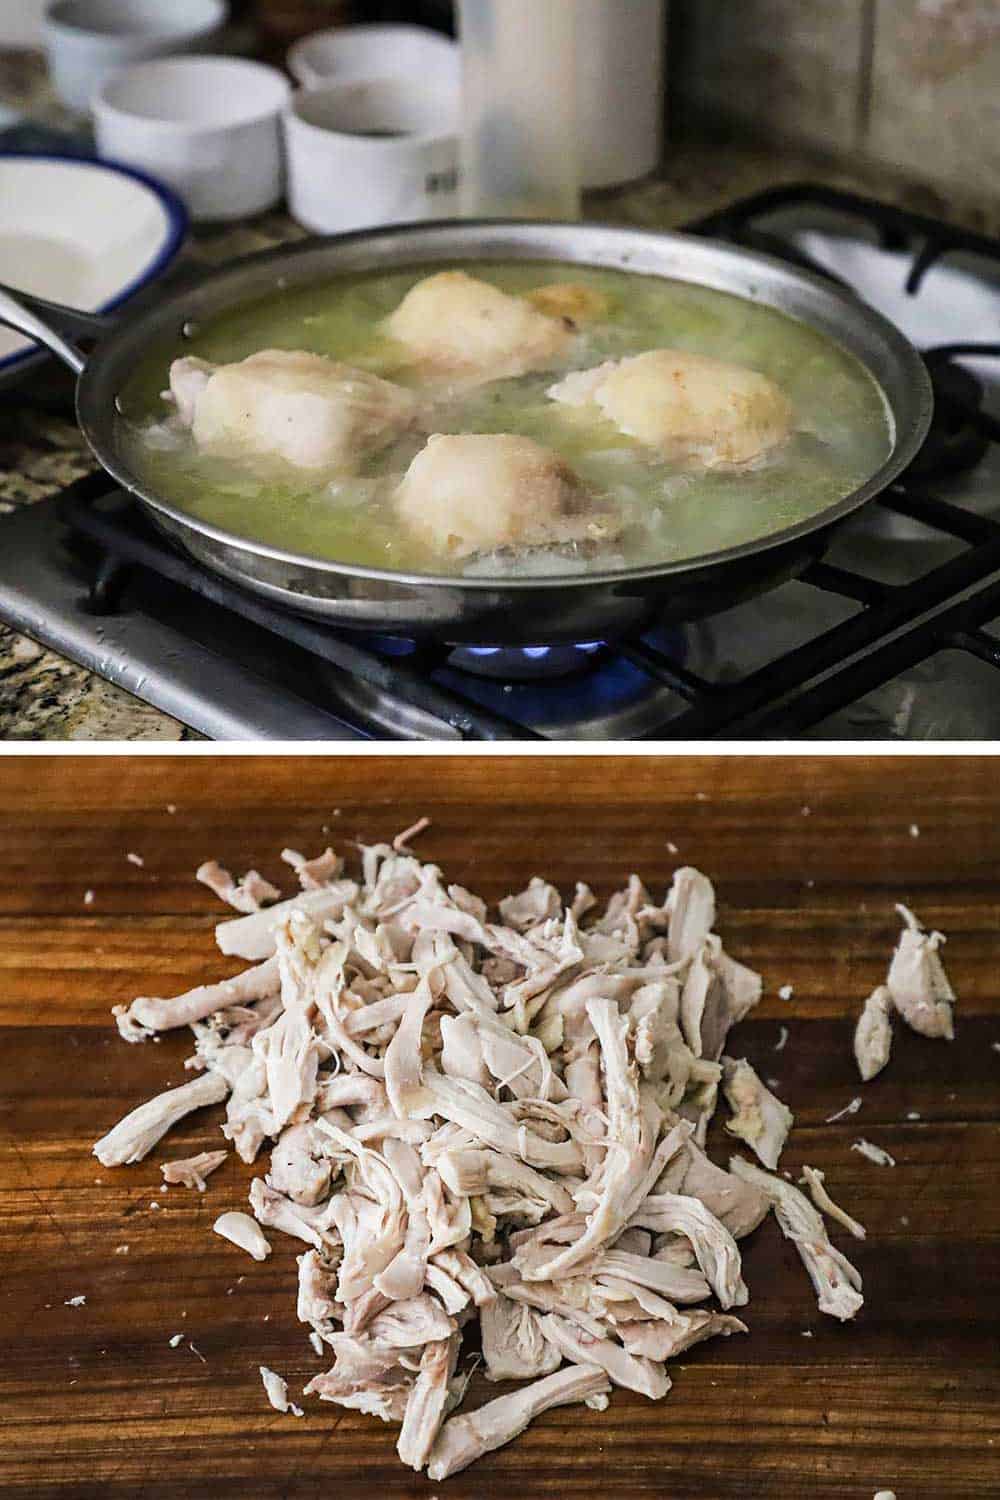
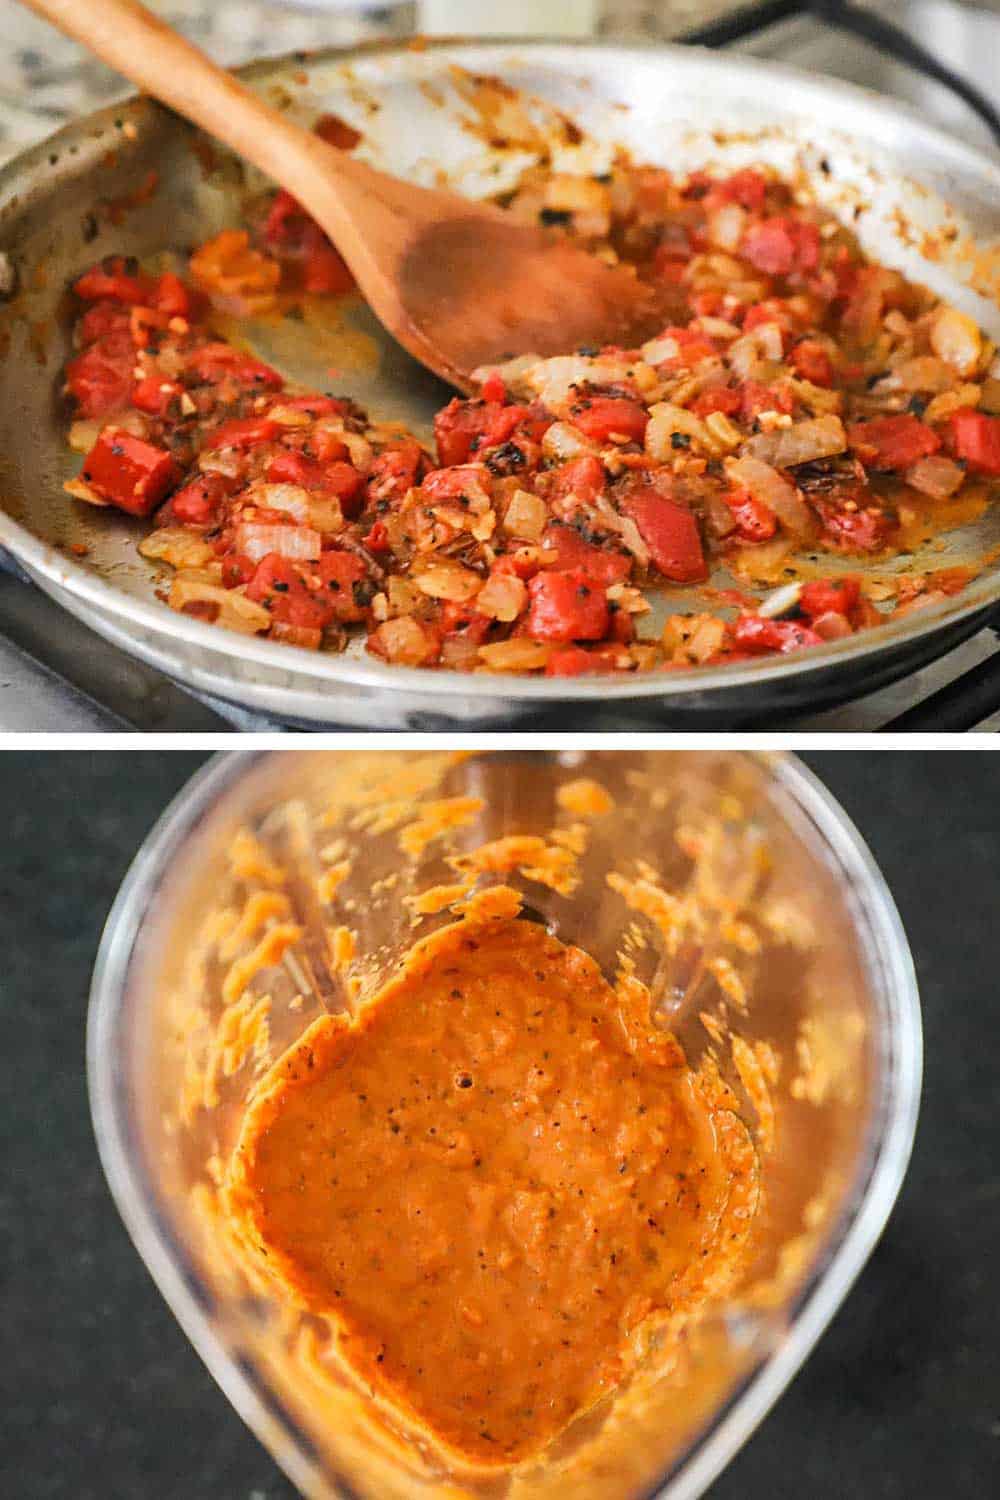
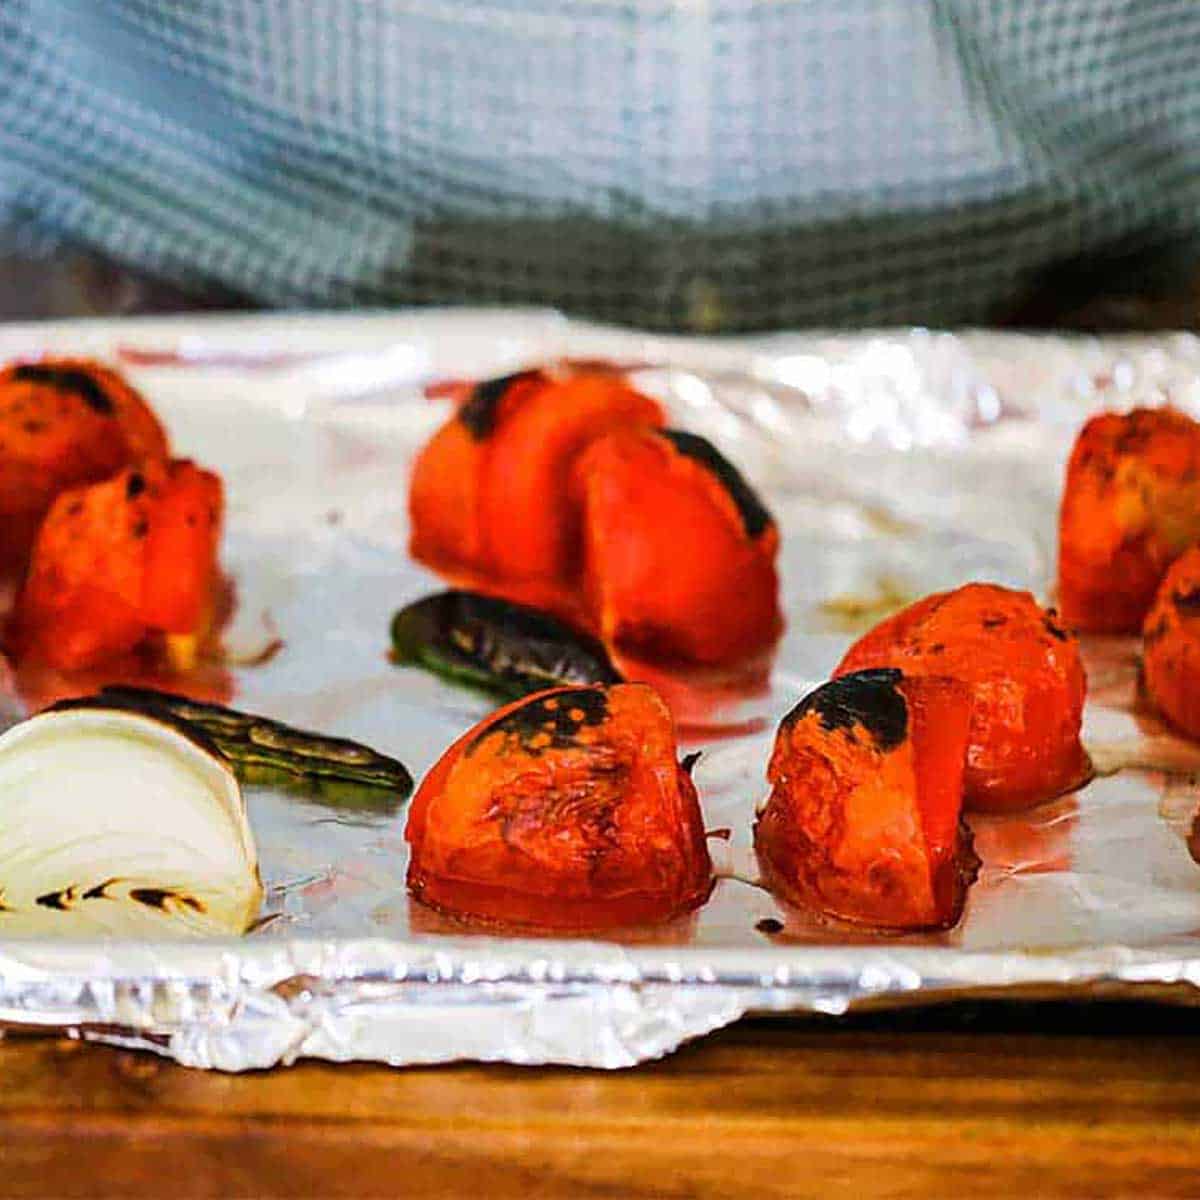
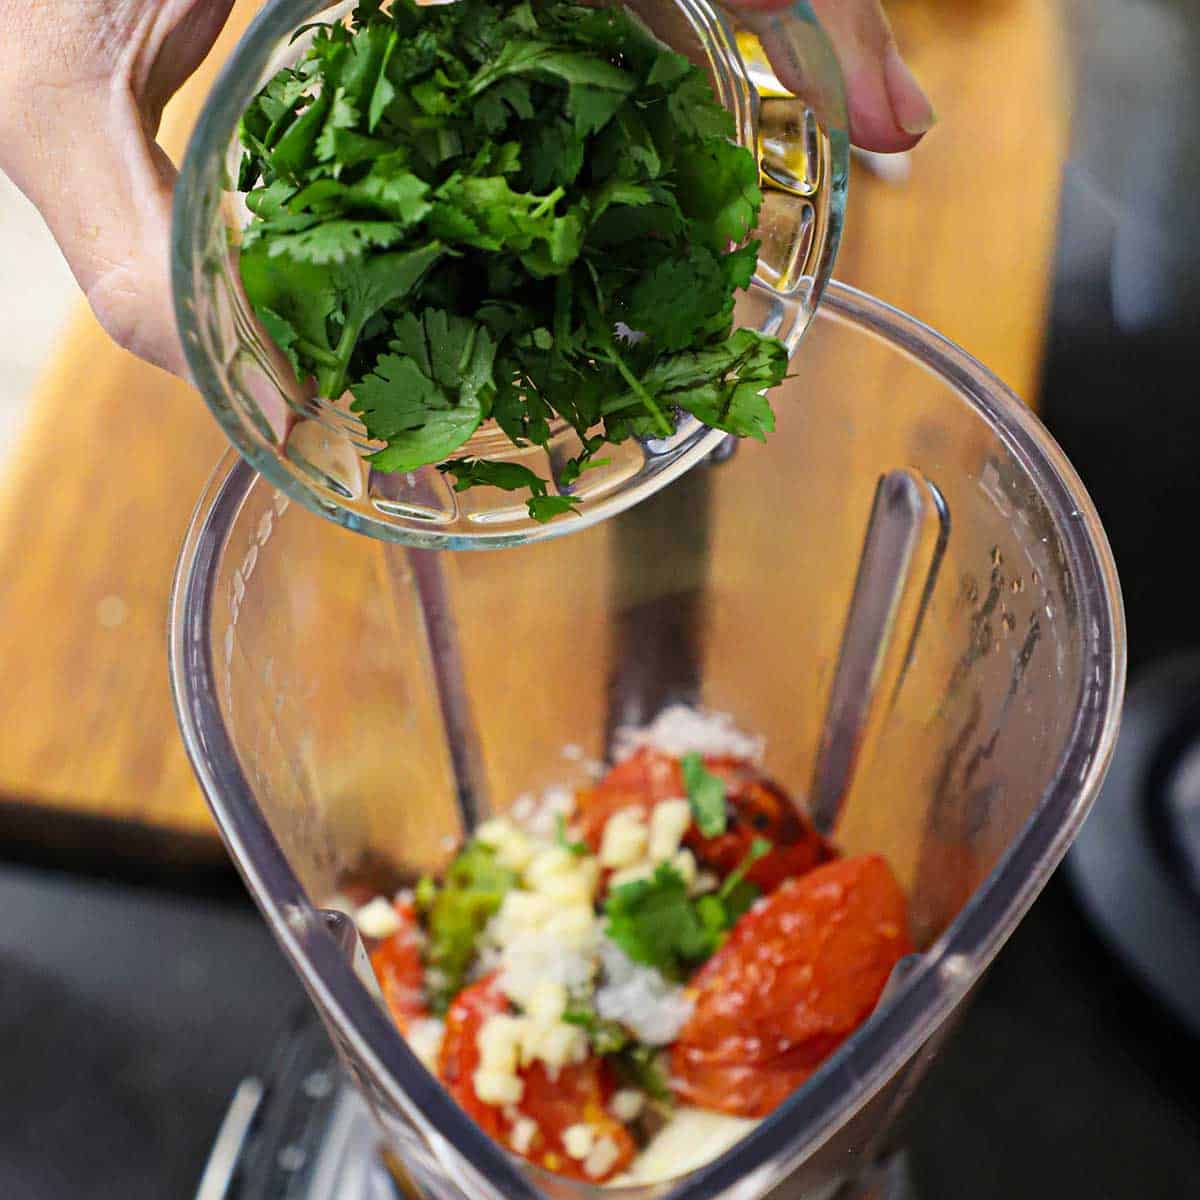
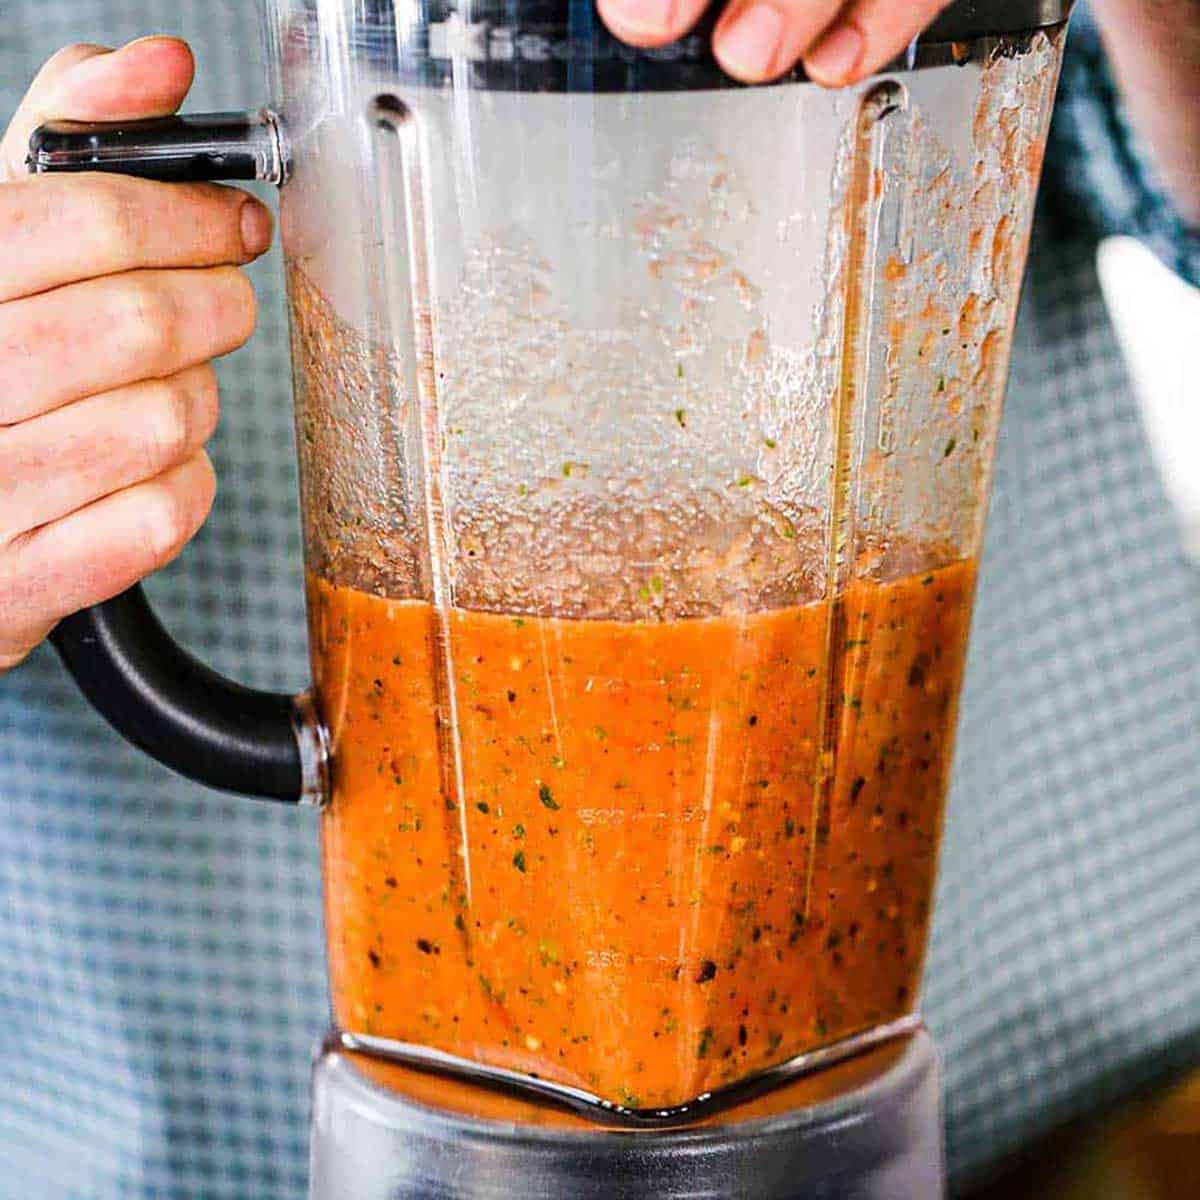
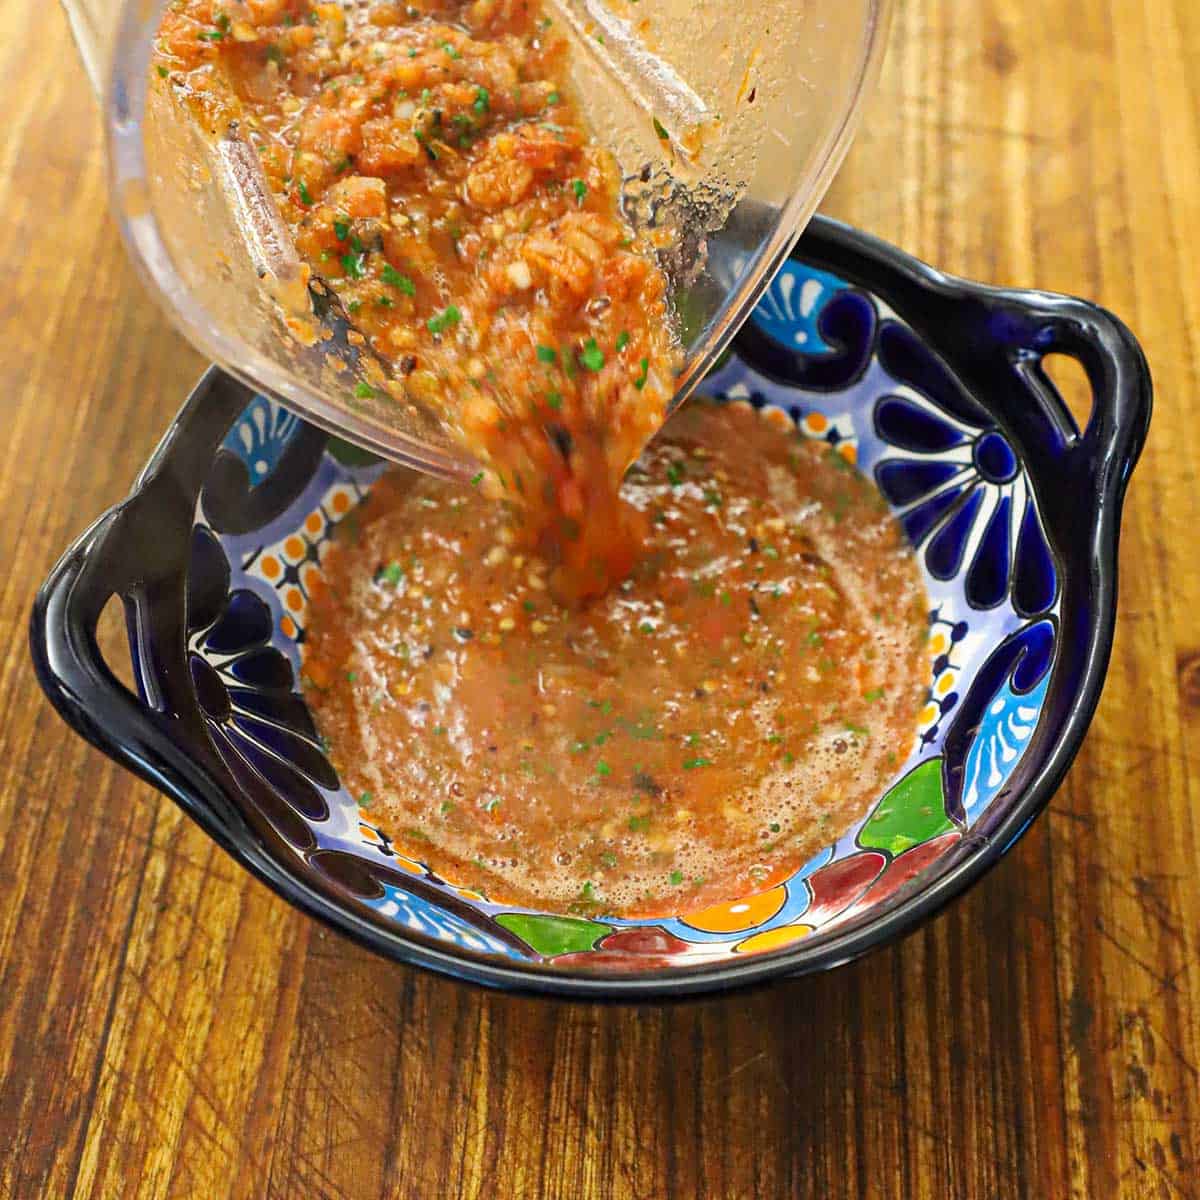
Making the homemade pizza dough and slow-cooker pulled pork is delicious and can be done in advance. Our homemade BBQ sauce is to die for and easy to prepare.


NOTE: If you liked this video, please subscribe to our YouTube channel. Remember to click the little ‘bell’ icon so you’ll never miss a new video! Thank you!

The Ingredients You Will Need

There are just a handful of ingredients that you’ll need to make a grilled pizza that everyone will be raving about for days to come.

Here’s what you need:

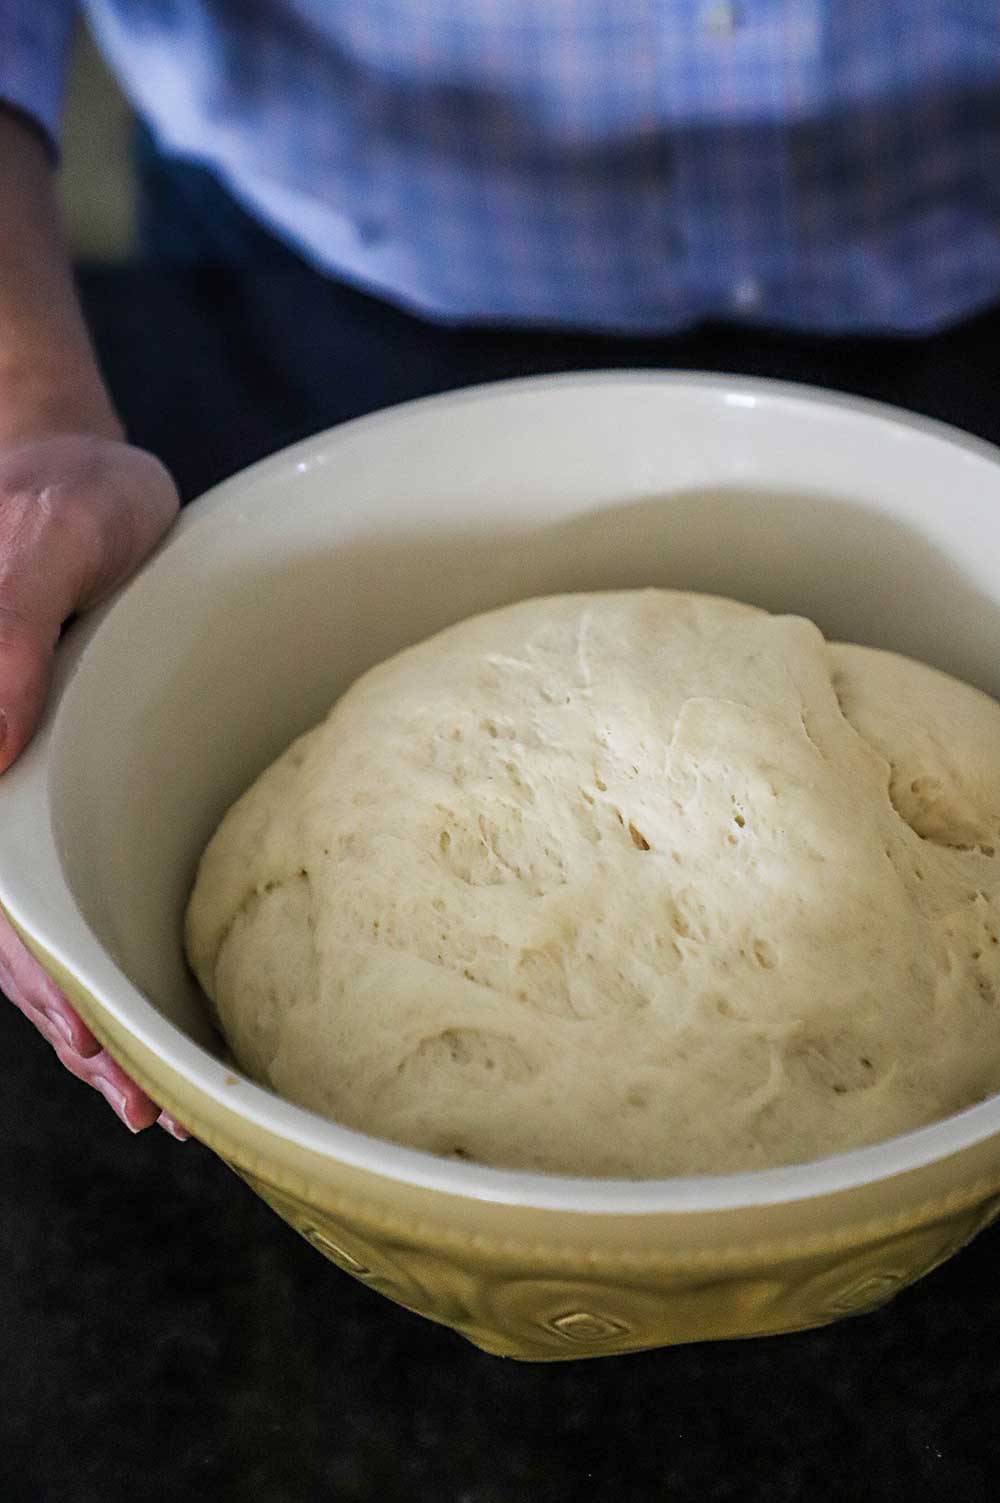
Pizza dough – enough for a 9-inch pizza, about 1 lb.
Cornmeal – for dusting your stone
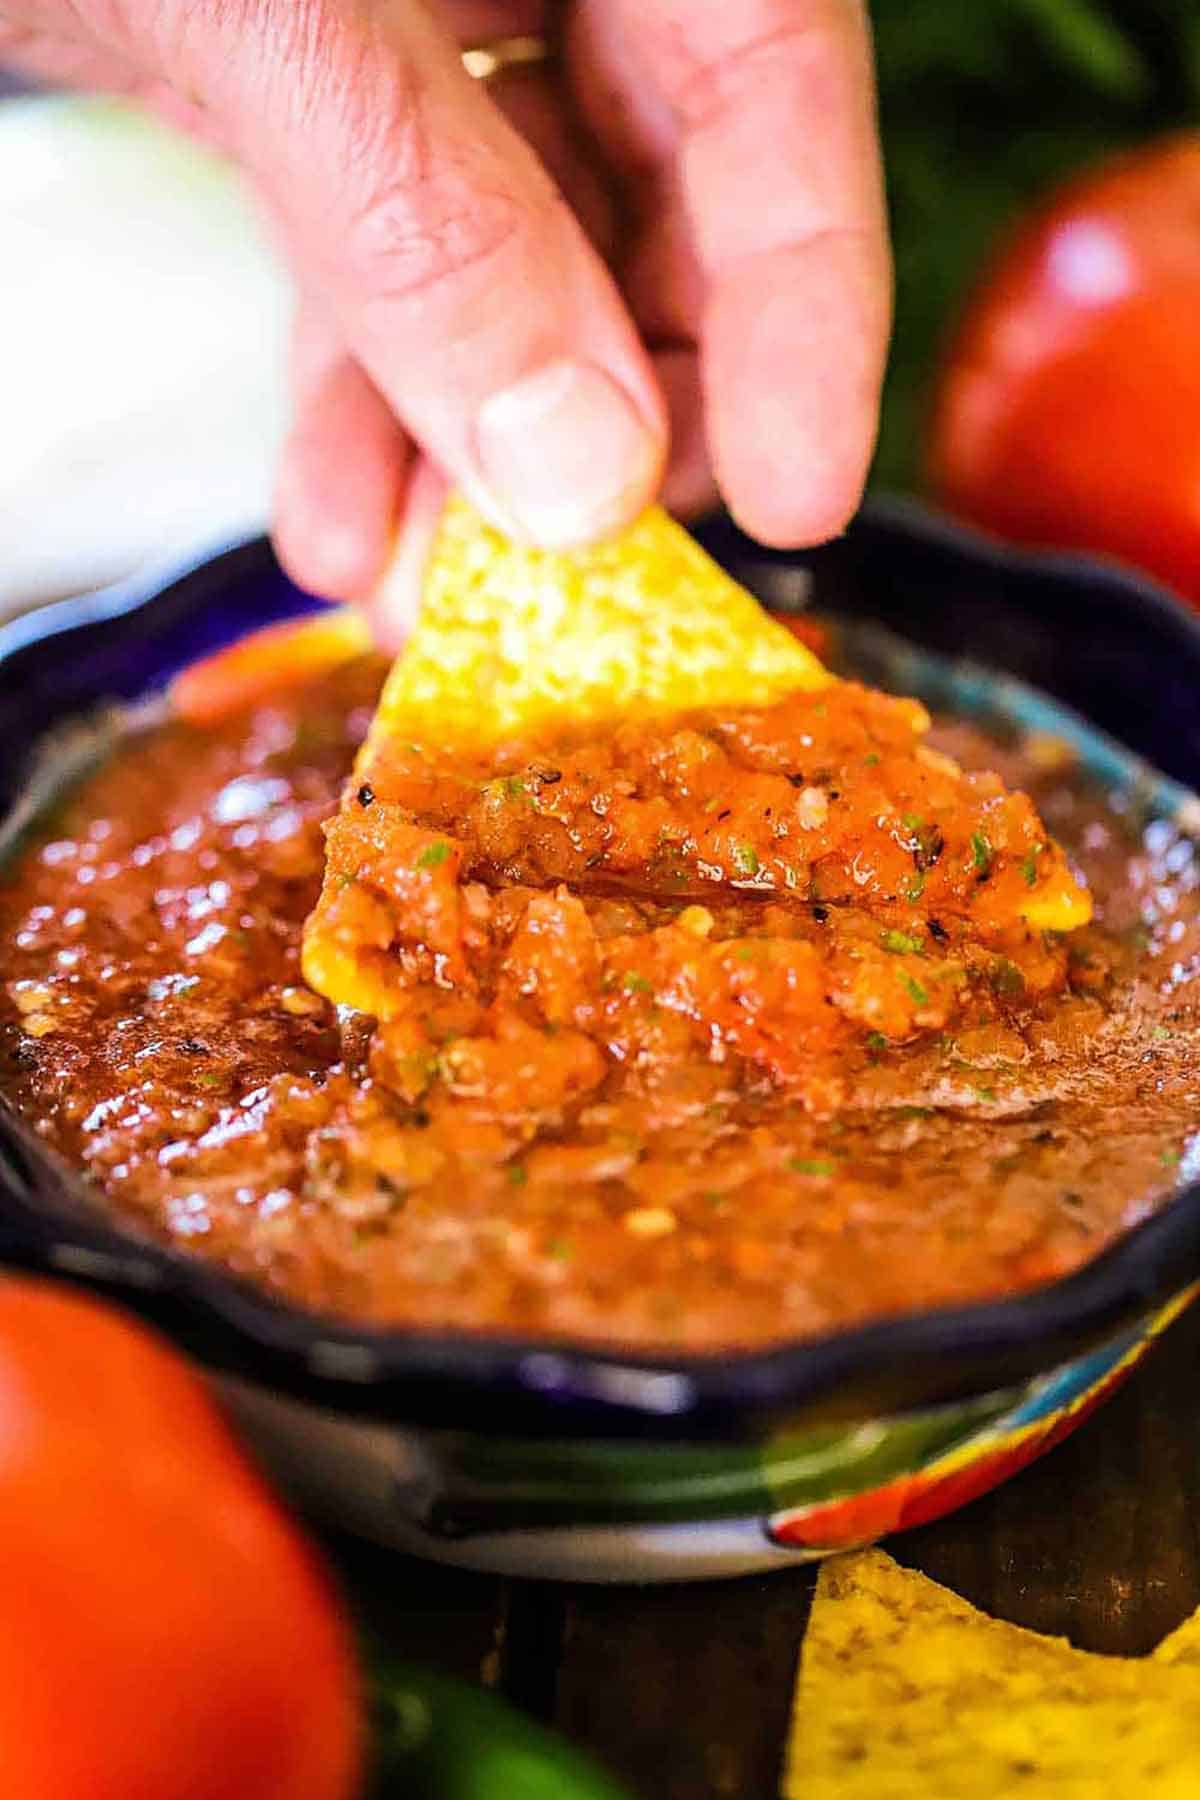
BBQ Sauce – you’ll need about 1 cup
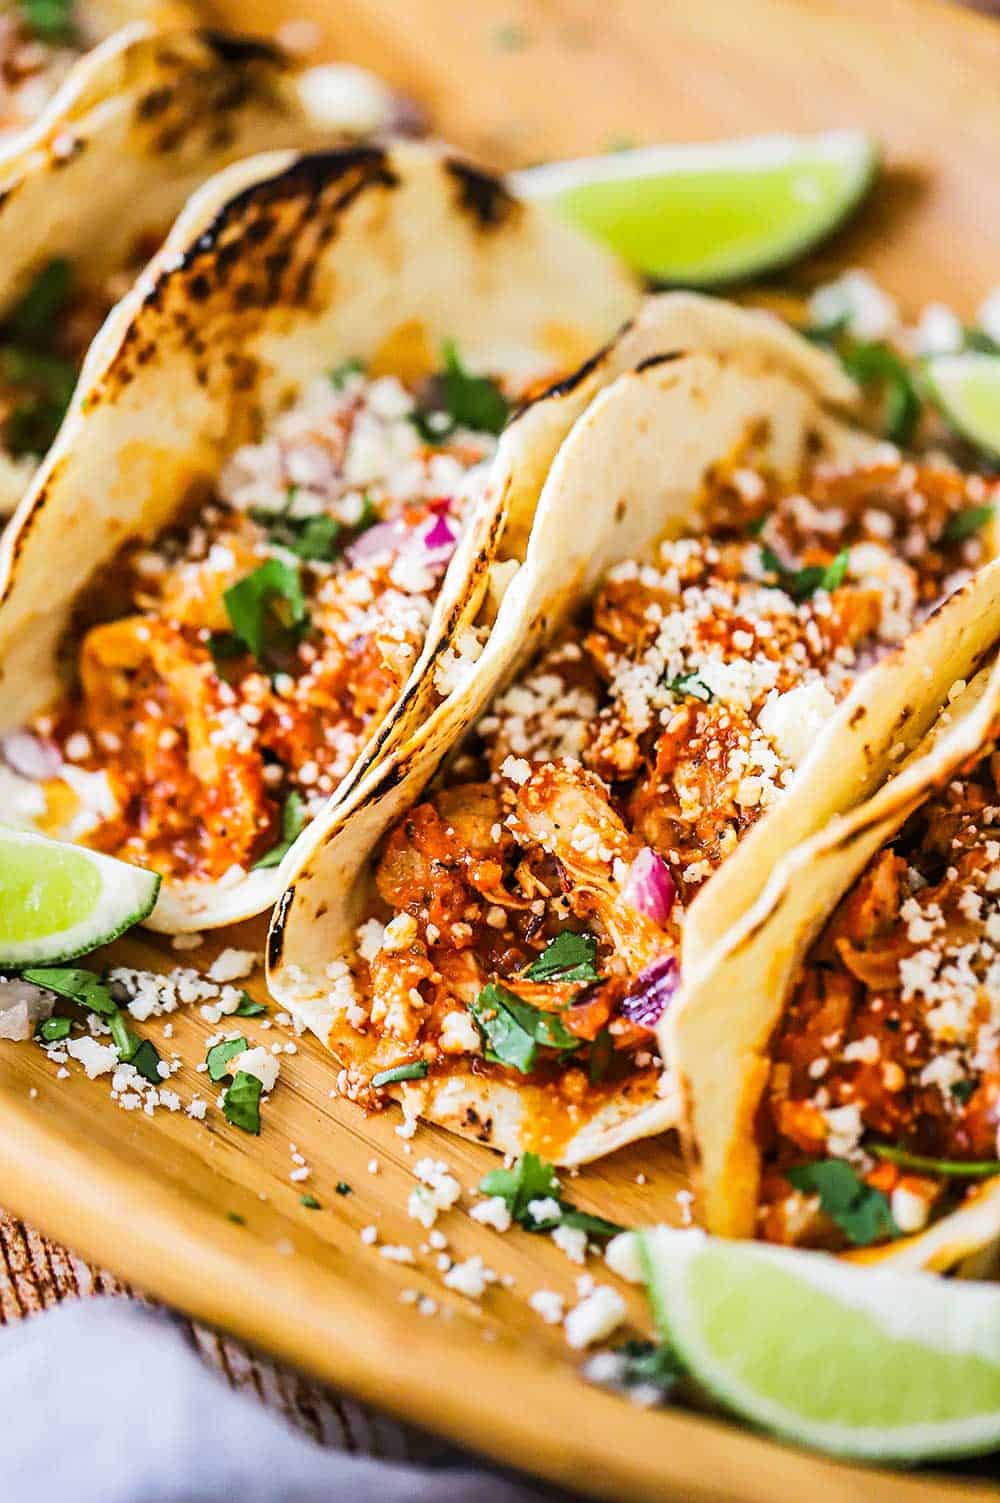
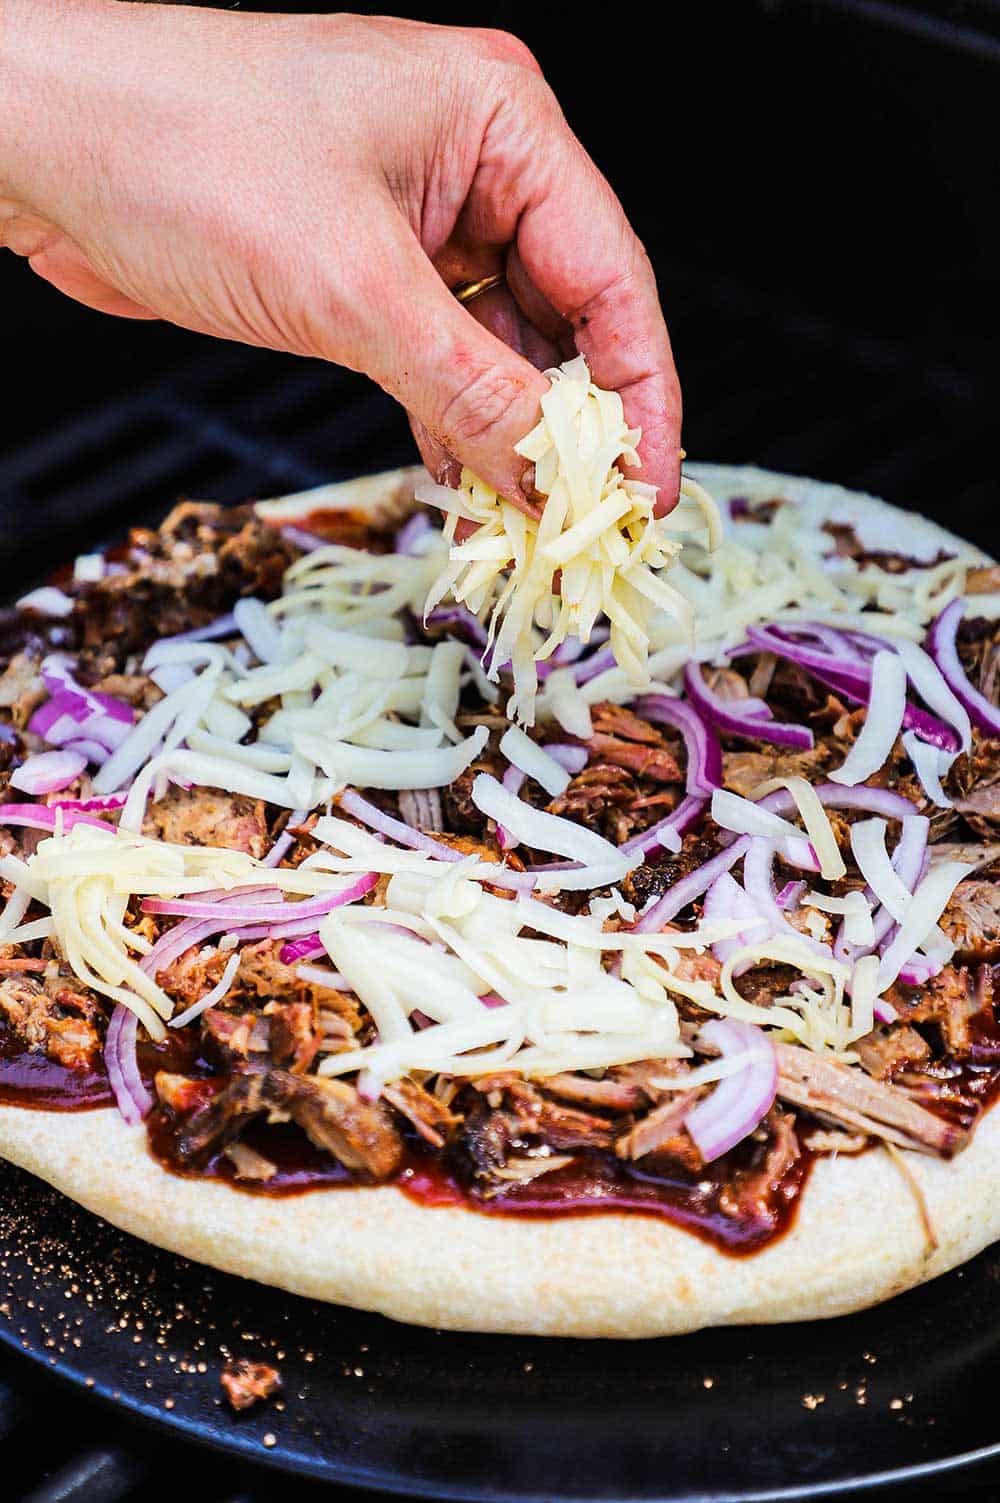
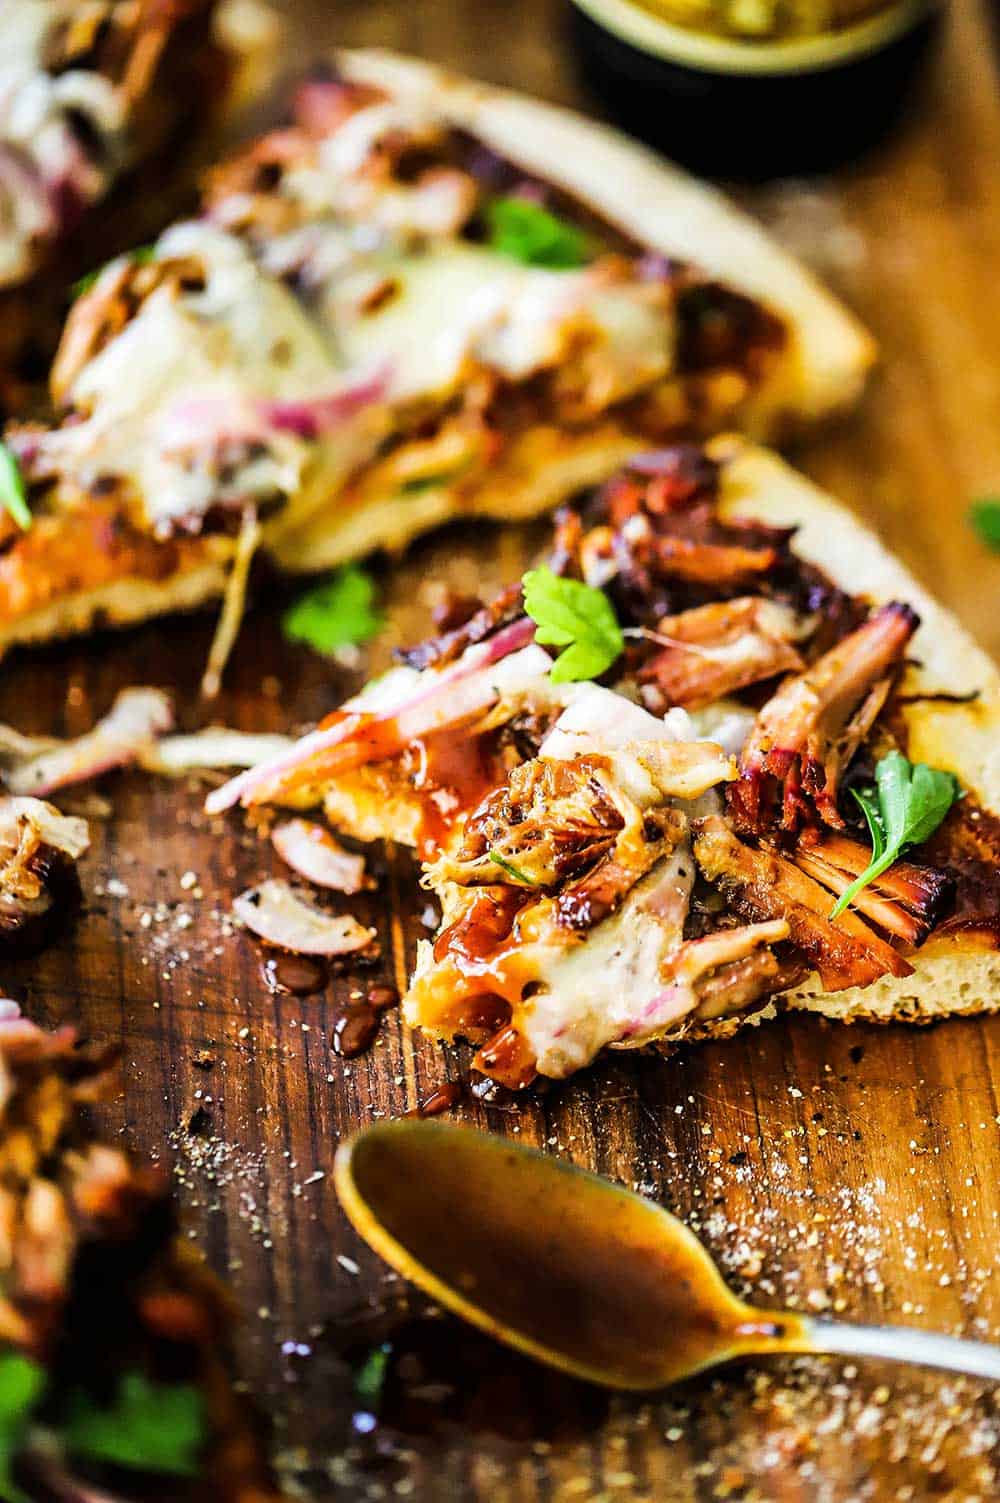
Pulled pork – you want to pile it on, about 1 lb.
Red onion – thinly sliced, as much (or little) as you like
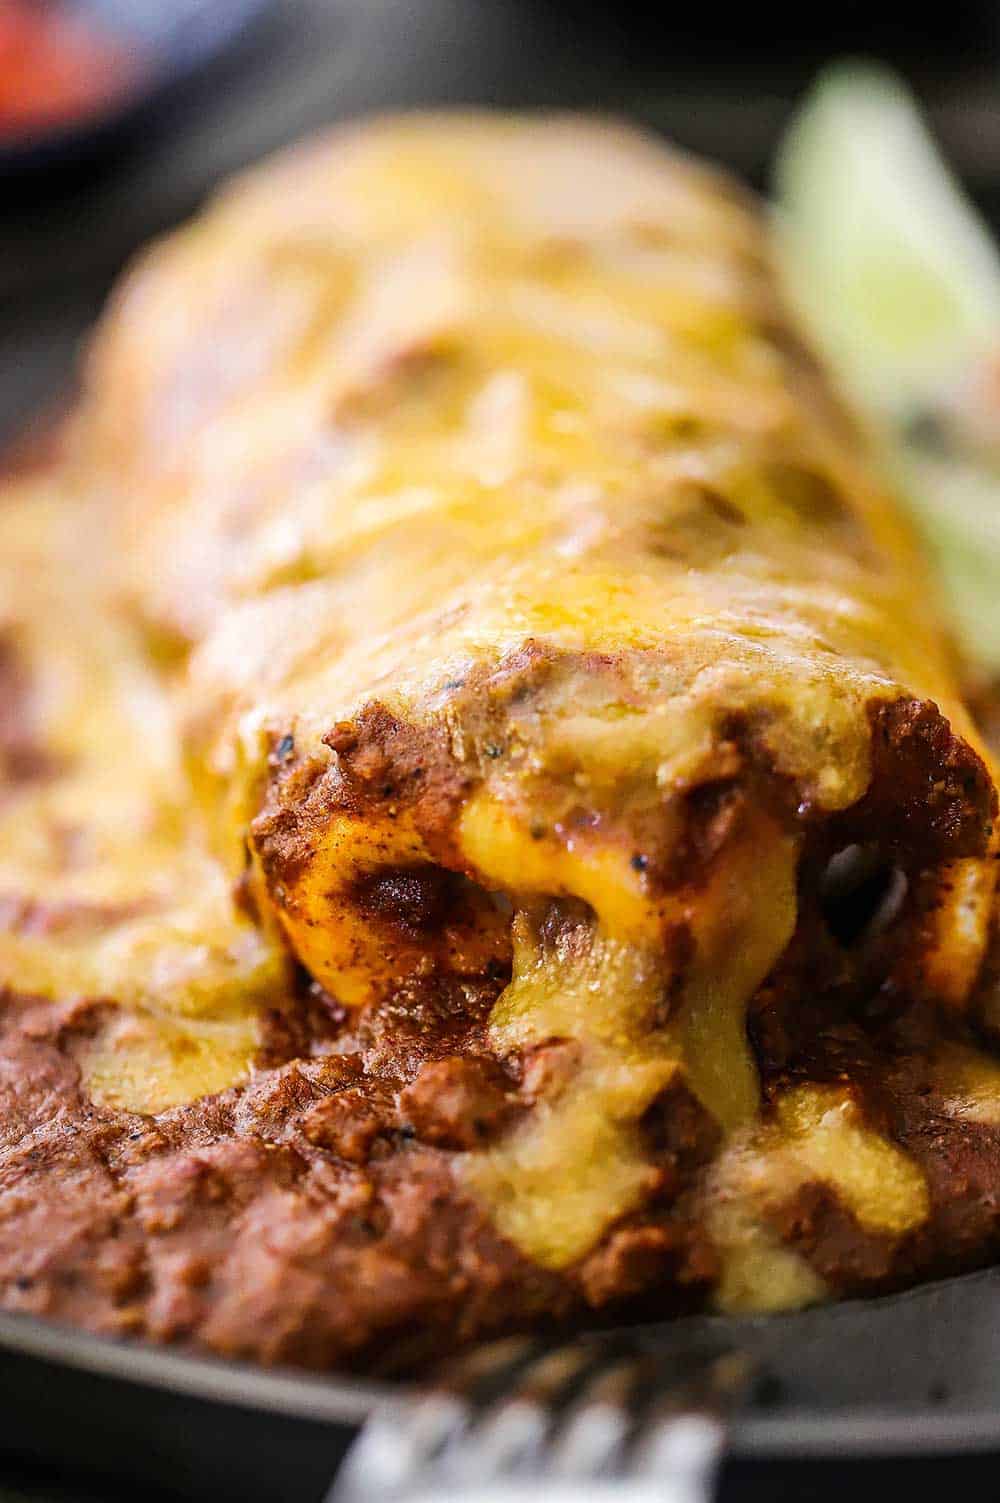
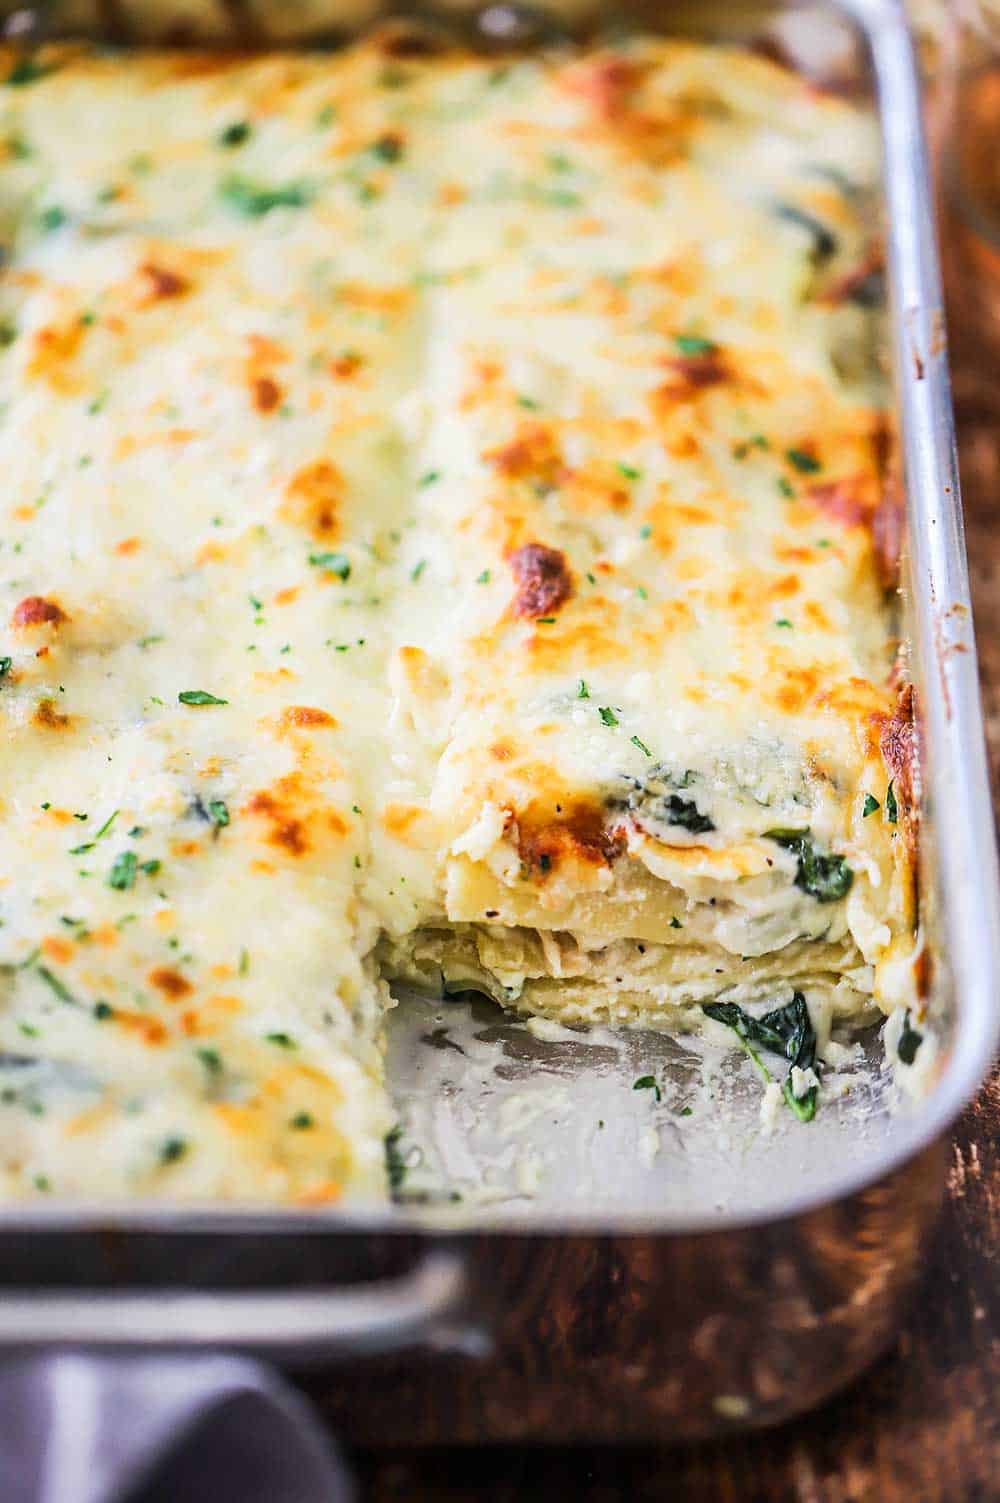
Shredded cheese – we do a combination of Gruyere and mozzarella
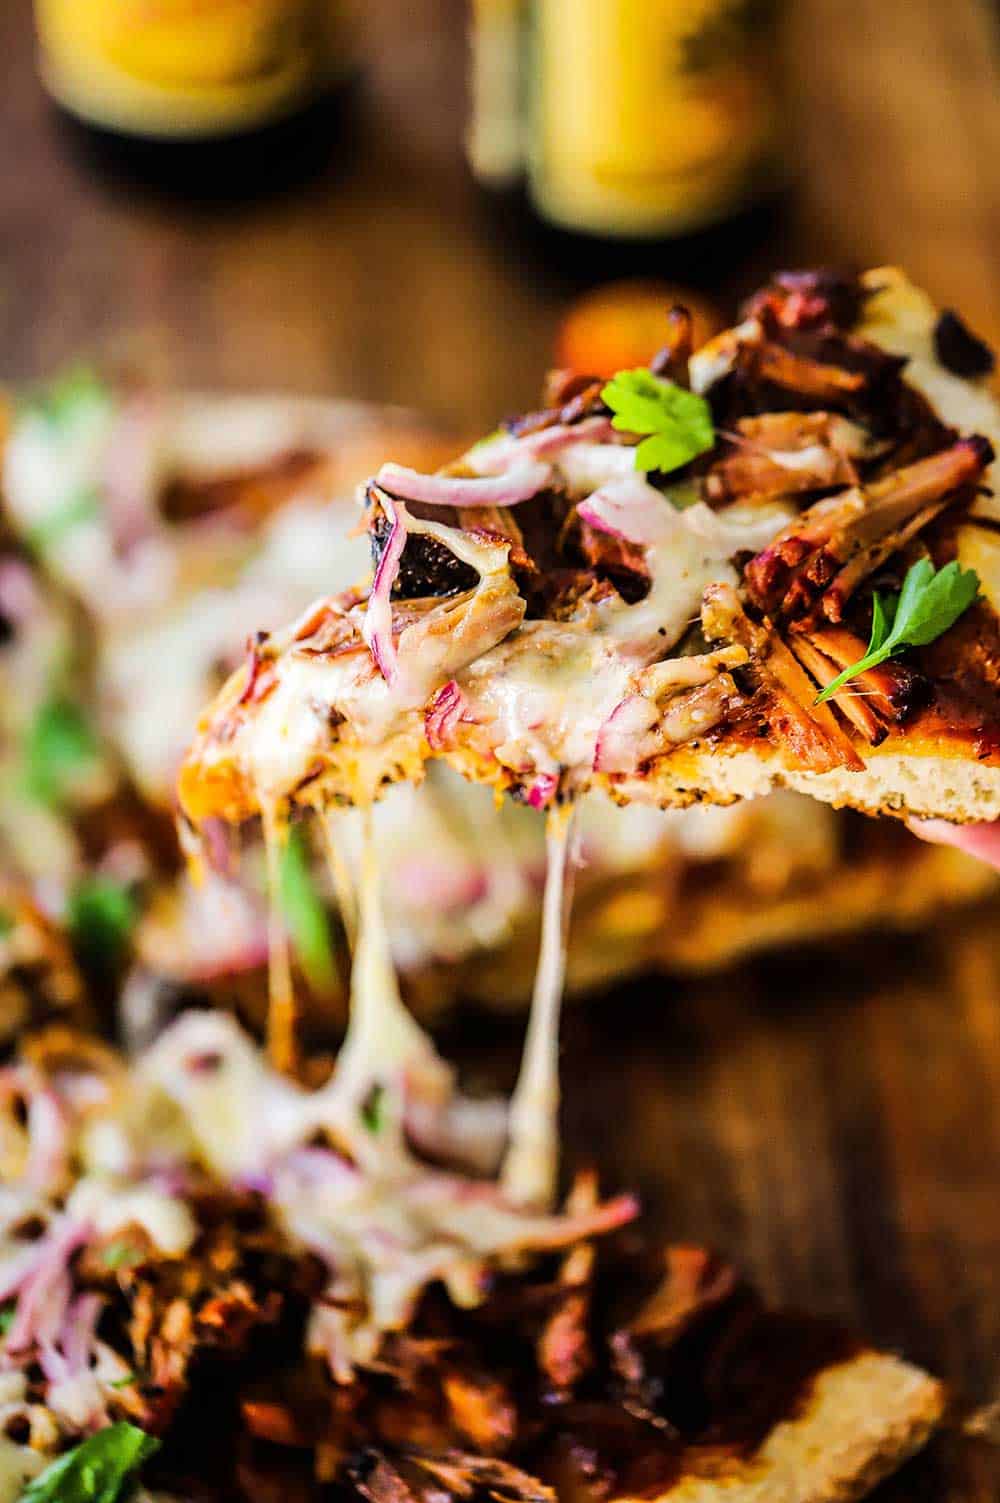
Fresh parsley – for a little color at the end

EXPERT TIP: We love to use a pizza stone for grilling pizza. You’ll need to roll out the pizza and add a little cornmeal to a pizza paddle or the back of a large baking sheet. Place the dough over the cornmeal and then slip the dough onto the stone that has been sitting in your heated covered grill. You can also apply oil to your grill grates and grill the dough directly on the grates. Either way, let the dough cook for about 2 minutes, and then flip.

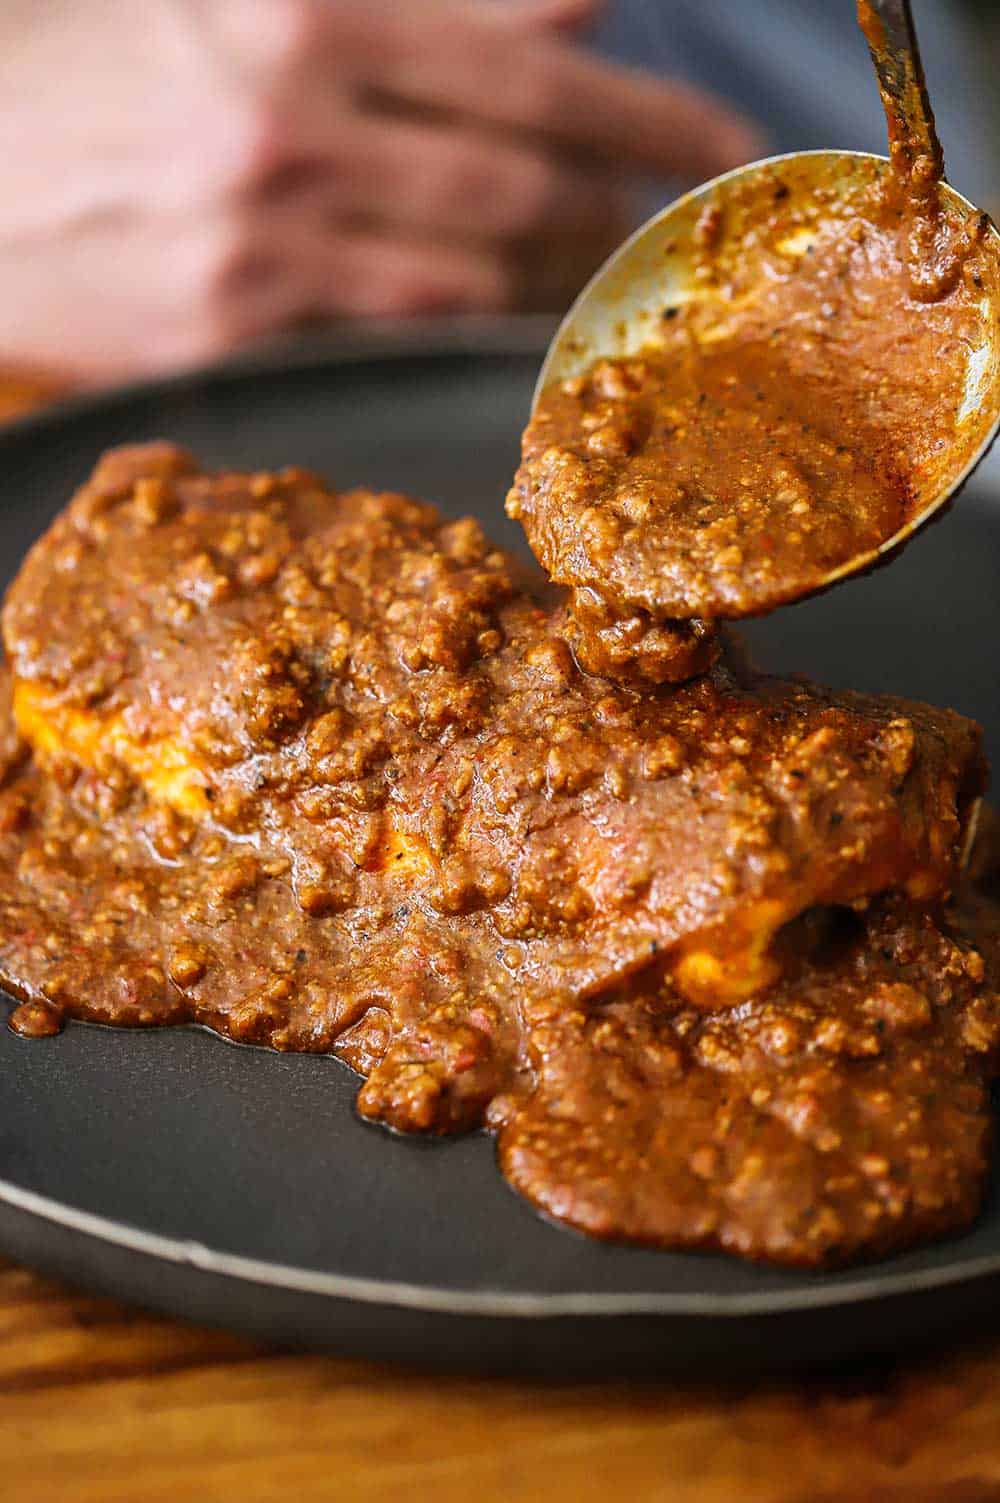
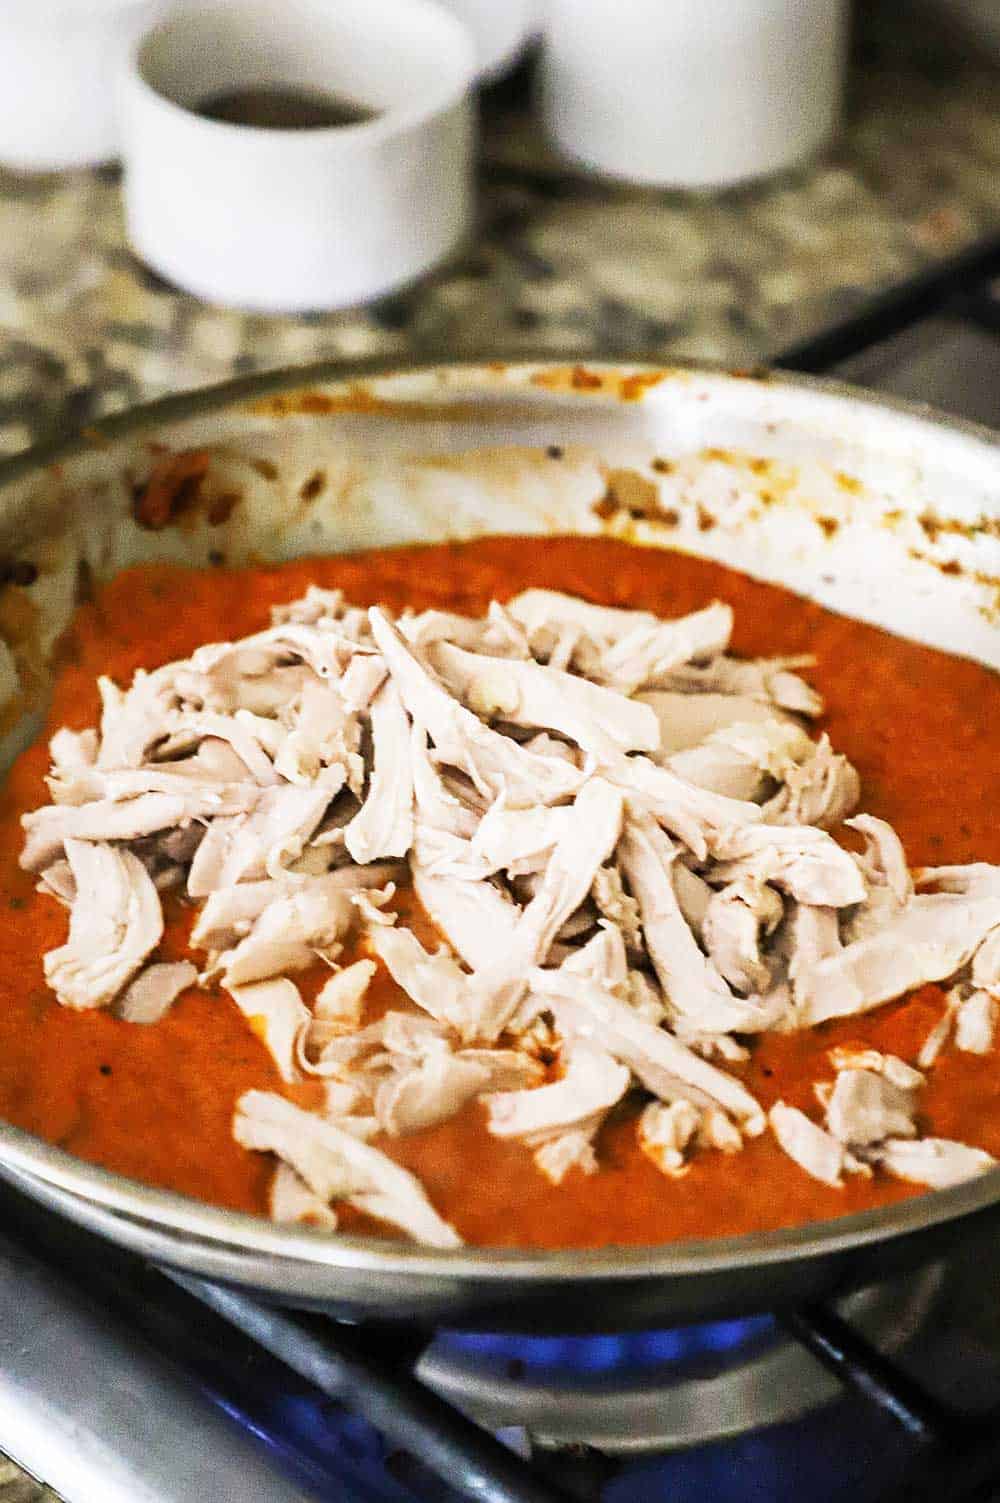
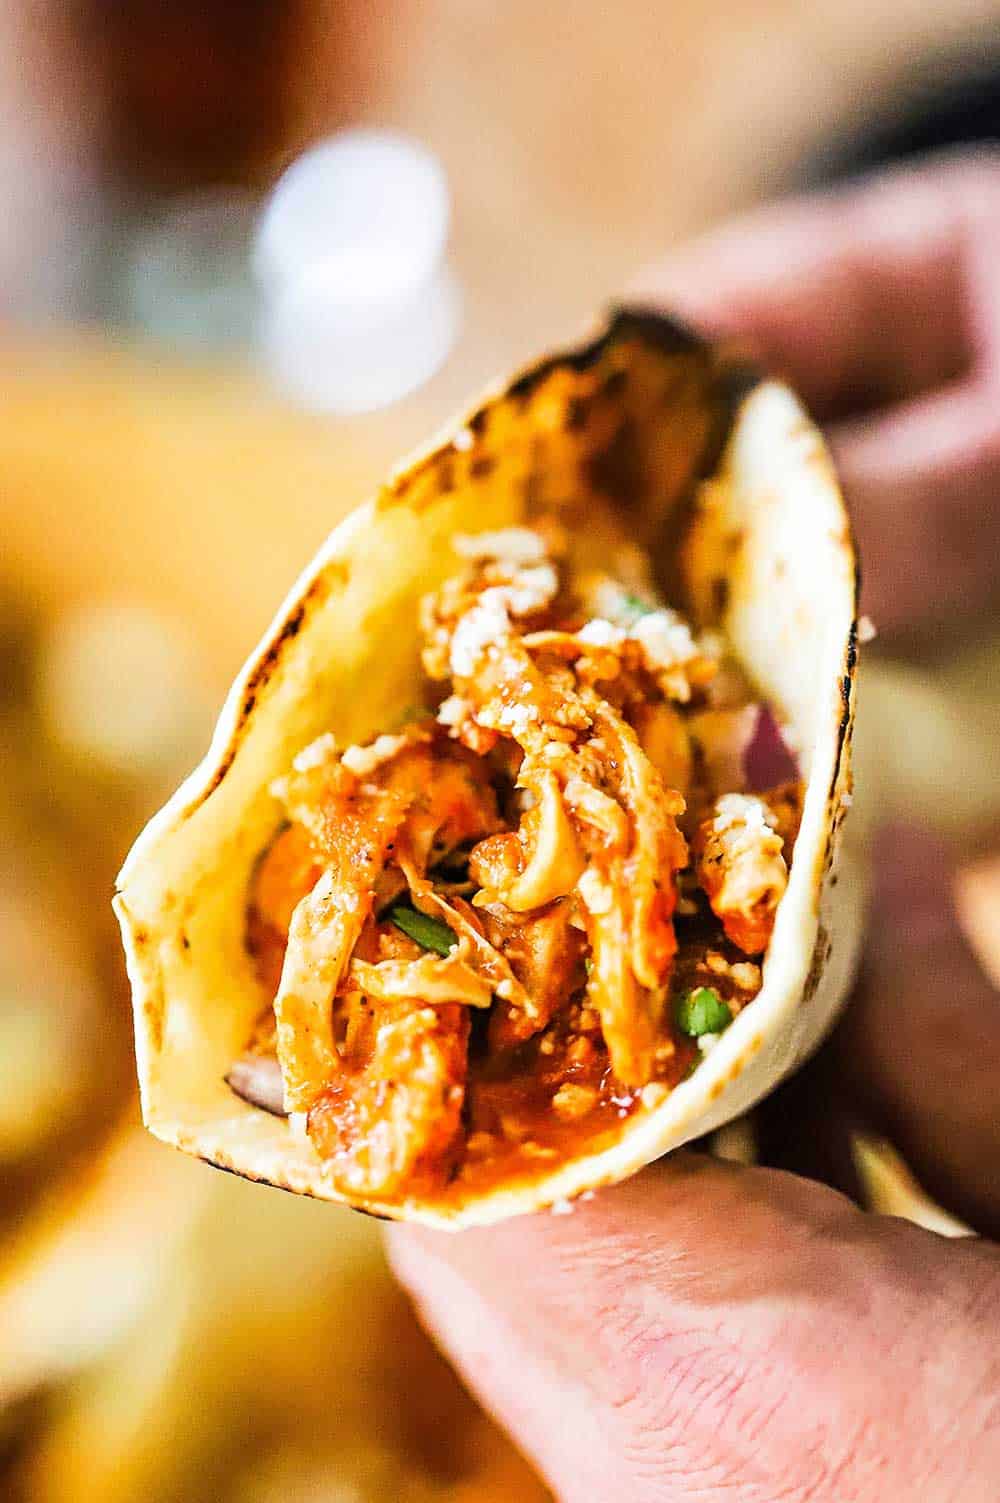
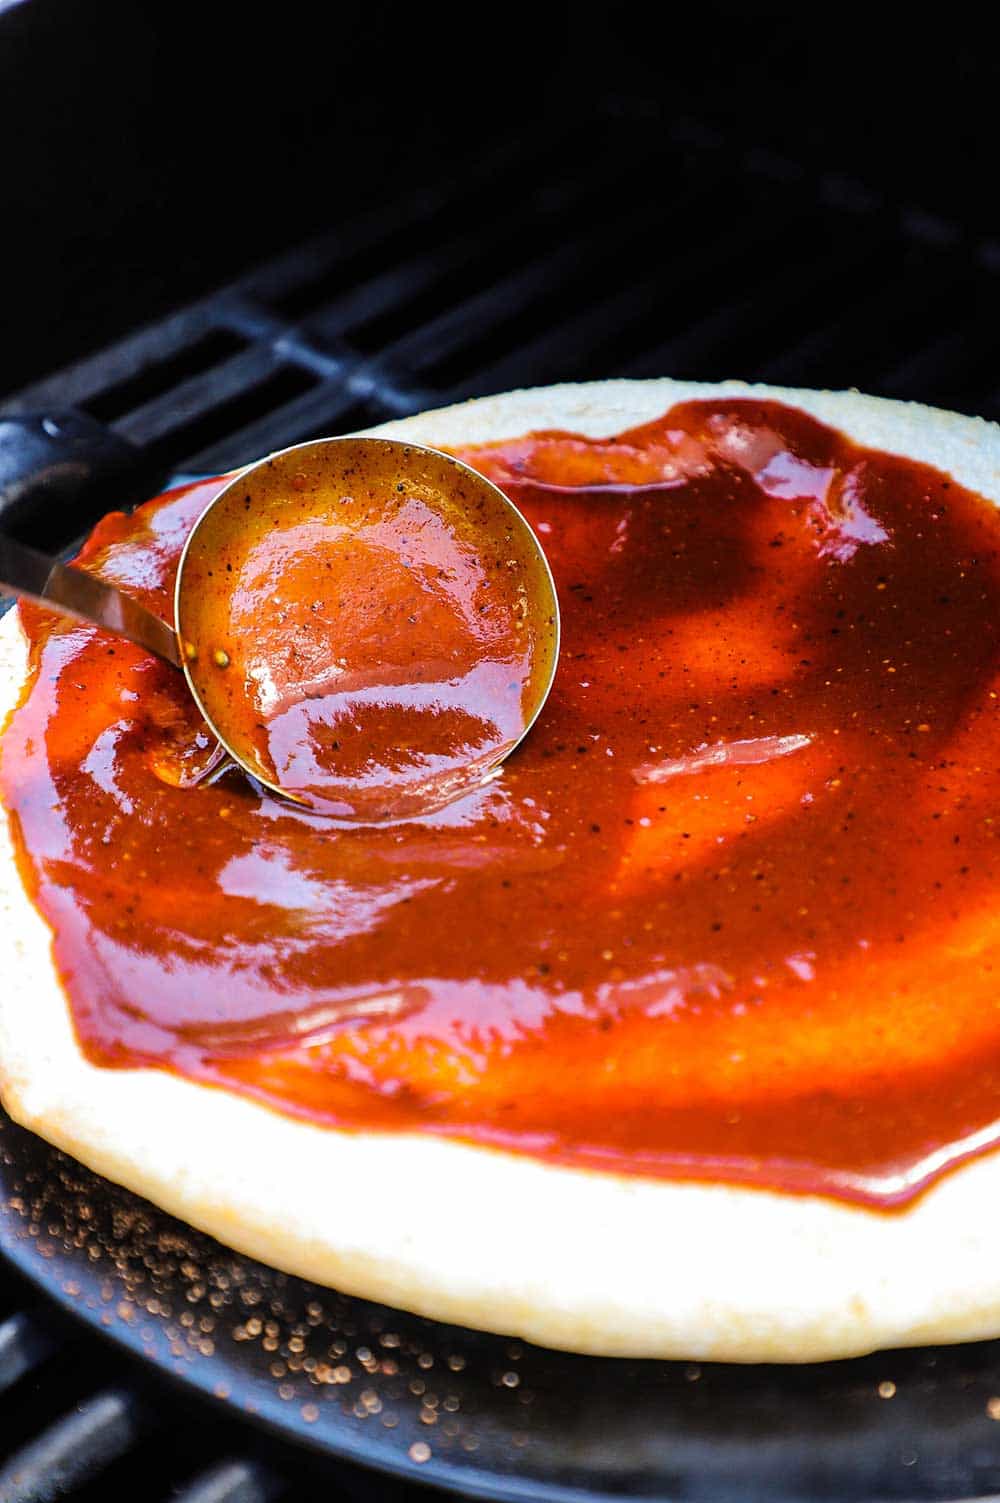
After flipping the dough, you’ll start to build the pizza, starting with the BBQ sauce.

A person using a small ladle to spread barbecue sauce all over a pizza dough that is cooking on a stone on a grill.

Tips for Making Grilled Pizza

Par Bake the Dough – After you’ve rolled the dough out to a 9-inch circle, you’ll want to par-bake the dough on the hot stone for just about 2 to 3 minutes, depending on how hot you get your grill to. Don’t let it cook too long, otherwise, the dough will over-inflate and char. It should be lightly browned on the bottom before you flip it.
Mise en Place – You’ll want to have all of your ingredients prepped and ready to go before you place the dough on the grill. Bring a ladle or large spoon with you to the grill to make spreading the BBQ sauce easier. It only takes about 4 to 8 minutes to cook the pizza once you close the grill lid.
Grilling Without a Stone – You can grill the pizza directly on the grill grates, if you desire. This takes a steady hand and you’ll need to be careful when you transfer the dough to the hot grates. Make sure the grates are well oiled before transferring the dough. It’s not a bad idea to remove the par-baked dough from the grill and apply more oil before flipping the dough and returning it to the grill.
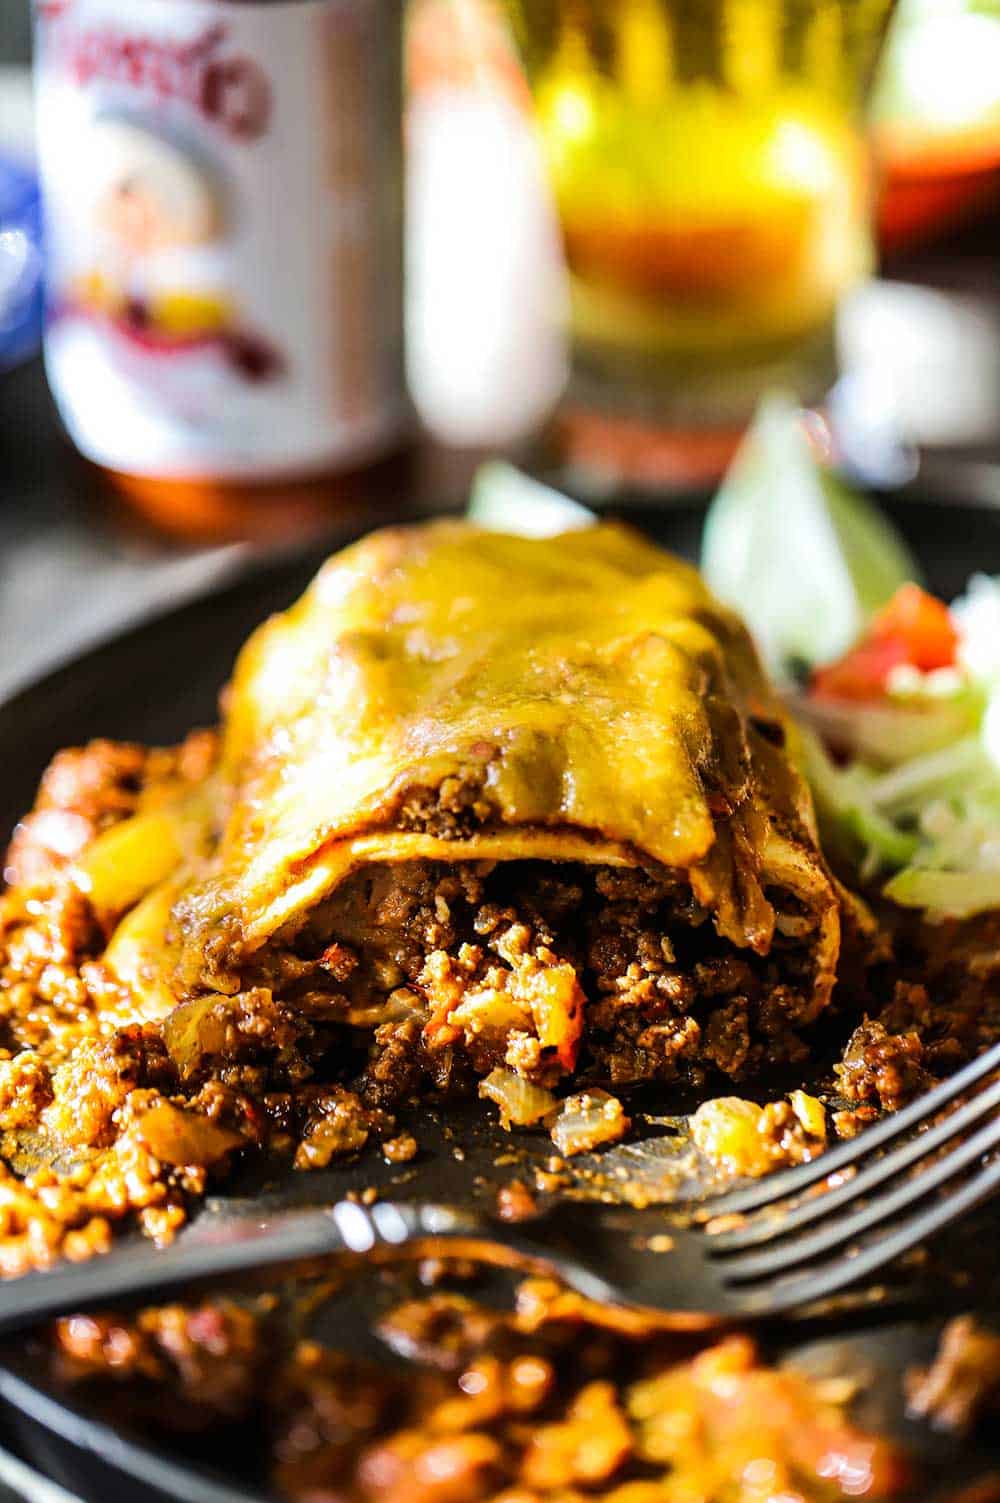
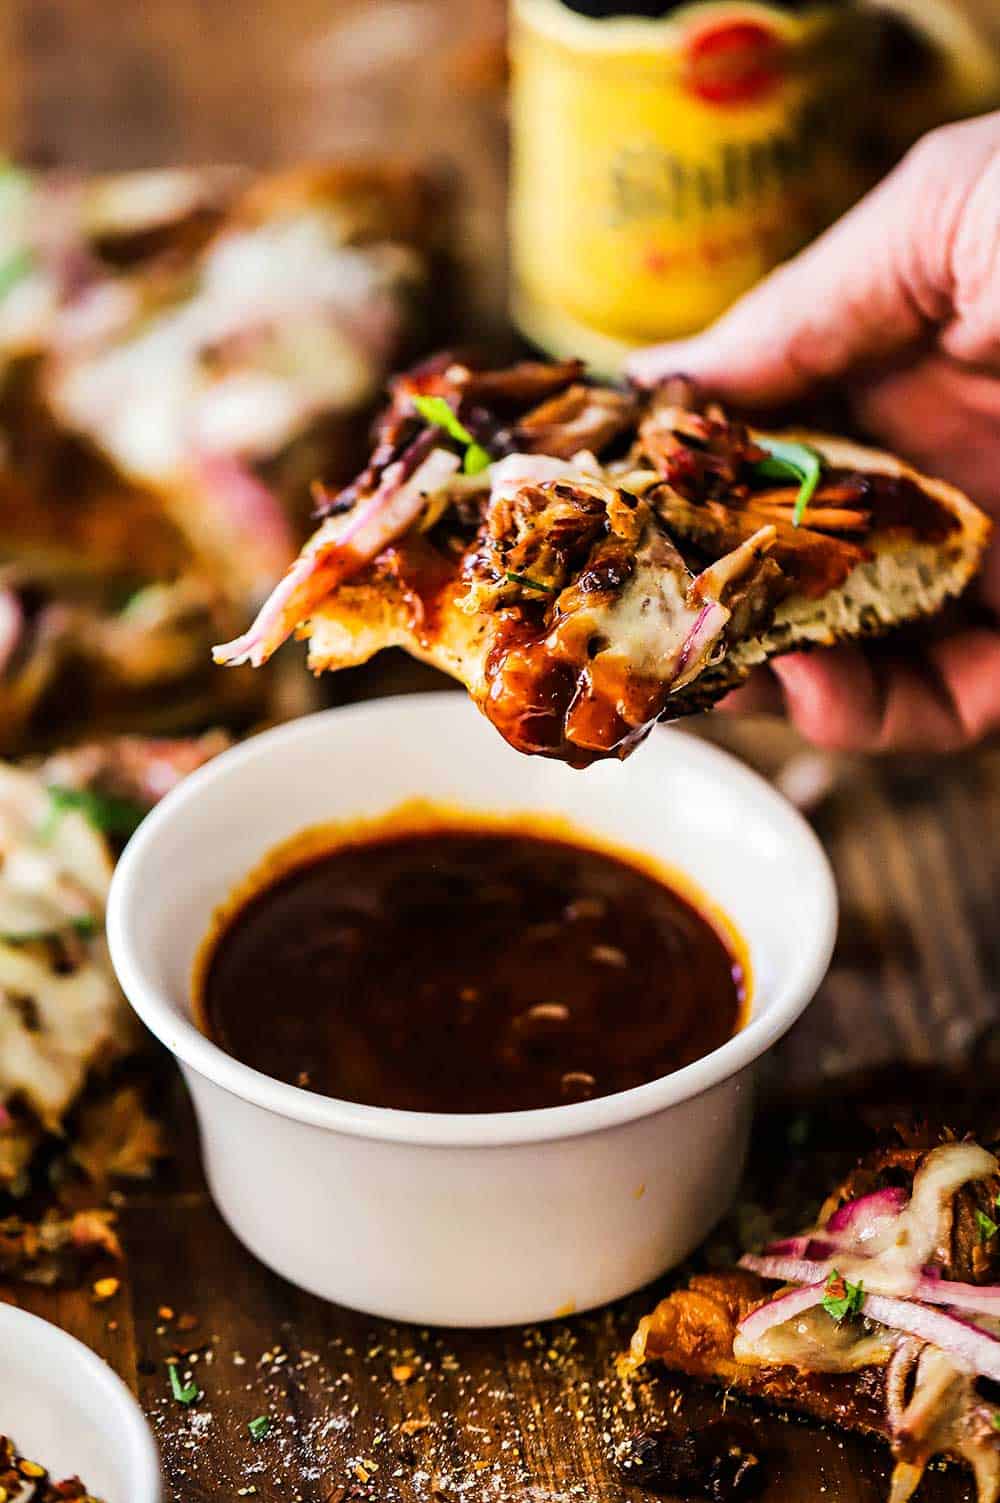
Removing the Cooked Pizza – Have your cutting board with you and use a sturdy pair of tongs to pull the pizza from the grill onto your cutting board. You may need a helper to make this easier.

EXPERT TIP: 1 lb of pulled pork may seem like a lot, but you want to pile it nice and high. For the cheese, go with your favorite white melting cheese. Mozzarella, Gruyere, Fontina, Chihuahua, and Monterrey Jack are all great choices.
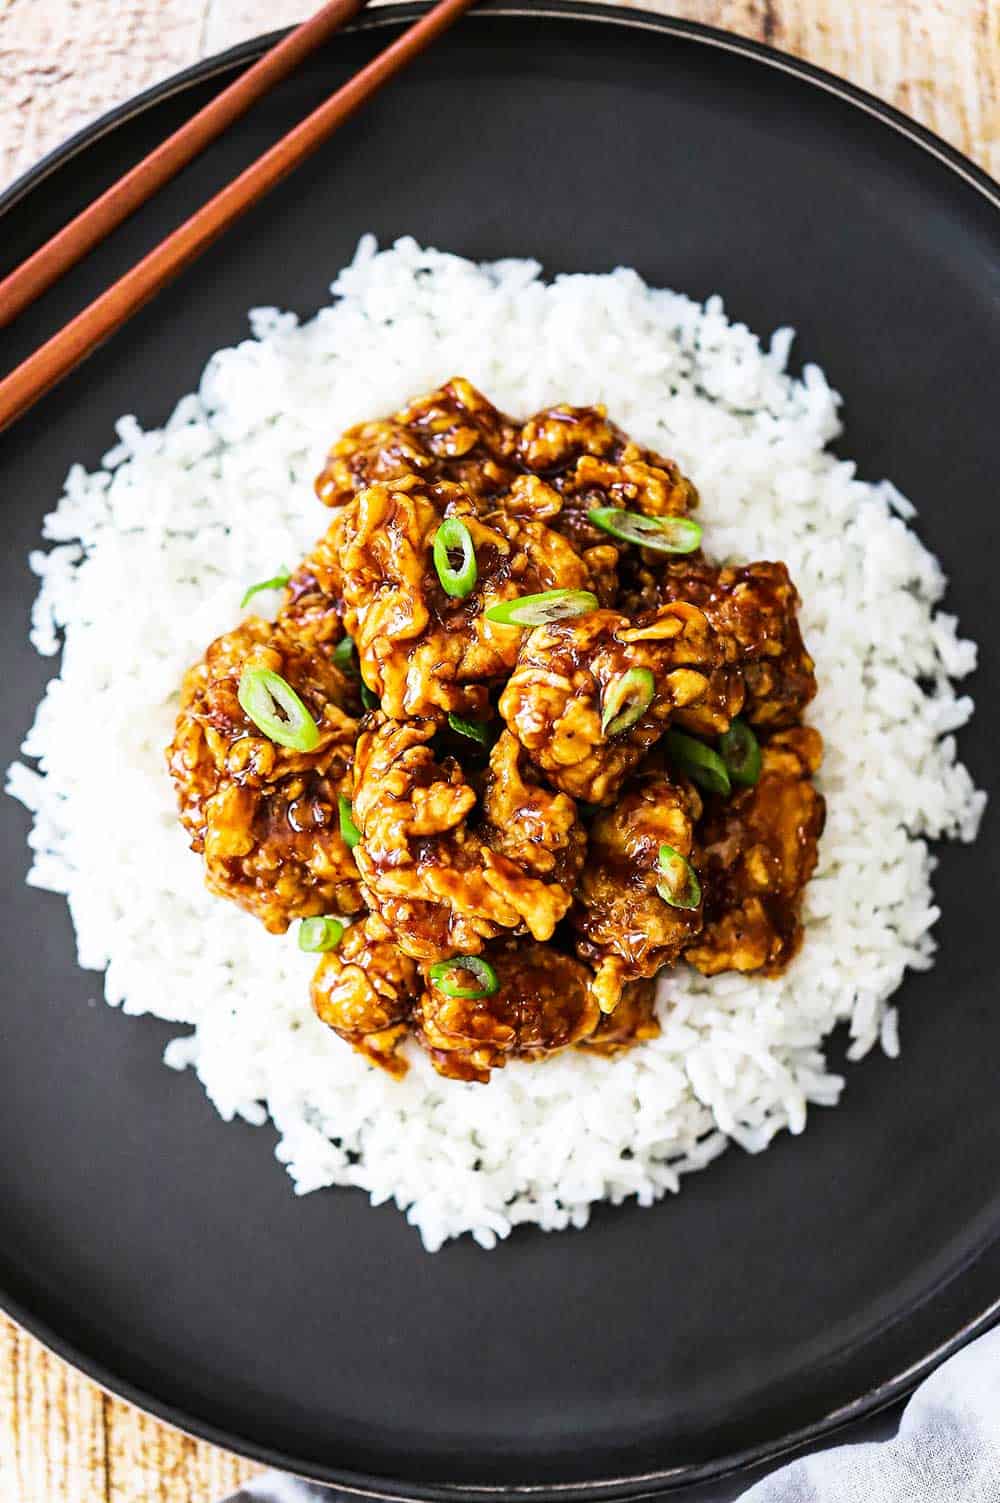
A person sprinkling shredded white cheese over a pizza dough covered with barbecue sauce, pulled pork, red onion.

How To Serve

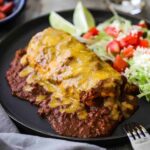
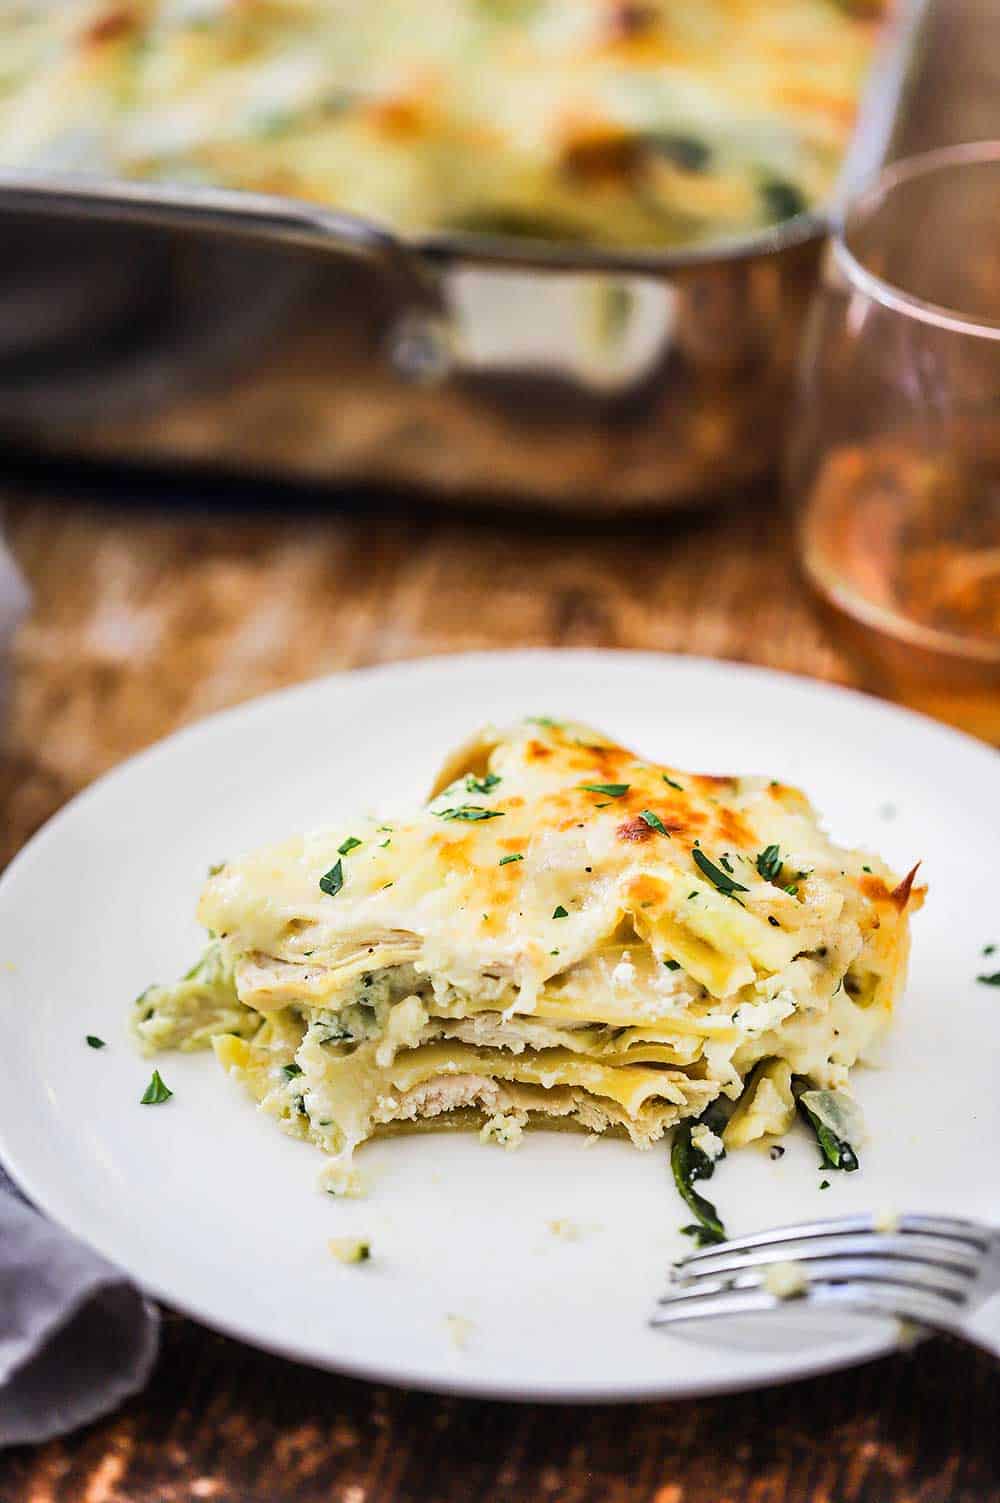
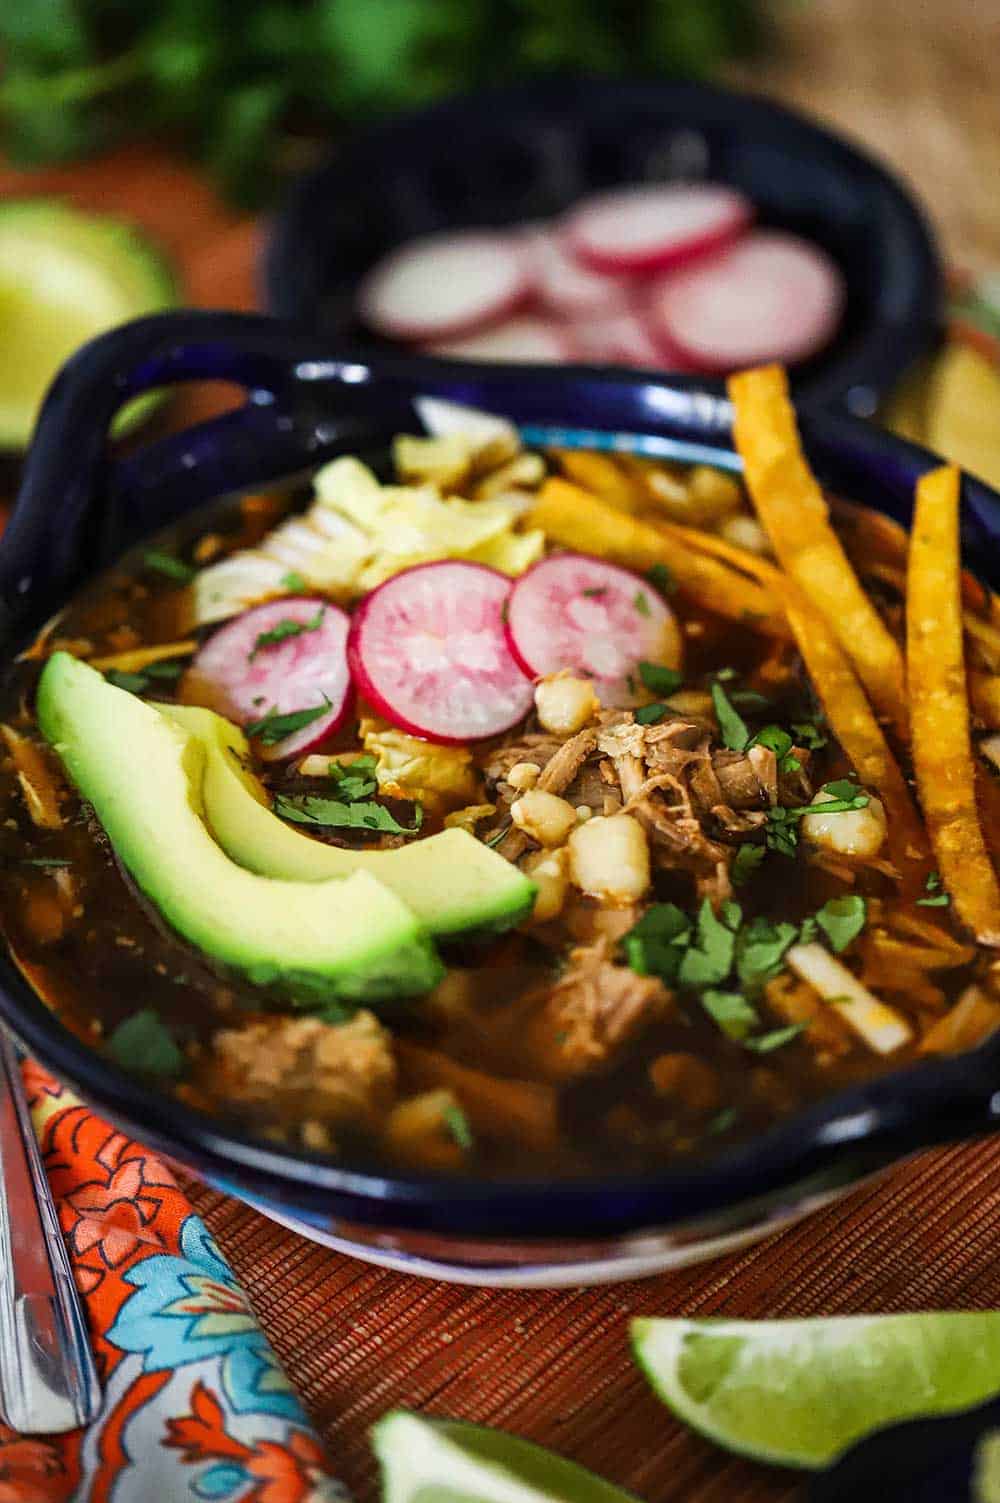
This pizza is spectacular served piping hot. We do recommend letting sit for about 5 minutes because that BBQ sauce gets blazing hot.

Offer some grated Parmesan cheese, red pepper flakes, and pickled jalapeno slices on the side for guests to add themselves. You’ll definitely want to have extra BBQ sauce available for dunking!

And plenty of cold beverages. Grilled pulled pork pizza pairs beautifully with an ice-cold beer or Southern-style iced tea.

A slice of pulled pork pizza that is being raised from the whole pizza with a several strands of cheese being pulled.

Other Crowd-Pleasing Grilled Recipes

You can really grill any type of pizza you like and get amazing results.

Here are some other recipes that are fantastic on the grill:

Grilled BLT Portabello Pizzas
Grilled Steak Sandwiches
Marinated Grilled Chicken
BBQ Shrimp
Grilled Oysters with Roasted Tomato Butter
Rockin’ Black and Bleu Burgers
Jamaican-Curry Turkey Burgers with Grilled Pineapple

In the meantime, who’s in the mood for pizza!

A slice of pulled pork pizza with a bite taken out of it sitting on a cutting board next to a spoon covered in barbecue sauce.

Folks, it just doesn’t get much better than this.

Whether you make everything from scratch or pick up items for your local pizza joint and BBQ joint, this pizza is sure to cause a sensation at your next outdoor BBQ.

And don’t forget the extra BBQ sauce for dipping! It is amazing!

A person holding a slice of pulled pork pizza with a bite taken out of it and held above a small bowl of barbecue sauce.

Ready to make the best grilled pizza in the world? Go for it!

And when you do, be sure to take a photo of it, post it on Instagram, and tag @HowToFeedaLoon and hashtag #HowToFeedaLoon!

An overhead view of a grilled pulled pork pizza that has been cut into slices on a cutting board.
Print Recipe
5 from 1 vote

Grilled Pulled Pork Pizza with BBQ Sauce

Grilled Pulled Pork Pizza is a pizza like none other. Make it easy on yourself and pick up some pizza dough from your local pizza or Italian joint and some pulled pork from your favorite BBQ place. Or, make it yourself!
Prep Time15 minutes mins
Cook Time15 minutes mins
Total Time30 minutes mins
Course: Entree
Cuisine: Southern
Servings: 4
Calories: 678kcal
Author: Kris Longwell

Equipment

  • Pizza stone
  • Grill Gas, charcoal, or electric

Ingredients

  • 1 cup BBQ sauce
  • all-purpose flour for dusting your counter
  • 1 lb pizza dough
  • cornmeal for dusting pizza wheel
  • 1 lb pulled pork
  • ½ cup red onion thinly sliced
  • ½ cup mozzarella shredded
  • ½ cup Gruyere cheese
  • 1 tablespoon parsley fresh, for garnish, optional

Instructions

Do Ahead

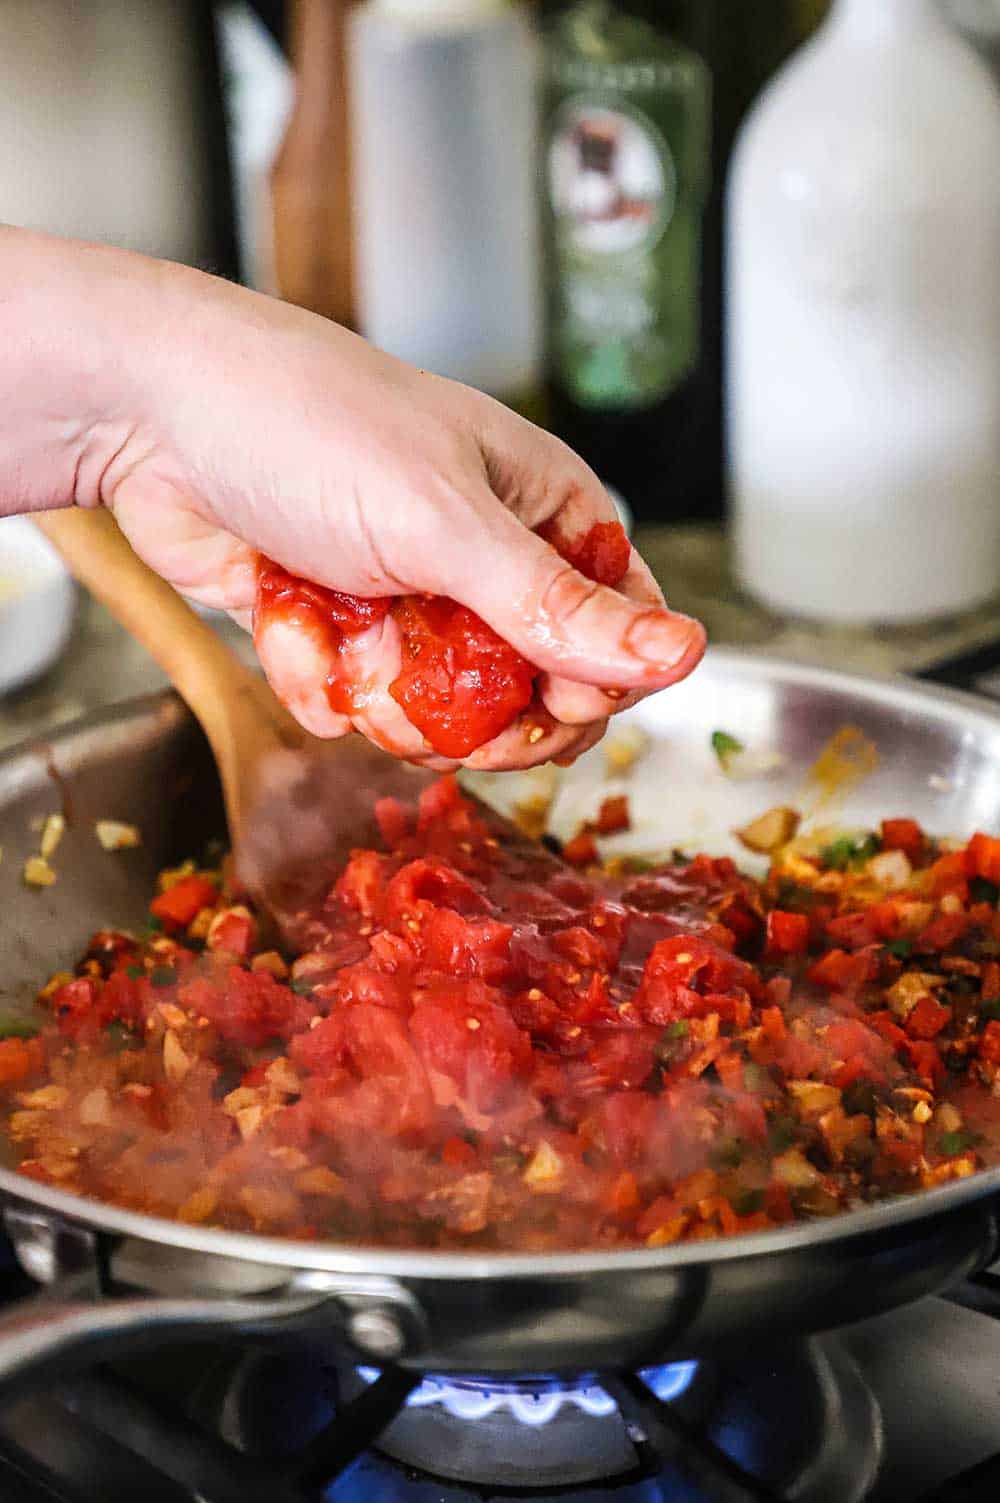
  • Prepare the BBQ Sauce and keep it in the fridge until ready to use.

Make the Pizza!

  • On a lightly floured surface, roll out the pizza dough to about 10 to 12 inches. Gently fold it in half. Sprinkle your pizza wheel or the back of a large baking sheet with cornmeal. Place the folded dough onto the wheel or baking sheet and unfold the pizza.
  • Meanwhile, place your pizza stone on the grill and crank the heat to medium-high and close the lid. The internal temp should be around 400°F, but it's okay if it's hotter.
  • Carefully slide the dough off of the wheel or baking sheet onto the hot stone. Close the lid and cook for about 2 to 3 minutes. Use a pair of tongs to flip the dough over.
  • Working quickly, use a ladle to spread the BBQ sauce over the dough, then add the pulled pork, sliced onions, and then both types of cheese. Close the lid and let cook until cheese has melted and lightly browned on top, about 5 minutes.
  • Use a pair of tongs (or two large spatulas) to transfer the pizza to a large cutting board. Slice the pizza into 8 slices. Garnish with chopped parsley, if desired and extra BBQ sauce on the side for dipping.

Video

Notes

See the video near the top of the blog post for visual guidance. If you liked the video, please subscribe to our YouTube channel. 
Some grills are hotter than others. Be sure to keep an eye on the dough before you flip it. 2 minutes should long enough to allow it to become stiff enough to flip. It should be lightly browned on the bottom. However, it may need to go longer, depending on your grill. If it goes too long, the dough will inflate and burn. 
We definitely recommend making the BBQ sauce. It's easy and so delicious. 
Wrap leftovers in foil and keep in the fridge for up to 3 days or on the counter for 1 to 2 days. Reheat in the microwave on HIGH for about 30 seconds. 

Nutrition

Calories: 678kcal | Carbohydrates: 106g | Protein: 32g | Fat: 18g | Saturated Fat: 9g | Polyunsaturated Fat: 1g | Monounsaturated Fat: 3g | Cholesterol: 78mg | Sodium: 2439mg | Potassium: 225mg | Fiber: 3g | Sugar: 48g | Vitamin A: 666IU | Vitamin C: 5mg | Calcium: 324mg | Iron: 5mg

Guinness Ground Beef Pot Pie

June 1, 2022 by Kris Longwell 2 Comments

An overhead view of a Guinness ground beef pot pie in a cast iron skillet with half of the crust gone and a spoon inserted in the meat and vegetable filling.

There is something about a piping hot pot pie that is just so comforting, and this recipe does not disappoint.

We are crazy for homemade pot pies. Our Chicken Pot Pie is one of the most popular recipes on the blog. We’re pretty sure this incredible beef version will be a big, too. The easy homemade pie dough puts it over the top. And, of course, the Guinness creates a deeply flavorful sauce that brings it all together. Ultimate comfort food!

How To Make Guinness Ground Beef Pot Pie

You can take some shortcuts with this recipe to make it easier on yourself without sacrificing taste.

Store-bought pie dough is a great option. And frozen vegetables work, too!

If you like to make everything from scratch (like we do), this makes for a really fun weekend foodie project! And it’s not hard, it just takes a little bit of time!


NOTE: If you liked this video, please subscribe to our YouTube channel. Remember to click the little ‘bell’ icon so you’ll never miss a new video!

The Ingredients You Will Need

Pie Dough – As mentioned, you can make the easy pie dough in advance, if you prefer. Our dough freezes beautifully, too. However, store-bought pie dough is a great option.

Beef – We highly recommend going with lean beef for this recipe. Our favorite is Laura’s Lean 96% Lean Ground Beef. If you don’t go with lean ground beef, you’ll want to drain off most of the excess grease.

Vegetables – We love going with carrots, celery, carrots, and frozen sweet peas. If using fresh, peel and cube the carrots and potatoes. Roughly chop the celery. If using frozen vegetables, add them during the end of the cooking process, along with the peas. You could substitute frozen cubed potatoes, in place of fresh potatoes, too.

Flavor Enhancers – Thyme (1 tablespoon fresh, 1 teaspoon dried), Worcestershire sauce, tomato paste.

Beer – Go with a nice stout beer. Guinness is our favorite! If you prefer to not cook with beer, increase the beef stock.

A person pouring stout beer from a bottle into a skillet filled with sautéed carrots, potatoes, and celery.

Ground Beef Pot Pie FAQs

Can I use a different type of meat? Beef is really a wonderful match to the stout beer. Roughly chopped pot roast or brisket (fully cooked) is wonderful in this pie. Ground turkey is a wonderful option, too! Ground lamb would be classic, too. And to get even healthier, go with plant-based protein! All fantastic choices!

I don’t have a cast-iron skillet, what else can I use? Cook the beef and vegetables in a skillet and then use a 9-inch pie dish to bake the pot pie. You could also use mini-casserole dishes or mini cast-iron skillets. You’ll just need to roll out the dough into smaller shapes.

Can the pot pie be made in advance? Absolutely. Assemble the entire pie and then gently wrap it in plastic wrap. Keep in the fridge until ready to bake.

EXPERT TIP: Roll the dough out to about 10 to 11 inches on a lightly floured surface. Fold the dough in half and gently transfer it to the top of the skillet. Press the edges along the side of the pan, using your fingers to pinch the dough to make a simple fluted design, if desired.

A person placing pie dough over the top of a cast-iron skillet filled with a ground beef and sautéed vegetable filling.

How To Serve and Store

This beef pot pie is definitely served piping hot right from the oven. However, it reheats beautifully in your microwave or in the oven.

It is truly a full meal in one skillet.

Leftovers will keep, covered, in the fridge for up to 5 to 7 days.

Cutting into the pot pie right out of the oven is truly a spectacular experience.

An overhead view of an untouched Guinness ground beef pot pie covered with a pie crust and sitting new to a bottle and glass of stout beer.

Other Beef Comfort Food Recipes

Pub-Style Brisket Pot Pie
Best-Ever Meatloaf with Mushroom Gravy
Slammin’ Sloppy Joes
Smothered Burritos with Chili Con Carne
Gourmet Beef Stroganoff
Texas-Style Chili

EXPERT TIP: Make an egg wash by stirring together one egg and 1 tablespoon of water. Brush it all over the top of the dough. This will produce a beautiful golden crust. Also, make several slits on the top of the dough with a sharp knife. This helps steam from escaping as the pie bakes.

This pot pie is approachable and truly the ultimate in comfort food.

You have options for how much effort you want to put into it.

Make it a fun weekend project and do it all with fresh ingredients and a homemade crust. Or, make it a fun weeknight meal with frozen veggies and store-bought dough.

Either way, it will be amazingly delicious!

A white serving bowl filled with a serving of ground beef pot pie next to a tall glass of stout beer.

Ready to make the most comforting dish in the land? Go for it!

And when you do, be sure to take a photo of it, post it on Instagram, and tag @HowToFeedaLoon and hashtag #HowToFeedaLoon!

An overhead view of a Guinness ground beef pot pie in a cast iron skillet with half of the crust gone and a spoon inserted in the meat and vegetable filling.
Print Recipe
5 from 2 votes

Guinness Ground Beef Pot Pie

Guinness Ground Beef Pot Pie is the ultimate comfort food. If using frozen veggies, don't add them until the very end of the cooking process along with the pies.
Prep Time20 minutes mins
Cook Time1 hour hr 10 minutes mins
Total Time1 hour hr 30 minutes mins
Course: Entree
Cuisine: American
Servings: 6
Calories: 465kcal
Author: Kris Longwell

Equipment

  • 1 9.5" cast-iron skillet or pie dish

Ingredients

  • 1 lb ground beef lean
  • 1½ teaspoon Kosher salt divided
  • 1 teaspoon black pepper
  • 2 tablespoon olive oil
  • 1 medium onion chopped
  • 3 cloves garlic minced
  • 1 tablespoon thyme fresh, chopped
  • 3 medium carrots peeled and chopped
  • 3 celery stalks chopped
  • 1 cup gold potatoes peeled and cubed, usually 1 large potato
  • 2 tablespoon all-purpose flour
  • 1 tablespoon tomato paste
  • 1 tablespoon Worcestershire sauce
  • 11.2 fl. oz. Guinness beer stout
  • 1 cup beef broth
  • 1 cup sweet peas frozen
  • 1 pie dough
  • 1 large egg plus 1 tablespoon water
US Customary - Metric

Instructions

  • Preheat oven to 375°F.
  • In a 9.5-inch cast-iron skillet, cook the beef until no longer pink. If excess grease has accumulated, then drain off with a spoon. Season the beef with ½ teaspoon salt and pepper, each. Transfer to a separate bowl and set aside.
  • In the same skillet, heat the oil over medium heat. Add the onions and sauté until soft, about 4 minutes. Add the garlic and thyme and cook for another 30 seconds, stirring often.
  • Add the carrots, celery, and potatoes, and cook for 10 minutes, stirring often.
  • Sprinkle the flour on and cook for another 1 minute.
  • Add the tomato paste, Worcestershire sauce, beef broth, and beer. Bring to a boil, then lower the heat and simmer for 10 minutes, stirring occasionally.
  • Stir in 1 teaspoon salt, ½ teaspoon pepper, and the peas. Stir in the ground beef. Stir until fully combined. Simmer another 5 minutes.
  • Meanwhile, roll out the dough on a lightly floured surface, to a 10-inch diameter. Remove the skillet from the heat. Carefully place the dough over the top of the skillet. Crimp the edges along the side of the pan.
  • In a small bowl, combine 1 egg with 1 tablespoon water. Stir with a fork to fully combine. Brush the egg wash over the top of the dough. Use a sharp knife to make 3 slits in the center portion of the dough.
  • Bake for 40 to 50 minutes, until the crust is golden and the inside is bubbly. Remove from the oven and let rest for 5 to 10 minutes.

Video

Notes

See the video near the top of the blog post for visual guidance. If you liked the video, please subscribe to our YouTube channel. 
Store-bough pie dough and frozen veggies can be substituted for this recipe. If using frozen, don't add them in until the end of the cooking process, along with the peas. 
If you don't have a cast-iron skillet, cook the filling in a separate pan, and then use a pie dish or 8"x8" baking dish to put together the pot pie.
If you don't want to cook with beer, increase the beef broth by 1 cup. 
Leftovers will keep covered in the fridge for up to 5 days. Reheat leftovers in the microwave or in a 300°F. oven.  You can also freeze the pot pie before baking for up to 2 months.  

Nutrition

Calories: 465kcal | Carbohydrates: 31g | Protein: 18g | Fat: 24g | Saturated Fat: 7g | Polyunsaturated Fat: 2g | Monounsaturated Fat: 8g | Trans Fat: 1g | Cholesterol: 85mg | Sodium: 993mg | Potassium: 630mg | Fiber: 3g | Sugar: 3g | Vitamin A: 5251IU | Vitamin C: 14mg | Calcium: 60mg | Iron: 3mg

Watermelon Cucumber Salad with Feta and Basil

May 29, 2022 by Kris Longwell 3 Comments

A large white oval platter filled with watermelon cucumber salad with feta and basil

This salad is quintessential summer goodness. Fresh and so delicious.

We love everything about summer. Especially eating outside. We love all kinds of summer side salads, especially ones with cucumbers. Our Cucumber and Dill Salad and Cucumber and Tomato Salad are two of our favorites. The addition of watermelon, basil, feta, pine nuts, and a bright vinaigrette make this salad our new all-time favorite.

A large white oval platter filled with watermelon cucumber salad with feta and basil

How To Make Watermelon Cucumber Salad with Feta and Basil

This salad relies on the freshness of the ingredients, which is why it is so amazing in the warm months when watermelon, cucumbers, and fresh basil are in peak season.

The simplicity of the salad makes it a snap to bring together.


NOTE: If you liked this video, please subscribe to our YouTube channel. Remember to click the little ‘bell’ icon so you’ll never miss a new video!

How to Cut up a Cucumber

To make the salad even more beautiful, we love to give the cucumbers a special treatment.

Use your peeler to cut away strips of the skin.

EXPERT TIP: Slice the cucumber down the middle, lengthwise, and then use a spoon to scoop out the seeds in the center. Then, simply cut each half into ¼-inch half-moon slices. If you do this in advance, toss the sliced cucumber with a little lemon juice to keep it fresh.

A person using a spoon to scoop out the seeds of a cucumber that has been cut in half lengthwise.

How To Cut up a Watermelon

  1. Pick up a seedless watermelon from your favorite market.
  2. Use a large knife to cut the ends off of the melon.
  3. Slice the melon in half.  Place one half on a cutting board, cut-side down. 
  4. Working a little at a time, cut away the rind and the white pith around the melon. 
  5. Cut the melon in the thirds, from top to bottom.  Your knife slicing through the melon parallel to the cutting board. 
  6. Now, cut downward, all the way to the cutting board. Make about 4 to 5 cuts.
  7. Turn the cutting board 90°, and cut downwards again, another 4 to 5 sices.
  8. You now have a cubed watermelon!

A person using a chef's knife to cut a seedless watermelon into cubes.

The Ingredients You Will Need

The dressing for this salad is simple, which is perfect. You’ll need

  • Fresh lemon juice
  • White wine vinegar
  • Extra-virgin olive oil
  • Kosher salt

For the salad, you’ll need:

  • Watermelon
  • Cucumber
  • Fresh basil
  • Toasted pine nuts
  • Feta cheese

EXPERT TIP: Add the vinaigrette ingredients into a jar with a lid. Shake it vigorously until emulsified and well combined. Pour over the salad components.

A person pouring a lemon vinaigrette into a glass bowl filled with watermelon, cucumber, feta cheese, basil, and pine nuts.

FAQs for Watermelon Cucumber Salad

Can this salad be made ahead? Sort of. Prep all of the components to the salad up to 12 hours in advance. Keep separate, covered, and refrigerated. We don’t recommend bringing it all together until just before serving. Purchasing pre-cut watermelon expedites preparation time significantly.
My seedless watermelon has some seeds, is this okay? This is completely normal. And don’t worry, watermelon seeds are completely edible and 100% safe to eat. You may want to discard any that are in abundance, simply for overall appearance’s sake.
What about dried basil? In a pinch, you could use dried basil, however, the great thing about this salad is its freshness of it. If you must use dried, then go with 1 tbsp. But, really try and go with fresh.
Can I use a different type of cheese? Absolutely! Other amazing options are goat cheese, mozzarella, fontina, cotija, blue, or gorgonzola. If you can, get a block of the cheese, and then crumble it with your hands. You’ll get creamier results than from a pre-crumbled variety.

A person tossing together chunks of watermelon with sliced cucumbers, feta cheese, basil, and pine nuts in a glass bowl.

Other Summertime Salads

These salads will make your next BBQ or gathering of friends and family a HUGE success.

Fresh Strawberry Spinach Salad with Avocado
Zesty Corn and Black Bean Salad
Best-Ever Potato Salad
Classic Pasta Salad
Avocado-Lime Slaw
Cajun Pasta Salad

Folks, these are all amazing. And this Watermelon Cucumber Salad with Basil and Feta is truly spectacular.

An overhead view of a large white oval platter filled with a watermelon cucumber salad with basil and feta.

This is one of those salads that is pure perfection when served along with your favorite BBQ fare.

Every bite is a celebration of everything we love about summer.

Bright, beautiful, and exploding with amazing flavor. Each ingredient compliments the other. Yum.

A large silver spoon lifting up a helping of watermelon cucumber salad with basil and feta.

Ready to make the best side salad in town? Go for it!

And when you do, be sure to take a photo of it, post it on Instagram, and tag @HowToFeedaLoon and hashtag #HowToFeedaLoon!

A large white oval platter filled with watermelon cucumber salad with feta and basil
Print Recipe
5 from 2 votes

Watermelon Cucumber Salad with Basil and Feta

This salad is the definition of summertime yummines. You can make it easier on yourself and purchase pre-cut watermelon from your favorite market. All the components can be prepped up to 12 hours in advance. Assemble just before serving for best results.
Prep Time20 minutes mins
Total Time20 minutes mins
Course: Appetizer or Salad
Cuisine: American
Servings: 8
Calories: 189kcal
Author: Kris Longwell

Ingredients

For the Vinaigrette

  • 2 tablespoon lemon juice from 1 lemon
  • 1 tablespoon white wine vinegar
  • 1 teaspoon Kosher salt
  • 2 tablespoon extra-virgin olive oil

For the Salad

  • 6 cups watermelon cubed
  • 2 cucumbers halved and sliced into ¼-inch pieces
  • ¼ cup basil fresh, roughly chopped
  • ½ cup pine nuts toasted
  • 6 oz feta cheese
  • coarse sea salt for finishing

Instructions

Make the Vinaigrette

  • Add all of the ingredients of the vinaigrette to a jar with a tight-fitting lid. Affix the lid and shake vigorously until fully combined, about 30 seconds to 1 minute. Set aside.

Assemble the Salad

  • In a large bowl, add the watermelon, cucumber, basil, pine nuts, and cheese. Leave some of the cheese and pines aside for topping the salad. Pour the vinaigrette over the top and then use two large wooden spoons to gently toss the salad until all components are coated.
  • Transfer to a serving platter or bowl and top with remaining cheese and pine nuts. Sprinkle on the coarse sea salt and serve at once.

Video

Notes

See the video near the top of the blog post for visual guidance. If you liked the video, please subscribe to our YouTube channel. Thank you!
You can prep all the ingredients and make the vinaigrette up to 12 hours in advance and keep covered in the fridge. For best results, toss the salad with the dressing within 30 minutes of serving. 
Substitutions: For the vinegar, you can easily go with red wine, apple cider, tarragon, or Champagne for wonderful results. For the cheese, you could use goat, blue, gorgonzola, fontina, or mozzarella. 
Leftovers will keep in the fridge for a day or two, but this salad is definitely best when served fresh. 

Nutrition

Calories: 189kcal | Carbohydrates: 12g | Protein: 5g | Fat: 9g | Saturated Fat: 5g | Polyunsaturated Fat: 1g | Monounsaturated Fat: 5g | Cholesterol: 19mg | Sodium: 536mg | Potassium: 300mg | Fiber: 1g | Sugar: 9g | Vitamin A: 835IU | Vitamin C: 13mg | Calcium: 127mg | Iron: 1mg

Baked Eggplant Rollatini with Ricotta

May 26, 2022 by The Loon Leave a Comment

A close up view of baked eggplant rollatini with cheese oozing out the sides of each roll all nestled in a bed of marinara sauce.

This dish is beautiful to serve and is equally as delicious in taste.

We just love solid Italian food and this is about as solid as they come. It has a similar taste as Eggplant Parmesan but is easier to prepare and also healthier. And our homemade marinara puts it over the top.  And it is surprisingly easy to prepare!

A close up view of baked eggplant rollatini with cheese oozing out the sides of each roll all nestled in a bed of marinara sauce.

How to Make Baked Eggplant Rollatini

Besides wonderful eggplant, the key ingredient in this dish is our homemade marinara sauce.

Fortunately, this sauce can be made several days in advance.

Assembly truly is a snap.


NOTE: If you liked this video, please subscribe to our YouTube channel. Remember to click the little ‘bell’ icon so you’ll never miss a new video. Thank you!

What Is The Difference Between Eggplant Rollatini and Eggplant Involtini?

This is easy to answer. They are the same dish.

In Italy, it’s called Eggplant Involtini (involtini di melanzane) and in Italian-American is Eggplant Rollatini.

How To Prepare the Eggplant

Before you assemble the dish, you are going to need to roast strips of eggplant.

Depending on the size of your eggplant, you’ll probably need two medium-sized eggplants to get anywhere from 8 to 12 rolls.

EXPERT TIP: ¼” to ½” sheets of eggplant that have been sliced lengthwise are best. You’ll want to try and make them all as uniform in size as possible. A mandolin makes this very easy, but a sharp knife and a steady hand will work just fine. Sprinkle the layers all over with salt and set in a colander for 20 to 30 minutes. This will soften the eggplant.

Line a large baking dish with parchment and then spray it with cooking spray. Roast in a 450°F oven for 10 minutes. Carefully flip, and then bake another 8 minutes.

Several strips of eggplant that have been roasted on a large baking sheet.

Helpful Tips for Eggplant Rollatini

The Marinara Sauce: If you don’t make the marinara sauce from scratch, then make sure you get good quality marinara. This really is key to authentic taste. Check with your local Italian eatery, they will often sell you their fresh marinara.
Selecting the Best Cheese: We recommend using whole milk ricotta. It adds depth of flavor and luxuriousness that is essential. For the mozzarella, get fresh, if at all possible. Simply chop it up and mix it in. Also, Parmiggiano-Reggiano is our favorite grated cheese, but regular Parmesan or Pecorino will work just fine, too.
Make-Ahead – The dish can be fully assembled up to 4 to 6 hours in advance of baking. Loosely cover and keep in the fridge until ready to bake.

For best results, ladle enough of the marinara sauce in the bottom of the pan to nestle each rollatini into. Use a spoon or ladle to add another layer of the marinara sauce down the center of the line of rollatini. You can arrange the rollatini any way you want in your baking dish. Just be sure to top with a layer of marinara.

A small ladle being used to spread homemade marinara over the top of roasted eggplant that is rolled with a cheese mixture in the middle of each one.

How To Serve

Assembling the rollatini is easy. Simply add a heaping tablespoon of the cheese mixture at one end of each roasted eggplant strip, and then roll them up like a hay bail!

You can serve them in individual serving dishes or pans, in a cast-iron skillet, or in a large baking dish.

Add a nice sprinkle of the grated Parmesan over the top layer of marinara just before baking.

EXPERT TIP: This dish can easily be doubled or tripled and served buffet-style in a chafing dish or large pan. It’s perfect for entertaining and is always a huge hit. 

A person sprinkling grated Parmesan cheese over the top of baked eggplant rollatini in an oval baking dish.

Other Classic Italian Appetizers To Try

If you’re looking for that perfect way to start an Italian feast, or assemble a group of delicious appetizers for a party, check these out:

Savory Italian Sausage-Stuffed Mushrooms
Classic Baked Clams
Spiendini alla Roma (Roasted Italian Bread with Mozzarella and Sauce)
Marinated Olives
Grissini (Italian Breadsticks)
Fried Calamari
Classic Caesar Salad
Italian Wedding Soup

But in the meantime, check out this amazing baked eggplant rollatini!

A spatula holding up a single eggplant rollatini with cheese oozing out the ends.

This is, hands down, one of most favorite Italian appetizers to serve.

It is fresh, authentic, cheesy, comforting, gorgeous, and utterly delicious.

Trust us on this one, you will not be disappointed with this dish!

A white plate filled with two baked eggplant rollatini's sitting in front a baking dish of the same.

Ready to make an amazing Italian appetizer? Go for it!

And don’t forget, when you make it, take a picture, post it to Instagram, and tag @HowToFeedaLoon and hashtag #HowToFeedaLoon!

A close up view of baked eggplant rollatini with cheese oozing out the sides of each roll all nestled in a bed of marinara sauce.
Print Recipe
No ratings yet

Baked Eggplant Rollatini with Ricotta

This dish is Italian through and through. Such the perfect start to an amazing Italian feast. Easy and so incredible! We encourage you to make the marinara! You can easily make it days in advance!
Prep Time15 minutes mins
Cook Time45 minutes mins
Making the Marinara45 minutes mins
Total Time1 hour hr 45 minutes mins
Course: Appetizer or Entree
Cuisine: American / Italian, Italian
Servings: 4 people
Calories: 170kcal
Author: Kris Longwell

Equipment

  • Baking dish or individual baking dishes
  • Baking sheet lined with parchments paper and sprayed with cooking oil

Ingredients

  • 3 cups marinara sauce
  • 2 large eggplant
  • Kosher salt and freshly ground black pepper
  • 1 cup whole-milk ricotta cheese
  • ¼ lb mozzarella cheese fresh, chopped
  • 4 tablespoon Parmesan cheese grated
  • 1 tablespoon flat-leaf parsley fresh, chopped, plus extra for garnish
  • Cooking spray
  • Olive oil for brushing

Instructions

  • Cut the stems away from the eggplant and slice off the ends. Use a mandolin on the widest setting to slice the eggplant, lengthwise, into slices between ¼ and ½-inch thick. Or, use a sharp knife and a steady hand to slice them as uniformly as possible.
  • Layer the slices in a colander set over a plate, sprinkling each layer with salt. Let stand for 30 minutes to drain.
  • Meanwhile, in a bowl, stir together the ricotta, mozzarella, 2 tablespoons Parmesan, parsley, ½ teaspoon salt, and a pinch of black pepper. Set aside.
  • Preheat your oven to 450°F.
  • Line a large baking sheet (or 2 smaller ones) with parchment paper. Spray the parchment paper with cooking spray.
  • Rinse the eggplant slices under cold running water to remove the salt. Pat each eggplant layer dry with paper towels.
  • Brush the slices on both sides with olive oil, and arrange them in a single layer on a baking sheet.
  • Bake the slices until lightly browned, about 10 minutes.
  • Turn the slices and continue to bake until browned on the second side and nice and tender, 8 minutes longer. Remove from the oven and immediately lower the oven temperature to 350°F.
  • Ladle marinara into the baking dish. Fill the bottom so there is enough to snuggle the rollatini into the sauce.
  • To make each eggplant roll, place a spoonful of the cheese mixture near one end of a slice and roll up the slice.
  • As each roll is formed, place it seam side down in the dish.
  • Spoon more sauce over the rolls.
  • Sprinkle with more grated Parmesan.
  • Bake the rolls until the sauce is bubbling hot and the rolls are heated through, about 20 to 25 minutes. Remove from the oven, garnish with chopped fresh parsley, and serve at once.

Video

Notes

See the video near the top of the blog post for visual guidance. If you liked the video, please subscribe to our YouTube channel. 
If you don't have time to make the marinara from scratch, no worries. Pick up good-quality marinara from the Italian section of your market, or, see if your favorite Italian restaurant will sell you some fresh marinara! You'll need about 1 pint. 
A mandolin ensures that your eggplant slices will be uniformly cut. This helps so they will roast evenly and be easier to roll up. However, a sharp knife and a slow and steady hand will do the trick, too. 
Leftovers (which there will likely be none of) will keep in the fridge for up to 3 days. Reheat in a 350°F oven or in the microwave.
The dish can be assembled 4 to 6 hours in advance of baking. Loosely cover and keep in the fridge until ready to bake. You can freeze it (unbaked) for up to 2 months, but for best results, prepare it fresh. 

Nutrition

Calories: 170kcal | Carbohydrates: 16g | Protein: 11g | Fat: 8g | Saturated Fat: 5g | Cholesterol: 26mg | Sodium: 1063mg | Potassium: 791mg | Fiber: 6g | Sugar: 11g | Vitamin A: 1004IU | Vitamin C: 15mg | Calcium: 233mg | Iron: 2mg

POST UPDATE: This recipe was originally published in August, 2014, but was updated with improved tweaks to the recipe with new tips and photography, and a fabulous new video in May, 2022!

Miso Black Cod (Nobu Copycat Recipe)

May 15, 2022 by Kris Longwell 23 Comments

Four miso black cod fillets on a white rectangular platter.

Every now and then, there comes a need to prepare a really special dinner.  This definitely fits the bill for extra-special.

Chef Nobu Matsuhisa is one of the greatest chefs of our time and his signature dish at his signature restaurant is about as good as they come. This is one of those “special occasion” dishes. You need to plan in advance. Get ready to pay a little extra for the fish. And allow time for marinating. But the result is truly magnificent.

Four miso black cod fillets on a white rectangular platter.

How To Make Miso Black Cod

The preparation of this dish is actually not challenging at all. The steps are quite simple.

You just need to give yourself time to allow the black cod to rest in the marinade.

NOTE: If you liked this video, please subscribe to our YouTube channel. Remember to click the little “bell” icon so you won’t ever miss a new video! Thank you!

The Ingredients You Will Need

First and foremost, you need to get your hands on good-quality black cod, or more commonly named: sablefish. Although it is prevalent in the Northern Pacific Ocean, it can be difficult to find at your local fish market in the U.S. and Canada. We order ours from Maine Lobster and we are always impressed with the quality.

Black cod (Sablefish) is not cheap. 4 fillets (with shipping) can you cost you nearly $100 bucks. Again, it’s one of those “special moments” items.

By the way, black cod is actually not part of the cod family that you see so often and is most commonly used for Classic Fish and Chips (check out our recipe!). Read more about its fascinating history here.

Black Cod Marinade Ingredients

  • Mirin (Japanese Sweet Cooking Wine)
  • Sake (Japanese Wine)
  • White Miso Paste (found at Asian food markets or online)
  • Granulated Sugar

And that’s it! Not a lot of ingredients, which means after you purchase the black cod, you’re almost done!

EXPERT TIP: After you prepare the marinade on the stove, you’ll need to allow it to completely cool before adding to the fish. We like to cut our fillets into 2 to 3 oz. strips and make they are well soaked in the marinade.

A person using tongs to flip black cod fillets in a dish filled with miso mariande.

How To Cook Black Cod

There are several methods for cooking this deeply flavorful fish. Here are the most popular common ones:

Seared then Baked: This is our preferred method. Searing locks in the gorgeous blackened glaze and then baking finishes off the cooking with ease.
Broiled: This is how Chef Nobu would prepare it, and most executive chef’s with top-notch broilers. For the home cook, it’s very easy to burn the fish. Remember, miso burns very easily. You can try it, but keep a very close on it!
Grilled: This is a method we have not tried because it is difficult to control the heat. Plus, we have seen that you don’t get that uniform blackened sear on the outside of the fish. But, you will get a hint of smokiness, which is always nice.

EXPERT TIP: We sear our black cod in our large non-stick skillet and then transfer it to a baking sheet lined with a silicone mat. However, you can also sear the fillets in a cast-iron skillet and then transfer them to the oven. This latter method is a little tricky because the fish has a tendency to stick to the pan. Be sure to lightly oil the skillet and very gently use a pair of tongs to slightly move the fillet to help prevent sticking.

Black cod fillets being seared in a cast-iron skillet

Commonly Asked Questions

Can I reduce the amount of marinating time? Absolutely. We like to marinate for 3 days, but you could reduce the time to 2 days or even 1 day. We’ve tried this and still get delicious results.
Are there other types of fish that I could substitute for the black cod? Yes. Salmon is a tasty substitute, as is swordfish. You won’t get the melt-in-your-mouth texture that you get with black cod, but you’ll still get wonderful results.
Is there any substitute for the white miso paste? Unfortunately, there isn’t. However, you can find many options at your local Asian food market, and it is really easy (and quick) to order online. We often get ours with same-day delivery.

EXPERT TIP: Although it’s not 100% necessary, we find we get the best results when we bake the fillets on a baking sheet lined with a silicone matt. It helps to keep the fish from sticking, and it also makes for a very easy clean-up.

A baked strip of black cod on a silicone mat on a baking pan.

What To Serve with Miso Black Cod

We absolutely love to serve Miso Black Cod as a spectacular appetizer before an incredible meal. All we garnish the fillets with is a thin radish slice and a sliver or two of chives.

As an entree, a simple side of sautéed spinach and perfectly steamed rice makes for the perfect feast.

If serving to guests, consider giving them the option of using chopsticks or a fork and knife.

A close-up view of two miso cod fillets that have been lightly charred on a white plate.

Other Amazing Seafood Dishes

We love seafood from almost every cuisine. Here are some other recipes you should check out:

  • Mediterranean Red Snapper
  • Sautéed Wild Sea Bass
  • Blackened Salmon
  • Spanish-Style Garlic Shrimp (Gambas al Ajillo)
  • Baked Tilapia with Lemon Garlic Sauce
  • Peppercorn-Seared Tuna Steaks with Strawberry Vinaigrette

In the meantime, folks, if you’re looking for a true 5-star dish that you can make at home, this is the one for you. Just take a look at this amazing fish.

A close-up view of a pair of chop stick flaking a piece of black cod that has been fully cooked

Ready to make a dish that could be served in a world-famous restaurant? Go for it!

And when you do, be sure to take a photo of it, post it on Instagram, and tag @HowToFeedaLoon and hashtag #HowToFeedaLoon!

A close-up view of two miso cod fillets that have been lightly charred on a white plate.
Print Recipe
5 from 10 votes

Miso Black Cod (Nobu Copycat Recipe)

Miso Black Cod is an upscale dish that is just like you get from the world-famous restaurant by Chef Nobu. Plan ahead for this dish. The preparation is simple, but you want to give the fish time to rest in the marinade for 2 to 3 days, if possible. See the blog post for where and how to order black cod and white miso paste.
Prep Time20 minutes mins
Cook Time16 minutes mins
Chilling in Marinade3 days d
Total Time3 days d 36 minutes mins
Course: Appetizer or Entree
Cuisine: Japanese
Servings: 4
Calories: 111kcal
Author: Kris Longwell

Equipment

  • 1 skillet preferably non-stick, or heat-proof
  • 1 Baking sheet preferably with silicone matt

Ingredients

  • 2 tablespoon salt
  • ¼ cup sake plus 2 extra tablespoon for washing off salt
  • ¼ cup mirin
  • ¼ cup white miso paste
  • 3 tablespoon sugar
  • 4 2½-oz. black cod fillets

Instructions

  • If desired, cut the fillets into 1 to 2-inch strips, about 2 to 3 oz. each.
  • Sprinkle salt all over the fillets and allow them to rest in the refrigerator for 30 minutes to 1 hour.
  • Remove the fillets and remove the salt by adding about 2 tablespoon of sake all over them, using your hands to help get the salt off.
  • Meanwhile, place the mirin and sake (¼ cup) in a small saucepan over high heat and bring to a boil. Lower the heat and then whisk in the white miso paste. Bring to a boil again, and then turn off the heat. Stir in the sugar until completely dissolved. Transfer to a heatproof bowl and let sit until it cools completely to room temperature.
  • Place the fillets in a dish and pour the cooled marinade over them. Turn the fillets over a couple of times and use a spoon to help fully coat them. Turn them skin side up in the marinade and cover tightly with plastic wrap. Place in the refrigerator for 2 to 3 days.
  • Preheat your oven to 400°F.
  • Use a paper towel to rub off most of the marinade, however, do not rinse them.
  • Heat a skillet (preferably non-stick) over medium-high heat. Add a small amount of olive oil to the skillet.
  • Place the fillets, skin-side up, in the hot skillet. Sear them for 3 minutes until browned on the bottom, and then flip them and sear them for another 2 to 3 minutes.
  • Use a spatula to carefully transfer the fillets to a baking dish, preferably lined with a silicone matt. Place them in the oven until nicely browned, about 8 to 10 minutes. Remove from the oven and serve at once.

Video

Notes

See the video near the top of the blog post for visual guidance. If you liked the video, please subscribe to our YouTube channel.
Although we recommend marinating the black cod for 3 days, you will still get delicious results with 2 days, or even just 1 day. It is important to make sure your black cod (sablefish) is very, very fresh. See the blog post for who we order ours from. 
Black cod is extremely buttery and flakes easily when cooked. You can substitute salmon or your favorite fish fillet in this recipe, and although it will still be yummy, it won't be the same as black cod! 

Nutrition

Calories: 111kcal | Carbohydrates: 20g | Protein: 2g | Fat: 4g | Saturated Fat: 1g | Polyunsaturated Fat: 1g | Monounsaturated Fat: 1g | Cholesterol: 1mg | Sodium: 4246mg | Potassium: 43mg | Fiber: 1g | Sugar: 14g | Vitamin A: 15IU | Calcium: 13mg | Iron: 1mg

Old Fashioned Peach Cobbler with Easy Crust

May 11, 2022 by Kris Longwell 7 Comments

Two white bowls filled with peach cobbler and topped with scoops of vanilla ice cream with a pint of ice cream in the background.

There are some desserts that are best when kept simple. This is one of those, without a doubt.

You can use fresh peaches or frozen peaches for this classic dessert. Making the easy homemade pie dough for the crust is what really makes this dish so special. But, in a pinch, store-bought dough will work.

How To Make Old Fashioned Peach Cobbler

This is one of those desserts that is not difficult to make at all.

Whether you go with fresh peaches or frozen peaches, you will find it very easy to put together.


NOTE: If you liked this video, please subscribe to our YouTube channel. Remember to click the little ‘bell’ icon so you’ll never miss a new video.

The Best Peaches for Cobbler

There are many types of peaches throughout the world.

In Texas, in late May, it’s easy to get your hands on freestone peaches which are delicious, and easy to cut away from the pit. This makes them perfect for baking. In fact, we buy them in bulk, cut them up, and then sprinkle on “fruit fresh” which keeps them fresh when we freeze them.

It also softens the peaches. If you can’t get your hands on fresh peaches, then go with top-notch frozen peaches. In a pinch, you could use drained canned peaches, but we recommend the frozen variety available in the frozen fruit section of most food markets. 

EXPERT TIP: If using fresh peaches, you’ll want to start with about 6 to 8 cups. Sprinkle on the sugar and flour and then mix. This will naturally soften the peaches and reduce the volume to approximately 5 to 6 cups. This recipe works with anywhere from 5 to 8 cups.

Cook the peaches with the other filling ingredients in a Dutch oven or large skillet until simmering. Then cook, stirring often, for only about 15 minutes.

A large blue oval Dutch oven filled with peach cobbler filling and a wooden spoon stuck in the peaches.

How To Make Easy Homemade Pie Crust

As mentioned, you can purchase decent pie dough from many well-stocked supermarkets. But we strongly believe making it from scratch puts this cobbler over the top, and you will be amazed at how easy it is.

We use our food processor to make the dough even easier. If you don’t have a food processor, you can knead the dough on a lightly floured surface until you reach a smooth and elastic dough.

Instructions for Making the Dough

  1. Add 1¼ all-purpose flour and ¼ teaspoon of salt to your food processor. Pulse to combine.
  2. Add 6 tablespoon of very cold butter cut into small cubes. Also, add 2 tablespoon of cold shortening that has been cubed.
  3. Pulse until butter resembles small peas (in size).
  4. Continue pulsing while adding ice-cold water 1 tablespoon at a time until a ball forms, usually after about 4 to 5 tbsp. (Don’t add too much water!).
  5. Remove from the food processor, form into a disc with your hands (don’t handle too much), wrap in plastic wrap, and place in the refrigerator until ready to use. The dough can also be frozen for up to 1 month.

EXPERT TIP: You’ll need two discs of dough to make this old-fashioned peach cobbler. Roll the dough out to a rough 10″x10″ square. Place on top of half of the peaches that you have placed in your baking dish.

A person using their hands to layer a square piece of pie dough into a square dish that is layered with peach cobbler filling.

How To Make a Pie Crust Lattice

After you’ve baked the first half of the cobble with the whole piece of dough on top, it’s time to add the rest of the filling and then create a lattice top.

Step By Step Instructions

    1. On a lightly floured surface, roll the dough roughly to a 10″x10″ square.
    2. Use a fluted pie dough cutter, a pizza cutter, or a sharp knife to cut the dough into 8 strips.
    3. Begin to weave the strips of dough by adding one strip of the dough perpendicular to you (we’ll call this a vertical strip) closest to the right side of the dish.
    4. Next, add the 3rd vertical strip in the same direction as the 1st strip (leaving room for the 2nd and 4th vertical strips, respectively).
    5. Now, lay your 1st horizontal strip (closest to you in the dish) over both of the vertical strips.
    6. Lay your 2nd and 4th vertical strips over the 1st horizontal.
    7. Pull back the 1st and 3rd vertical so it gently lays over the side of the dish.
    8. Place the 2nd horizontal strip over the 2nd and 4th vertical strips. Return the 1st and 3rd vertical strips over the 2nd horizontal.
    9. Continue this process until the lattice is complete.
    10. Watch the video for visual guidance.

We use our fluted bakery cutter for that classic look, but a pizza cutter or even a sharp knife will work, too.

A person's hand layering cut pieces of pie dough in a lattice formation on top of a dish of old fashioned peach cobbler.

Tips for Perfect Old Fashioned Peach Cobbler with Easy Crust

Can the cobbler be ahead of time? Absolutely! You can prepare the entire dish before baking up to 24 hours in advance. Bake the first portion, top with the rest of the cobbler and lattice dough top, and then keep the cobbler covered in the fridge until ready to bake. Let bake until the top is golden and the filling is bubbly.
What do I do with leftover dough? Cut into little pieces and stud the cobble throughout with baking. You’ll get even more crunchy dough with every bite!
Which are better, canned peaches or frozen? Fresh is best. Frozen is perfectly fine. Canned peaches are great for consuming right out of the can, but we find the taste is better with frozen.

EXPERT TIP: Brush a little egg wash (1 egg mixed with 1 tablespoon water) all over the uncooked dough lattice. Generously sprinkle turbinado sugar all over the lattice. It adds an amazing taste and texture to the peach cobbler.

An overhead view of a baked peach cobbler that is topped with a lattice crust and topped with turbinado sugar.

How To Serve

This cobbler is wonderful served hot or warm. It’s even yummy when at room temperature, but warm is best.

Allow the cobble to rest for 15 to 20 minutes before serving.

And top-notch vanilla ice cream is a must. There is something magical about how it starts to melt and mingle with the ooey-gooey richness of the sweet peach filling. Delicious.

A side view of a white dessert bowl filled with old fashioned peach cobble with crust and two scoops of vanilla ice cream on top.

Other Peach Dishes to Try

  • Peach Crisp
  • Grilled Peaches with Rum Caramel Sauce
  • Caprese Salad with Grilled Peaches (Savory)
  • Pan-Fried Pork Cutlets and Peaches (Savory)
  • Braised Chicken and Peaches (Savory)

Other Classic Old-Fashioned Desserts

  • Easy Blueberry Cobbler
  • Classic Apple Pie
  • Cherry Pie
  • Southern Cheese Pie
  • Lemon Meringue Pie
  • Banana Pudding Trifle

In the meantime, doesn’t this old-fashioned peach cobbler recipe just look peachy good? Trust us: It is amazing!

A person holding up a large spoonful of baked peach cobbler topped with vanilla ice cream.

Ready to make the best cobbler this side of Georgia? Go for it!

And when you do, be sure to take a photo of it, post it on Instagram, and tag @HowToFeedaLoon and hashtag #HowToFeedaLoon!

An overhead view of a white circular dessert bowl filled with old-fashioned peach cobbler and topped with three scoops of vanilla ice cream.
Print Recipe
5 from 2 votes

Old Fashioned Peach Cobbler with Easy Crust

Old Fashioned Peach Cobbler is nothing short of dessert perfection. A few simple ingredients transform themselves into one of the most delicious dishes of all time. The easy homemade pie dough truly is easy to make and puts it all over the top. Don't forget the vanilla ice cream for serving!
Prep Time10 minutes mins
Cook Time40 minutes mins
Dough making15 minutes mins
Total Time1 hour hr 5 minutes mins
Course: Dessert
Cuisine: American
Servings: 8
Calories: 428kcal
Author: Kris Longwell

Equipment

  • 10"x10" baking dish

Ingredients

  • 6 cups peaches softened, fresh or frozen (thawed), see NOTES
  • 2 cups granulated sugar
  • 3 tablespoon all-purpose flour
  • ½ teaspoon nutmeg ground
  • 1 teaspoon vanilla extract
  • ⅓ cup unsalted butter
  • 2 pie doughs each for a 9-inch pan
  • 1 large egg
  • ¼ cup turbinado sugar
  • vanilla ice cream for serving

Instructions

Do ahead

  • Make the pie dough (twice) and wrap it in plastic wrap in keep them in the refrigerator until ready to use (up to 2 days, or freeze up to 1 month).

Make the Cobbler

  • If using fresh peaches, sprinkle the sugar, flour, and nutmeg over the peaches and stir to coat. Let rest for about 30 minutes, until softened. If using frozen peaches, proceed to the next step.
  • Preheat your oven to 475°F.
  • Add the peaches (with the sugar, flour, and nutmeg) into a large skillet over medium-high heat. Bring to a boil and then let simmer for 15 minutes over low heat. Remove from heat and stir in the butter and vanilla extract. Stir until the butter has completely melted.
  • On a lightly floured surface, roll out the first pie dough to a 10"x10" square. Use a pastry cutter, pizza cutter, or knife to form straight edges. Save the excess dough.
  • In a lightly greased 10"x10" baking dish, add half of the peach mixture. Carefully place the square pie dough over the top of the dough. Bake for 12 minutes until the dough is lightly browned.
  • Meanwhile, roll out the second pie dough to a 10"x10" square. Cut into 8 strips.
  • Remove the dish from the oven and ladle the remaining peach filling over the center crust. Arrange the strips of dough into a lattice design over the top of the peaches (see blog post and/or video for details on how to do this). Pinch pieces of the leftover dough and insert them all throughout the top layer of filling.
  • Make an egg wash by combining the egg with 1 tablespoon of water in a small bowl. Brush the egg wash all over the strips of dough. Sprinkle the turbinado over the dough.
  • Bake for another 15 to 18 minutes, until the top is nicely browned and the filling is bubbly. Let rest for 5 to 15 minutes before serving. Serve with vanilla ice cream, if desired.

Video

Notes

See the video near the top of the blog post for visual guidance. If you liked the video, please subscribe to our YouTube channel. 
NOTE regarding peaches. If you are using freshly cut peaches, you'll need to start with about 8 cups. Toss them with the sugar, flour, and nutmeg, and then let them sit for about 30 minutes to an hour. They will soften and reduce to about 6 cups.  This recipe is very forgiving with the volume of peaches you start with. As long as you have anywhere between 5 and 7 cups of softened peaches, you'll be in good shape.  There is no need to peel the peaches, but if you have peeled peaches, that is perfectly fine, too. 
Store-bought pie dough is just fine and will save you some time. Remember, you need two pie doughs for this recipe. But, our food-processor method is so easy and puts this dessert over-the-top in deliciousness! 
This cobbler is best served fresh but can be reheated over the next day for about 15 to 20 minutes in a 350°F oven, or even easier, nuke a bowlful in the microwave.
The cobbler can be made in advance: Follow the recipe through the baking of the first portion of the cobbler. Place the second half of the peach filling over the baked bottom layer (with pie square in place), and then arrange the lattice design of dough on top. Gently cover with plastic wrap and keep in the fridge for up to 1 day. Let sit out for 1 hour before baking. Apply the egg wash and turbinado sugar and then bake for another 18 minutes, until golden brown and bubbly all over. 

Nutrition

Calories: 428kcal | Carbohydrates: 70g | Protein: 2g | Fat: 19g | Saturated Fat: 5g | Polyunsaturated Fat: 1g | Monounsaturated Fat: 2g | Trans Fat: 1g | Cholesterol: 44mg | Sodium: 26mg | Potassium: 159mg | Fiber: 2g | Sugar: 66g | Vitamin A: 647IU | Vitamin C: 5mg | Calcium: 12mg | Iron: 1mg

Easy Grilled Chicken Wings with Buffalo Sauce

May 8, 2022 by Kris Longwell 7 Comments

A pile of grilled chicken wings with buffalo sauce resting on a wooden board next to a jar of blue cheese dressing and cut strips of celery.

These easy grilled chicken wings with buffalo sauce are smoky, spicy, and downright irresistible. Perfectly charred on the grill and tossed in tangy buffalo sauce, they’re a crowd‑pleasing favorite for game day or backyard cookouts. And the best part? A homemade blue cheese dressing that takes every bite over the top.

A pile of grilled chicken wings with buffalo sauce resting on a wooden board next to a jar of blue cheese dressing and cut strips of celery.
[feast_advanced_jump_to]

⭐️ The Ingredients

Made with simple ingredients like chicken wings, hot sauce, butter, and a few pantry spices—plus a creamy homemade blue cheese dressing—this recipe is big on flavor without being fussy. Find ingredient notes (including substitutions and variations) below.

An arrangement of ingredients for grilled chicken wings with buffalo sauce on a wooden background including chicken wings, seasonings, butter, hot sauce, celery, and blue cheese dressing.

👉 Key Ingredients Notes and Substitutions

  • Chicken Wings: Use whole wings or pre‑cut drumettes and flats. Boneless chicken bites can also work if you prefer.
  • Hot Sauce: Classic buffalo flavor comes from a vinegar‑based hot sauce like Frank’s RedHot. Substitute with your favorite hot sauce or even sriracha for a different kick.
  • Butter: Balances the heat and gives the sauce a silky texture. Swap with ghee or plant‑based butter for a dairy‑free option.
  • Garlic Powder & Paprika: Add depth and smokiness. Onion powder or chili powder can be used if you want to mix up the flavor.
  • Blue Cheese Dressing: Homemade is best for bold flavor, but store‑bought works in a pinch. Ranch dressing can be swapped in if you’re not a blue cheese fan.
  • Celery & Carrot Sticks (optional): Traditional sides that add crunch and freshness—cucumber sticks also make a great substitute.

See the recipe card (with video) below for a full list of ingredients and measurements.

☑️ Tips & Tricks for Easy Grilled Chicken Wings with Buffalo Sauce

  • Crispy on the grill: Pat the wings dry with paper towels before seasoning—this helps the skin crisp up instead of steaming.
  • Indirect heat first: Start the wings over indirect heat to cook them through, then finish over direct heat for that perfect char.
  • Control the heat: Adjust the buffalo sauce by adding more butter for a milder flavor or an extra splash of hot sauce for fiery wings.
  • Toss, don’t soak: Coat wings in the buffalo sauce just before serving to keep the skin crisp.
  • Make ahead: The blue cheese dressing tastes even better if made a day in advance, giving the flavors time to meld.

Expert Tip

For evenly cooked wings with juicy meat and crispy skin, grill with the lid closed—this traps the heat like an oven, ensuring the wings cook through without burning.

👩🏼‍🍳 How To Make Grilled Chicken Wings with Buffalo Sauce

A person using a small whisk to combine salt, chili powder, paprika, and garlic powder in a small glass bowl on a cutting board.
  1. Step 1: In a small bowl, mix together the rub ingredients.
A person transferring a mixture of seasonings over uncooked chicken wings in a large glass bowl.
  1. Step 2: Toss the wings with the rub.
Seasoned chicken wings and drumettes being grilled on the grate of a gas grill.
  1. Step 3: Grill the wings over indirect heat, then transfer to direct heat.
A person using a wooden spatula to stir melted butter in a saucepan filled with simmering hot sauce and a sprinkle of garlic powder.
  1. Step 4: Heat the hot sauce, butter, pepper, and garlic powder in a saucepan.
A person pouring buffalo wings sauce from a skillet into a glass bowl filled with grilled chicken wings.
  1. Step 5: Take the wings off the grill, place them in a bowl, and add the wing sauce.
A person using his fingers to plunge a grilled chicken wing with buffalo sauce into a small jar filled with blue cheese dressing.
  1. Step 6: Toss and serve at once with homemade blue cheese dressing. 

Expert Tip

For maximum flavor, let the seasoned wings chill—covered—in the fridge for at least an hour, or even overnight, so the rub really sinks in. Short on time? You can skip the rest and head straight to the grill, and they’ll still be delicious.

🔥 Other Methods for Cooking Chicken Wings

  • Air Fryer: Season the wings as directed, then cook at 380°F for about 20 minutes until golden and crispy. Toss in buffalo sauce and serve hot.
  • Deep Fryer: After seasoning, dredge the wings lightly in flour. Fry in 350°F oil for 15–20 minutes until crispy and cooked through, then coat with sauce.
  • Oven‑Baked: Season the wings, arrange them on a wire rack set over a baking sheet, and bake at 400°F for 40–45 minutes, flipping halfway, until crispy. Toss with sauce and enjoy immediately.
  • Smoker + Grill: For a touch of smoke, add a small handful of hickory chips and smoke the wings for about 5 minutes. Finish them on the grill for crispiness, then toss them in buffalo sauce.

🙋🏽‍♂️ Frequently Asked Questions

Can I make Easy Grilled Chicken Wings with Buffalo Sauce ahead of time?

You can prep the wings and even make the blue cheese dressing in advance, but for the crispiest results, grill the wings just before serving.

What’s the best way to reheat Easy Grilled Chicken Wings with Buffalo Sauce?

Reheat in the oven or air fryer to bring back the crispiness—avoid the microwave, which makes the skin soggy.

Can I make Easy Grilled Chicken Wings with Buffalo Sauce without a grill?

Yes! You can bake, air fry, or even deep fry the wings and then toss them in the buffalo sauce. See the above section for more details.

How spicy are Easy Grilled Chicken Wings with Buffalo Sauce?

They’re medium‑spicy, but you can tone down the heat by adding more butter to the sauce or crank it up with extra hot sauce.

A person using his fingers to plunge a grilled chicken wing with buffalo sauce into a small jar filled with blue cheese dressing.

😋 Other Chicken Wings Recipes To Try

  • A close up view of a blue platter holding teriyaki chicken wings with sesame seeds sprinkled over the top.
    Teriyaki Chicken Wings
  • An overhead view of a serving of garlic Parmesan wings on two pieces of brown paper with two small jars of blue cheese dressing nearby.
    Garlic Parmesan Chicken Wings
  • An overhead view of a pile of grilled curry chicken wings topped with chopped cilantro on a white rectangular platter.
    Grilled Curry Chicken Wings
  • A large wooden cutting board with a bunch of grilled bourbon maple chicken wings sitting next to a small bowl of sauce in front of a grey napkin.
    Grilled Bourbon Maple Wings

Ready to make the best wings in town? Go for it!

And when you do, be sure to take a photo of them, post it on Instagram, and tag @HowToFeedaLoon and hashtag #HowToFeedaLoon!

An overhead view of wings that are seasoned and grilled piled on a cutting board next to a jar of blue cheese dressing.
Print Recipe
5 from 4 votes

Easy Grilled Chicken Wings With Buffalo Sauce

Grilled Chicken Wings with Buffalo Sauce are incredibly delicious. Crispy on the outside and deeply flavorful with every bite. The homemade blue cheese dressing puts them over the top. The BEST!
Prep Time15 minutes mins
Cook Time20 minutes mins
Chilling1 hour hr
Total Time1 hour hr 35 minutes mins
Course: Appetizer or Entree
Cuisine: American
Servings: 8
Calories: 207kcal
Author: Kris Longwell

Equipment

  • Gas, charcoal, or electric grill with lid

Ingredients

For the Rub

  • 1 teaspoon Kosher salt
  • 1 teaspoon black pepper
  • ½ teaspoon garlic powder
  • ½ teaspoon onion powder
  • ¼ teaspoon smoked paprika
  • ¼ teaspoon chili powder

For the Wings

  • 2 lbs chicken wings flats and drumettes
  • ⅓ cup hot sauce i.e., Frank's
  • ⅓ cup unsalted butter
  • ¼ teaspoon black pepper
  • ¼ teaspoon garlic powder
  • Homemade blue cheese dressing for serving
  • cut celery for serving

Instructions

  • In a small bowl, mix together the rub ingredients and set aside.
    1 teaspoon Kosher salt, 1 teaspoon black pepper, ½ teaspoon garlic powder, ½ teaspoon onion powder, ¼ teaspoon smoked paprika, ¼ teaspoon chili powder
  • Add the chicken wings to a large bowl and stir in the rub. Toss with two large wooden spoons until the wings are evenly coated. Cover with plastic wrap and let sit in the fridge while you make the blue cheese dressing.
    2 lbs chicken wings
  • Set up your grill for 2-zone grilling (one side direct heat and the other side no heat).
  • Place the wings on the indirect heat side of the grill and cover the grill. Let cook for 7 to 10 minutes, flipping once.
  • Transfer the wings to the direct heat side of the grill and cook until lightly charred and fully cooked, about 8 to 10 minutes.
  • Meanwhile, heat the hot sauce, butter, pepper, and garlic powder in a medium-sized saucepan over medium heat. Once the butter has melted, stir occasionally and let it simmer on low for 5 minutes.
    ⅓ cup hot sauce, ⅓ cup unsalted butter, ¼ teaspoon black pepper, ¼ teaspoon garlic powder
  • Take the wings off the grill and place them in a large bowl. Pour the sauce over them and toss with two wooden spoons until fully coated.
  • Serve at once with cut celery sticks and the homemade blue cheese dressing on the side.
    Homemade blue cheese dressing, cut celery

Video

Notes

NOTE: Watch the video near the top of the recipe for visual guidance.
The seasoned wings can sit in the fridge (covered) for up to 12 hours. The sauce can be made 1 to 2 hours in advance. Reheat the sauce over medium heat until simmering.
Frank’s is a fairly mild hot sauce. If you want your wings spicier, then add 1 teaspoon cayenne to the rub. 
These wings are definitely best served fresh off the grill. See the blog post for additional cooking methods.
Leftover wings will keep in the fridge for up to 5 days. Reheat in the oven at 225°F until heated through. Or, microwave on HIGH for 15 to 30 seconds. Again, these wings are best when they are fresh off the grill and immediately tossed with the sauce. 

Nutrition

Calories: 207kcal | Carbohydrates: 1g | Protein: 11g | Fat: 12g | Saturated Fat: 6g | Polyunsaturated Fat: 2g | Monounsaturated Fat: 4g | Trans Fat: 1g | Cholesterol: 67mg | Sodium: 602mg | Potassium: 124mg | Fiber: 1g | Sugar: 1g | Vitamin A: 394IU | Vitamin C: 8mg | Calcium: 13mg | Iron: 1mg

Smothered Beef Burritos with Chili Con Carne

May 4, 2022 by Kris Longwell 8 Comments

A blue plate filled with a smothered beef burrito with chili con carne sitting next to a salad topped with diced tomatoes.

This dish is an instant family favorite and all of the components can be made well in advance.

Talk about the perfect TexMex (or CalMex) dinner. Whip up a batch of homemade refried beans for the most authentic burrito of all time. Turn it into a fun weekend food project and make the flour tortillas from scratch.

A blue plate filled with a smothered beef burrito with chili con carne sitting next to a salad topped with diced tomatoes.

How To Make Smothered Beef Burritos

We’re going to show you how to make the main components of this dish from scratch, but, we won’t tell anyone if you cheat and use a taco seasoning packet, or purchase your refried beans from your favorite Mexican joint.

But, it’s so much fun to make as much from scratch as possible! Get the kids involved!


NOTE: If you liked this video, please subscribe to our YouTube channel. Remember to click the little ‘bell’ icon so you’ll never miss a new video. Thank you so much!

Tips For Making Restaurant-Quality Taco Meat

If you want your seasoned ground beef mixture to be similar to what you get at top-notch TexMex or Mexican, you don’t want it to dry out. You may see this meat mixture referred to as beef picadillo.

The addition of chopped fresh tomatoes and beer will keep the meat super moist. The tomatoes will cook down and not be chunky at all. However, if you are one of those people who hate any kind of tomato chunks in their dish, then you can omit them completely, or add ½ cup of tomato sauce.

EXPERT TIP: Keep an eye on the meat mixture as it simmers. Keep an extra bottle of beer handy and add more to the mixture in order to keep it nice and moist. Beef broth can be substituted for beer if you don’t want to cook with any type of alcohol.

A wooden spoon inserted into a skillet filled with cooked taco meat with tomatoes.

How To Make Chili Con Carne Sauce

We love to smother our burritos in homemade chili con carne sauce, but another delicious topping is our TexMex queso. If using queso, no need to add shredded cheddar on top.

Simmering ground beef in water that has been puréed with onion and garlic will produce a velvet-like meat texture. Be sure to simmer until almost all of the water.

To achieve that classic chili con carne taste, you’ll want to make an easy chili sauce. Pick up a bag of dried guajillo peppers and dried chile de arbol peppers from your well-stocked supermarket, Hispanic market, or order them online. Remove the seeds (as much as you can) and then place them in boiling water. Purée in a blender with garlic, salt, chicken bouillon, and reserved pepper broth. That’s all there is to it!

The chili sauce will keep in a jar in the fridge for up to 2 weeks. We use it all the time, over scrambled eggs, on baked potatoes, or stirred into anything Mexican!

The Ingredients You Will Need for Chili Con Carne Sauce

  • Prepared ground beef (using the onion/garlic water technique)
  • Blonde roux (made with vegetable oil and all-purpose flour)
  • Chili sauce (homemade is easy and so good)
  • Beef bouillon (2 cubes)
  • Chili powder (go with quality!)
  • Ground cumin
  • Dried oregano (preferably Mexican)
  • Salt and pepper

This can be made up to 3 days in advance and stored covered in the fridge and also freezes beautifully for up to 2 months.

A person lifting a large wooden spoon out of a stainless steel skillet filled with homemade chili con carne sauce.

How To Roll a Burrito

Rolling up your stuffed burrito is a snap. Here’s how you do it:

  1. Warm large flour tortillas in the microwave wrapped in paper towels sprinkled with a little tap water.
  2. Place a warmed tortilla on a cutting board and spread about ¼ cup of refried beans on one half of the tortilla, leaving about ½ to an inch of untouched tortilla at each end.
  3. Add a handful of shredded cheddar over the beans.
  4. Spoon a ½ cup of the meat mixture of the beans.
  5. Fold in the edges of the tortillas and start to carefully roll the tortilla over the fillings.
  6. Continue rolling, using your fingers to tuck in the sides as you roll.
  7. Place the rolled burrito on the plate, seam side down.

A person using a spoon to spread refried beans on one half of a flour tortilla, and then adding a layer of shredded cheddar cheese, and then topping that with taco meat.

Tips for Making Smothered Beef Burritos

Do ahead – This dish is truly at its best when everything is made from scratch. Do yourself a favor and start days in advance. We make the refried beans one day, then chili con carne the next day, and then the taco meat either the next day or the day of serving.
Shortcuts – You will still have delicious burritos if you use your favorite taco seasoning packet with cooked ground beef. For the beans, we love to order a pint from our local Mexican or TexMex restaurant (this is so much better canned).
Other fillings or toppings: In addition to beef, we love making this with chicken tinga. For a Cal-Mex version, include Mexican rice along with guacamole. As mentioned, instead of chili con carne, homemade queso is also wonderful for smothering the burritos.

IMPORTANT: Don’t skimp when smothering the burritos! Make sure to cover the entire burrito. We use a ladle to help us do this important step.

A person using a ladle to pour chili con carne sauce all over a burrito on a blue dinner plate.

How To Serve Smothered Beef Burritos

These burritos are practically a meal all by themselves.  After you’ve smothered each burrito with the chili con carne sauce, top with a generous handful of shredded cheddar cheese.  Modern dinnerware can handle brief heat from the oven without any breakage. Place each plate on the middle rack and turn your broiler on HIGH. It will only take a matter of seconds (probably about 15 to 20) before the cheese is nice and melty. 

However, they are wonderful with a side of Mexican rice, or cilantro lime rice, and garnished with fresh pico de gallo, salsa, and homemade guacamole.

And of course, making a batch of our Mama’s Margarita’s round out the perfect meal.

FUN TIP: One of the most enjoyable dinner parties we ever had was when we had a smothered burritos party. Have all of the components (including beef and chicken) and chili con carne and queso in warmed pans or in small chaffing dishes, and have all the fixings placed out so guests can make their own burrito. So much fun!

A close-up view of smothered beef burritos covered in chili con carne sauce and melted cheddar cheese.

Other Classic Mexican Dishes

Easy Chicken Tinga Tacos
Chicken Flautas
Carnitas Tacos
Mahi Mahi Tacos
Baja Tacos
Beef Tostadas
Classic Cheese Enchiladas with Ancho Sauce
Chicken Enchiladas with Verde Sauce

But in the meantime, just look at this gem! You and your family will flip for this amazing smothered beef burritos recipe!

A smothered beef burrito that has been cut open with the meat and bean mixture spilling out.

Ready to make the best burrito this side of the Alamo? Go for it!

And when you do, be sure to take a photo of it, post it on Instagram, and tag @HowToFeedaLoon and hashtag #HowToFeedaLoon!

A blue plate filled with a smothered beef burrito with chili con carne sitting next to a salad topped with diced tomatoes.
Print Recipe
4.60 from 5 votes

Smothered Beef Burritos with Chili Con Carne

Smothered Beef Burritos with Chili Con Carne is better than anything you will ever order in a restaurant. If you can make it all from scratch, it's just so good. You can do it all in one day, no problem, just carve out a few hours to do it. Or, do like we do and make the various components in advance and then quickly reheat before serving. A burrito party is about as fun of a dinner party as you'll ever have!
Prep Time20 minutes mins
Cook Time2 hours hrs
Total Time2 hours hrs 20 minutes mins
Course: Entree
Cuisine: Cal-Tex, Mexican / TexMex, Midwest
Servings: 4
Calories: 875kcal
Author: Kris Longwell

Equipment

  • 1 12-inch skillet
  • 1 Blender

Ingredients

For the Chili Sauce (Do Ahead)

  • 16 guajillo peppers dried, stemmed, and most of the seeds removed
  • 16 arbol peppers dried, try and remove as many seeds as you can
  • Water for boiling
  • 4 cloves garlic
  • 1 chicken bouillon about 1 tsp
  • 2 teaspoon Kosher salt

For the Meat Filling

  • 2 tablespoon olive oil
  • 1 cup onion chopped
  • 1 jalapeno seeded and finely chopped
  • 2 cloves garlic minced
  • 1 lb ground beef
  • 2 Roma tomatoes chopped
  • 1 tablespoon chili powder
  • 1 tablespoon ground cumin
  • 1 teaspoon Kosher salt
  • ½ teaspoon black pepper
  • 1 cup beer dark or amber

For the Chili con Carne Sauce

  • 1 cup onion chopped
  • 10 cloves garlic
  • 1 lb ground beef
  • 4 tablespoon vegetable oil
  • 4 tablespoon all-purpose flour
  • ½ cup chili sauce previously prepared
  • 2 beef bouillon cubes roughly crumbled
  • 5 tablespoon chili powder
  • 1 tablespoon ground cumin
  • 1 teaspoon oregano dried, preferably Mexican
  • 1½ tablespoon Kosher salt
  • 1 tablespoon black pepper

For the Burritos

  • 4 large flour tortillas burrito size
  • 2 cups refried beans
  • 2½ cups cheddar cheese shredded

Instructions

Make the Chili Sauce (Do Ahead)

  • Bring a medium-sized pot of water to a boil. Add the prepared chiles and let boil for 15 minutes.
  • Use a slotted spoon to transfer the softened chiles to a blender along with the garlic, chicken bouillon, salt, and 1 cup of the chile broth. Purée until smooth. Let cool somewhat and then transfer to a jar with a tight-fitting lid. Use at once, or store in the refrigerator for up to 2 weeks.

Make the Meat Filling

  • Heat the olive oil in a large skillet over medium-high heat. Add the onions and peppers and cook until soft, about 4 to 5 minutes. Add the garlic and cook for another 30 seconds, stirring often.
  • Add the beef and use a wooden spoon to break up the meat. Cook, stirring often, until the beef is no longer pink. If desired, tilt the skillet and use a large spoon to remove most of the grease that has been rendered while cooking. Discard safely.
  • Add the tomatoes, chili powder, cumin, salt, and pepper, and stir until tomatoes are softened and beginning to break down, about 5 minutes. Add the beer and let simmer for about 20 minutes. Add more beer if getting dry (the meat should be very moist). Set aside and keep warm.

Make the Chili Con Carne

  • Place the roughly chopped onion, garlic cloves, and 3 cups of water into a blender. Purée for about 1 minute, until smooth.
  • Add the ground beef to a 12-inch skillet and break up with a large wooden spoon. Pour the onion-water purée and cook over medium-high heat. Bring to a simmer and continue cooking, stirring occasionally, until all of the water is gone, about 40 to 50 minutes.
  • Meanwhile, in a small sauté pan, turn the heat to medium-high and add the vegetable oil. Whisk in the flour and continue whisking until fully combined. Stir with a wooden spoon for about 5 minutes. This color will darken slightly to an amber hue. Turn off the heat and set it aside.
  • Add the roux, chili sauce, bouillon, chili powder, cumin, oregano, salt, and pepper to the meat and stir to combine. Stir in 3 cups of water and bring to a low simmer. Cook for about 8 minutes.

Assemble and Finish Off the Burritos

  • Place the tortillas in between paper towels and sprinkle tap water on them with your fingers. The towels should be damp, but not drenched. Place in the microwave on HIGH for about 30 seconds, or until they are warm and pliable.
  • To build each burrito, place a warm tortilla on a cutting board. Spoon about ⅓ cup of warm refried beans on one half of the tortilla (the half closest to you). Top with a generous handful of shredded cheddar. Spoon a generous ½ cup (more or less, depending on the size of your tortilla) of the meat mixture over the cheese. Gently grab the edges of the tortilla closest to you, and press the inwards slightly. Begin to tightly roll the burrito over the filling, using your fingers to tuck in the sides as you go. Once the burrito is completely rolled and the sides are tucked in, place it on a plate or platter, seam-side down.
  • Use a ladle or large spoon to pour chili carne sauce all over the top and sides of the burrito. Top with a handful of cheese.
  • Turn your broiler on HIGH and place the plates on the middle rack for about 20 seconds, or until the cheese has melted and is a little bubbly. Use oven mitts to remove the plates and serve immediately.

Video

Notes

See the video near the top of the blog post for visual guidance. If you liked the video, please subscribe to our YouTube channel.
The chili sauce can be made up to 2 weeks in advance. The meat filling, chili con carne, and refried beans can all be made several days in advance. Keep in the fridge and reheat on the stove before assembling the burritos. 
Most modern dinner plates or platters can handle heat in the oven for a short amount of time. Don't place vintage dinnerware in the oven. Be sure to let your guests know that the plates are hot! 
You can freeze the assembled burritos for up to 2 months. Let thaw and then heat in the oven for 30 minutes at 350°F. 

Nutrition

Calories: 875kcal | Carbohydrates: 77g | Protein: 71g | Fat: 32g | Saturated Fat: 12g | Polyunsaturated Fat: 4g | Monounsaturated Fat: 14g | Trans Fat: 3g | Cholesterol: 232mg | Sodium: 1489mg | Potassium: 1727mg | Fiber: 19g | Sugar: 12g | Vitamin A: 9190IU | Vitamin C: 29mg | Calcium: 772mg | Iron: 13mg

Easy Chicken Tinga Tacos

May 1, 2022 by Kris Longwell 16 Comments

A row of easy chicken tinga tacos sitting next to each other on a wooden platter topped with crumbled cheese and garnish with lime wedges.

Everyone loves a good taco, right? Well, get ready to make (and eat) one of the best in town.

These tacos are always such a hit whenever we serve them. They are great in tacos, but they are also great on tostadas, enchiladas, and flautas. You can poach the chicken as we do, or you can absolutely use a rotisserie chicken from the market. And they are so easy to prepare!

A row of easy chicken tinga tacos sitting next to each other on a wooden platter topped with crumbled cheese and garnish with lime wedges.

How To Make Chicken Tinga Tacos

Mexican cuisine has a deep and colorful history and is loved around the world, especially in North America.

This chicken tinga recipe is easy to bring together but tastes like you’ve been slow-cooking it for hours or days.

NOTE: If you liked this video, please subscribe to our YouTube channel. Remember to click the little ‘bell’ icon so you’ll never miss a new video! Thank you!

How to Prepare the Chicken

As mentioned, you can absolutely skip poaching the chicken and purchase a rotisserie chicken from the supermarket. Nowadays, you can even find shredded and/or cubed roasted chicken in the prepared food section of many well-stocked supermarkets. If you go this route, you’ll also need some chicken broth for making the tinga.

We love, however, to poach 6 chicken thighs to get incredibly delicious chicken. Our favorite is to go with skin-on, bone-in thighs, however, you could certainly opt for chicken breasts, with or without skin and bones.

EXPERT TIP: After you’ve poached the chicken in simmering water (with skillet covered), you’ll want to carefully remove the chicken with a slotted spoon and let rest until cool enough to handle. Strain the liquid into a heat-proof bowl and keep a cup reserved for the tinga. Save the remaining broth for chicken noodle soup, chicken pot pie, or any recipe that calls for chicken stock.

We love to shred the chicken with our fingers, but a couple of forks will do the trick, too.

A large saucepan filled with skin-on chicken thighs and simmering water and then that same chicken that has been shredded on a cutting board.

The Ingredients You Will Need

Obviously, chicken is a key ingredient for chicken tinga. We’ve already covered that.

Another key ingredient is chipotle peppers in adobo sauce. These peppers are actually a form of jalapenos and do carry a decent amount of spice. If you like your tacos to have some heat, use two peppers and include the seeds. After chopping the peppers, we use our knife to scrape away most of the seeds. This provides a slightly spicy sauce but is not too hot at all.

The other ingredients include:

  • Chopped onion
  • Minced garlic
  • Canned diced fire-roasted tomatoes (or just regular diced tomatoes)
  • Dried oregano, preferably Mexican
  • Bay leaves
  • Salt and pepper
  • Chipotle peppers and adobo sauce

EXPERT TIP: Chipotle peppers are typically canned and can be found in the Hispanic section of most well-stocked supermarkets or Latin food markets. You’ll only use one or two, but the remaining peppers and sauce and be transferred to a baggie and frozen until the next time you need chipotle.

After you’ve simmered the tinga sauce, you can purée it or leave it chunky. We pull out our trusty blender and purée the mixture. It coats the shredded chicken beautifully.

Now, it’s time to bring finish up the tinga.

If you’ve puréed the sauce, carefully add it back into the skillet and stir in the shredded chicken.

Stir in the chicken and then let simmer for only about 5 to 10 minutes.

A large stainless steel skillet filled with puréed tinga sauce with shredded chicken sitting the middle of the pan.

What You Need to Make the Perfect Chicken Tinga Tacos

Tortillas: You can go with flour or corn tortillas. To get maximum flavor, crank up your gas stove or fire up your grill and place the tortillas over the flame for just a few minutes. Get the edges a little charred and then place them on a plate covered with a damp kitchen towel. This adds flavor and slightly steams the tortillas making them nice and pliable.
Toppings: You go with your favorite taco toppings, but our favorites for these tacos are chopped fresh cilantro, crumble cheese (such as Cojita), and finely chopped red onion. Top with your favorite hot sauce. A slice or two of fresh avocado is a wonderful touch, too.
Fresh Limes: These tinga tacos are just begging for a fresh squeeze of lime. Cut a couple of limes into wedges and serve alongside the tacos.

We love to place all of these ingredients in bowls on the table or kitchen island and let family or guests build their own easy chicken tinga tacos.

A large oval wooden platter that is filled with six chicken tinga tacos with cut limes surrounding them and crumbled cheese sprinkled over the top.

Other Easy Taco Recipes

We love all kinds of tacos! Here are some of our other favorites:

Crispy Beef Tacos
Pork Carnita Tacos
Mahi Mahi Tacos
Baja Fish Tacos
Korean Beef Tacos with Kimchi

Tostadas are delicious, too! Check out our Best Beef Tostada and Black Bean, Chicken, and Corn Tostada!

But in the meantime, don’t you want to sink your teeth into this gem?

A person holding a chicken tinga taco in a grilled flour tortilla.

Ready to make the best chicken tinga tacos this side of Puebla, Mexico? Go for it!

And when you do, be sure to take a photo of them, post it on Instagram, and tag @HowToFeedaLoon and #HowToFeedaLoon

A row of easy chicken tinga tacos sitting next to each other on a wooden platter topped with crumbled cheese and garnish with lime wedges.
Print Recipe
5 from 5 votes

Easy Chicken Tinga Tacos

Chicken Tinga Tacos are so easy to prepare and perfect for a weeknight taco dinner as well as a fun taco party. The poached chicken thighs are wonderful, but you could also go with a rotisserie chicken from the store, just be sure to grab some chicken broth, too.
Prep Time15 minutes mins
Cook Time35 minutes mins
Total Time50 minutes mins
Course: Entree
Cuisine: Mexican / TexMex
Servings: 4
Calories: 491kcal
Author: Kris Longwell

Equipment

  • 1 large (12-inch) skillet
  • Blender

Ingredients

For the Poached Chicken and Broth

  • 6 chicken thighs bone-in, skin-on
  • 1 large onion roughly cut up
  • 4 cloves garlic pressed, or minced
  • 1 teaspoon Kosher salt
  • Water

For the Chicken Tinga Tacos

  • 1 tablespoon olive oil
  • 1 cup onion chopped
  • 3 cloves garlic minced
  • 1 teaspoon oregano dried, preferably Mexican
  • ½ teaspoon ground cumin
  • 1 14.5 oz. can fire-roasted diced tomatoes with juices
  • 1 cup chicken broth reserved from the poaching, or purchased
  • 2 tablespoon chipotle peppers chopped with some of the seeds removed
  • 2 tablespoon adobo sauce from the chipotle can
  • 1 teaspoon Kosher salt
  • 2 bay leaves
  • 6 flour tortillas or corn, heated over a gas flame and then covered
  • ½ cup Cotija cheese crumbled, for topping (optional)
  • ¼ cup cilantro fresh, chopped, for topping (optional)
  • ½ cup red onion chopped, for topping (optional)
  • hot sauce for topping (optional)

Instructions

Poach the Chicken with Broth

  • Place the chicken, roughly cut onion, pressed garlic, and 1 teaspoon salt in a large skillet. Add enough water to just cover the chicken.
    6 chicken thighs, 1 large onion, 4 cloves garlic, 1 teaspoon Kosher salt, Water
  • Bring to a boil and then lower to a simmer. Cover the pan and simmer for 20 to 25 minutes. Use a slotted spoon to remove the chicken to a platter. Let rest until cool enough to handle. Use your fingers, or two forks, to remove the skin and then pull the meat from the bones and roughly shred it. Set aside.
  • Carefully strain the broth through a colander into a heat-proof bowl and remove 1 cup of the broth to use for cooking the tinga chicken. Save the remaining broth for another use. (It freezes perfectly!).

Make the Chicken Tinga Tacos

  • In a large skillet (can be the same one use poached the chicken in), heat the oil over medium heat. Add the onions and cook until soft, about 4 to 5 minutes. Add the garlic and cook, stirring often, for another 30 seconds.
    1 tablespoon olive oil, 1 cup onion, 3 cloves garlic
  • Stir in the oregano and cumin. Cook, stirring, for about 1 minute.
    1 teaspoon oregano, ½ teaspoon ground cumin
  • Add the tomatoes (with juice), chicken broth, peppers, and adobo sauce. Stir in the salt and add the bay leaves. Let simmer for about 15 minutes.
    1 14.5 oz. can fire-roasted diced tomatoes, 1 cup chicken broth, 2 tablespoon chipotle peppers, 2 tablespoon adobo sauce, 1 teaspoon Kosher salt, 2 bay leaves
  • Remove the bay leaves and then carefully transfer the tinga sauce to a blender (a ladle helps). Purée for about 1 minute until smooth. Add the puréed sauce back into the skillet. Stir in the chicken and cook, stirring often, until heated through, about 5 minutes.
  • Serve at once with warmed tortillas (see NOTES), cheese, cilantro, red onions, and hot sauce, if desired.
    6 flour tortillas, ½ cup Cotija cheese, ¼ cup cilantro, ½ cup red onion, hot sauce

Video

Notes

NOTE: Watch the video near the top of the recipe for visual guidance.
If you use rotisserie chicken, then you'll need to grab some chicken broth. In a pinch, you could just add 1 cup of water to the sauce. 
We love to place each tortilla over a gas flame on our stove and lightly char the edges. Then place them on a plate with a dampened kitchen towel to steam them. You could also do this on your grill. Or, just heat them in damp paper towels in the microwave. 
The tinga sauce can be made up to 48 hours in advance.  Reheat in a large skillet and stir in the chicken. 
Leftovers will keep for up to 5 days in the fridge. Reheat in a medium skillet over medium heat (you may need to add a little more broth). Leftovers can be frozen for up to 2 months. 

Nutrition

Calories: 491kcal | Carbohydrates: 42g | Protein: 37g | Fat: 22g | Saturated Fat: 8g | Polyunsaturated Fat: 4g | Monounsaturated Fat: 17g | Trans Fat: 1g | Cholesterol: 184mg | Sodium: 3612mg | Potassium: 622mg | Fiber: 6g | Sugar: 9g | Vitamin A: 315IU | Vitamin C: 10mg | Calcium: 229mg | Iron: 4mg

Best-Ever Blondies

April 27, 2022 by Kris Longwell Leave a Comment

Four blondies with vanilla chips and toffee stacked on top of each other on a piece of white parchment paper.

Don’t get us wrong. We love brownies. In fact, check out our Ultimate Fudge Brownies. But wait until you try these babies.

So buttery and delicious, these are always such a huge hit whenever we serve them. They are spectacular fresh out of the oven, but they are incredible at room temperature, too. Add in your favorite add-ins, but we’ll show you ours. And it all comes together in about 30 minutes.

Four blondies with vanilla chips and toffee stacked on top of each other on a piece of white parchment paper.

How To Make Blondies

This blondie recipe is a snap to make and can easily be made in advance (just reheat in the microwave, if desired).

You can also double the recipe to feed a group!

Besides being easy to make, they are fun, as well. Get the kids involved!


NOTE: If you liked this video, please subscribe to our YouTube channel. Remember to click the little ‘bell’ icon so you won’t ever miss a new video! Thank you!

What Is The Difference Between a Blondie and a Brownie?

They are somewhat similar to each other in texture in that they are both rich and chewy.  Some folks call them blondie brownies, but they are, in fact, not the same. 

Chocolate is a key ingredient in brownies and not blondies. Browned butter and brown sugar are key ingredients in blondies and usually not in brownies.

Our blondies are a little darker in color because of the browned butter.

EXPERT TIP: The batter will be quite thick, this is normal. We place two large pieces of parchment paper in the bottom of an 8″x8″ dish with the edges hanging over the sides. This makes removing the blondies from the dish simple. Use your fingers to press the batter into the dish.

A pair of hands pressing unbaked brownie dough into a white square baking dish.

What Goes In the Batter?

The main ingredients for making blondies

  • Butter (unsalted)
  • Brown sugar (light or dark)
  • Granulated sugar
  • Egg
  • Vanilla extract
  • Salt
  • All-purpose flour

“Add-ins”

  • Vanilla chocolate chips
  • Chocolate chips
  • Butterscotch chips
  • Toffee bits (such as Heath)
  • M&M’s
  • Walnuts
  • Pecans
  • Almonds

EXPERT TIP: The batter will spread a little as it bakes. It will also expand, too. The blondies are done with they are lightly browned on top. This typically takes about 15 to 20 minutes in a preheated oven. Keep an eye on them!

An overhead view of a square white baking dish filled with freshly baked blondies sitting on a wire baking rack.

How To Serve and Store Blondies

These are absolutely amazing when served warm fresh out of the oven. But they are also fantastic served room temperature.

And we must say that if any dessert was made for a scoop of vanilla ice cream and caramel sauce, this would be it.

We like to cut ours into 4 large blondies, but you could easily cut them into 9 bars by cutting two slices in one direction and then two more perpendicular slices in the other direction.

The brownies will keep covered on the counter for up to 5 days and in the fridge for a week.

An overhead view of a stack of blondies that are studded with walnuts, white chocolate morsels, and toffee.

Other Baked Desserts

In addition to these gems, you’ll also love these incredible cookies and brownies:

Cheesecake Brownies
Heath Bar Fudge Brownies
Red Velvet Sandwich Cookies
Classic Snickerdoodle Cookies
Pumpkin Whoopi Pies

But in the meantime, you’re probably going to want to make these as quickly as you possibly can. Don’t forget the ice cream and caramel sauce!

A white dessert plate filled with two blondies stacked on top of each other with a partially melted scoop of vanilla ice cream on top with a fork sitting next to it.

Ready to make one of the yummiest sweet treats of all time? Go for it!

And when you do, be sure to take a photo of it, post it on Instagram, and tag @HowToFeedaLoon and hashtag #HowToFeedaLoon!

Four blondies with vanilla chips and toffee stacked on top of each other on a piece of white parchment paper.
Print Recipe
No ratings yet

Best-Ever Blondies

There is just so much to love about these homemade blondies. You can easily double the recipe and bake them in a 9"x13" baking dish. Served fresh out of the oven or at room temperature are both fantastic. Be sure to have a scoop of vanilla ice cream and some caramel sauce handy once you're ready to dig in! And be creative with the "add ins"! (See the blog post for inspiration).
Prep Time10 minutes mins
Cook Time20 minutes mins
Total Time30 minutes mins
Course: Dessert
Cuisine: American
Servings: 4
Calories: 780kcal
Author: Kris Longwell

Equipment

  • 8"x8" baking dish
  • Parchment paper

Ingredients

  • Cooking spray
  • ½ cup unsalted butter 1 stick
  • ¾ cup light brown sugar can also use dark
  • ¼ cup sugar
  • 1 large egg
  • 2 teaspoon vanilla extract
  • ½ teaspoon Kosher salt
  • 1 cup all-purpose flour
  • ½ cup white chocolate chips
  • ½ cup toffee bits
  • ½ cup chopped walnuts
  • vanilla ice cream for serving, optional
  • caramel sauce warmed, for serving, optional

Instructions

  • Preheat oven to 350°F. Place two pieces of parchment paper in an 8"x8" dish with the edges long enough to hand over the sides. Spray the paper with cooking spray.
  • In a medium pan over medium heat, melt the butter. Use a wooden spoon to stir the butter around. Cook for several minutes, stirring constantly, until it starts to smell nutty and small golden dots appear on the bottom of the pan. Remove from the heat.
  • In a large bowl, whisk the browned butter into both sugars. Use a large wooden spoon to stir in the egg, vanilla, and salt. Once combined, fold in the flour, and keep stirring until just combined. Fold in the chips, toffee, and nuts.
  • Use your hands to press the batter into the prepared dish. Bake until the top is lightly golden and an inserted toothpick comes out clean, about 15 to 20 minutes.
  • Let cool and then carefully grab the paper and gently removed the blondies from the dish. Peel away the parchment paper and cut into squares. Serve with ice cream and warmed caramel sauce, if desired.

Video

Notes

See the video near the top of the blog post for visual guidance. If you liked the video, please subscribe to our YouTube channel. 
The blondies will stiffen somewhat as they cool. If you slice them right out of the oven, they may still feel a little gooey, but they are very delicious. 
Store baked blondies in an air-tight container with a lid on the counter for up to 5 days, or in the fridge for up to a week. They can be frozen for up to 1 month. 

Nutrition

Calories: 780kcal | Carbohydrates: 112g | Protein: 9g | Fat: 40g | Saturated Fat: 18g | Polyunsaturated Fat: 7g | Monounsaturated Fat: 12g | Trans Fat: 1g | Cholesterol: 143mg | Sodium: 385mg | Potassium: 260mg | Fiber: 2g | Sugar: 85g | Vitamin A: 1127IU | Vitamin C: 1mg | Calcium: 122mg | Iron: 2mg

White Chicken Lasagna with Spinach

April 24, 2022 by Kris Longwell 18 Comments

A metal spatula lifting up a slice of white chicken lasagna from a lasagna pan.

If you’re looking for a delicious twist on this beloved baked pasta dish, you’re in luck.

Like most of us, we simply love lasagna, including our classic bolognese lasagna, but we can honestly say this chicken and spinach version has moved right up to the top of the list of our all-time favorites. And what makes it even better is how easy it is to prepare!

A metal spatula lifting up a slice of white chicken lasagna from a lasagna pan.

How To Make Chicken Lasagna

It is truly amazing how delicious this lasagna is, especially when you consider how easy it is to assemble.

Make it easy on yourself and go with a rotisserie chicken. You can often find roasted chicken that has already been shredded and packaged in the prepared food section of many well-stocked supermarkets.

No-boil noodles are a great option, too!


NOTE: If you liked this video, please subscribe to our YouTube channel. Remember to click the little ‘bell’ icon so you’ll never miss a new video. Thank you!

How To Make a Béchamel Sauce with Spinach

Béchamel is one of the French five mother sauces and is what gives this lasagna the creamy, luscious taste and texture.

It’s so easy to make. You’ll need to create a roux first which is simply cooking equal amounts of flour with melted butter.

EXPERT TIP: We love using fresh spinach for this dish. We don’t recommend using baby spinach, it’s best used in salads. Simply trim away the stems of the fresh spinach and then drop it into the sauce. In a pinch, you could go with thawed (and squeezed dry) frozen spinach.

A large skilled with a béchamel sauce with fresh spinach leaves being dropped into and then that same skillet with the spinach wilted and mixed into the sauce.

What Other Ingredients Can I Use

Chicken lasagna is the basis for so many options with ingredients.

In addition to fresh spinach, you could also try any of the following:

Vegetables

  • Sautéed mushrooms
  • Steamed broccoli
  • Steamed or roasted cauliflower
  • Roasted butternut squash
  • Sautéed zucchini and/or yellow squash

Other protein options

  • Cooked Italian sausage, sliced
  • Ground turkey, simmered with salt, pepper, and Italian seasonings
  • Ground pork, simmered with salt, pepper, and Italian seasonings
  • Uncooked seafood such as cleaned shrimp, scallops, lobster, oysters, or a combination of them all.

Go with veggies only for a spectacular vegetarian lasagna!

To add even more creaminess to this lasagna, we mix together fresh whole-milk ricotta with freshly chopped parsley, an egg, and freshly grated parmesan.  This pairs perfectly with the béchamel, chicken, noodles, and spinach. 

An overhead view of a glass bowl filled with ricotta cheese, chopped parsley, egg, and parmesan cheese, and then the same bowl with everything whisked together.

How To Layer Lasagna

A common mistake home cooks make when assembling a lasagna is to add too much of any given layer at first, and then not have enough to evenly finish off the dish.

We recommend using a spoon or spatula to spread thin layers of the ricotta as well as the béchamel sauce. It may seem like there’s not enough, but the thin layers work perfectly with the noodles and chicken.

Here is the order that we recommend:

  1. A thin layer of spinach béchamel
  2. Noodles
  3. ¼ of the ricotta mixture
  4. ⅓ of the chicken
  5. ¼ of the shredded mozzarella
  6. A thin layer of grated Parmesan cheese
  7. Repeat this two more times
  8. Add another layer of noodles
  9. Top with the rest of the ricotta mixture and then the rest of the mozzarella
  10. Add one more thin layer of grated Parmesan

A person adding a spinach béchamel sauce into a lasagna pan and then layering cooked noodles and then adding shredded cooked chicken and topping with grated Parmesan cheese.

Can I Make Chicken Lasagna in Advance?

Besides the great taste and ease of preparation, this phenomenal dish can absolutely be made in advance.

You can assemble the lasagna up to 24 hours in advance of baking, or you can assemble it and freeze it for up to 2 months.

EXPERT TIP: This lasagne is even amazingly delicious when reheated. Simply cover with foil and bake for about 30 to 45 minutes in a 350°F oven until bubbly.

An overhead view of white chicken lasagna with spinach that has been fully cooked and lightly browned on top.

How To Serve

We can assure you that this dish will be an instant hit with the family. The kids may be unsure of the spinach, but we are amazed at how quickly even the pickiest of eaters get past that and devour every bite.

It’s perfect to serve to guests for a wonderful dinner party, shower, or potluck dinner.

Serve it with homemade Caesar salad and garlic bread for one of the most amazing Italian dinners you’ll ever serve or eat!

A stainless steel lasagna pan filled with chicken lasagna with the corner slice missing.

We just can’t rave about the lasagna enough.

If you prefer, make it easy on yourself and go with a nice rotisserie chicken, no-boil noodles, and if you’re really crunched for time, frozen spinach.

The layers and layers of yumminess will keep your loved ones coming back for seconds time and time again.

A white plate holding a serving of a white chicken lasagna with spinach with a bite taken out.

Ready to make a dish that will become an instant family favorite? Go for it!

And when you do, be sure to take a photo of it, post it on Instagram and tag @HowToFeedaLoon and hashtag #HowToFeedaLoon!

A metal spatula lifting up a slice of white chicken lasagna from a lasagna pan.
Print Recipe
5 from 6 votes

White Chicken Lasagna with Spinach

White Chicken Lasagna with Spinach is always such a hit when served to family and friends. You can assemble the lasagna up to 24 hours in advance, keep covered and chilled in the fridge. You can also freeze the uncooked dish for up to 2 months. Rotisserie chicken and no boil noodles make assembly even easier.
Prep Time15 minutes mins
Cook Time40 minutes mins
Resting time5 minutes mins
Total Time1 hour hr
Course: Entree
Cuisine: Italian / American
Servings: 8
Calories: 588kcal
Author: Kris Longwell

Equipment

  • 1 lasagna dish, or 9"x13" dish

Ingredients

For the Béchamel Sauce with Spinach

  • 4 tablespoon unsalted butter
  • 1 cup onion chopped
  • 3 cloves garlic minced
  • 4 tablespoon flour
  • 1 cup whole milk
  • 1 cup heavy cream
  • 2 cups chicken broth
  • 4 cups spinach fresh
  • 2 teaspoon Kosher salt
  • 1 teaspoon black pepper
  • 2 tablespoon Parmesan cheese grated

For the Ricotta Mixture

  • 1 15 oz container ricotta cheese whole milk
  • 1 large egg
  • ¼ cup parsley fresh, chopped
  • ¼ cup Parmesan cheese grated

For Assembling the Lasagna

  • 4 cups chicken cooked, shredded
  • 13 lasagna noodles cooked, or use no-boil (may need more than 13)
  • 2 cups mozzarella whole milk, shredded, plus a little extra for additional topping
  • 1 cup Parmesan cheese grated
  • 1 tablespoon parsley fresh, chopped, for garnish

Instructions

Prepare the Béchamel and Cook the Noodles

  • Get a large pot of salted water to a boil.
  • Heat the butter in a large skillet over medium heat. Once melted, add the onion, and sauté until soft, about 4 to 5 minutes. Add the garlic and cook for another 30 seconds, stirring often.
  • Stir in the flour and cook for 1 to 2 minutes. Whisk in the milk, cream, and then chicken broth. Whisk to remove any clumps. Continue stirring with a wooden spoon until thickened, about 5 minutes.
  • Stir in the spinach and cook until wilted. Season with salt and pepper and then stir in the Parmesan cheese. Set aside.
  • During this process, add the noodles to the boiling water. Drain and spray with cool tap water.

Prepare the Ricotta Mixture

  • In a medium bowl, whisk together the ricotta, parsley, egg, and Parmesan cheese. Set aside.

Assemble the Lasagna

  • Preheat oven to 375°F.
  • In a lasagna pan, or a large (9x13" dish, or larger) dish, start with a thin layer of the spinach béchamel (¼ of the sauce). Next, add a layer of noodles. Then, ¼ of the ricotta mixture. Then ⅓ of the chicken, then ¼ of the mozzarella, and a liberal sprinkling of grated Parmesan.
  • Repeat this process two more times. Add one more layer of noodles and then the rest of the ricotta and then mozzarella. Finish off with one final liberal sprinkling of grated Parmesan cheese.
  • Bake the lasagna for 20 to 25 minutes until bubbly. Remove from oven and let rest for 5 minutes. Garnish with chopped parsley. Serve at once.

Video

Notes

See the video near the top of the blog post for visual guidance. If you like the video, please subscribe to our YouTube channel. 
If you don't have access to rotisserie chicken, you can poach 2 to 3 chicken breast in simmering water, covered, for about 20 minutes.  Cool and then shred. Or, roast in an oven for about 40 minutes (for skin-on, bone-in). 
 
The lasagna can be assembled up to 1 or 2 days in advance. Cover and keep in the fridge until ready to bake.  Add another 10 minutes to the baking time if chilled.  The assembled lasagna can also be frozen for up to 2 months.  Let thaw before baking. 
Leftovers will keep in the fridge for up to 5 to 6 days or frozen for up to 1 month.  Reheat covered in the oven for about 30 minutes at 350°F. 

Nutrition

Calories: 588kcal | Carbohydrates: 44g | Protein: 28g | Fat: 26g | Saturated Fat: 11g | Polyunsaturated Fat: 2g | Monounsaturated Fat: 7g | Trans Fat: 1g | Cholesterol: 131mg | Sodium: 971mg | Potassium: 423mg | Fiber: 2g | Sugar: 5g | Vitamin A: 2665IU | Vitamin C: 10mg | Calcium: 445mg | Iron: 2mg

Shakshuka

April 20, 2022 by Kris Longwell Leave a Comment

An overhead view of a large skillet filled with shakshuka with a spoon in it sitting next to a white bowl filled with poached eggs in a tomato sauce with pita triangles scattered around.

Do you love a good poached egg as much as we do? Well, you’re in for a real treat.

We just love breakfast and brunch dishes, and this one is no exception.  A little reminiscent of huevos rancheros, but without the tortillas. Serve this alongside our classic breakfast potatoes and you’ll have a brunch to remember. And it’s so easy to prepare!

An overhead view of a large skillet filled with shakshuka with a spoon in it sitting next to a white bowl filled with poached eggs in a tomato sauce with pita triangles scattered around.

How To Make Shakshuka

The origins of shakshuka are as colorful as the dish itself. It has its roots in North Africa and is hugely popular in the Middle East, as well as Israel. The dish has been made for generations. Learn much more here.

The ingredients are simple and straightforward, and all you need is a nice large skillet.


NOTE: If you liked this video, please subscribe to our YouTube channel. Remember to click the ‘bell’ icon so you’ll never miss a new video. Thank you!

Main Ingredients

The ingredients for this amazing dish are very pantry friendly. Here’s what you’ll need:

  • Olive oil
  • Jalapeno
  • Onion
  • Red bell pepper
  • Garlic
  • Smoked paprika
  • Ground cumin
  • Cayenne (optional)
  • Canned whole tomatoes
  • Salt and pepper
  • Crumbled feta (optional)

EXPERT TIP: Make sure to use a large skillet/saucepan to prepare the dish. We use our 10-inch Sardel and it’s best if your pan has a lid. This helps to poach the eggs perfectly.

Next, it’s time to add the tomatoes.

You’ll want to simmer the mixture long enough until it starts to slightly thicken, about 10 minutes.

EXPERT TIP: For the tomatoes, we love going with canned certified San Marzano whole tomatoes. We use our hands to squeeze and break into the skillet.

A person squeezing a whole canned tomato into a skillet filled with sautéed peppers and onions.

How To Poach the Eggs

Once the sauce has thickened somewhat, use the handle of a large wooden spoon to form a small well. Crack the egg directly into the well.

Distribute the eggs evenly around the skillet.

Cover and let cook for about 3 minutes for medium-cooked yolks, and 5 minutes for fully cooked centers.

A person transferring an uncooked egg into a skillet filled with a savory tomato sauce.

How To Serve

This dish is absolutely wonderful to serve directly from the pan you prepared it in.

The sauce can be made up to 12 hours in advance. Simply reheat and then add the eggs.

EXPERT TIP: You’ll want to serve this with something to dig into the poached eggs. We love to use our pizza cutter to cut pita bread into triangles. Brush on a little olive oil and then lightly sprinkle on salt and pepper. Toast for a few minutes until crispy.

A large stainless steel skillet filled with shakshuka and a red bell pepper and pita bread sitting nearby.

Other Classic Brunch Dishes

We love everything about breakfast and brunch and here are some of most favorite dishes:

  • Eggs Benedict with No-Fuss Hollandaise
  • Classic Eggs Blackstone
  • Grandma’s Cinnamon Rolls
  • Broccoli and Cheddar Quiche
  • Diner-Style Hash Browns
  • Lemon-Ricotta Pancakes

And folks, this shakshuka recipe is one you’ll be adding to your breakfast and brunch rotation.

An overhead view of a large stainless steel skillet filled with poached eggs in a vibrant red tomato sauce.

If you’re looking for a new brunch egg dish, then you really need to try this one!

It is honestly as stunning in presentation as it is in taste.

You and your family will absolutely flip for shakshuka! Don’t forget the toasted pita triangles!

A person dipping a toasted pita triangle into a poached egg nestled into shakshuka.

Ready to make one of the most amazing brunch dishes in the world? Go for it!

And when you do, be sure to take a photo of it, post it on Instagram, and tag @HowToFeedaLoon and hashtag #HowToFeedaLoon!

An overhead view of a large stainless steel skillet filled with poached eggs in a vibrant red tomato sauce.
Print Recipe
No ratings yet

Shakshuka

Shakshuka is quintessential brunch fare. You can make the sauce up to 12 hours in advance. Reheat the sauce and then add the eggs. This dish is not terribly spicy, but if you want very little to no spice, cut back on the jalapeno and the cayenne.
Prep Time15 minutes mins
Cook Time20 minutes mins
Total Time35 minutes mins
Course: Breakfast / Brunch
Cuisine: North Africa / Middle East / Israeli
Servings: 4
Calories: 298kcal
Author: Kris Longwell

Equipment

  • 10 or 12-inch skillet with lid

Ingredients

  • ¼ cup olive oil
  • 1 jalapeno fresh, seeded, and chopped
  • 1 medium onion chopped
  • 1 red bell pepper cored, seeded, and chopped
  • 5 cloves garlic minced
  • 1 tablespoon smoked paprika
  • 1 teaspoon ground cumin
  • ½ teaspoon cayenne (optional)
  • 1 28 oz can whole tomatoes San Marzano is great
  • 1 teaspoon salt
  • ½ teaspoon black pepper
  • 6 eggs
  • ½ cup feta cheese crumbled (optional)
  • 2 tablespoon parsley fresh, chopped, for garnish

Instructions

  • Heat the oil in a large skillet (with lid) over medium heat until shimmering. Add the onions, jalapeno, and bell peppers and sauté, stirring often, until soft, about 5 minutes.
  • Add the garlic and cook for another 30 seconds.
  • Transfer the tomatoes into a medium bowl and use your hands to crush the tomatoes into the skillet. Add the juice from the tomatoes. Allow to simmer for 10 minutes, until slightly thickened.
  • Use the handle of a large wooden spoon to make a small well in the sauce. Add a whole egg into the well. Repeat this with the remaining eggs, evenly distributing around the pan. Cover and cook for 5 minutes for a slightly runny yolk. Cook for 7 to 8 minutes for a solid yolk.
  • Uncover and sprinkle with feta (if using) and parsley. Serve at once with toasted lightly salted pita triangles.

Video

Notes

See the video near the top of the blog post for visual guidance. If you liked the video, please subscribe to our YouTube channel. 
This dish has a fairly low spice level, but there is a bit of warming heat. If you want little spice or no heat at all, then pull back on the fresh jalapeno and/or cayenne. 
We think this dish is best when served fresh, but you can make the sauce the night before and then reheat it the next morning and then add the eggs once simmering. 
While the addition of feta cheese is not traditional, we think it is a wonderful complement to the dish. 

Nutrition

Calories: 298kcal | Carbohydrates: 9g | Protein: 12g | Fat: 14g | Saturated Fat: 4g | Polyunsaturated Fat: 2g | Monounsaturated Fat: 13g | Trans Fat: 1g | Cholesterol: 262mg | Sodium: 895mg | Potassium: 298mg | Fiber: 2g | Sugar: 3g | Vitamin A: 2550IU | Vitamin C: 48mg | Calcium: 158mg | Iron: 2mg

Grilled Marinated Lamb Chops

April 17, 2022 by The Loon Leave a Comment

An overhead view of two marinated grilled lamb chops crisscrossing each other on a bed of a white bean salad all on a white dinner plate.

Looking for something new and delicious to throw on the grill? Ladies and gentlemen, look no further.

These chops are naturally loaded with flavor and the simple herbed marinade combined with the smoky heat from the grill produces one of the most flavorful cuts of grilled meat you’ll ever serve or eat. Allow them to rest in the marinade for at least a couple of hours, but overnight is best.

An overhead view of two marinated grilled lamb chops crisscrossing each other on a bed of a white bean salad all on a white dinner plate.

How To Make Marinated Grilled Lamb Chops

There are numerous cuts of lamb to choose from. These are technically rib chops that have been Frenched, which means some of the fat and meat have been trimmed away from the bone.

They can be found in many well-stocked supermarkets, at your local butcher, or online.


NOTE: If you liked this video, please subscribe to our YouTube channel. Remember to click the little ‘bell’ icon so you’ll never miss a new video!

The Ingredients You Will Need

Besides the lamb rib chops, all you need is garlic, a few fresh herbs, salt, pepper, and quality olive oil.

We love to use a combination of fresh

  • Garlic
  • Rosemary
  • Thyme

Other options are:

  • Oregano
  • Marjoram
  • Sage

Place the chops in a dish and sprinkle with salt and pepper on both sides and then brush them all over with the marinade. Cover with plastic wrap and let chill in the fridge for at least 2 hours.

A brush being used to apply a garlic and herb marinade onto uncooked lamb chops in a glass dish.

How To Cook Lamb

We love to use our charcoal grill for the marinated grilled lamb chops, but gas, electric, or even a screeching hot grill pan on the stove will work, too.

If going with charcoal, be sure to wait until the coals are ashy, but still very hot, with a little amber still left in them.

EXPERT TIP: The ideal internal temperature for perfectly cooked lamb is 145°F. An instant-read thermometer will ensure your chops are cooked properly. Take them off the grill at around 140°F, and let them rest for a few minutes. They will continue to cook as they rest.

Four lamb chops on a charcoal grill with burning coals underneath the grate.

How To Serve Grilled Marinated Lamb Chops

We love to serve these fresh off the grill on a bed of our favorite Greek white bean and cucumber salad. Here’s what you’ll need to make this versatile, cool, and refreshing salad:

  • Canned white beans, drained and rinsed
  • English cucumber, cut into bite-size pieces
  • Cherry tomatoes, halved
  • Fresh lemon juice
  • Fresh parsley, chopped
  • Dried oregano
  • Garlic powder
  • Salt
  • Feta cheese, crumbled

Mix it all together and chill. This can be made in advance, but it is always really delicious when served fresh.

Mound a nice bed of the salad on each serving plate and then top with the chops. We love to hit the final dish with a sprinkle of finishing salt, such as Maldon.

An overhead view a white serving bowl filled with a Greek white bean and cucumber salad.

These chops are wonderful served as an appetizer, but we like to plate two of them on a bed of the bean and cucumber salad for an ideal entrée.

The presentation is stunning and truly has a “wow” factor.

And then the flavor and texture are just out of this world. The meat literally melts in your mouth.

Two marinated grill lamb chops on sitting on a Greek salad on a white dinner plate.

Other Lamb Dishes To Try

Other amazing lamb recipes for you to try are our:

  • Roast Rack of Lamb
  • Lamb Lollipops
  • Pasta with Lamb Ragu

In the meantime, make these amazing Grilled Marinated Lamb Chops. You and your guests will be so thrilled that you did.

A close-up view of a marinated grilled lamb chop sitting on a Greek salad on a white dinner plate.

Ready to make one of the best grilled meats you’ll ever taste or serve? Go for it!

And when you do, be sure to take a photo of them, post it on Instagram, and tag @HowToFeedaLoon and hashtag #HowToFeedaLoon!

Two marinated grill lamb chops on sitting on a Greek salad on a white dinner plate.
Print Recipe
No ratings yet

Grilled Marinated Lamb Chops

Oh, these grilled marinated lamb chops are so tender and just so incredibly flavorful. Grilled to perfection. Simple, elegant, and just amazing. They can sit in the marinade for two hours, but we think they're even better when chilled overnight.
Prep Time15 minutes mins
Cook Time10 minutes mins
Salad prep and assembly15 minutes mins
Total Time40 minutes mins
Course: Italian
Cuisine: American / Greek
Servings: 4
Calories: 508kcal
Author: Kris Longwell

Equipment

  • Grill, charcoal, gas, or electric Can also use a grill pan on your stovetop.

Ingredients

  • 3 cloves garlic minced
  • 1 tablespoon rosemary fresh, chopped
  • 1 tablespoon thyme fresh, chopped
  • ¼ cup olive oil
  • Kosher salt and black pepper
  • 8 lamb rib chops trimmed of excess fat
  • 1 tablespoon finishing salt such as Madlon, for finishing, optional

Instructions

  • In a small bowl, stir together the garlic, rosemary, thyme, and olive oil.
  • Place the lamb chops in a shallow dish and sprinkle salt and pepper all over them. Next, brush them all over with the olive oil mixture, coating both sides of the chops.
  • Cover and refrigerate for at least 2 hours, or overnight.
  • Prepare a charcoal or gas grill (even electric will work in a pinch) for direct grilling over high heat.
  • Using tongs, place the chops over the hottest part of the grill, turning once, until browned and crisp on the exterior and medium-rare at the center when tested with a knife, about 10 minutes total. The internal temperature should be 140°F. Let rest for a few minutes and garnish with a light sprinkle of finishing salt, if desired.
  • Transfer the chops to plates with a bed of white bean and cucumber salad. Serve at once.

Video

Notes

See the video near the top of the blog post for visual guidance. If you liked the video, please subscribe to our YouTube Channel.
The chops can chill in the marinade for just a couple of hours, but they are even better when allowed to rest overnight. If you have time, allow the chops to come to room temp before grilling.
To make the salad, simply combine the following ingredient in a bowl and chill (covered) until ready to use:
  • 1 15 oz can white beans, drained and rinsed (ie, Navy, Great Northern White)
  • ½ English cucumber, cut into bite-size pieces
  • ½ cup cherry tomatoes, halved
  • 1 tablespoon fresh parsley, chopped
  • 1 tablespoon dried oregano
  • 1 tablespoon garlic powder
  • 1 teaspoon salt
  • Juice of one lemon
  • ½ cup crumbled feta cheese

Nutrition

Calories: 508kcal | Carbohydrates: 1g | Protein: 45g | Fat: 26g | Saturated Fat: 6g | Polyunsaturated Fat: 3g | Monounsaturated Fat: 18g | Cholesterol: 149mg | Sodium: 164mg | Potassium: 623mg | Fiber: 1g | Sugar: 1g | Vitamin A: 99IU | Vitamin C: 4mg | Calcium: 45mg | Iron: 4mg

POST UPDATE: This recipe was originally published in April 2019, but was updated with improved tweaks to the recipe with new tips and photography and a fabulous new video in April 2022!

Braised Green Beans with Tomatoes

April 13, 2022 by Kris Longwell Leave a Comment

An overhead view of a stainless skillet filled with braised green beans with tomatoes with a large wooden spoon inserted into the middle.

If you’re like us, you’re always looking for a special side dish that is a twist on a classic. Well, here you go.

There is just everything to love about this deeply flavorful side dish. The fresh beans are braised until they are tender and infused with warming spice. The dish is gorgeous and is perfect for any holiday feast. Or, just an easy meal at home! And it comes together very quickly!

An overhead view of a stainless skillet filled with braised green beans with tomatoes with a large wooden spoon inserted into the middle.

How To Make Braised Green Beans with Tomatoes

When you see how easy this dish is to prepare, you’ll want to run out and get the ingredients immediately.

And you can prepare the dish (up to braising) well in advance of serving.

One word of warning: Be prepared for folks asking for the recipe. It’s always a crowd favorite.


NOTE: If you liked this video, please subscribe to our YouTube channel. Remember to click the “bell” icon so you’ll never miss a new video! Thank you!

How To Cook Green Beans

Fresh green beans are loaded with farm fresh flavor and are loaded with health benefits.

But you may be wondering: “how do you keep green beans from being rubbery?”

That’s easy! Braising is the key to soft, tender, flavorful green beans.

EXPERT TIP: When purchasing fresh green beans, make sure they are bright green and not brown in spots and beginning to shrivel. If they have stems at the end of them, simply clip them off. If you prefer short green beans (like what you get in a can), just slice the beans in half with your knife.

A person using a metal spatula to stir fresh green beans with sautéd onions in a large silver skillet.

What Can I Add to Green Beans for Flavor?

This is where we are going to transform the everyday green bean into a dish that is layered with warming flavors.

Once the green beans have begun to soften, you’re going to add the following seasonings:

  • Ground Cinnamon
  • Ground Cumin
  • Red pepper flakes
  • Salt and pepper

EXPERT TIP: The addition of diced tomatoes will add even more flavor and will serve as the perfect ingredient to braise the seasoned beans. A final splash of red wine vinegar brings it all together. You’ll want to make sure you start with a large skillet (or Dutch oven) with a lid for the braising process.

A person transferring diced tomatoes into a stainless steel skillet filled with sautéed green beans and onions.

When and How To Serve Braised Green Beans with Tomatoes

This has become a staple side dish for our Easter table. It really is the perfect accompaniment to our Slow-Cooker Spiral Ham or Honey Bourbon Glazed Ham.

Other classic holiday dishes:

  • Carrot Ginger Soup
  • Potatoes Dauphinoise (French au Gratin)
  • Corn Casserole
  • Maple Glazed Carrots
  • Shaved Brussels Sprouts with Pancetta and Balsamic
  • Homemade Dinner Rolls
  • Coconut Cream Cake

EXPERT TIP: For added flavor and a little crunch, we like to sprinkle sliced almonds over the top of the beans. For even more flavor, you could toast them, but keep an eye on them, they burn easily!

A close-up view of a wooden spoon inserted into a skillet filled with braised green beans with tomatoes.

If you’re looking for a new twist on a classic side dish, this is one you’ll want to try.

The flavors aren’t exotic, but just comforting, tender, and so delicious.

Always a favorite at the table. And it’s ideal for holiday feasts or just an easy weeknight dinner at home. Perfect in every way!

A large white serving dish filled with braised green beans with tomatoes and topped with almond slices.

An overhead view of a stainless skillet filled with braised green beans with tomatoes with a large wooden spoon inserted into the middle.
Print Recipe
No ratings yet

Braised Green Beans with Tomatoes

Braised Green Beans with Tomatoes is a wonderful twist on a familiar vegetable. The ground cinnamon gives a bit of warmth and the cumin and red pepper flakes add an amazing depth of flavor. Perfect for your holiday table or just a simple meal at home.
Prep Time15 minutes mins
Cook Time30 minutes mins
Total Time45 minutes mins
Course: Vegetable - Side Dish
Cuisine: American / Italian
Servings: 6 people
Calories: 122kcal
Author: Kris Longwell

Equipment

  • 1 12-inch saucepan (or Dutch oven) with lid

Ingredients

  • 2 tablespoon extra-virgin olive oil
  • 1 yellow onion sliced
  • 2 cloves garlic minced
  • 1 teaspoon ground cumin
  • ¼ teaspoon ground cinnamon
  • ¼ teaspoon red pepper flakes or more, to taste
  • 1½ lbs green beans fresh, ends trimmed
  • 1 14.5 oz can diced tomatoes with their juice
  • 2 teaspoon red wine vinegar
  • 1 teaspoon Kosher salt
  • ½ teaspoon black pepper
  • ¼ cup almonds sliced, toasted, for garnish (optional)

Instructions

  • Over medium heat, in a large skillet (with lid) or a Dutch oven, warm the olive oil.
  • Add the onion and saute until soft, about 5 minutes.
  • Add the garlic and sauté for about 30 seconds.
  • Stir in the cumin, cinnamon, and red pepper flakes.
  • Add the green beans and stir them to coat with the spices.
  • Cook, stirring often, until beans are barely tender, about 4 minutes.
  • Stir in tomatoes, cover, reduce heat to low, and cook until beans are very tender, about 20 minutes.
  • Stir in the vinegar and season with salt and pepper. Transfer to a serving bowl and top with almond slices/slivers (if using).

Video

Notes

See the video near the top of the blog post for visual guidance. If you liked the video, please subscribe to our YouTube channel. 
The dish can be made in advance up to braising.  30 minutes before serving, add the tomatoes with juice and then follow the recipe as written.
In a pinch, three (3) 14.5 oz. cans of green beans (drained) can be used in place of fresh.  Follow the recipe as written, but remember, beans will be very, very soft (but still delicious). 
The entire dish can be made in advance (up to 12 hours), chilled, and then reheated on the stove until heated through and simmering.  You may need to add a little vegetable broth or water if the beans are a little dry. 
Leftovers will keep for up to 4 days in the fridge and can be frozen for up to 2 months. Reheat on the stove over medium heat. 

Nutrition

Calories: 122kcal | Carbohydrates: 12g | Protein: 4g | Fat: 8g | Saturated Fat: 1g | Polyunsaturated Fat: 1g | Monounsaturated Fat: 5g | Trans Fat: 1g | Sodium: 398mg | Potassium: 325mg | Fiber: 4g | Sugar: 5g | Vitamin A: 813IU | Vitamin C: 16mg | Calcium: 69mg | Iron: 2mg

POST UPDATE: This recipe was originally published in April 2014, but was updated with improved tweaks to the recipe with new tips and photography and a fabulous new video in April 2022!

Carrot Ginger Soup

April 10, 2022 by Kris Longwell 2 Comments

Two white soup bowls filled with carrot ginger soup sitting next to two glasses or rosé wine.

If there was ever a soup that was the definition of Spring vibrance, this would be it.

There is something spectacular about pure juice extracted from carrots and ginger root.  The flavor is truly unmatched and it just doesn’t get much more beautiful of a presentation than this soup. The fresh herb mousse is the perfect garnish. Ideal for your Easter feast or anytime you are looking for a delicious and gorgeous soup to serve.

Two white soup bowls filled with carrot ginger soup sitting next to two glasses or rosé wine.

How To Make Carrot Ginger Soup

Carrot Ginger soup is not difficult to make.

It is truly so delicious because of the simplicity and freshness of the ingredients.


NOTE: If you liked this video, please subscribe to our YouTube channel. Remember to click the little ‘bell’ icon so you’ll never miss a new video! Thank you!

How To Juice Carrots and Ginger

The short answer to this question is with a juicer.

There is a myriad of juicers available to consumers nowadays, but we recommend going with a quality brand.

Our favorite (and the one we use all the time) is our Breville Juice Fountain Cold Centrifugal Juicer.

EXPERT TIP: If you don’t have a juicer, no worries. Fresh carrot juice can be found in many the produce area of many well-stocked supermarkets. Whole Foods and Central Market both carry it. If you can’t find ginger juice, simply peel and finely mince 1 tablespoon and include it during the sautéing process.

A large juicing machine that has carrot pulp in the catcher with a glass pitcher of fresh carrot juice in front of it.

To make this soup as deep in carrot and ginger taste as possible, we combine both fresh with sautéed vegetables.

In a large skillet, you’ll need to sauté fresh carrots with onion until softened. The addition of honey and ground ginger adds another depth of flavor that is slightly sweet and slightly savory.

EXPERT TIP: A little ginger juice goes a long way. You’ll be tempted to add more to the soup, but add in small amounts, and taste test. The addition of orange zest adds another layer of freshness that is just wonderful. The star taste of this soup is the carrots, but the ginger and orange bring it to another level.

A large glass measuring cup filled with fresh carrot juice being poured into a skillet filled with sautéd carrots and then a small jar of ginger juice being added.

Carrot Ginger Soup FAQs

Do You Cook Carrots Before Putting in Soup?

We highly recommend sautéing 2 lbs of fresh carrots before adding the fresh carrots. The onion and honey will infuse into the softened carrots and another layer of flavor that is amazing.

What are the Benefits of Carrot Soup?

Carrots are abundantly loaded with beta-carotene, the same pigment that gives carrot its bright orange color. Beta-carotene helps improve eyesight and keep seasonal infections at bay. Carrots and ginger are both known for helping the body heal and stay healthy through their immunity-boosting powers.

How Long Does Homemade Carrot Soup Last?

This soup will keep in the fridge in a container with a lid for up to 1 week. It freezes beautifully for up to 2 months. Thaw and gently reheat over medium heat on the stove.

EXPERT TIP: When it’s time to purée the soup, you have a couple of options.

  1. Immersion Blender: An immersion blender is easy to use, but it can cause quite a bit of splattering and you will most likely still have chunks of carrots.
  2. Free-Standing Blender: When using a blender (our preferred method), carefully ladle the soup into the blender and cover the top with a kitchen towel to prevent leakage. Always take extra care when transferring hot liquids!

An electric blender filed with fresh carrot and ginger juice.

How To Serve

Carrot Ginger soup is wonderful served chilled, at room temperature, or warmed. Our favorite is slightly chilled, just slightly cool. This usually requires four to five of hours of chilling in the fridge before serving.

The herbed mousse can be made hours in advance and is really a wonderful addition to the soup.

For a gorgeous presentation, transfer the soup to a food-safe pitcher and then pour it into guests’ soup bowls at the table.

A close up view of a white bowl filled with carrot ginger soup topped with an herbed mousse.

The carrot ginger soup is really the perfect beginning to a spectacular Springtime feast – Easter, for example.

Looking for other Easter dish ideas? How about our:

  • Honey Bourbon Glazed Ham or Slow-Cooker Spiral Ham
  • French Potatoes au Gratin (Dauphinoise)
  • Roasted Asparagus with Herb Egg Salad
  • Slow-Cooker Corn on the Cob
  • Coconut Cream Cake

And, trust us, when you serve this, you will be setting the stage for a feast that your guests will be talking about for quite some time.

An overhead view of two white soup bowls filled with carrot ginger soup sitting next to a wine glass of Rosé.

Ready to make the most delicious (and delicious) soup in town? Go for it!

And when you do, be sure to take a photo of it, post it on Instagram, and tag @HowToFeedaLoon and hashtag#HowToFeedaLoon!

A single white soup bowl filled with carrot ginger soup topped with an herb mousse.
Print Recipe
No ratings yet

Carrot Ginger Soup

Carrot Ginger Soup is truly a spectacular dish that is wonderful served chilled, room temperature, or warm. The herbed mousse puts it over the top and can also be made in advance. This soup is truly as gorgeous as it is delicious.
Prep Time15 minutes mins
Cook Time25 minutes mins
Chill4 hours hrs
Course: Appetizer or Soup
Cuisine: American
Servings: 8
Calories: 219kcal
Author: Kris Longwell

Equipment

  • Blender or immersion blender
  • Hand mixer

Ingredients

For the Carrot Ginger Soup

  • 2 tablespoon olive oil
  • 1 medium onion chopped, about 1 cup
  • 2 lbs carrots peeled and sliced
  • 1 teaspoon Kosher salt
  • ½ teaspoon black pepper
  • 2 tablespoon honey
  • 6 cups carrot juice fresh
  • ¼ cup ginger juice fresh
  • orange zest from 1 orange
  • orange juice about 2 tbsp, from 1 orange

For the Herbed Mousse

  • 8 oz crème fraîche
  • 1 teaspoon oregano fresh, chopped
  • 1 teaspoon parsley fresh, chopped
  • 1 teaspoon chives fresh, snipped, plus more for garnish

Instructions

Make the Soup

  • If juicing the carrots and ginger, do this first and set aside.
  • In a large saucepan/skillet, heat the oil over medium heat. Add the onions and sliced carrots and cook until softened, about 5 minutes.
  • Stir in the honey, salt, and pepper. Cook until the carrots are very soft, about 15 more minutes.
  • Add the carrot and ginger juices and bring to a simmer. Stir in the orange zest and orange juice. Taste and add more salt, if desired.
  • Purée the soup in a blender (transferring the liquid very carefully) or in the skillet with an immersion blender. If not serving hot, allow to cool somewhat before serving. If serving cool or chilled, transfer to a large container with a tight-fitting lid and place in the refrigerator for 4 to 5 hours for slightly chilled, or overnight for fully chilled. Serve with a dollop of herbed mousse and a sprinkling of chopped chives on top.

Make the Herbed Mousse

  • In a medium bowl, use a hand mixer to incorporate the fresh herbs into the crème fraîche for about 1 to 2 minutes, or until light and fluffy. Store in the fridge, covered, until ready to use, up to 1 day.

Video

Notes

See the video near the top of the blog post for visual guidance.  If you liked the video, please subscribe to our YouTube channel. 
Fresh carrot juice can be found in the refrigerated produce section of many well-stocked supermarkets or at fresh juice establishments.  We find it at Whole Foods and Central Market.
See the blog post for a link to the juicer we use to easily juice carrots and ginger.
If you can't get fresh ginger juice, add 1 tablespoon of minced fresh ginger to the carrot slices and onion while sautéing.  After adding the fresh carrot juice, use a box grater to grate about ¼ cup of fresh ginger into the mixture. 
Our favorite way to serve this soup is slightly chilled.  It's wonderful fully chilled and also warm, too.  If the soup is fully chilled, then let sit out for about 1 hour for slightly chilled or warm in a large skillet to heat through. 
The soup will keep in the fridge for up to 1 week and freezes beautifully for up to 2 months.
This soup is delicious and gorgeous, but also extremely healthy and high in immunity-boosting attributes. 

Nutrition

Calories: 219kcal | Carbohydrates: 35g | Protein: 4g | Fat: 8g | Saturated Fat: 3g | Polyunsaturated Fat: 1g | Monounsaturated Fat: 3g | Sodium: 516mg | Potassium: 911mg | Fiber: 5g | Sugar: 18g | Vitamin A: 52806IU | Vitamin C: 23mg | Calcium: 89mg | Iron: 1mg

NOTE: This recipe is somewhat adapted from “The Home Cook” by Alex Guarnaschelli. 

Broccoli and Cheddar Quiche

April 6, 2022 by Kris Longwell 6 Comments

Broccoli and Cheddar Quiche on a cooling rack

Let us tell you one thing, REAL men (and women) do eat quiche, especially when it’s this recipe.

This combination of broccoli and cheddar is classic, but add in a little fresh dill and some Dijon mustard, and you’ve got something truly special to serve. And you will be amazed at how quickly it comes together. Put it over the top by making the pie crust from scratch!

Broccili-Cheddar-Quiche-1

How To Make Broccoli Cheddar Quiche

As mentioned, you can make the pie dough from scratch or you can go with store-bought. You can’t go wrong with either option.

The pie dough can be blind-baked a day in advance, making the final assembly and baking a snap!


NOTE: If you liked this video, please subscribe to our YouTube channel. Remember to click the little ‘bell’ icon so you’ll never miss a new video! Thank you!

Layers and Layers of Amazing Flavor

For a truly rich flavor, go with heavy cream, but if you want to go with a lighter version, you could substitute half and half.

Either way, you’ll have Broccoli and Cheddar Quiche perfection.

broccoli and cheddar recipe

Making the buttery, flaky pie crust from scratch is what really makes this quiche unforgettable.

Of course, you can go with a store-purchased pie crust, but going the extra distance and making your own crust will not only make you feel good, you just won’t believe the taste and texture.

Incredible!

broccoli and cheddar recipe

We just love using our tart pan with removable bottom.  We also love our ceramic pie weights and pie crust shield!

It makes for a beautiful quiche and is so easy to use and clean.

Serve this at your next brunch, or gathering of friends and family, and you will be very well-liked. We just can’t rave about this incredible Broccoli and Cheddar Quiche enough!

broccoli and cheddar quiche recipe

If you like this Quiche recipe, you’d also love our Skillet Scramble with Fontina, Tomato and Basil or our Best-Ever Breakfast Quiche

Now, let’s make this amazing Broccoli and Cheddar Quiche recipe!

Broccoli and Cheddar Quiche on a cooling rack
Print Recipe
5 from 1 vote

Broccoli and Cheddar Quiche

This Broccoli and Cheddar Quiche is really incredible. Quiche has gotten a bad rap sometimes, which I never understood. When do right, it's just amazing. You could go with store-bought dough for this, but part of what put's this recipe over the top is the buttery, flakey homemade crust. Give it a shot! And using a tart pan with a removable bottom is great, but you could also use a regualar pie pan.
Prep Time45 minutes mins
Cook Time1 hour hr 15 minutes mins
Total Time2 hours hrs
Course: Breakfast / Brunch
Cuisine: Vegetarian
Servings: 6 people
Calories: 374kcal
Author: Kris Longwell

Equipment

  • 1 9-inch tart pan with removable bottom or a 9-inch pie dish

Ingredients

  • 1 pie dough homemade or store-bought
  • 2 cups broccoli florets
  • 1 cup heavy cream
  • 1 tablespoon Dijon mustard
  • 2 eggs
  • 1 tablespoon fresh dill chopped
  • 1 teaspoon Kosher salt
  • ½ teaspoon freshly ground black pepper
  • 1 cup sharp cheddar cheese shredded

Instructions

Blind (Par) Bake the Dough

  • Roll the dough out into a 12-inch round and then transfer to a 9 ½-inch tart pan with a removable bottom (or a pie pan), gently fitting the dough into the bottom and sides of the pan.
  • Trim the dough, leaving a ½-inch overhang and then fold the overhanging dough back over into the pan, pressing it firmly against the side; the dough should be double thick (on the sides) and rise an ⅛-inch above the pan rim.
  • Pierce the dough all over with a fork.
  • Line the dough with foil or parchment paper, leaving the tops of the edges exposed and then place in the freezer for 15 to 30 minutes.
  • Pre-heat oven to 375°F.
  • Place the dough pan on a baking sheet and place pie weights or dried beans onto the foil or parchment paper.
  • Bake until the dough is set and beginning to brown, about 30 minutes.

Prepare the Quiche

  • Bring a pot of lightly salted water to a boil.
  • Add the broccoli and cook until just tender, about 5 minutes.
  • Drain and pat dry.
  • In a bowl, whisk together the cream, Dijon, eggs, dill, salt, and pepper.
  • Remove the baking sheet with the tart pan from the oven and gently remove the foil and weights/beans.
  • Scatter the broccoli and cheese evenly into the pastry shell.
  • Carefully pour in the egg mixture until it just reaches under the top lip of the crust. (Don't overfill the pan. If you have a little extra egg mixture left over, discard it).
  • Reduce the oven temp to 350° F and bake until the filling is puffed and golden brown, about 45 minutes.
  • Let cool slightly and then serve.

Video

Notes

See the video near the top of the blog post for visual guidance.  If you liked the video, please subscribe to our YouTube channel.  
The crust can be blind baked up to 1 day in advance.  Let cool completely, wrap in plastic wrap, and keep on the counter or in the fridge until ready to use.  
The quiche can be assembled up to 6 hours before baking.  
This quiche is wonderful served hot, warm, or at room temperature.
Leftovers will keep in the fridge for up to 5 days.  We don't recommend freezing the quiche as the cream could separate. 

Nutrition

Calories: 374kcal | Carbohydrates: 18g | Protein: 10g | Fat: 22g | Saturated Fat: 6g | Polyunsaturated Fat: 2g | Monounsaturated Fat: 9g | Trans Fat: 1g | Cholesterol: 118mg | Sodium: 696mg | Potassium: 200mg | Fiber: 2g | Sugar: 2g | Vitamin A: 1047IU | Vitamin C: 27mg | Calcium: 189mg | Iron: 1mg

POST UPDATE: This recipe was originally published in November, 2017, but was updated with improved tweaks to the recipe with new tips and photography and a fabulous new video in April, 2022!

Chicken Fricassee

April 3, 2022 by Kris Longwell 24 Comments

An overhead view of a stainless steel skillet filled with six pieces of chicken fricassee with a creamy mushroom sauce.

This may be the ultimate “winner winner chicken dinner.”

Leave it to the French to develop a chicken stew recipe that is so deep in flavor, you will be amazed from the very first bite. We serve over mashed potatoes for comfort food heaven. And it’s not hard to prepare at all!

An overhead view of a stainless steel skillet filled with six pieces of chicken fricassee with a creamy mushroom sauce.

How To Prepare Chicken Fricassee

This dish comes together in less than an hour, so it’s perfect for a busy weeknight meal, but spectacular enough to serve to guests at a dinner party.

You can use really any type of chicken piece, but we love going with skin-on, bone-in chicken thighs. More on that shortly.

The only tool you need is a large skillet with a lid.

How To Crisp Chicken Thighs

As mentioned, we love going with skin-on, bone-in chicken thighs for a variety of reasons.

First, the dark meat is extra flavorful and is less likely to dry out.

EXPERT TIP: Crispy skin is also why we love this piece of chicken. Salt and pepper the chicken all over and then sear them, skin-side down, until golden brown, about 5 minutes. As the chicken braises in the sauce, the skin will stay above the liquid and stay crispy. See NOTES for other options for chicken.

A large stainless steel skillet filled with skin-on chicken thighs that have been seared causing the skin on top to be crispy.

Chicken Fricassee is believed to be a compound of the two French techniques of “frire” (to fry) and “casser” (to break into pieces). The chicken is actually not fried but braised. Learn more here.

We love adding sautéed mushrooms to the dish. If you can, go with a nice variety of wild mushrooms.  Shiitake, baby bella, oyster, and cremini are all wonderful.

EXPERT TIP: After you’ve seared the chicken thighs, you’ll want to remove most of the fat that has been rendered in the pan in order to sauté the mushrooms. If the mushrooms seem a little too dry, then add 1 or 2 tablespoons of butter or olive oil during the cooking process.

A stainless steel skillet filled with quartered wild mushrooms that have been sautéd and stirred with a wooden spoon.

Adding Depth to the Sauce

Once the sauce has begun to thicken, it’s time to add some cream.

We love the addition of crème fraîche, which can often be found in the specialty cheese section of most well-stocked supermarkets.

EXPERT TIP: If you can’t find crème fraîche, you can easily substitute heavy cream, or combination of heavy cream and milk, or half and half. They are all wonderful additions to the sauce.

A person transferring softened crème fraîche from a glass bowl into a skillet filled with a dark brown gravy with mushrooms.

How To Serve Chicken Fricassee

As mentioned, this dish is excellent served over homemade mashed potatoes, but cooked pasta egg noodles are great, too.

Heat some green beans and a loaf of French country-style bread for the perfect meal.

EXPERT TIP: The sauce can be made up to 24 hours in advance. The chicken is best prepared just before it simmers in the sauce. Leftovers can be reheated in the sauce on the stove over medium heat.

A wooden spoon being used to pour a creamy mushroom gravy sauce over seared chicken thighs.

Other Classic French Dishes

Folks, if we had to rank our favorite chicken dish in the world, this would be right up near the top, if not the very top. But here are some other amazing French dishes to try:

  • Coq au Vin
  • Beef Bourguignon
  • Provençal Chicken Stew
  • Potatoes Dauphinoise

But in the meantime, you’ve got to make a batch of this unforgettable chicken fricassee. You and your family will want to make this dish time and time again.

A plate of chicken fricassee with a seared chicken thigh sitting on a bed of mashed potatoes with a mushroom gravy poured over the top.

Ready to make the best chicken dish this side of Paris? Go for it!

And when you do, be sure to take a photo of it, post it on Instagram, and tag @HowToFeedaLoon and hashtag #HowToFeedaLoon!

A wooden spoon being used to pour a creamy mushroom gravy sauce over seared chicken thighs.
Print Recipe
4.89 from 9 votes

Chicken Fricassee

Chicken Fricassee is a French chicken stew that is layered with amazing taste, and it comes together in less than 1 hour. Serve over mashed potatoes or cooked egg noodles and a warm loaf of bread.
Prep Time15 minutes mins
Cook Time45 minutes mins
Total Time1 hour hr
Course: Entree
Cuisine: French
Servings: 4
Calories: 728kcal
Author: Kris Longwell

Equipment

  • 1 Large skillet/saucepan with lid

Ingredients

  • 3 lb chicken thighs about 6, skin-on, bone-in
  • 2 tablespoon olive oil
  • Kosher salt and pepper
  • 4 tablespoon unsalted butter
  • 1 shallot chopped
  • 1 tablespoon thyme chopped
  • 3 cloves garlic minced
  • 1 lb mushrooms i.e., button, shiitake, baby bella, cremini, oyster - quartered or halved
  • 3 tablespoon flour
  • ½ cup white wine dry
  • 2 cups chicken stock
  • 8 oz crème fraîche
  • 2 tablespoon parsley fresh, chopped, for garnish

Instructions

  • Brush olive oil all over the chicken thighs. Liberally sprinkle with salt and pepper.
    3 lb chicken thighs, 2 tablespoon olive oil, Kosher salt and pepper
  • Melt butter in a large skillet over medium-high heat. Place the chicken thighs, skin-side down, in the butter. Sear until the skin is browned and crisp, about 5 minutes. Use a pair of tongs to flip the chicken thighs over and cook for another minute. Remove from the pan and place on a plate or platter. Set aside.
    4 tablespoon unsalted butter
  • Remove most of the fat and butter that is in the skillet (leave about 2 tbsp).
  • Over medium heat, add the shallots and thyme and cook until softened, about 2 to 3 minutes. Add the garlic and cook, stirring often, for another 30 seconds.
    1 shallot, 1 tablespoon thyme, 3 cloves garlic
  • Add the mushrooms and cook, stirring often, until they are softened and beginning to release some liquid, about 5 to 8 minutes (If the mushrooms are too dry during this step, add another 1 to 2 tablespoon of butter). Sprinkle with salt and pepper.
    1 lb mushrooms
  • Add the flour to the mushrooms and stir to coat for about 1 minute.
    3 tablespoon flour
  • Carefully whisk in the wine and bring to a boil. Lower the heat and whisk in the chicken stock, 1 teaspoon salt, and ½ teaspoon black pepper. Whisk and/or stir with a spoon to remove any clumps. Simmer for about 5 minutes until starting to thicken.
    ½ cup white wine, 2 cups chicken stock
  • Nestle the chicken thighs in the sauce, skin-side up. Add in any collected juices, too. Turn the heat down a little (to medium-low). Cover the skillet and let it simmer for 30 minutes.
  • Remove the chicken from the sauce and stir in the crème fraîche. Bring to a low simmer. Add the chicken back into the sauce. Serve at once with sauce spooned over the chicken, either on a platter or on individual plates, passing additional sauce at the table. Garnish with chopped parsley.
    8 oz crème fraîche, 2 tablespoon parsley

Video

Notes

For the chicken, you can also use skin-on, bone-in chicken breast and/or legs.  The breasts will take closer to 40 minutes to reach 165°F.  You can also go with skinless and boneless chicken thighs or breasts. You won't get the crispy skin, but they will still be delicious.  They will only need to cook for about 15 to 20 minutes.  
Crème fraîche can often be found in the specialty cheese section of many well-stocked supermarkets. You can substitute heavy cream (1 cup), or a combination of heavy cream and milk (½ cup each), or half and half. 
Leftovers will keep in the fridge for up to 5 days. We don't recommend freezing the sauce (the cream will separate). Reheat leftovers in a skillet with the sauce over medium heat until heated through. 

Nutrition

Calories: 728kcal | Carbohydrates: 16g | Protein: 63g | Fat: 34g | Saturated Fat: 8g | Polyunsaturated Fat: 3g | Monounsaturated Fat: 14g | Trans Fat: 1g | Cholesterol: 367mg | Sodium: 445mg | Potassium: 1266mg | Fiber: 2g | Sugar: 5g | Vitamin A: 871IU | Vitamin C: 9mg | Calcium: 57mg | Iron: 4mg

Pappardelle with Seasonal Vegetables

March 30, 2022 by Kris Longwell 3 Comments

A circular white serving bowl filled with pappardelle with seasonal vegetables next to a bottle of Rosé and two glasses of wine.

If you’re looking for a dish to feature all those amazing Spring veggies, you’ve found it.

We just love everything about this dish. It’s healthy, which is great, but it is also deeply flavorful and lets the vegetables shine. It takes a little more effort, but making the pasta from scratch is well worth it.  And it all comes together in about 30 minutes! 

A circular white serving bowl filled with pappardelle with seasonal vegetables next to a bottle of Rosé and two glasses of wine.

How To Make Pappardelle with Seasonal Vegetables

This dish is great any time of the year, but it’s especially wonderful when vegetables are in their prime season, such as in spring.

Head to your local farmer’s market and grab the veggies that are calling your name.

And choose your favorite herbs to season the dish. Fresh is the best!


NOTE: If you liked this video, please subscribe to our YouTube channel. Remember to click the little ‘bell’ icon so you’ll never miss a new video. Thank you!

What Are Cipolline Onions and How To Prepare

We love adding cooked cipolline onions to this dish.

Although they are typically grown in the fall, you can find them year-round in most well-stocked supermarkets or farmer’s markets.

EXPERT TIP: In Italy, cipolline onions are traditionally served whole. Simply boil them in their skins for about 5 minutes and then remove them from the water and let them cool. Use your fingers to cut the root end off then just squeeze the onion from the skin. They are mild in taste but very delicious and add a wonderful texture to the dish.

A medium-sized silver pot filled with boiling water and cipollini onions and then a person removing the skins from those onions.

The Ingredients You Will Need

As mentioned, pick whatever vegetables look fresh and vibrant to you. Here are the vegetables we love to use:

  • Baby carrots, orange, purple and white
  • Asparagus, ends trimmed
  • Sweet peas, or shucked sugar snap peas
  • Parsnips
  • Cipolline onions (See NOTES)

Any of the following fresh herbs add amazing flavor:

  • Basil
  • Parsley
  • Marjoram
  • Tarragon
  • Dill

EXPERT TIP: If you don’t have the time to make homemade pasta, seek out good-quality fresh pasta. If you can’t find pappardelle, you can cook lasagna noodles and then use a pizza cutter to cut large strands of pasta. Or, go with whatever fresh pasta is available to you.

A person transferring sweet peas from a small glass bowl into a pot of simmering vegetables including carrots, asparagus, and pearl onions.

After simmering the vegetables, you can remove them from the liquid and continue cooking the broth until it reduces to about 1 cup.

When you add the vegetables and pasta back to the reduced sauce, it will simply coat them and you won’t have a “saucy” dish at all.

We enjoy a little extra broth with the dish. It’s perfect for dunking a fresh piece of bread into.

Either method is extremely delicious and satisfying.

An overhead view of a large stainless steel skillet filled with pappardelle with seasonal vegetables with a wooden spoon inserted into it.

How To Serve Pappardelle with Seasonal Vegetables

Because this dish comes together very quickly, we don’t recommend preparing it in advance of serving.

However, to help reduce your time in the kitchen greatly, have all of the vegetables and herbs prepped and ready to go.

Drop the pasta in just before you are ready to serve. Be sure to follow package instructions, but most fresh pasta only takes 2 to 3 minutes to cook until al dente.

EXPERT TIP: This dish is absolutely heavenly when finished off with a little butter. It adds a luxurious texture to the pasta, but it can be omitted, if desired. Topping the finished dish with grated Parmesan and a small bunch of pea shoots is beautiful and delicious, too.

A person grating a block of Parmesan cheese over a bowl filled with fresh pasta and sautéd vegetables.

This pasta dish is so deeply flavorful and fresh that you won’t miss the meat at all.

Other favorite Italian vegetarian dishes include:

  • Vegetarian Pasta Bake
  • Eggplant Parmesan
  • Asparagus Risotto
  • Pasta alla Norma
  • Pasta Primavera

In the meantime, you’ve got to give this vibrant pasta dish a try. You and your guests will be so glad that you did!

A large white serving bowl filled with fresh pappardelle pasta and sautéd spring vegetables.

Ready to make one of the most beautifully delicious and healthy dishes in town? Go for it!

And when you do, be sure to take a photo of it, post it on Instagram, and tag @HowToFeedaLoon and hashtag #HowToFeedaLoon.

A circular white serving bowl filled with pappardelle with seasonal vegetables next to a bottle of Rosé and two glasses of wine.
Print Recipe
No ratings yet

Pappardelle with Seasonal Vegetables

This Pappardelle with Seasonal Vegetables is so vibrant and so fresh! Really healthy and perfect to make when vegetables from the farmer's market are young and bursting with flavor.
Prep Time20 minutes mins
Cook Time15 minutes mins
Total Time35 minutes mins
Course: Entree / Pasta
Cuisine: Italian
Servings: 4 people
Calories: 375kcal
Author: Kris Longwell

Ingredients

  • ½ lb pappardelle pasta can use linguine*
  • 3 cups vegetable stock
  • Kosher salt and freshly ground black pepper
  • 1 cloves garlic minced
  • 1 bunch asparagus medium size, ends trimmed
  • 1 cup baby carrots tri-color, if available
  • 1 cup spring onions aka Cipolline (see NOTES)
  • ½ cup sweet peas
  • 2 tablespoon basil fresh, chopped
  • 2 tablespoon parsley fresh, chopped
  • 2 tablespoon thyme fresh, chopped
  • 4 tablespoon unsalted butter
  • 1 tablespoon lemon zest
  • 1 tablespoon lemon juice from the lemon
  • Pea shoots or watercress for garnish
  • Freshly grated Parmigiano-Reggiano cheese optional, for garnish

Instructions

  • In a small pan, bring 2 cups of water to a boil and add the onions and simmer for 5 minutes.
  • Remove the onions with a slotted spoon. Cut off the root end, and squeeze the onion out of the skin. Set aside.
  • In a large skillet, bring the stock, garlic, 1 teaspoon salt, and ½ teaspoon of pepper to a simmer over medium-high heat.
  • Add the carrots, cover, and simmer for 5 minutes. Add the remaining asparagus and onions, cover again, and simmer for another 5 minutes, or until they are soft.
  • Meanwhile, cook the pasta in a pot of salted boiling water until al dente, about 3 minutes. Drain.
  • Stir in the peas. Next, add the cooked pasta, herbs, butter, zest, and lemon juice to the stock. Gently stir for 1 minute, or until butter is melted and pasta is coated.
  • Serve in pasta bowls and garnish with pea shoots and topped with shaved (or grated) Parmesan (if using).

Video

Notes

See the video near the top of the blog post for visual guidance.  If you liked the video, please subscribe to our YouTube channel. 
Pappardelle pasta can be found in the fresh pasta section of many well-stocked supermarkets, gourmet food shops, or Italian markets.  You can also cook lasagna noodles and then cut them into ½-inch strips with a pizza cutter.   Or, simply go with your favorite type of pasta. 
Cipolline onions can be found in the produce section of many well-stocked supermarkets and definitely at fresh produce markets.  They are sometimes called 'boiler onions' or 'spring onions.'  If you can't find them, you could go with pearl onions, but we recommend peeling them first. 
We recommend using a combination of fresh herbs for the dish.  We used tarragon in the video, which is wonderful but does have a slight (but distinct) licorice taste.  If using dried herbs, only use 1 teaspoon of each. 
Leftovers will keep in the fridge for up to 3 days.  Gently reheat on the stove in a skillet until heated through.   The dish does not freeze well. 

Nutrition

Calories: 375kcal | Carbohydrates: 53g | Protein: 12g | Fat: 14g | Saturated Fat: 8g | Polyunsaturated Fat: 1g | Monounsaturated Fat: 4g | Trans Fat: 1g | Cholesterol: 78mg | Sodium: 751mg | Potassium: 555mg | Fiber: 7g | Sugar: 7g | Vitamin A: 6661IU | Vitamin C: 22mg | Calcium: 101mg | Iron: 5mg

POST UPDATE: This recipe was originally published May, 2016, but was updated with improved tweaks to the recipe with new tips and photography and a fabulous new video in March, 2022!

Grilled Carne Asada

March 27, 2022 by Kris Longwell 2 Comments

A partially sliced grilled carne asada on a wooden cutting board topped with homemade chimichurri sauce with a large chef's knife near the meat along with tortillas, and a bowl of salt, and a bowl of pico de gallo.

Grilled Carne Asada is juicy, tender, and deeply flavorful. There is no doubt about it, we are crazy for steak fajitas. But there is also something equally as satisfying about this cut of meat that is marinated for hours and then grilled perfectly. Truly spectacular.

A partially sliced grilled carne asada on a wooden cutting board topped with homemade chimichurri sauce with a large chef's knife near the meat along with tortillas, and a bowl of salt, and a bowl of pico de gallo.
[feast_advanced_jump_to]

🍍 The Ingredients

The bold combination of pineapple, garlic, onion, spices, and homemade chili sauce comes together to create one of the most flavorful and tender meats. Find ingredient notes (including substitutions and variations) below.

A collection of ingredients on a wooden background for grilled carne asada including steak, tortillas, chiles, pineapple juice, spices, soy sauce, and pico de gallo.

🌶️ Substitutions and Variations

  • Beef – The flat iron steak is one of the most tender cuts of beef available, and it’s not overly expensive. Ask your butcher: It’s from the chuck, specifically the top blade section of the shoulder. Skirt steak, ribeye, or flap steaks are all excellent options for carne adada.
  • Citrus – Pineapple juice helps to tenderize the steak, but also adds a wonderful depth of flavor. Lime juice is a great substitution.
  • Chili sauce – Making it from scratch is easy and adds such depth of flavor. However, you can use bottled chili sauce and still get excellent results. It can be found in the condiments section of most supermarkets, near the ketchup.

See the recipe card (with video) below for a full list of ingredients and measurements.

🥩 How To Make Grilled Carne Asada

A person using a slotted spoon to transfer freshly boiled dried chili peppers from a pot of hot water into a blender filled with more softened chiles.
  1. Step 1: Soften the chiles in hot water, transfer to a blender with garlic, salt, and chile water.
A person holding the pitcher of a blender with puréed chiles and seasonings in it.
  1. Step 2: Purée for 1 minute.
A person transferring a marinade and sliced onions into a plastic baggie that has an uncooked flat-iron steak in it.
  1. Step 3: In a bowl, mix together the marinade ingredients and cover the meat with it in a baggie
An unsliced strip of seasoned flat iron steak cooking on the grate of a gas grill.
  1. Step 4: Grill until internal temperature reaches 135°F.
A person using a large chef's knife to cut strips of grilled carne asada on a wooden cutting board.
  1. Step 5: Let the meat rest for about 5 to 10 minutes, then slice against the grain.
Strips of medium-rare grilled carne asada on a wooden cutting board with small amounts of chimichurri sauce on top as well as a sprinkling of coarse sea salt.
  1. Step 6: Garnish with chimichurri sauce and coarse sea salt. 

Expert Tip

We recommend using a digital meat thermometer to ensure the meat has reached the correct temperature. We find the medium-rare to medium is perfect. Once you’ve reached 130°F on the grill, take the meat off. It will continue to cook off the heat to 135°F.

🍽️ How To Serve Carne Asada

  • This meat is so amazing, it doesn’t need a lot of accouterments.
  • Warm flour tortillas and a fresh batch of homemade chimichurri are all you need. Pico de gallo is always a nice addition, too.
  • Serve with a nice batch of Borracho Beans or Mexican Black Beans and Mexican Rice for the perfect meal.

🙋🏽‍♂️ Frequently Asked Questions

What cut of beef is best for grilled carne asada?

Flat iron or flap steak is best because they are very tender, marbled, and grill perfectly. Flank steak and skirt steak work well, too. Ribeye will work, but, isn’t traditional.

How long should I marinate grilled carne asada for the best flavor?

For optimal flavor and tenderness, marinate the meat for at least 2 hours, but preferably overnight in the refrigerator.

What is the best way to grill carne asada?

Grill carne asada over high heat for 3-5 minutes per side to achieve a nice char while keeping the inside juicy and tender, then let it rest before slicing against the grain. We like grilling over super-hot charcoals, but a gas or electric grill will work, too.

Strips of grilled carne asada that has been cooked to medium-rare and is resting on a cutting board and topped with chimichurri sauce and coarse sea salt.

🔥 Other Amazing Grilling Recipes

  • An arrangement of ingredients for grilled tacos al pastor on a white background including dried chiles, spices, pineapple, pork shoulder, sugar, vinegar, and corn tortillas.
    Grilled Tacos al Pastor
  • A cast iron fajita skillet of steak fajitas with limes and green onions nearby.
    Authentic Steak Fajitas
  • An overhead view of grilled chicken skewers with Alabama sauce on a piece of crumpled brown wax paper.
    Grilled Chicken Skewers with Alabama White Sauce
  • A white oval platter filled with a pile of grilled buffalo shrimp with two small jars filled with blue cheese dressing and celery sticks on each side of the dish.
    Grilled Buffalo Shrimp

Ready to make the best grilled meat this side of Mexico? Go for it!

And when you do, be sure to take a photo of it and post it on Instagram and tag @HowToFeedaLoon and hashtag #HowToFeedaLoon!

Strips of grilled carne asada that has been cooked to medium-rare and is resting on a cutting board and topped with chimichurri sauce and coarse sea salt.
Print Recipe
5 from 1 vote

Carne Asada

Carne Asada is an incredibly flavorful and juicy cut of beef grilled to perfection. Similar to steak fajitas but without all the fixings. If possible, go with flat iron steak or flap steak, which can be found in the meat department of many well-stocked supermarkets or at your local meat market. Skirt steak will work, too.
Prep Time15 minutes mins
Cook Time10 minutes mins
Chill time in the marinade8 hours hrs
Total Time8 hours hrs 25 minutes mins
Course: Entree
Cuisine: Mexican / TexMex
Servings: 4
Calories: 546kcal
Author: Kris Longwell

Equipment

  • Grill, charcoal, gas, or electric

Ingredients

For the Chili Sauce

  • water for boiling
  • 16 ancho chiles Stemmed and seeds removed (as many as possible)
  • 16 arbol chilis Stemmed and seeds removed (as many as possible)
  • 4 cloves garlic roughly chopped
  • 2 teaspoon Kosher salt
  • 1 cube chicken bouillon

For the Carne Asada

  • ½ cup soy sauce
  • 2 tablespoon vegetable oil
  • 2 tablespoon chili sauce
  • ½ onion cut into slices
  • 1 clove garlic minced
  • ¼ cup pineapple juice
  • 1 teaspoon Kosher salt
  • ½ teaspoon black pepper
  • 1 lb flap or flat iron or skirt or ribeye (sliced thinly)
  • 8 flour tortillas warmed
  • chimichurri sauce optional
  • pico de gallo optional
  • finishing salt such as Maldon's, for finishing

Instructions

Make the Chili Sauce

  • Bring a medium pot filled with water to a boil. Carefully add the seeded peppers and cook for 15 minutes.
    16 ancho chiles, 16 arbol chilis, water
  • Use a slotted spoon to transfer the softened peppers and a cup of the chili broth to a blender. To the blender, add the garlic, salt, and bouillon cube. Purée until smooth. Transfer to a jar with a tight-fitting lid and set aside.
    4 cloves garlic, 2 teaspoon Kosher salt, 1 cube chicken bouillon

Make the Carne Asada

  • In a medium-sized bowl, add the soy sauce, vegetable oil, chili sauce, onion, garlic, pineapple juice, and salt. Mix to combine.
    ½ cup soy sauce, 2 tablespoon vegetable oil, 2 tablespoon chili sauce, ½ onion, 1 clove garlic, ¼ cup pineapple juice, 1 teaspoon Kosher salt, ½ teaspoon black pepper
  • Place the meat in a large plastic baggie. Pour the marinade mixture over the meat. Use your fingers to carefully remove the air from the baggie and then seal. Place in the refrigerator for at least 4 hours, or even better, up to 24 hours. If you can, massage the baggie every few hours.
    1 lb flap or flat iron
  • Heat your charcoal, gas, or electric grill to high.
  • Remove the meat from the marinade. Discard the marinade.
  • Place the meat on the grill over direct heat. Sprinkle the meat with a little more salt. After 4 to 5 minutes, use a pair of tongs to flip the meat over. Hit it with a little more salt. Cook for another 4 to 5 minutes, or until an internal temperature of 125° to 130°F is reached. Remove from the grill and let rest for about 5 minutes. Slice against the grain and serve at once with tortillas, chimichurri, and pico de gallo. We like to sprinkle finishing salt (such as Maldon's) over the meat after slicing.
    8 flour tortillas, chimichurri sauce, pico de gallo, finishing salt

Video

Notes

NOTE: Watch the video near the top of the recipe for visual guidance.
Flat iron and flap steak can be found at most meat markets. Ask your butcher for it. Flap steak is also called sirloin tip and sometimes a bavette tip.  If you can’t find flap, go with skirt or ribeye. 
We use either ancho chiles or guajillo chilese (along with the arbol) for making the sacue. They both are great and not spicy. They can be found in the Hispanic section of many supermarkets, Hispanic food markets, or online. 
The chimichurri sauce can be made up to 2 days in advance. 
The longer the meat sits (up to 24 hours) the better.
Leftovers will keep in the fridge for up to 5 days.  Reheat on the stove over medium heat or in the microwave for 30-second intervals until heated through. 

Nutrition

Calories: 546kcal | Carbohydrates: 94g | Protein: 20g | Fat: 11g | Saturated Fat: 4g | Polyunsaturated Fat: 4g | Monounsaturated Fat: 2g | Sodium: 7843mg | Potassium: 968mg | Fiber: 14g | Sugar: 23g | Vitamin A: 7524IU | Vitamin C: 19mg | Calcium: 231mg | Iron: 8mg

Shrimp Marinara

March 23, 2022 by Kris Longwell 8 Comments

An overhead view of a large pasta bowl filled with shrimp marinara sitting next to a couple glasses of rosé wine.

If you love shrimp and if you love pasta, you will flip for this dish.

This is one of those dishes that is so simple to prepare but the results are truly spectacular. To put it over the top, make a batch of homemade marinara sauce in advance and then it all comes together in about 20 to 30 minutes!

An overhead view of a large pasta bowl filled with shrimp marinara sitting next to a couple glasses of rosé wine.

How To Make Shrimp Marinara

This honestly could not be easier to prepare.

Because you’re cooking with shrimp, it comes together very quickly.

You’ll want to make sure you have all of your ingredients prepped and ready to be before you start cooking.


NOTE: If you liked this video, please subscribe to our YouTube channel. Remember to click the ‘bell’ icon so you’ll never miss a new video!

Choosing the Right Shrimp

Purchasing frozen shrimp from your supermarket is perfectly fine.

In fact, unless you’re shopping at a seafood market where shrimp was caught the same day (usually along the coast), the shrimp you see in the display came from the same bags you see in the frozen section.

EXPERT TIP: A shrimp’s size is measured by the number of individual shrimp it takes to make up a pound. A label of 16/20 means that there are between 16 and 20 of these shrimp in a pound. The main takeaway? The smaller the number, the bigger the shrimp. Learn more here.

Seek out shrimp that is deveined and peeled to make it easy on yourself. Toss with fresh herbs before adding to the hot skillet with the sautéed garlic.

Uncooked shrimp that has been coated with fresh herbs being transferred into a skillet filled with sautéed garlic.

After you’ve dumped the shrimp into the hot skillet, you’ll need to let them sauté for just a few minutes before flipping them.

The shrimp will begin to curl up and turn pink.

EXPERT TIP: Once the shrimp is pink all over, be sure to remove them with a slotted spoon immediately. Overcooking the shrimp will result in an unpleasant rubbery texture.

A wooden spoon stirring shrimp that has been sautéd with herbs in a large stainless steel skillet.

Tips for Perfect Shrimp Marinara

Mise en Place: As mentioned, this dish comes together very quickly. Be sure to have all of your herbs chopped and ready to go, and measure out the other ingredients. You don’t want to have to do any of this once you start cooking.
Quality Marinara: This dish doesn’t require a lot of ingredients, so going with quality is best. Go with top-notch marinara sauce, or make it from scratch (in advance). San Marzano tomatoes are a great choice. Squeeze them with your hands as you add them to the skillet.
Choosing the Best Pasta: For this, go with your favorite. We recommend a long tubular pasta, such as angel hair (or favorite), spaghetti, linguine, or fettuccine. Short pasta will work, too, but the chunky sauce is a nice match to the long-style pasta..

A person squeezing whole Italian tomatoes into a skillet filled with marinara sauce.

Once you brought the sauce together, it’s time to add back in the shrimp.

You’re getting very close to serving time.

EXPERT TIP: Be sure to check your cooking time for your pasta. If using fresh pasta, this will only take about 3 to 4 minutes. Completely dried pasta will take up to 12 minutes. It also depends on the type of pasta you are using. Remember to get your salted water boiling well in advance so everything will time out perfectly.

Sautéed shrimp being transferred from a platter into a skillet filled with simmering marinara sauce.

How To Serve and Store

You can easily pour the sauce with the shrimp directly over the cooked pasta.

However, we like to grab a second large skillet, add a little of the sauce, then add the pasta. Use tongs to coat the pasta. Transfer the remaining sauce and mix until completely mixed. Save a little pasta water if you need to to loosen then sauce a bit.

The sauce will keep covered in the fridge for up to 5 days and freezes beautifully for up to 2 months. Reheat the pasta in the microwave in 1 minutes intervals until hot. Or, reheat in a skillet, adding a little water, if needed.

Wine Pairing: You can’t go wrong with white, red, or our favorite, rosé. The marinara sauce matches well against a Cabernet or Pinot Noir, but the shrimp matches well with Pinot Grigio, Chardonnay, Sauvignon Blanc. A light rosé is wonderful, too.

A large pasta bowl filled with shrimp marinara next to a glass of rosé wine and a torn loaf of bread.

This pasta is without a doubt one of our all-time favorites.

It’s so easy and quick, it’s perfect for a weeknight dinner, but it’s elegant and so delicious, it’s also great for serving to guests.

No matter what, with just one bite, you’ll be a believer. Delizioso!

A person lifting up a fork that has pasta wrapped with cooked shrimp marina and angel hair pasta.

Ready to make one of the best shrimp pasta dishes this side of Sicily? Go for it!

And when you do, be sure to take a photo of it, post it on Instagram, and tag @HowToFeedaLoon and hashtag #HowToFeedaLoon!

An overhead view of a large pasta bowl filled with shrimp marinara sitting next to a couple glasses of rosé wine.
Print Recipe
4 from 1 vote

Shrimp Marinara

Shrimp Marinara is such an amazing dish that literally comes together in about 20 to 30 minutes. The are other components to the sauce other than
Prep Time10 minutes mins
Cook Time20 minutes mins
Course: Entree
Cuisine: Italian
Servings: 4
Calories: 372kcal
Author: Kris Longwell

Equipment

  • 1 large skillet or saucepan
  • 1 pot for cooking pasta

Ingredients

  • ¼ cup olive oil
  • 6 cloves garlic minced
  • 1 lb shrimp medium to large, peeled and deveined
  • 1 teaspoon oregano fresh, chopped
  • 1 tablespoon Italian parsley fresh, chopped
  • ¼ cup basil fresh, chopped
  • ¼ cup white wine
  • 1 15 oz can whole tomatoes drained
  • ½ cup clam juice
  • ½ cup marinara sauce
  • ½ lb pasta i.e., angel hair, spaghetti, linguine
  • Salt and pepper

Instructions

  • Add water to a large pot and liberally add salt. Bring to a boil.
  • In a large skillet/saucepan, heat the olive over medium heat until shimmering. Add the garlic and sauté until just starting to turn a light brown, 1 to 2 minutes.
  • Meanwhile, place the shrimp in a bowl and stir in the oregano, parsley, and basil.
  • Add the shrimp to the hot skillet and cook until the shrimp is curled and pink, about 4 to 5 minutes. Remove the cooked shrimp with a slotted spoon to a platter and set aside.
  • In the same skillet, over medium-high heat, add the wine and stir it around for about 1 minute.
  • Carefully squeeze the drained tomatoes with your hands into the skillet. Add the clam juice and marinara sauce and cook fro about 4 minutes. Stir in ¾ teaspoon of salt and ½ teaspoon black pepper.
  • During this process, add your pasta to the boiling water and cook until just cooked, or al dente, according to package directions.
  • Carefully add the shrimp into the sauce and simmer for a few minutes.
  • Drain the pasta and either stir into the sauce, or place on a platter (or bowls) and pour sauce over the top, or get a new skillet, add a little of the sauce over medium heat, stir in the pasta, and then stir in the remaining sauce. Taste and add more salt, if desired. Serve at once.

Video

Notes

See the video near the top of the blog post for visual guidance.  If you liked the video, please subscribe to our YouTube channel.  
You don't have to make the marinara sauce from scratch, but you won't regret that you did.  We make a batch in advance and then freeze what you don't need. 
The sauce will keep in the fridge for up to 5 days and freezes beautifully for up to 2 months.  Reheat leftover pasta in the microwave on a skillet on the stove over medium heat (you may need to add a little water to loosen the sauce). 

Nutrition

Calories: 372kcal | Carbohydrates: 50g | Protein: 8g | Fat: 13g | Saturated Fat: 2g | Polyunsaturated Fat: 2g | Monounsaturated Fat: 10g | Sodium: 258mg | Potassium: 289mg | Fiber: 3g | Sugar: 4g | Vitamin A: 351IU | Vitamin C: 7mg | Calcium: 40mg | Iron: 2mg

Orange Chicken (Panda Express Copycat)

March 20, 2022 by Kris Longwell 11 Comments

An overhead view of a wok filled with orange chicken with a wooden spoon inserted in the side.

We all love to indulge in a delicious guilty pleasure every now and then.

There is something irresistible about a dish that is a little sweet, a little tangy, a little saucy, and a whole lot of crunchy. This dish takes the fast-food chain’s classic dish and turns the dial up in a big way.

An overhead view of a wok filled with orange chicken with a wooden spoon inserted in the side.

How To Make Orange Chicken From Scratch

As is the case with many Asian-inspired dishes, it’s important to have all of your ingredients prepped and ready to go before you start cooking.

This dish is no exception.

EXPERT TIP: If you don’t have a wok, no problem. The dish can easily be prepared in a cast-iron skillet or any pot that can handle high heat.

How To Make Extra-Crispy Fried Chicken

When we set out to make this iconic dish even better (a tall order, we know), we knew we had to start with the chicken. It needed to be extra chicken.

A two-stage dredge does the trick. We’ll start with a wet flour batter to dredge the chicken pieces in, and then a second dry seasoned flour will produce extra crispy chicken

EXPERT TIP: When adding water to the flour to make the wet batter, be sure it’s ice cold. Add iced water to a large measuring cup and then pour into another 1-cup measuring cup, holding the ice back. This is a similar approach to making amazing tempura. The wet batter should have the consistency of pancake batter.

A fork being used to dredge chicken pieces in a wet batter in a pan and then those pieces dredged in flour.

Dredge all of the chicken pieces first while your oil is heating up.

We highly recommend using a candy thermometer to ensure you’ve reached an oil temperature of 350°F to 360°F.

EXPERT TIP: Fry the chicken in batches; you don’t want to overcrowd the oil. Use a spider or a couple of forks to move the chicken pieces around in the oil. This will keep the pieces from sticking to each other.

A kitchen spider holding up pieces of fried chicken nuggets over a wok filled with hot oil.

How To Serve

Once you’ve created the amazing orange chicken sauce and then coated the extra-crispy pieces of fried chicken with it, you’ll be tempted to eat them all right from the wok.

However, we love to serve the dish over perfectly steamed rice.

NOTE: Leftovers will keep in the fridge for up to several days, but this dish is best when served piping hot right from the wok.

An overhead view of a black dinner plate filled with white rice topped with orange chicken with a pair of chopsticks on the side of the plate.

Other Classic Chinese Dishes

Here are a few of our other favorite Asian-inspired dishes that you will love making at home:

  • Homemade Egg Rolls
  • Pork Dumplings in Peanut Sauce
  • Beef and Broccoli Stir-Fry
  • Sesame Chicken
  • Best Chicken Fried Rice

In the meantime, don’t you want to sink your teeth into this classic dish?

A black dinner plate filled with white rice topped with orange chicken and garnished with chopped scallions.

Folks, if you love Orange Chicken from Panda Express as much as we do, then you are going to flip for this dish.

Super crispy fried chicken pieces in a deeply flavorful orange syrupy sauce that are just unbelievable.

You may never order out again. Well, that’s a stretch. But, seriously, this orange chicken will change your life. It’s honestly that good!

A pair of chopsticks holding up a piece of fried orange chicken over a plate of the same.

Ready to make the best homemade take-out dish this side of, well, you know where? Go for it!

And when you do, be sure to take a photo of it, post it on Instagram, and tag @HowToFeedaLoon and hashtag #HowToFeedaLoon!

A black dinner plate filled with white rice topped with orange chicken and garnished with chopped scallions.
Print Recipe
4.75 from 4 votes

Orange Chicken (Panda Express Copycat)

If you love orange chicken from Panda Express, then you are going to absolutely flip for this dish. Extra crispy chicken in a deeply flavorful orange sauce. Truly amazing.
Prep Time15 minutes mins
Cook Time20 minutes mins
Total Time35 minutes mins
Course: Entree
Cuisine: Chinese / American
Servings: 4
Calories: 763kcal
Author: Kris Longwell

Equipment

  • 1 Wok or sturdy pot that can handle high heat

Ingredients

For the Sauce

  • ⅓ cup hoisin sauce
  • 1 teaspoon orange zest
  • 3 tablespoon orange juice
  • 3 tablespoon soy sauce
  • ½ cup sugar
  • 1 teaspoon sesame oil
  • 1 tablespoon cornstarch
  • 2 tablespoon water

For the Chicken

  • 2½ cups flour divided
  • 1 cup water ice cold
  • 1 large egg
  • ¼ cup cornstarch
  • 1 teaspoon salt
  • ½ teaspoon black pepper
  • Vegetable oil for frying and then for stir-frying.
  • 1 lb chicken thighs boneless, skinless, cut into bite-sized pieces

Finishing

  • 1 tablespoon ginger fresh, minced
  • 2 large cloves garlic minced
  • 1 tablespoon scallions chopped, for garnish (optional)

Instructions

Make the Sauce

  • In a medium bowl, mix together all of the sauce ingredients until fully combined. Set aside.
    ⅓ cup hoisin sauce, 1 teaspoon orange zest, 3 tablespoon orange juice, 3 tablespoon soy sauce, ½ cup sugar, 1 teaspoon sesame oil, 1 tablespoon cornstarch, 2 tablespoon water

Prepare the Chicken and Stir-Fry

  • In a medium bowl or pan, mix together 1½ cups of flour with the cold water and egg. Stir until a batter forms (it should have the same consistency as pancake batter).
    2½ cups flour, 1 cup water, 1 large egg
  • In another bowl, pan, or platter, mix together 1 cup of flour, ¼ cup cornstarch, salt, and pepper.
    ¼ cup cornstarch, 1 teaspoon salt, ½ teaspoon black pepper
  • Heat about 2 inches of vegetable oil in your wok to 350°F.
    Vegetable oil
  • Working in batches, coat the chicken pieces in the wet batter and then dredge in flour. Set aside. Finish the remaining chicken.
    1 lb chicken thighs
  • Working in batches, fry the battered chicken in the oil until golden brown and very crispy. Carefully remove from the oil with a spider or metal tongs and let drain on a plate lined with paper towels.
  • Carefully discard all of the oil from the wok and clean it out with a paper towel. See NOTES.
  • Heat 2 tablespoon of vegetable oil over high heat in your wok.
  • Add the ginger and garlic and stir-fry for about 30 seconds. Stir constantly.
    1 tablespoon ginger, 2 large cloves garlic
  • Carefully pour in the reserved sauce and stir frequently. Bring to a boil and let simmer for about 2 to 3 minutes, or until slightly thickened.
  • Add all of the fried chicken pieces and stir to fully coat. Serve at once over rice, garnished with scallions.
    1 tablespoon scallions

Video

Notes

See the video near the top of the blog post for visual guidance.  If you liked the video, please subscribe to our YouTube channel.  
Boneless, skinless chicken breasts can be substituted for chicken thighs.
You can fry the chicken up in a separate pot or deep-fryer and then cook the sauce in the wok or sturdy skillet.  Discard of any oil responsibly (don't pour down the kitchen sink!). 
Leftovers will keep in the fridge for up to 3 days.  Reheat in the microwave for about 1 minute.  This dish is best served piping hot right out of the wok!
We love serving this over Steamed Rice. 

Nutrition

Calories: 763kcal | Carbohydrates: 107g | Protein: 31g | Fat: 23g | Saturated Fat: 6g | Polyunsaturated Fat: 5g | Monounsaturated Fat: 9g | Trans Fat: 1g | Cholesterol: 158mg | Sodium: 1819mg | Potassium: 437mg | Fiber: 3g | Sugar: 33g | Vitamin A: 201IU | Vitamin C: 8mg | Calcium: 48mg | Iron: 5mg

Reuben Sandwich

March 16, 2022 by Kris Longwell 6 Comments

A grilled rueben sandwich that has been cut in half and then stacked on top of each other on a white plate with a pickle spear nearby.

This sandwich brings together a true taste sensation that makes it such a classic.  And it may not actually be Irish in origin, but many of the components are.  The perfect St. Patrick’s Day sammie!

The ingredients are simple: thinly sliced corned beef, sauerkraut, cheese, rye bread, and homemade Russian dressing! Grilled to perfection!

A grilled rueben sandwich that has been cut in half and then stacked on top of each other on a white plate with a pickle spear nearby.

How To Make a Rueben Sandwich

This is one of those sandwiches where the sum is greater than the parts.

Each component comes together to make a classic and epic taste sensation.

And they are so much fun to prepare!


The Key Ingredients

We’ve got to say, a Rueben sandwich is really only as good as the corned beef. What is corned beef you may ask? Read more here.

We order incredible corned beef from Katz Delicatessen in New York City.

The homemade Russian dressing (with a Loon twist) adds amazing taste. More on that in a moment.

Seek out top-notch sauerkraut, Swiss cheese, and deli rye bread to create the perfect sandwich.

EXPERT TIP: You can find delicious corned beef at almost any decent deli, even at most quality supermarkets. We love our corned beef cut nice and thick, but it is also extremely delicious when cut very thin. You decide what looks best to you and have the deli person slice it for you accordingly. Place the meat in a heat-proof bag and steam in simmering water for about 5 minutes.

An overhead view of a loaf of rye bread, a plate of sliced Swiss cheese, a plate of sliced cooked corned beef, a small bowl of Russian dressing, and a bowl of sauerkraut.

Russian Dressing vs. Thousand Island Dressing

Russian Dressing and Thousand Island Dressing are very similar.

We combine the main components of each to make what we think is one of the best condiments you’ll ever have or serve. Here are the ingredients you’ll need:

  • Mayonnaise
  • Sour cream
  • Chili sauce
  • Worcestershire sauce
  • Prepare horseradish sauce
  • White onion, grated
  • Dill (or sweet) pickles, finely chopped
  • Fresh parsley, chopped
  • Fresh lemon juice
  • Salt and pepper

EXPERT TIP: Chili sauce can usually be found in the condiment section of most supermarkets. Heinz makes a great chili sauce. We like dill pickles, but sweet pickles are tasty, too. After you mix it all together, store it in the fridge to deepen the flavor.

A small glass jar filled with Russian dressing with a spoon lifting some of it out of the jar.

Building the Perfect Reuben Sandwich

The sandwich needs to be treated almost like a grilled cheese sandwich.

Smear a generous amount of softened butter on one side of each slice of bread. Slather on a layer of the dressing. Place in a medium-hot non-stick skillet.

Add the corned beef, then sauerkraut, cheese slices, and another slice of bread with dressing on one side and butter on the other. Cook until golden brown on the underside.

Flip and continue on the other side.

A person layer corned beef on top of slice of rye bread in a non-stick skillet and then that person layering on sauerkraut and Swiss cheese slices.

When and How To Serve a Reuben Sandwich

This Reuben sandwich is classic any time of the year. We love to celebrate St. Patrick’s Day by fixing them pile-high for lunch.

However, these are also so much fun to serve to family and friends.

After you’ve warmed the corned beef, then set up an assembly line using an electric griddle or a large non-stick skillet, such as our beloved Sardel.

A grilled rueben sandwich that has been split in half and stacked one on top of the other.

Other Epic Sandwiches

We are absolutely crazy about a great sandwich. Here are some of our all-time favorites:

  • Wagyu Pastrami Sandwich
  • Marinated Grilled Steak Sandwich
  • Chicken Fried Steak Sandwich
  • Buffalo Chicken Sandwich
  • Honey Mustard Chicken Sandwich
  • Salmon Burger
  • Fantastic Fried Fish Sandwich

In the meantime, aren’t you just dying to make this epic sammie?

Two hands holding two halves of a grilled rueben sandwich exposing the thick cut corned beef, sauerkraut, and and melty Swiss cheese.

Folks, there are sandwiches, and then the are epic sandwiches.

This is undoubtedly one of them. It’s possibly the best sandwich we’ve ever made.

The combination of the flavors is comfort food at its very best. One bite, and we think you’ll 100% agree.

A hand holding one half of a grilled rueben sandwich with a bite taken out of it.

Ready to make the best sandwich this side of…ANYWHERE? Go for it!

And when you do, be sure to take a picture of it, post it on Instagram, and tag @HowToFeedaLoon and #HowToFeedaLoon!

A grilled rueben sandwich that has been cut in half and then stacked on top of each other on a white plate with a pickle spear nearby.
Print Recipe
No ratings yet

Reuben Sandwich

Reuben Sandwich has been a deli favorite for decades in the U.S. Be sure to seek out top-notch ingredients and make the Russian (1,000 Island) dressing from scratch. It's easy and can be made several days in advance.
Prep Time15 minutes mins
Cook Time20 minutes mins
Total Time35 minutes mins
Course: Lunch / Dinner, Sandwich
Cuisine: American
Servings: 4 people
Calories: 719kcal
Author: Kris Longwell

Equipment

  • A large non-stick skillet or griddle

Ingredients

  • 8 slices rye bread
  • 4 tablespoon unsalted butter softened, for outside of bread slices
  • ¼ cup Classic Russian Dressing for spreading
  • 1½ lb corned beef thinly sliced
  • 12 oz sauerkraut drained
  • 6 slices Swiss Cheese

Instructions

  • Butter one side of each bread slice.
  • Heat a large, non-stick skillet (or griddle)over medium-high heat.
  • Place a bread slice in the skillet, buttered-side down (place two slices in the skillet, if room, if not, you'll need to keep the cooked sandwiches in a warm oven, until they are all ready for serving).
  • Add about a tablespoon of Russian dressing to the bread slice(s).
  • Next add a nice heaping handful of the corned beef.
  • On top of this, add a layer of the sauerkraut.
  • On top of the kraut, add cheese slices.
  • Add another layer of Russian dressing.
  • Top with bread slice, buttered-side on top.
  • Once lightly browned, carefully flip the sandwich, and grill the other side until nicely browned.
  • Remove, slice, and serve at once!

Video

Notes

See the video near the top of the blog post for visual guidance.  If you liked the video, please subscribe to our YouTube channel. 
We order our corned beef from Katz Deli in NYC, but you can find excellent corned beef at any decent deli.  It's up to you if you prefer thick-cut vs. thin-cut. 
We love to gently heat the corned beef in a heat-proof bag in simmering water for about 5 minutes.  Most quality freezer/storage bags would work just fine.
The corned beef and prepared Russian dressing will keep in the fridge for up to 5 days. 

Nutrition

Calories: 719kcal | Carbohydrates: 35g | Protein: 38g | Fat: 34g | Saturated Fat: 12g | Polyunsaturated Fat: 2g | Monounsaturated Fat: 18g | Trans Fat: 1g | Cholesterol: 146mg | Sodium: 2307mg | Potassium: 777mg | Fiber: 6g | Sugar: 4g | Vitamin A: 581IU | Vitamin C: 59mg | Calcium: 314mg | Iron: 6mg

POST UPDATE: This recipe was originally published in June 2015 but was updated with improved tweaks to the recipe with new tips and photography and a fabulous new video in March 2022!

Slow-Cooker Dublin Coddle

March 13, 2022 by Kris Longwell 11 Comments

A white bowl filled with Dublin coddle next to a glass of stout beer.

This dish is spectacular any time of the year, but we especially love it for a St. Patrick’s Day feast!

What more is there to say? Slow-cooked sausage with potatoes, onions, and a little Irish beer. This truly is comfort food at its very best. The ultimate “dump and go” meal with unforgettable results.

A white bowl filled with Dublin coddle next to a glass of stout beer.

How To Make Dublin Coddle

You may be wondering, what is Dublin Coddle? Short answer: It’s an Irish dish that is loaded with sausage (traditionally Irish bangers), potatoes, onions, and a little liquid (Guinness, shall we say!).

All we know is that this dish is pure comfort food. And it could not be easier to put together.


NOTE: If you liked this video, please subscribe to our YouTube channel. Remember to click the ‘bell’ icon so you’ll never miss a new video!

What’s In a Dublin Coddle?

We start off with 4 strips of cooked bacon.

Go with your favorite cut of bacon.

We love applewood smoked, thick-cut.

EXPERT TIP: We cook our bacon in a large cast-iron skillet until crispy. The grease will add amazing flavor to the next step of preparing your coddle.

A cast-iron skillet filled with cooked bacon.

After the bacon is nice and crispy, let it drain on a plate lined with paper towels.

Now, it’s time to brown the sausage links.

EXPERT TIP: If you can find them, go with bangers, or Irish bangers. There is a slightly sweet taste of nutmeg combined with savory seasonings. Heavenly. If you can’t find bangers, go with bratwurst or Italian sausage links, raw, not cured, or smoked.

A cast-iron skillet filled with browned links of sausage in it.

For added flavor, cook the sliced onions in the hot skillet.

Drain off most of the grease in the pan, and then add the onions and cook until just browned, about 5 minutes.

EXPERT TIP: If you are in a crunch for time, you can skip browning the onions and the sausage. Just layer into the slow-cooker as is. Browning them adds a wonderful depth of flavor, but it’s not 100% necessary.

A large black cast-iron skillet filled with browned onions.

Building a Dublin Coddle

Now, it’s time to layer the amazing components to a Dublin Coddle.

Start with half of the onions, then half of the potatoes, half of the carrots, all of the bacon and sausage (that has been cut into bite-size pieces), and then topped with the remaining carrots, onions, and finally potatoes.

EXPERT TIP: Add a nice sprinkling of salt and pepper as you add each layer to the coddle.

A person placing chunks of browned sausage into a slow-cooker and then a hand layering in sliced potatoes, and then finally Guinness being poured in from a can.

How To Serve Dublin Coddle

This is truly a one-dish wonder. You’ve got your meat and potatoes perfectly cooked.

Serve with warm, crusty bread, and that’s really all you need for a complete meal.

All it takes is about 4 to 5 hours on LOW in your slow-cooker. You can also roast this in a baking dish, or Dutch oven, for about 1 hour, covered, in a 350°F oven.

Once the potatoes are easily pierced with a knife, the dish is ready. Stir with a wooden spoon and serve immediately.

Dublin Coddle in a slow cooker with a wooden spoon stuck in the side.

Other Classic Irish Dishes

If you are wanting to prepare the perfect St. Patrick’s Day feast (or anything Irish), take a look at these classics:

  • Instant Pot Guinness Beef Stew
  • Guinness Ground Beef Pie
  • Irish Soda Bread
  • Pub-Style Guinness Beef Pie
  • Classic Shepherd’s Pie
  • Instant Pot Corned Beef and Cabbage
  • Classic Fish and Chips

In the meantime, it’s time to whip a batch of this Irish classic one-pot wonder!

A white bowl filled with Dublin Coddle with a fork inserted in the side.

Ready to make the most comforting bowl of food this side of Dublin? Go for it!

And when you do, be sure to take a photo of it, post it on Instagram, and tag @HowToFeedaLoon and hashtag #HowToFeedaLoon!

A white bowl filled with Dublin Coddle with a fork inserted in the side.
Print Recipe
5 from 2 votes

Dublin Coddle

Slow-Cooker Dublin Coddle is comfort food at its very best. It only cooks for about 4 to 5 hours in your slow cooker. You can also cook it in a baking dish (or Dutch oven) in the oven for about 1½ hours, or until the potatoes are very tender. Easy and so delicious!
Prep Time15 minutes mins
Cook Time4 hours hrs 30 minutes mins
Total Time4 hours hrs 45 minutes mins
Course: Entree
Cuisine: Irish
Servings: 6
Calories: 167kcal
Author: Kris Longwell

Equipment

  • 1 6 to 8 quart slow-cooker

Ingredients

  • 4 slices bacon
  • 6 links sausage banger, bratwurst, or Italian
  • 2 medium onions peeled and thickly sliced
  • Salt and pepper
  • 2 large potatoes russet or gold, peeled and thickly sliced
  • 2 large carrots peeled and thickly sliced
  • 8 oz stout beer or hard cider, chicken stock, or water
  • 2 tablespoon parsley fresh, chopped, for garnish (optional)

Instructions

  • Add the bacon to a large skillet over medium-high heat. Cook until crispy. Remove to a plate lined with a paper towel.
  • In the same skillet, add the sausages. Cook until browned all over, about 5 minutes (the sausage won't be fully cooked). Set aside. Drain off the grease.
  • Add the onions to the pan and cook until lightly browned all over, about 8 minutes.
  • In your slow-cooker, add half of the onions, and then sprinkle salt and pepper all over them. Next, add half of the potatoes and a sprinkling of salt and pepper. Add half of the carrots, and then roughly chop the bacon and place on top of the carrots. Slice the sausages into bite-sized pieces and place them over the bacon. Top with the remaining carrots, onions, and potatoes. Add another liberal sprinkling of salt and pepper. Pour in the beer (or whatever liquid you're using).
  • Cook on LOW for 4 to 5 hours. Serve hot, garnished with freshly chopped parsley.

Notes

See the video near the top of the blog post for visual guidance.  If you liked the video, please subscribe to our YouTube channel. 
If you can't find bangers (sausage), go with bratwurst or Italian sausages.  They are best if not smoked or cured.  They should be raw.  You can leave the sausage whole when you place them in the slow-cooker, if desired. 
Leftovers will keep for 5 days in the fridge or frozen for up to 2 months.   Reheat gently on the stove until heated through, about 10 minutes.   Add more broth, if necessary. 

Nutrition

Calories: 167kcal | Carbohydrates: 7g | Protein: 3g | Fat: 8g | Saturated Fat: 2g | Polyunsaturated Fat: 1g | Monounsaturated Fat: 3g | Trans Fat: 1g | Cholesterol: 10mg | Sodium: 122mg | Potassium: 169mg | Fiber: 1g | Sugar: 3g | Vitamin A: 4129IU | Vitamin C: 6mg | Calcium: 19mg | Iron: 1mg

Pozole (Pork and Hominy Stew)

March 9, 2022 by Kris Longwell 6 Comments

A colorful Mexican bowl filled with Mexican pozole stew surrounded by bowls of sliced radishes, cabbage, avocados, and corn tortillas.

We can honestly say that this bowl of goodness is in the top 5 of our all-time favorite things to eat.  It’s really that good.

It’s steeped in Mexican tradition and heritage and the flavor is unmatched.  Just like all great soups or stews that are only as good as their base, such as Chicken Noodle Soup (with Homemade Chicken Broth) or French Onion Soup (with Homemade Beef Stock), this soup is right up with these classics. Make the pork broth well in advance and the rest comes together in no time at all! 

A colorful Mexican bowl filled with Mexican pozole stew surrounded by bowls of sliced radishes, cabbage, avocados, and corn tortillas.

How To Make Pozole

This Mexican stew is layered with incredible flavor.

Start by simmering the pork should (preferably bone-in) at least one day in advance.


NOTE: If you like this video, please subscribe to our YouTube channel. Remember to click the little ‘bell’ icon so you’ll never miss a new video!

How To Make Pork Broth

To achieve a pozole that has an amazing depth of flavor, you need to start with a broth that gently simmers on the stove for 2 to 3 hours. And then is allowed to rest for 12 to 24 hours.

You’ll add a 5 to 7 lb pork should to a large stockpot. Make sure you’ve cut away all the excess fat.

EXPERT TIP:
The addition of meaty pork bones adds incredible flavor. Pork feet and neck bones can be found in the meat department of Hispanic food markets. If you don’t have access to one, then you can usually find ham hocks at your supermarket. Or, double up on pork spare ribs for simmering.

Cover with water and bring to a boil and then use a small sieve to skim off impurities at the surface. Lower the heat and simmer gently for another 2½ hours.

NOTE: Once the broth has cooled, we recommend placing the pot (with the roast and bones still in it) into the refrigerator. This just deepens the flavor even more and makes it really easy to skim the congealed fat that will form on the surface of the broth.

Shred the meat from the pork shoulder with your hands, forks, and/or a knife.

A large pork shoulder sitting on a cutting board next to a platter filled with pork bones and then a person skimming impurities off of pork stock and then a person shredded the pork with forks.

Creating the Classic Mexican Taste

The use of dried chiles is one of the reasons we love this stew so much. Once reconstituted and blended with garlic and seasonings, you get an unbelievable depth of flavor.

We go with a combination of dried chilis including:

  • Ancho
  • Guajillo
  • Arbol

EXPERT TIP: Dried chilies can be found in the produce section or the Hispanic section of many well-stocked supermarkets, at Latino food markets, or online.

Adding the chili sauce to the pork broth turns it into a vibrant, gorgeous orange hue.

Ancho chili sauce being poured from a silver pot into a black pot filled with pork broth.

Finishing the Pozole

Hominy is made from dried corn kernels and has been around for centuries. It was an important part of Native Americans’ diets for multiple generations.

We love the earthy, corn-like texture of hominy. If you were making this dish in the most authentic fashion, you would go with corn that has gone through the nixtamalization process, but we’ll just use good-ole store-bought hominy – it gets the job done just fine.

You can go with white hominy or golden hominy, but white is traditional and easier to find, usually in the canned vegetable section of your supermarket, near the corn. If not there, try the Hispanic area.

The hominy goes in right near the end of the cooking process for the pozole.

A person transferring white hominy from a white bowl into a black pot filled with pork broth.

How To Serve

The pork broth, tender pork, and ancho sauce are really the stars of this soup. The hominy is wonderful, too.

But almost as important are the additional “toppings” you serve with it.

Here are the classic ingredients that come together to just make an unforgettable bowl of yumminess.

  • Shredded Napa cabbage
  • Thinly sliced radish
  • Sliced avocado
  • Crispy corn tortilla strips
  • Chopped fresh cilantro
  • Fresh lime

A color Mexican-style bowl filled with pozole and topped with avocado slices, radish slivers, and strips of fried corn tortillas.

When the temperatures drop outside, you can be sure that this classic Mexican stew will warm you and your loved ones to the bone.

The broth alone is truly something magical.

The melt-in-your-mouth chunks of pork and tangy hominy bring it all together in a way that is unforgettable.

And leftovers freeze beautifully! Hooray for Pozole!

A large silver ladle filled with pork and hominy pozole over a large pot filled with the stew.

A colorful Mexican bowl filled with Mexican pozole stew surrounded by bowls of sliced radishes, cabbage, avocados, and corn tortillas.
Print Recipe
5 from 2 votes

Pozole (Pork and Hominy Stew)

Pozole (Pork and Hominy Stew) is Mexican comfort food at its very best. The deep flavors of the broth, combined with the hominy and ancho chili sauce can not be beaten If you can find pig's feet at your butcher, ask him to cut them in half for you, and add them in with the other pork. You can often find pigs feet and neck bones at your local Hispanic food market. If possible, start the broth the night before, let it simmer for about 2 ½ hours, and then let it cool in the broth all night, and then I shred the meat the next day. It just continues to deepen the flavors through the night.
Prep Time30 minutes mins
Cook Time3 hours hrs 30 minutes mins
Chilling12 hours hrs
Total Time16 hours hrs
Course: Soup or Stew
Cuisine: Mexican
Servings: 12 people
Calories: 362kcal
Author: Kris Longwell

Equipment

  • 1 Pot large enough to hold the pork shoulder plus bones (if using).

Ingredients

  • 5 lbs Pork shoulder preferably bone-in, as much of the fat cut away as possible.
  • 2 lbs any combination of: Pigs feet, or trotters, neck bones, pork shanks, or ham hocks (if you can't find any of this, just use country-style ribs)
  • 2 medium Spanish onions peeled and quartered (you'll need one for the broth, and one for the ancho sauce)
  • 12 large garlic cloves you'll need 6 for the broth, and 6 for the ancho sauce
  • Kosher salt
  • 4 ancho chiles dried, stems removed and seeded
  • 4 guajillo chiles dried, stems removed and seeded
  • 2 arbol chiles seeds removed (as best you can)
  • 1 teaspoon Mexican oregano
  • 2 15 oz can white hominy drained

FOR GARNISH

  • 2 cups Napa cabbage shredded
  • 4 Radishes thinly sliced
  • 1 Avocado peeled and sliced
  • ½ cup Cilantro chopped
  • Fried corn tortilla strips See NOTES
  • Lime wedges

Instructions

  • Place pork, 1 onion (quartered), and 6 garlic cloves in a large stock pan and fill with water to cover, about 4 to 5 quarts.
  • Bring to a boil, then lower the heat and simmer for 2 and half hours, skimming the impurities off the top as they accumulate. If necessary, add more hot water to keep the pork submerged.
  • If possible, let the pork cool in the broth overnight, covered.
  • Remove the pot from the refrigerator and use a spoon to skim off all of the congealed fat on the surface. If the broth has congealed and become gelatinous, then gently reheat just long enough to liquify. Remove the pork shoulder and then the bones and vegetables. Strain the liquid into a separate bowl.
  • Use your hands, two forks, and/or a knife to shred and cut the pork into bite-size pieces. Set aside.

MAKE THE ANCHO SAUCE

  • Bring a medium pot of water to a boil, turn off the heat, and place the chiles in the hot water. Simmer for 15 minutes.
  • Place the peppers, 1 onion (roughly chopped), 6 garlic cloves, oregano, ½ teaspoon salt, and 1½ cups chili soaking broth into a blender or food processor. Puree until very smooth.
  • Strain the sauce through a fine-mesh sieve.
  • Add the sauce to a medium saucepan and simmer over medium heat for 10 to 15 minutes until slightly thickened.

FINISH THE SOUP

  • In a large pot, add the broth and heat over medium-high heat.
  • Add the ancho chili sauce and 2 teaspoons salt to the broth and bring to a boil.
  • Lower the heat and add the meat and simmer for 15 to 25 minutes. Stir in the hominy.
  • Taste for seasoning, you'll probably need to add about another 1 teaspoon of salt. Add a little at a time (taste first!).
  • Serve in bowls with garnishes.

Video

Notes

See the video near the top of the blog post for visual guidance.  If you liked the video, please subscribe to our YouTube channel.  
Pork bones such as pigs feet and neck bones can be found at some meat markets and definitely at Hispanic food markets.  Ham hocks can be found at most supermarkets are a decent substitute.  If you can't get extra pork bones, it's still delicious after simmering the pork shoulder for 2½ hours.
Allowing the pork to chill in the fridge overnight (after simmering) adds a depth of flavor that is wonderful.  Remember to let the pot cool off before placing it in the fridge.  
When shredding the pork, you will see strands of fat.  Discard any excess fat.  
Leftovers will keep in the fridge for up to 1 week and can be frozen for up to 2 months. 

Nutrition

Calories: 362kcal | Carbohydrates: 12g | Protein: 46g | Fat: 12g | Saturated Fat: 6g | Polyunsaturated Fat: 1g | Monounsaturated Fat: 17g | Cholesterol: 163mg | Sodium: 142mg | Potassium: 999mg | Fiber: 5g | Sugar: 6g | Vitamin A: 3545IU | Vitamin C: 12mg | Calcium: 77mg | Iron: 4mg

POST UPDATE: This recipe was originally published in January 2019, but was updated with improved tweaks to the recipe with new tips and photography and a fabulous new video in March 2022.

Tiramisu

March 6, 2022 by The Loon 3 Comments

A circular white dessert plate filled with a square piece of tiramisu.

This is a dessert that really is the perfect ending to the perfect Italian meal.

There are just a handful of ingredients in this iconic Italian dessert, so, we recommend using the best of the best to make every component come together to make a dessert you won’t soon forget.

A circular white dessert plate filled with a square piece of tiramisu.

How To Make Tiramisu

We’re presenting you the traditional method for making classic tiramisu.

We’re not including heavy cream, and we’re not heating our egg white peaks or egg yolks.

EXPERT TIP: Go with top-notch eggs here that are very fresh and preferably organic. If you are serving this to anyone who is immunocompromised, consider using pasteurized eggs, or placing the egg yolks and egg white over simmering water for a few minutes. Or, just move on to the next Italian dessert, such as Ricotta Cheesecake!


The Essential Ingredients

Besides eggs (whites and yolks separated), you’ll need to get your fingers on some ladyfingers.

These can be found in the Italian section of many well-stocked supermarkets, Italian specialty food markets, or online.

A strong dose of espresso deepens the flavor intensely but in such a good way!

Mascarpone cheese is also essential and should be at room temperature.

EXPERT TIP: We use our hand mixer to beat the room temperature egg yolks with the sugar. Beat for about 2 to 4 minutes, until a pale yellow. Next, gently mix in the room temperature mascarpone until just mixed.

A glass bowl filled with creamed eggs and sugar with mascarpone being added and then the same bowl after the cheese has been blended in.

How To Build the Tiramisu

Now, it’s time to layer all the delicious elements.

IMPORTANT: Don’t over soak your ladyfingers! Drop them in the espresso for literally a second and then quickly remove them.

Add a layer of cream, then the soaked ladyfingers, another layer of the cream mixture, another layer of soaked ladyfingers, and then finally the rest of the cream.

A hand dipping a ladyfinger cookie into a bowl of espresso, and then layering them in a dish over cream, and then more cream on top, and then another layer of cookies.

Now, it’s time to top this amazing dessert!

Just grab that unsweetened cocoa powder you have in the back of the pantry and add a couple of tablespoons into a small sifter (or, just use your fingers).

Sift the powder liberally all over the top.

EXPERT TIP: We use an 8″x8″ baking dish to build the tiramisu. It may feel small, but you’ll get 9 nice-sized cuts from this size. You could also go with a 9″x9″, and still have great results.

A hand tapping the side of a small sieve filled with chocolate powder over a casserole dish filled with tiramisu.

When To Serve

This is a light dessert that is perfect after a wonderful Italian feast.

It’s amazing after Rustic Lasagna, Eggplant Parmesan, Chicken Marsala, or Pasta alla Norma.

EXPERT TIP: It’s really best served the day it is assembled, but you can absolutely make this up to 24 hours in advance of serving. Keep chilled in the fridge.

A square white baking dish filled with tiramisu with half of it removed.

Can Cream Be Added to Tiramisu

Some folks like to include whipped heavy cream into the egg yolk mixture.

Although purists will tell you this is strictly forbidden, it’s still yummy and makes the dish even fluffier (but you didn’t hear this from us).

But trust us, this version right here is simple and incredibly delicious.

A circular white dessert plate filled with a square piece of tiramisu.

No stellar meal is complete without a knock-out dessert.

Folks, here you go.

Creamy. Italian. Scrumptious.

A plate of tiramisu with a bite taken out of it on a nearby fork.

Ready to make the best Italian dessert this side of Venice? Go for it!

And when you do, be sure to take a picture of it, post it on Instagram, and tag @HowToFeedaLoon and #HowToFeedaLoon!

Print Recipe
5 from 1 vote

Tiramisu

Tiramisu is a classic Italian dessert. Use any liqueur of your choice, or, leave it out completely. Amaretto is a great choice, but so is Marsala wine, Kahlua, or dark rum. Allow the tiramisu to set in the fridge for at least 2 hours, overnight is best.
Prep Time20 minutes mins
Chill time2 hours hrs
Total Time2 hours hrs 20 minutes mins
Course: Dessert
Servings: 9
Calories: 441kcal
Author: Kris Longwell

Equipment

  • electric mixer
  • 8"x8" dish 9"x9" works well, too

Ingredients

  • 6 egg yolks room temperature
  • ½ cup sugar
  • 1 lb mascarpone room temperature
  • 6 egg whites room temperature
  • 25 ladyfingers
  • 2 cups brewed espresso or strong coffee, cooled
  • ½ cup unsweetened cocoa powder for dusting
  • 4 tablespoon Amaretto or Marsala wine, Kahlua, dark rum (or omit)

Instructions

  • Use an electric mixer to whip the egg yolks with the sugar until pale, making sure the sugar is completely dissolved.
  • Mix in the mascarpone cheese and whip for about 1 to 2 minutes until well combined and smooth. Mix in the Amaretto.
  • In a separate bowl, use your cleaned electric mixer to whip the egg whites to stiff peaks. Fold the egg white into the egg yolks/mascarpone mixture in several additions.
  • Spread a thin layer of the cream mixture in your baking dish (8x8 or 9x9).
  • Very briefly submerge a ladyfinger into the cooled espresso and then place it in the dish on top of the cream (don't over-soak the ladyfingers!). Continue until you filled the dish with one layer.
  • Spoon another layer of the cream mixture (half of the mixture) over the ladyfingers and then repeat with another layer of lightly espresso-soaked ladyfingers.
  • Cover with foil or plastic wrap and chill for at least 2 hours, preferably overnight.
  • Just before serving, dust the top with the cocoa powder with a fine-mesh sieve.

Video

Notes

See the video near the top of the blog post for visual guidance. If you liked the video, please subscribe to our YouTube channel. 
Ladyfingers can be found in the Italian section (or in the cookies section) of many well-stocked supermarkets, at an Italian food market, or online. 
For best results, allow the tiramisu to chill in the fridge for 12 hours.
Leftovers will keep covered in the fridge for up to 3 days.  We don't recommend freezing tiramisu. 
NOTE: Consuming raw eggs may increase your risk of foodborne illness, especially if you have certain medical conditions.  

Nutrition

Calories: 441kcal | Carbohydrates: 34g | Protein: 12g | Fat: 29g | Saturated Fat: 17g | Polyunsaturated Fat: 1g | Monounsaturated Fat: 3g | Cholesterol: 248mg | Sodium: 113mg | Potassium: 153mg | Fiber: 2g | Sugar: 11g | Vitamin A: 1049IU | Calcium: 108mg | Iron: 2mg

POST UPDATE: This recipe was originally published in August, 2014, but was updated with new tips and photography and a fabulous new video in March, 2022!

Blackened Salmon

March 2, 2022 by Kris Longwell 6 Comments

A slice of a blackened salmon fillet sitting on a corn and black bean salad on a black dinner plate.

This has become one of our all-time favorite dishes to prepare.  And it’s fast. And it’s healthy. Oh, and it’s through-the-roof delicious.

We developed this recipe when we were trying to lose a little weight. We like anything that is blackened (practically anything), but there is something about the moist yet flakiness of the salmon that just makes this dish sing. We’ll even provide you with the perfect side salad to serve it with.  And it all comes together in less than 30 minutes!  Winner Winner Salmon Dinner!

A slice of a blackened salmon fillet sitting on a corn and black bean salad on a black dinner plate.

How To Make Blackened Salmon

The process of blackening fish (or any protein or vegetable) was developed and popularized by the legendary late Cajun chef Paul Prudhomme. Learn more about this amazing chef here.

Although the process is very simple, the results are truly spectacular.

You can control the spice level by increasing or decreasing the amount of cayenne pepper and/or black pepper.

Our recipe has a nice heat that hits you on the backend, but is not too intense at all.

What Is the Best Fish for Blackening

So many seafood fillets are ideal for blackening. You want to pick one that will be nice and flaky, but not overly fragile.

In addition to salmon, you could use this method on redfish, catfish, sole, halibut, trout, tuna, and/or grouper.

EXPERT TIP: It’s up to you if you go with skin-on or no-skin salmon fillets. When you are searing the salmon in your piping-hot skillet (preferably a cast-iron), sear the seasoned side first. We start off by applying a little oil to the flesh side of the salmon and then pressing the rub in with your fingers. After it’s nicely blackened, flip it over. If your salmon has skin, it will crisp up beautifully; if not, it will brown nicely as well. The skin is nutritious and 100% edible.

A person brushing olive oil onto the tops of salmon fillets sitting on a cutting board and then blackening seasoning being applied to the fillets by a person's fingers.

The brown sugar and the spices will turn a beautiful, almost black color as you are searing the fillets in the piping hot skillet.

We recommend opening a window or door to the outside, as it may produce smoke. You might need to unplug your smoke detector, but don’t forget to plug it back in! A hood works nicely, of course.

EXPERT TIP: We recommend using a small spatula to press the fillets into the hot skillet. For a more traditional version, we add a little butter to the skillet to blacken the fish in. For a slightly healthier version, substitute the butter with extra-virgin olive oil, or regular olive oi.

A thin metal spatula pressing down on a salmon fillet that is being seared in cast-iron skillet along with three other fillets.

What to Serve with Blackened Salmon

As mentioned, this blackened salmon has a little kick to it, and pairs wonderfully with a super-easy Southwestern salad that takes no time at all to prepare.

Easy Southwestern Black Bean and Corn Salad

In a large bowl, mix together:

  • 2 cups of cooked brown rice (Instant is just fine)
  • 1 15 oz. can black beans, drained and rinsed
  • 1 15 oz. can fire-roasted corn, drain (or any type of corn, such as thawed frozen corn)
  • Half a jar (about 8 oz.) of your favorite salsa (more or less, depending on taste)
  • ¼ cup fresh cilantro, chopped (optional…but really tasty)
  • Healthy pinch of salt and pepper.

Serve warm or at room temperature.  Leftovers keep in the fridge for up to 5 days.

Four blackened salmon fillets sitting in a sizzling black cast-iron skillet all garnished with fresh chopped parsley.

Other Favorite Salmon Dishes

  • Poached Salmon with No-Fuss Hollandaise Sauce
  • Baked Teriyaki Salmon
  • The Perfect Salmon Burger
  • Grilled Salmon with Poblano Butter
  • Instant Pot Teriyaki Salmon

In the meantime, you’re going to want to sink your teeth into this incredible dish!

A fork flaking open a fillet of salmon that is blackened and sitting on a corn and black bean salad on a black dinner plate.

Ready to make the best recipe for blackened salmon this side of New Orleans? Go for it!

And when you do, be sure to take a photo of it, post it on Instagram, and tag @HowToFeedaLoon and hashtag #HowToFeedaLoon!

A slice of a blackened salmon fillet sitting on a corn and black bean salad on a black dinner plate.
Print Recipe
5 from 2 votes

Blackened Salmon

Blackened Salmon is truly a taste sensation and could not be easier to make. You will probably get some smoke, so leave a window or door open to help circulate air. You may need to temporarily unplug your smoke detector. This recipe is mild-moderate spicy. For more heat, increase the cayenne to 2 tsp, for less heat, decrease it to 1 tsp, or ½ tsp.
Prep Time10 minutes mins
Cook Time9 minutes mins
Total Time19 minutes mins
Course: Entree
Cuisine: American Southern
Servings: 4
Calories: 434kcal
Author: Kris Longwell

Equipment

  • Cast-iron skillet or another sturdy skillet that can handle high heat.

Ingredients

  • 4 7 oz salmon fillets either with or without skin
  • 2 tablespoon extra-virgin olive oil
  • Salt and pepper
  • 1 tablespoon brown sugar light or brown
  • 1 tablespoon smoked paprika
  • 1 tablespoon cayenne pepper See NOTES about spice level
  • 1 teaspoon onion powder
  • 1 teaspoon garlic powder
  • 1 teaspoon oregano dried
  • 1 teaspoon thyme dried

For the Corn and Bean Salad

  • 2 cups brown rice cooked, Instant is perfectly fine
  • 1 15 oz. can black beans drained and rinsed
  • 1 15 oz. can fire-roasted corn drained, or regular corn, or thawed frozen
  • ½ jar salsa or more, to tasted
  • ¼ cup cilantro fresh, chopped, plus extra for garnish
  • Salt and pepper

Instructions

  • Place the fillets on a cutting board, skin-side down (if your fillets have skin). Rub a little oil over the tops of the fillets. Sprinkle generously with salt and pepper.
  • In a small bowl, mix together the brown sugar, paprika, cayenne pepper, onion powder, garlic powder, oregano, and thyme.
  • Use your fingers to press the seasoning mixture all over the top flesh of the fillets.
  • Heat 1 tablespoon of oil (or butter) in a large sturdy skillet over medium-high heat. Heat until oil is just starting to whisp and a tiny bit smokey.
  • Carefully, add the fillets to the hot skillet, flesh-side down. Use a spatula to gently press down on the fillets. Cook for about 4 minutes, until nicely blackened. (You will most likely produce a fair amount of smoke from the skillet).
  • Carefully flip the fillets over and continue cooking for another 4 to 6 minutes, until the fillets easily flake, and are cooked through. You should reach an internal temperature of about 120°F (the fillets will continue to cook even after they are removed from the skillet. Then internal temp should rise to about 14o to 145°F).
  • Serve at once, over the black bean and corn salad and garnished with extra chopped cilantro if desired.

Video

Notes

See the video near the top of the blog post for visual guidance.  If you like the video, please subscribe to our YouTube channel.
This recipe has a bit of heat (spiciness) to it.  If you like your blackened salmon to be spicy, then increase the cayenne pepper to 2 tbsp.  For less heat, we recommend 1 teaspoon of cayenne. This will give that backend heat that you expect from blackening, but not too much.  For even less heat, reduce the cayenne to ½ tsp. 
If after about 9 minutes of cooking, the salmon doesn't look (or isn't) cooked through, with an internal temp of around 125°F, then keep in the skillet for another few minutes until cooked.  The salmon will continue to cook after it's removed from the skillet.  You'll want a final internal temp around 145°F. 
Blackening often will produce smoke in your kitchen.  You may want to consider unplugging your smoke detector, but DO NOT forget to plug it back in!  Opening a window or door helps with ventilating and reducing smoke. 
Leftovers will keep in the fridge for 2 days.  We don't recommend freezing blackened salmon. 
To make the corn black bean salad, simply mix all ingredients in a bowl.  Serve warm or at room temp.  It can be made several days in advance and kept in the fridge for up to 5 days.  

Nutrition

Calories: 434kcal | Carbohydrates: 79g | Protein: 8g | Fat: 8g | Saturated Fat: 2g | Polyunsaturated Fat: 2g | Monounsaturated Fat: 6g | Cholesterol: 1mg | Sodium: 10mg | Potassium: 364mg | Fiber: 5g | Sugar: 3g | Vitamin A: 1567IU | Vitamin C: 4mg | Calcium: 55mg | Iron: 3mg

Muffuletta

February 27, 2022 by Kris Longwell Leave a Comment

A quarter slice of a muffuletta sandwich on a cutting board surrounded by other slices and a mug of beer.

If you’re in the mood for classic New Orleans fare, now you can have it in the comfort of your own home!

This sandwich is about as good as they come.  We’ll show you how to make the bread and the olive salad, both essential for that authentic taste. It’s fun to prepare, impressive to serve, and beyond delicious!

A quarter slice of a muffuletta sandwich on a cutting board surrounded by other slices and a mug of beer.

How To Make a Muffuletta

Before we get into how to make it, you may be wondering, what is a muffuletta and why is it called that?

The word muffuletta is a Sicilian word that actually refers to the bread: A round Sicilian sesame loaf.

An Italian immigrant named Salvadorte Lupo, owner of Central Grocery Co. in New Orleans, created the sandwich in 1906 for hungry immigrant workers. It has become a classic that has its roots firmly planted in New Orleans. Learn more here.

Now, you can make it home, and we’re going to show you how!


NOTE: If you like this video, please subscribe to our YouTube channel. Remember to click the ‘bell’ icon so you’ll never miss a new video!

How to Make Muffuletta Bread

Unless you live in, or near New Orleans, finding homemade muffuletta bread is nearly impossible.

But, making it at home is easier than you think.

EXPERT TIP: We start off by bringng the dough together in our stand mixer. The dough won’t form into a ball immediately, but that’s normal. We like to then knead the bread on a lightly floured surface for 10 minutes until soft and pliable. You can certainly let your stand mixer do the kneading with the dough attachment.

Place the dough in an oiled bowl and set it in a non-drafty, slightly warm area for 90 minutes until it has doubled in size. (See video above for visual reference).

Muffuletta bread dough that has risen in a ceramic bowl.

Now, it’s time to form the loaf.

Transfer the risen dough to a lightly floured surface and use your hands to carefully shape the dough into a 9-inch circle.

Spray the top of the dough with water and then sprinkle on a copious amount of sesame seeds all across the surface.

Cover with a kitchen towel and let rise again for another 60 to 90 minutes.

EXPERT TIP: Bake the bread at 425°F for 10 minutes, and then lower the temperature to 375°F. Cook until golden brown and hollow-sounding when tapped. This typically takes about 20 minutes (30 minutes total). But ovens can vary, so keep an eye on it. An egg wash ensures a golden exterior.

Use a serrated knife to carefully and slowly slice the bread in half (top to bottom). Start cutting just where the loaf is beginning to dome. Too low of a cut will give you a thin lower half and too thick for the top.

A round Sicilian sesame loaf of bread sitting on a baking rack and then that same loaf being sliced horizontally by a serrated knife.

What You Need to Make Olive Salad

Another key component to an authentic muffuletta is the olive spread.

You can find olive spread already bottled in New Orleans, in gourmet food shops, or online.

But, why not make your own? It’s easy and so good! Here are the ingredients you’ll need:

  • Olives – we like a mix of green (stuffed with pimentos) and kalamatas
  • Celery
  • Pickled banana peppers or pepperoncini
  • Garlic
  • Fresh parsley
  • Dried oregano
  • Red wine vinegar
  • Olive oil
  • Salt and pepper

EXPERT TIP: The olive salad gets better after it has time to chill for a while. We prep the salad and then refrigerate it in a jar with a lid for at least 24 hours, but a minimum of 1 hour if okay, too.

A mason jar filled with olive salad with a spoon inserted into it.

Building The Muffuletta

Once the bread has cooled and you’ve sliced it in half and after the olive salad has time to rest for at least an hour in the fridge, it’s time build the muffuletta!

Start by adding a good helping of the olive salad on the cut-side of the top and bottom of the bread. Don’t put too much of the liquid from the salad on the bottom half (it will get a little soggy if too much liquid is added).

Next, add a layer of the Italian meats. We do a layer of coppa (Italian cured ham) and then mortadella (Italian bologna).

Then on to the sliced cheeses. We go with top-notch sliced provolone and mozzarella. They use sliced Swiss down in Central Grocery Co in NOLA along with the provolone. You choose your favorites.

Top with a couple of layers of genoa salami.

EXPERT TIP: To limit the olive salad from falling from the bread, we carefully transfer the bottom layer of the sandwich to the top layer. The layers of meat and cheese help keep the bottom layer of olive salad in place. Then carefully flip the sandwich upright. Some of the salad will no doubt fall out, but that’s okay. Either stick it back in the sides of the sandwich, or just pop them in your mouth. It will be your little secret!

A person adding olive salad to a halved circular loaf of bread, and then cured meats being added, then cheese, and then more meats.

How to Serve

Central Grocery Co. in New Orleans serves their classic sandwich chilled or at room temperature. This is delicious.

However, some places serve them warm. We had one of the most amazing sandwiches we’ve ever had in our lives at the amazing chef Donald Link’s eatery named butcher. He serves his warmed.

If you want to serve it warm, simply cut the sandwich into quarters, and then wrap it in foil. Place in a 325°F oven for about 15 minutes. You want the cheese to just start to get melty. If you heat too long, the bread will get overly crisp and the meats will become greasy.

EXPERT TIP: This sandwich is big. We quarter it, which will comfortably serve 4 people. Kettle chips, pickle spears, and ice-cold beer are the perfect accompaniments.

Four quarter pieces of a muffuletta sandwich sitting on a wooden cutting board.

Other Louisiana Classic Dishes

If you can’t get down to the Big Easy, you can bring Louisiana and the Bayou home to your own kitchen.

Here are some of our all-time favorite Cajun, Creole, and/or New Orleans recipes:

  • Jambalaya
  • Shrimp and Okra Gumbo
  • Andouille and Chicken Gumbo
  • Crawfish Étouffée
  • Red Beans and Rice
  • Dirty Rice
  • Fried Catfish Po-Boy
  • Cafe Du Monde Beignets

In the meantime, don’t you think it’s time to whip up a batch of these? Every bite is a New Orleans sensation!

A quarter slice of a muffuletta sandwich with a bite taken out of it.

Ready to make the sandwich this side of Bourbon Street? Go for it!

And when you do, be sure to take a photo of it, post it on Instagram, and tag @HowToFeedaLoon and hashtag #HowToFeedaLoon!

A quarter slice of a muffuletta sandwich on a cutting board surrounded by other slices and a mug of beer.
Print Recipe
No ratings yet

Muffuletta

Here is an authentic recipe for the New Orleans classic sandwich. You can make the bread and the olive salad up to a day in advance. You can find the Italian cured meats at Italian markets and many well-stocked supermarkets.
Prep Time20 minutes mins
Cook Time30 minutes mins
Bread proofing3 hours hrs
Total Time3 hours hrs 50 minutes mins
Course: Lunch / Dinner
Cuisine: New Orleans
Servings: 4
Calories: 824kcal
Author: Kris Longwell

Ingredients

For the Muffuletta Bread

  • 1 cup water warmed to 110° - 120°F
  • 2¼ teaspoon instant yeast or active dry
  • 1 tablespoon sugar
  • 3 cups all-purpose flour
  • 1½ teaspoon salt fine, not coarse
  • 2 tablespoon shortening or lard, or butter (chilled)
  • 2 tablespoon olive oil for greasing the bowl
  • ¼ cup sesame seeds
  • 1 large egg

For the Olive Salad

  • 1 cup olives stuffed with pimentos, roughly chopped
  • ¼ cup brine from the olives jar
  • 1 cup Kalamata olives roughly chopped
  • 3 stalks celery finely chopped
  • ¼ cup banana peppers chopped
  • ¼ cup capers drained
  • 3 cloves garlic minced
  • 2 tablespoon parsley fresh, chopped
  • 1 tablespoon oregano dried
  • 2 tablespoon red wine vinegar
  • ⅓ cup olive oil
  • ½ teaspoon Kosher salt
  • ¼ teaspoon black pepper

For the Sandwich

  • ¼ cup olive oil
  • ¼ lb coppa Italian ham, thinly sliced
  • ¼ lb mortadella Italian bologna, thinly sliced
  • ¼ lb provolone cheese thinly sliced
  • ¼ lb mozzarella cheese thinly sliced, or Swiss cheese
  • ¼ lb genoa salami thinly sliced

Instructions

Make the Muffuletta Bread

  • In the bowl of your stand mixer, add the warm water and gently whisk in the sugar and yeast. Allow to rest for 5 minutes, until foamy.
  • Meanwhile, in a medium-sized bowl, whisk together the flour with the salt. Use your fingers to work the shortening into the flour.
  • With the dough attachment in place, turn the mixer on medium-low. Slowly add the flour mixture, stopping once or twice to scrape down the sides with a rubber spatula. After a minute or two, the dough should start to come together. A ball of dough won't form, but it will start to form a rough (or shaggy) dough.
  • Remove the dough from the bowl and form into a rough ball in the palms of your hands. Place the dough on a lightly floured surface. Use the palms of your hands to knead the dough for 10 minutes, until it becomes soft and pliable. Alternatively, knead the bread with the dough attachment in your mixer for 7 to 8 minutes.
  • Take the dough and use your fingers to smooth it into a ball. Add 1 or 2 tablespoon olive oil to a bowl. Add the ball of dough to the bowl and turn to coat it with oil. Cover with plastic wrap and place in a warm, non-drafty area for 90 minutes, until it has doubled in size.
  • Transfer the risen dough to a lightly floured surface and use your hands to form a 9-inch disc. (The dough will expand to 10 inches as it rises and then bakes).
  • Spray a little water with a spray bottle (or your fingers) over the top of the dough. Sprinkle the sesame seeds all over the top. Transfer the dough to a baking pan that has been lined with parchment paper and lightly sprayed with cooking oil. Cover with a kitchen towel, and place in a warm, non-drafty area for 60 to 90 minutes.
  • Preheat your oven to 425°F.
  • Make an egg wash by mixing together the lightly beaten egg with two tablespoon of water. Brush all over the surface of the bread dough.
  • Place in the oven and bake for 10 minutes. Lower the oven temperature to 375°F and bake for another 15 to 20 minutes. Once the bread is golden on top and hollow-sounding when tapped, it's done. Let cool on a rack. Use a serrated knife to cut the bread in half, starting just above where the loaf is beginning to dome.

Make the Olive Salad

  • Use a large wooden spoon or rubber spatula to mix all of the ingredients in a large bowl.
  • Cover with plastic wrap and let chill in the refrigerator for 1 hour or up to 48 hours.

Build The Muffuletta

  • Brush olive oil all over the cut side of the top and bottom portion of the sliced bread.
  • Add half of the olive salad on the top portion of the bread, and then the remaining olive salad on the bottom. Don't add too much of the liquid to the bottom half (it will get soggy if you do).
  • Next, add a layer of the coppa, then a layer of the mortadella.
  • Top with layers of sliced provolone and mozzarella. Next, add the salomi layer.
  • Very carefully flip the bottom half of the sandwich onto the top. Then flip the sandwich over. (It's okay if some of the olive salad falls out of the sandwich, this is almost impossible to prevent).
  • Wrap the sandwich with plastic wrap. Place a heavy object on top of the sandwich (such as a cast-iron skillet). Let is rest for 1 hour, or up to 12 hours.
  • Remove the plastic wrap and use a large sharp knife to cut the sandwich into 4 equal portions. Serve at once, or wrap in foil, and heat in a 325°F oven for 15 minutes.

Video

Notes

See the video near the top of the blog post for visual guidance.  If you like the video, please subscribe to our YouTube channel.
The bread and the olive salad can be made up to 2 days in advance.  Place the bread in a paper sack and leave on the counter.  Transfer the salad to a jar or container with a lid and keep in the fridge until ready to use. 
Wrap leftovers in foil and they will keep in the fridge for up to 5 days. 

Nutrition

Calories: 824kcal | Carbohydrates: 88g | Protein: 43g | Fat: 32g | Saturated Fat: 12g | Polyunsaturated Fat: 8g | Monounsaturated Fat: 51g | Trans Fat: 1g | Cholesterol: 98mg | Sodium: 2377mg | Potassium: 504mg | Fiber: 9g | Sugar: 5g | Vitamin A: 1142IU | Vitamin C: 11mg | Calcium: 560mg | Iron: 9mg

Authentic Jambalaya

February 23, 2022 by Kris Longwell 48 Comments

A large oval blue Dutch oven filled with jambalaya with a wooden spoon inserted into the mixture.

This is easily one of our all-time favorite NOLA dishes.

Even if it’s not Mardi Gras when you’re reading this, when you make this recipe, you’ll feel like you’re down in the French Quarter having this amazing bowl of pure goodness! It’s so good and is even better the next day! 

A large oval blue Dutch oven filled with jambalaya with a wooden spoon inserted into the mixture.

How To Make Jambalaya at Home

There are just so many things to love about this classic dish.

And don’t worry, if you don’t like shrimp then leave it out! Same with the sausage or chicken!

All of the components do come together to make a dish that is really authentic in taste and texture, and not hard to make at all!


NOTE: If you liked this video, please subscribe to our YouTube channel. Remember to click the little ‘bell’ icon so you’ll never miss a new video!

The Difference Between Cajun and Creole Jambalaya

This dish is very popular in Louisiana and you’ll find different family recipes all across the state.  There really are two major categories, however. Cajun vs. Creole.

Cajun typically has a smokier taste and does not usually include tomatoes. Often, the proteins are cooked first, and then on the Cajun holy trinity of vegetables: Onion, green bell pepper, and celery.

Our version includes three types of protein: Chicken, sausage, and shrimp, which is common in the Creole version. Creole also usually includes tomatoes, which our includes, as well.

It’s similar to the mix of culture and tastes down Louisiana way…so vibrant and diverse and just so much flavor. The history of jambalaya is as fully textured and colorful as the dish itself.  Just incredible!

EXPERT TIP: We love using uncooked Andouille sausage links for our recipe. If you can’t find raw andouille sausage, you can usually find smoked sausage in most well-stocked supermarkets. The smoked sausage is already cooked so all you need to do is brown the slices in your pot. For raw, you’ll need to cook the sausage first, either on the grill or in a hot skillet.

Sear the chicken, remove it, and then give the cooked sausage a quick brown in the pot. The shrimp goes in right at the end of the cooking process.

A large oval blue Dutch oven sitting on a stovetop with seared chicken thighs in it and then the same pot with seared slices of Andouille sausage in it.

For the shrimp, we like large, extra-large, or even jumbo.

We don’t recommend leaving the tails on because they can get in the way when guests dig into a serving, but that’s a matter of personal taste. 

If you can find gulf shrimp, go for it! Authentic and so delicious.

You’ll stir in the shrimp during the final 15 minutes of cooking the jambalaya.

A person pouring uncooked shrimp in a blue Dutch oven that is filled with cooked rice, tomatoes, and seasonings.

How To Serve and Store

This recipe will easily feed 8 to 12 people, depending on how hungry they are and what else you are serving. It’s great for a Mardi Gras party, watching the big game, or a delicious Sunday night dinner.

We serve it right out of the pot with some warm crusty bread and lots of Louisiana-style hot sauce.  A cold beer is certainly a nice addition, too. 

EXPERT TIP: As mentioned, the dish is even better served the next day. Store in an air-tight container in the fridge and then heat it up on the stove, adding another ½ cup or so of chicken broth to loosen it up.

A white bowl filled with Louisiana jambalaya with a fork sitting on the side of the dish.

Other Classic Louisiana Dishes

Some of these dishes are Creole, some are Cajun, some are famous in New Orleans, but all of them are downright delicious.

  • Shrimp and Okra Gumbo
  • Sausage and Chicken Gumbo
  • Crawfish Étouffée
  • Dirty Rice
  • Red Beans and Rice
  • Homemade Beignets

In the meantime, aren’t you craving some made-from-scratch jambalaya? Woo hoo!

A blue Dutch oven filled with jambalaya with shrimp, sausage, and chicken.

Folks, you may not be able to make it down to Mardi Gras or the Big Easy anytime soon, but that doesn’t mean you can’t bring it home to your kitchen.

This dish is always a crowd favorite and sure to get lots of cheers of joy when you serve it to friends and family.

There is just something magical about this incredible Louisiana classic dish.

Only thing better? A little Louisiana hot sauce drizzled on top of the steaming bowl of yumminess!

A person pouring hot sauce from a bottle onto a helping of jambalaya in a white bowl next to pieces of French bread.

Ready to make the best dish this side of the bayou? Go for it!

And when you do, be sure to take a photo of it, post it on Instagram, and tag @HowToFeedaLoon and hashtag #HowToFeedaLoon!

A white dinner bowl filled with shrimp and sausage jambalaya next to a bottle of Louisiana hot sauce and a mug of beer.
Print Recipe
4.93 from 14 votes

Authentic Jambalaya

Well, it doesn't get much better than this amazing jambalaya recipe! Classic Louisiana flavor. We love using chicken, andouille sausage and shrimp. Along with the other spices and aromatics that make this an-all favorite dish. So good!
Prep Time20 minutes mins
Cook Time1 hour hr
Searing chicken and sausage15 minutes mins
Total Time1 hour hr 35 minutes mins
Course: Entree
Cuisine: Cajun, Creole, Louisiana
Servings: 8
Calories: 552kcal
Author: Kris Longwell

Equipment

  • Large pot, such as an 8 qt Dutch oven

Ingredients

  • 3 tablespoon olive oil
  • 1 lb chicken thighs boneless, skinless
  • Salt and pepper
  • 1 lb andouille sausage fully cooked and sliced into rounds (SEE NOTES)
  • 1 yellow onion chopped
  • 1 large green bell pepper cored, seeded and chopped
  • 3 celery ribs chopped
  • 1 jalapeno cored, seeded, and chopped
  • 4 garlic cloves minced
  • 1 tablespoon tomato paste
  • 1 tablespoon red wine vinegar
  • 1 tablespoon hot sauce i.e., Louisiana, Tobacco, Crystals
  • 2 teaspoon fresh thyme chopped (or 1 teaspoon, dried)
  • 1 teaspoon cayenne pepper
  • 1 teaspoon garlic powder
  • 1 teaspoon smoked paprika
  • 1 teaspoon chili powder
  • 1 28 oz. can whole tomatoes crushed with your hands
  • 4 cups chicken stock
  • 2 bay leaves
  • 1½ cups long-grain rice we use white
  • 1 lb shrimp peeled and deveined
  • 2 tablespoon parsley fresh, chopped, for garnish (optional)

Instructions

  • Preheat oven to 350 degrees°F.
  • Season chicken with salt and pepper.
  • In a large heavy pot, preferably a Dutch oven, heat 1 tablespoon oil over medium-high heat.
  • Add the chicken pieces and sauté until browned, about 5 minutes. Remove from pot and cut into bite-size pieces. Set aside.
  • Heat the remaining 2 tablespoons of oil in the pan over medium-high heat.
  • Add the cooked sausage and cook until starting to brown, about 4 minutes.
  • Add all remaining ingredients, except for the shrimp and cooked chicken. Add 2 teaspoon of salt and 1 teaspoon black pepper. Stir to fully combine.
  • Cover and cook in the oven until the rice is nice and tender, about 1 hour.
  • Remove from oven and stir in the shrimp and cooked chicken. Return to the oven (covered) for 15 minutes. The shrimp should be nice and pink, if it doesn't look fully cooked, return to the oven for another 10 to 15 minutes.
  • Stir with a wooden spoon and garnish with fresh parsley, if desired. Serve at once with additional hot sauce.

Video

Notes

See the video near the top of the blog post for visual guidance.  If you liked the video, please subscribe to our YouTube channel! 
We recommend not adding super cold chicken stock to the mixture, this will take longer to heat through.  Either gently heat the stock/broth on the stove, or add room temperature stock/broth.  If you do add cold stock/broth, you will probably need to increase the bake time by another 15 to 20 minutes to fully cook the rice.  Do a taste test on the rice to determine this. 
We love to make this recipe with raw andouille sausage that is in links.  You can find this easily in the Southern U.S. states and in many well-stocked supermarkets or meat markets.  You'll need to cook the sausage before starting this recipe.  We love to grill ours, or cook it in a hot skillet with a little water.   If you can't find fresh (raw) andouille sausage, you can usually find it already smoked (and fully cooked) in the refrigerated area of your market near other smoked sausages and hot dogs. No need to cook smoked sausage, just slice it and then brown it as instructed in the recipe. 
Reheat leftovers in a pot on the stove with the addition of a half to 1 cup of broth or water. 
Leftovers will keep covered in the fridge for up to 1 week and it freezes nicely for up to 2 months. 

Nutrition

Calories: 552kcal | Carbohydrates: 36g | Protein: 26g | Fat: 27g | Saturated Fat: 9g | Polyunsaturated Fat: 3g | Monounsaturated Fat: 16g | Trans Fat: 1g | Cholesterol: 107mg | Sodium: 791mg | Potassium: 572mg | Fiber: 2g | Sugar: 3g | Vitamin A: 618IU | Vitamin C: 25mg | Calcium: 41mg | Iron: 2mg

POST UPDATE: This recipe was originally published in February 2015, but was updated with improved tweaks to the recipe with new tips and photography and a fabulous new video in February, 2022!

Slow-Cooker Beef Stew

February 20, 2022 by Kris Longwell 19 Comments

Two side-by-side blue soup bowls filled with slow-cooker beef stew.

This is one of the most delicious stews of all time. And with the slow-cooker, one of the easiest, too.

There is just something undeniably comforting with homemade beef stew. Melt-in-your mouth chunks of beef, hearty vegetables, and a velvety sauce that all just works together beautifully. Put it all together the night before and come home the next day to a meal you and your family will treasure.

Two side-by-side blue soup bowls filled with slow-cooker beef stew.

How To Make Slow-Cooker Beef Stew

This amazing stew could not be easier to make.

We put the entire dish together the night before we intend to serve it.

Keep it in the fridge, covered, and then slow-cook it the following day. Easy peezy!


NOTE: If you liked this video, please subscribe to our YouTube channel. And remember to click the ‘bell’ icon so you’ll never miss a new video!

The Ingredients You Will Need

The ingredients for standard beef stew are simple and straightforward. They include:

  • Olive oil
  • Chuck beef roast
  • Salt and pepper
  • Yellow/Gold potatoes
  • Carrots
  • Celery
  • Onion
  • Garlic
  • Tomato Paste
  • Worcestershire sauce
  • Beef broth
  • Red wine (optional)
  • Fresh rosemary
  • Dried thyme
  • Bay leaves
  • Smoked paprika (or regular)
  • Corn starch

EXPERT TIP: The red wine adds a wonderful depth of flavor to the stew, and 99% of the alcohol will cook off. However, if you prefer to not cook with wine, then simply omit it and increase the beef broth to 5 cups.

A wooden cutting board holding whole potatoes, celery stalks, beef broth in a jar, chuck roast, carrots, and on onion.

The Best Beef for Beef Stew

There are many types of beef to choose from as you peruse the meat department at your local supermarket.

For beef stew, you do not need an expensive cut of meat. The “low and slow” technique of cooking the stew will naturally tenderize the meat and create a melt-in-your-mouth texture.

We recommend a chuck roast. In many well-stocked supermarkets and at your local meat market, you can find stew meat that has already been cut up for you. Easy and perfect!

EXPERT TIP: To help lock in even more flavor, we season the cut-up meat with salt and pepper, and then toss it in flour. Then, we sear the meat in a hot skillet with a little oil until nicely browned all over. Usually, we need to do this in a couple of batches. If you don’t have time for this step, then simply add the meat into the slow-cooker uncooked along with all of the other ingredients.

A large black skillet filled with pieces of beef that has been seared.

Slow-Cooker Beef Stew FAQs

Can I use any cut of beef? Absolutely! As mentioned, there’s no need to purchase a more expensive cut of meat because you will get amazing results with a low-cost cut. However, if you have ribeye, sirloin, or brisket that you need to use up, then go for it. It will be amazing!
What can I substitute for the wine? You can substitute white wine for the cup of red wine called for in the recipe. If you prefer to not cook with alcohol, then omit the wine completely and increase the beef broth by 1 cup (5 cups total).
Can this recipe be doubled? Absolutely! Just make sure you’ve got a large enough slow-cooker, or use two!

EXPERT TIP: Once the slow-cooker beef stew has cooked for 8 to 10 hours, it’s time to thicken the sauce a little. We use a cornstarch slurry which is ¼ cup of cornstarch mixed with 4 tablespoons of water. Pour it into the stew and it will thicken quickly. You can also mix ¼ cup of all-purpose flour with ½ cup of the stew sauce and then stir it in and cook for another 30 minutes.

A cornstarch slurry being poured from a small glass bowl into a slow cooker filled with beef stew.

When To Serve and How To Store

This stew is really the perfect weeknight dinner because it’s so easy to prepare. However, it’s also a wonderful weekend feast, especially during those chilly winter months.

And it’s always a huge hit when we serve it to friends and family for a game-day gathering.

EXPERT TIP: This stew freezes absolutely beautifully. It will also keep covered in the fridge for up to 1 week. Freeze for up to 3 months.

Just amazing. And the smell of your house while the stew is stewing? So good!

A wooden spoon being lifted out of a slow-cooker filled with beef stew.

Other Slow-Cooker Favorite Recipes

We love cooking with our slow-cooker so much, and here are some other favorite recipes for you to try:

  • Incredible Slow-Cooker Baby Back Ribs
  • Slow-Cooker Ham and Potato Au Gratin
  • Brisket
  • Spiral Ham
  • Chicken Chow Mein
  • Corn on the Cob
  • Asparagus Risotto

In the meantime, you’ve got to try this amazing beef stew!

This is one recipe that you will want to make time and time again. It’s honestly that good.

A blue soup bowl filled with slow-cooker beef stew with another bowl behind it sitting next to a loaf of bread.

Ready to make the best stew in town? Go for it!

And when you do, be sure to take a photo of it, post it on Instagram, and tag @HowToFeedaLoon and hashtag #HowToFeedaLoon!

A blue soup bowl filled with slow-cooker beef stew and garnish with chopped fresh parsley.
Print Recipe
5 from 4 votes

Slow-Cooker Beef Stew

Slow-Cooker Beef Stew is one of the most comforting dishes of all time. And making it in your slow-cooker is a snap! We get it all together the night before, and then let it slow cook the next day for the perfect (and easy) dinner!
Prep Time15 minutes mins
Cook Time8 hours hrs
Beef searing10 minutes mins
Total Time8 hours hrs 25 minutes mins
Course: Entree / Slow Cooker
Cuisine: American
Servings: 8
Calories: 358kcal
Author: Kris Longwell

Equipment

  • 8-Quart Slow Cooker

Ingredients

  • 2 lbs chuck roast cut into bite-sized pieces
  • 1 cup all-purpose flour
  • Salt and pepper
  • 2 tablespoon olive oil or vegetable
  • 3 cups potatoes yellow or gold, cubed
  • 3 medium carrots peeled and sliced
  • 4 stalks celery sliced
  • 1 medium onion chopped
  • 4 cloves garlic minced
  • 2 tablespoon tomato paste
  • 4 cups beef broth
  • 1 cup red wine
  • 2 tablespoon Worcestershire sauce
  • 1 tablespoon rosemary fresh
  • 1 teaspoon thyme dried
  • 1 teaspoon smoked paprika
  • 2 bay leaves
  • ¼ cup cornstarch

Instructions

  • Liberally season the meat all over with salt and pepper. Place the flour on a large platter and dredge the beef pieces in it until coated.
  • Heat the oil in a large skillet over medium-high heat. Working in a couple of batches, add the floured meat to the skillet and cook until browned all over, about 3 minutes. Repeat with remaining beef.
  • Place the seared beef into the slow-cooker. Next, add the remaining ingredients (except the cornstarch) plus 2 teaspoon of salt and 1 teaspoon of black pepper into the slow cooker and stir to fully mix.
  • Cook on LOW for 8 hours or on HIGH for 3 to 4 hours.
  • Just before serving, in a small bowl, mix the cornstarch together with 4 tablespoon of cool tap water. Stir the cornstarch slurry into the stew and continue stirring until slightly thickened. This only takes a minute or two. The stew is now ready to serve.

Video

Notes

See the video near the top of the blog post for visual guidance.  If you liked the video, please subscribe to our YouTube Channel.  
No need to use an expensive cut of beef for this stew.  We recommend a nice chuck roast.  Cut away any excess fat.  Streaks of fat in the meat is good, it will add flavor and become melt-in-your-mouth delicious.  You can often find pre-cut stew meat in the meat department of most well-stocked supermarkets.
We love using yellow or gold potatoes, but really any variety will work, including red, russet, or fingerling.  And no need to peel the potatoes!
Leftovers will keep in the fridge for up to 1 week and the stew freezes beautifully for up to 3 months.  Reheat leftovers in a pot on the stove over medium heat. 

Nutrition

Calories: 358kcal | Carbohydrates: 21g | Protein: 25g | Fat: 16g | Saturated Fat: 6g | Polyunsaturated Fat: 2g | Monounsaturated Fat: 9g | Trans Fat: 1g | Cholesterol: 78mg | Sodium: 503mg | Potassium: 654mg | Fiber: 2g | Sugar: 2g | Vitamin A: 4074IU | Vitamin C: 3mg | Calcium: 57mg | Iron: 4mg

Homemade Chicken Noodle Soup

February 16, 2022 by Kris Longwell 6 Comments

A white soup bowl filled with homemade chicken noodle soup next to a sliced of toasted bread.

We think we can all agree, this has to be one of the most comforting soups of all time. Not much argument there.

There’s a reason moms and grandmas have been preparing this for their kids when they’re feeling under the weather…it just makes you feel better! The key here is the homemade broth. The roasted chicken adds so much, too. Make these two components in advance and the soup comes together in about 30 minutes. It’s honestly one of the best soups you will ever eat and serve. 

A white soup bowl filled with homemade chicken noodle soup next to a sliced of toasted bread.

How To Make Chicken Noodle Soup

Chicken Noodle Soup is so iconic, it even has its place in the culinary hall of fame and history, no doubt.

Now, let’s get to taking this beloved soup and making it as good as it can possibly be.

It’s really not difficult at all, you just need to give yourself some time to make the stock and roast the chicken.


NOTE: If you liked this video, please subscribe to our YouTube Channel. Remember to click the ‘bell’ icon so you’ll never miss a new video!

How To Make Homemade Chicken Stock

There are a couple of different approaches for making the broth for chicken noodle soup.

Our recipe for Roasted Chicken Stock utilizes roasted bones and a long slow simmer. The flavor is deep and very robust.

We find that our recipe for Homemade Chicken Broth works perfectly for the soup. Here’s all you have to do:

  1. Simmer 3 lbs of chicken parts (skin-on, bone-in) in 1½ gallons of water for about 30 minutes, skimming impurities from the surface.
  2. Add chopped celery, onion, and carrots, along with a collection of herbs (ie, rosemary, thyme, parsley).
  3. Simmer for 3 hours.
  4. Strain and chill.
  5. Skim congealed fat from the surface.
  6. Store until ready to use.

EXPERT TIP: To get juicy, delicious chicken, we recommend roasting. Simply take about 3 to 4 lbs of skin-on, bone-in chicken breasts. Rub olive oil over them, season with salt and pepper, and then roast for about 50 minutes, or until the internal temperature is 165°F. Once cool enough to handle, pull the chicken from the bones and roughly chop. Or, if desired, you can shred the chicken that you used to make the broth, just be sure to pick out all of the bones and discard the skin. 

A person using a chef's knife to cut up cooked chicken breasts on a wooden cutting board.

Once the broth and chicken are ready to go, it’s time to get started on the soup.

Chop up an onion, slice a few stalks of celery, and cut several carrots into chunky pieces.

Sauté in a couple of tablespoons of butter until nice and soft, about 5 minutes.

A large non-stick black skillet filled with sliced carrots, celery, and chopped onion with a wooden spoon inserted in the side.

Easy Chicken Noodle Soup

Making the chicken broth and roasting the chicken will take your chicken noodle soup to amazing culinary heights.

But you may be wondering, I don’t have much time, can I cut some corners and still have a yummy soup? In a word: YES!

Simmer chicken, with or without skin and bones, for about 1 hour. You now have cooked chicken and chicken broth. Will the flavor be as deeply delicious as homemade stock and roasted chicken? No. But will it still be significantly better than the canned variety? Absolutely

EXPERT TIP: When selecting a noodle, go with a nice wide egg noodle. There are several types of egg noodles. Pick one that is bite-sized. The noodles will go in during the final cooking of the soup. Remember, as the noodles cook and even after the soup sits for a day or two, the noodles will expand. Two cups of pasta are all you need to reach the best ratio of noodles to the broth.

Uncooked pasta egg noodles being transferred from a white bowl into a black pot filled with simmering broth and cooked vegetables.

Homemade Chicken Noodle Soup FAQs

Can I use a rotisserie chicken? Absolutely! This is a fantastic option. The chicken is flavorful and already cooked for you! Save the bones to make stock next time you make the soup. We find the 2 rotisserie chickens will give you the 4 cups needed to make the soup.
Is it okay to use boxed/canned chicken broth? Well, in a pinch. Of course, it is. You won’t get the depth of comforting flavor as homemade broth. If you don’t have time to make the broth from scratch, then remember, you can simmer your skinless boneless chicken breasts in water until cooked. You now have cooked chicken and pretty decent chicken stock!
What are the best seasonings for chicken noodle soup? Keep it simple. Salt and pepper are really about all you need. The addition of fresh parsley adds a nice depth of freshness. If you like fresh dill, add 1 tbsp. It brightens up the soup but does give it a hint of dill. Bottom line: Taste as you go. If your broth is salted, you won’t need to add as much salt to the soup. Or the reverse if the broth is unsalted. Taste and adjust.

A black pot with handles filled with homemade chicken noodle soup topped with chopped fresh parsley.

Other Classic Soups to Try

Like most of us, we are simply crazy for a good soup. Here are some of our favorites to make and serve:

Roasted Tomato and Basil Soup
Rustic Lentil Soup
Classic French Onion Soup
Tortilla Chicken Soup
Roasted Butternut Squash Soup
Farm Fresh Corn Chowder
New England Clam Chowder
Cioppino (San Francisco-Style Seafood Stew

In the meantime, you’ve just got to make the most classic soup of them all!

 A large ladle filled with homemade chicken noodle soup.

Chicken Noodle Soup has been loved by generations and generations of families over the years.

When you make it from scratch, there is something truly magical about it.

Every single bite comforts you and warms you to the core. In our books, it’s simply the best. We think you’ll agree.

A white soup bowl filled with chicken noodle soup sitting on a dinner plate with a soup spoon tucked in the side and toasted bread slices nearby.

Ready to make a soup that will bring joy to you and your family with every single bite? Go for it!

And when you do, be sure to take a photo of it, post it on Instagram, and tag @HowToFeedaLoon and hashtag #HowToFeedaLoon!

A white soup bowl filled with chicken noodle soup sitting on a dinner plate with a soup spoon tucked in the side and toasted bread slices nearby.
Print Recipe
5 from 1 vote

Classic Homemade Chicken Noodle Soup

This Classic Homemade Chicken Noodle Soup is the ultimate in comfort. Make the stock and roast the chicken a day before and then it comes together very easily the next day. This freezes beautifully, too. Nothing much better than homemade chicken noodle soup. Yum!
Prep Time15 minutes mins
Cook Time50 minutes mins
Roast the Chicken1 hour hr
Total Time2 hours hrs 5 minutes mins
Course: Soup
Cuisine: Soup
Servings: 8 people
Calories: 315kcal
Author: Kris Longwell

Equipment

  • 1 6 to 8 qt pot or Dutch oven

Ingredients

For the Roast Chicken

  • 3 lb chicken breasts skin-on, bone-in
  • 2 tablespoon olive oil
  • salt and pepper

For the Soup

  • 10 cups chicken broth preferably homemade
  • 2 tablespoon unsalted butter
  • 1 medium onion chopped
  • 1 cup carrot sliced, about 3 medium carrots
  • 3 celery ribs sliced
  • 1 tablespoon fresh thyme chopped
  • Juice of 1 lemon about 1 to 2 tablespoons
  • Kosher salt and black pepper
  • ¼ cup fresh parsley chopped
  • 2 cups egg noodles dried

Instructions

Roast the Chicken

  • Preheat oven to 350°F.
  • Rub the olive oil all over the chicken. Liberally salt and pepper. Place on a rack on a baking pan. Roast for 45 to 50 minutes, or until an internal temperature reaches 165°F.
  • Once the chicken is cool enough to handle, remove the skin and discard. Carefully pull the meat from the bones and roughly cut it into bite-sized pieces. Set aside.

Make the Soup

  • Heat the stock in a large pot over medium heat to a gentle simmer.
  • Meanwhile, in a large skillet, heat the butter over medium heat. Add the onion, carrot, celery, and thyme and cook until soft, about 5 minutes.
  • Add the cooked chicken and the cooked vegetables to the simmering broth.
  • Add the lemon juice, 2 teaspoons salt, ¼ teaspoon black pepper, and the parsley, leaving some left for garnish.
  • Simmer for 30 minutes.
  • Add the egg noodles and simmer for another 15 minutes, or until cooked through.
  • Taste and adjust seasoning, if necessary. Garnish with extra chopped parsley, if desired.

Video

Notes

See the video near the top of the blog post for visual guidance. If you liked the video, please subscribe to our YouTube channel.  
The homemade broth is really what makes the soup extra special.  However, you can simplify the process by simmering skinless, boneless chicken breast in water for about 30 minutes until fully cooked.  You'll have cooked chicken and a decent chicken broth.  Better than the canned variety!
If desired, you can shred the chicken from the broth to use in the soup. Just be sure to pick over any bones and discard the skin before adding to the soup. 
The broth can be made up to 5 days in advance.  We often make a double batch of broth and freeze until we're ready to make soup again.  The roasted chicken can be prepared up to 3 days in advance.
The soup will keep covered in the fridge for up to 6 days and freezes beautifully for up to 2 months. 

Nutrition

Calories: 315kcal | Carbohydrates: 11g | Protein: 39g | Fat: 11g | Saturated Fat: 3g | Polyunsaturated Fat: 1g | Monounsaturated Fat: 5g | Trans Fat: 1g | Cholesterol: 124mg | Sodium: 1289mg | Potassium: 979mg | Fiber: 1g | Sugar: 2g | Vitamin A: 3030IU | Vitamin C: 29mg | Calcium: 46mg | Iron: 2mg

POST UPDATE: This recipe was originally published in April 2015, but was updated with improved tweaks to the recipe with new photography and tips and a fabulous new video in February, 2022!

Wagyu Pastrami Sandwich

February 13, 2022 by Kris Longwell 1 Comment

A person holding two halves of a Wagyu pastrami sandwich on rye bread.

We’re taking this iconic sandwich to new heights.  Amazingly delicious new heights. 

Folks, this is a sandwich for the record books. You can go all out and purchase the wagyu pastrami and the homemade Jewish rye bread, or you can get these items locally. Either way, you’ll have a sandwich that is nothing short of epic.

A person holding two halves of a Wagyu pastrami sandwich on rye bread.

How to Make a Pastrami Sandwich

There aren’t many ingredients in an authentic pastrami sandwich. Pastrami, rye bread, brown mustard.

No matter what, make sure you seek out quality ingredients.

Then, it all falls right into sandwich perfection.


NOTE: If you like this video, please subscribe to our YouTube channel. Remember to click the ‘bell’ icon so you’ll never miss a new video!

Where To Find Wagyu Pastrami

We love making things from scratch, no doubt

But, if you’re like us, you don’t have 10 days to make pastrami at home. And you REALLY don’t have time to locate Wagyu beef and turn it into pastrami.

EXPERT TIP: If you’re wanting to make the best of the best, order your wagyu pastrami from Gourmet Food Store. You’ll get an 8 lb cut of meat that has been brined for days, smoked for hours, and steamed to perfection for hours. It’s going to cost a little extra, but the end result is phenomenal.  The pastrami freezes beautifully, too. 

A person using a large butcher's knife to slice into a slab of cooked pastrami on a wooden cutting board.

Where To Find Jewish Rye Bread

It is important to stress that you can find quality pastrami at many top-notch delis around the globe. Following this recipe with decent pastrami will give you an amazing sandwich.

It’s also important to know that you can find really great rye bread in most well-stocked supermarkets and at quality bakeries around the globe. Again, give you a great sammy!

But, if you want to ensure your Jewish rye bread is about as good as you could possibly find, then order a loaf or two from Zimmerman’s Bakery.

You’ll get a beautiful crunchy crust on the outside, and a flavorful pillowy inside. Amazing!

A person using a serrated knife to cut slices from Jewish rye bread on a wooden cutting board.

How To Heat the Pastrami

If you have whole pastrami, i.e., from Gourmet Food Store, you’ll want to heat the meat before serving. Give yourself a few hours for this.

Simply remove the meat from the plastic and place it in a large pot with enough simmering water to submerge the whole pastrami. Simmer on medium for 3 hours. Carefully remove and use a large sharp knife to cut the meat into thin slices.

To reheat pre-cut pastrami, or even to amp up the flavors of the slices you’ve just cut from the heated whole pastrami, try the following:

In a medium saucepan, add 1 can of dark beer and 4 tablespoons of whole-grain mustard. Bring to a boil, slightly lower the heat, and then add the pastrami slices. Simmer for about 3 minutes. This step isn’t completely necessary, but beautifully heats the slices and adds another layer of amazing flavor.

A stainless steel pot filled with slices of wagyu pastrami simmering in a beer and whole mustard mixture.

What To Put on a Pastrami Sandwich

This pastrami sandwich recipe keeps it simple. Just like they do at the legendary Katz’s Delicatessen in New York City.

Take your rye bread slices and slather on a good helping of brown mustard (we love the spicy variety).

Now, layer slices of the hot pastrami on top of one slice of bread. Don’t be shy, you’ll want at least a couple of inches of meat piled high.

A person smearing on brown mustard onto a slice of rye bread and then adding slices of pastrami on next.

Wagyu Pastrami Sandwich FAQs

  • What’s the best way to slice whole pastrami? We highly recommend using a nice sharp knife. Try not to cut thick slices. You don’t need to cut one full slice each time you cut through the meat. Turn the knife to an angle and cut off slivers. The slices in our photos here are as big as you’d want. You can have them sliced with a deli meat slicer, but we find you get better results with hand-cut slices. 
  • Can the pastrami be served cold or at room temperature? Of course! We prefer a hot pastrami sandwich, but all that amazing flavor will still be there when serving chilled or at room temp. You can place the sliced meat on a platter and let guests build their own sandwiches!
  • What other types of bread can be used? Jewish rye bread is definitely traditional, but you’ll still have great results with pumpernickel, sourdough, whole grain, or even good ole country white bread.

One half of a Wagyu pastrami sandwich sitting on a cutting board with the layers of meat exposed.

When To Serve and How To Store

This sandwich is truly something special. It’s amazing for any occasion, but we love having friends over to watch the big game and serve these. The fun is letting them build their own epic sandwich.

New York-style pickles can be found in the deli section of most well-stocked supermarkets and are a must to have on the side. We love serving with homemade coleslaw, potato salad, and/or Kettle chips.

EXPERT TIP: If you’ve ordered the Wagyu pastrami from Gourmet Food Store, chances are you’ll have plenty of leftovers. Wrap the cut of meat, whole or in slices, in butcher paper or parchment paper, and then wrap in foil. The meat freezes beautifully for up to 2 months. Leftovers will keep in the fridge for a week.

So amazing!

A Wagyu pastrami sandwich sitting on a small cutting board with a toothpick stuck through the middle of it.

Other Amazing Sandwiches To Try

Any and all of these other epic sandwiches are so good!

  • Grilled Honey-Mustard Bacon Sandwich
  • Grilled Steak Sandwich
  • Fantastic Fried Fish Sandwich
  • Buffalo Chicken Sandwich
  • Banh Mi Sandwich
  • Chicken Fried Steak Sandwich
  • CopyCat McDonald’s Big Mac

In the meantime, don’t you just want to sink your teeth into this masterpiece?

A pastrami sandwich that has been sliced into two halves both sitting a small wooden cutting board.

Ready to make a sandwich that even Katz’s Deli in NYC would be impressed with? Go for it!

And when you do, be sure to take a photo of it, post it on Instagram, and tag @HowToFeedaLoon and hashtag #HowToFeedaLoon!

One half of a Wagyu pastrami sandwich sitting on a cutting board with the layers of meat exposed.
Print Recipe
No ratings yet

Wagyu Pastrami Sandwich

This sandwich really is epic. You can order the Wagyu pastrami and homemade Jewish rye bread and have it delivered to your doorstep (see NOTES), or you can pick them up from your favorite deli and bakery. No matter what, you'll have amazing results.
Prep Time5 minutes mins
Cook Time10 minutes mins
Simmering (if starting with room temp whole pastrami)3 hours hrs
Total Time3 hours hrs 15 minutes mins
Course: lunch
Cuisine: American, Jewish
Servings: 4
Calories: 417kcal
Author: Kris Longwell

Ingredients

  • 2 lbs pastrami wagyu or regular, sliced
  • 4 tablespoon whole grain mustard
  • 1 bottle dark beer
  • 6 slices rye bread
  • 1 cup brown mustard i.e., spicy

Instructions

Heating the Whole Pastrami (if using whole pastrami)

  • Heat a large pot (big enough to fit the entire whole pastrami) with enough water to fully submerge the cut of meat. Bring to a gentle boil. Add the pastrami and simmer for 3 hours. Carefully remove from the water and place on a cutting board. Use a sharp knife to cut away thin slices of the meat.

Prepare the Sandwiches

  • In a pot, combine beer and mustard and bring to boil. Add pastrami and simmer for 3 minutes. Remove with a pair of tongs.
  • Generously spread the brown mustard on one side of the sliced bread.
  • Stack the slices of pastrami on half of the bread slices (about 1 to 2 inches tall).
  • Top with the remaining bread slices (with mustard facing down). Slice down the middle of each sandwich and serve at once.

Video

Notes

See the video near the top of the blog post for visual guidance.  If you liked the video, please subscribe to our YouTube channel.  
We love to order our Wagyu pastrami from Gourmet Food Store.  Fresh homemade Jewish rye bread is amazing from Zingerman's Bakery.  
Of course, you can get pastrami and rye bread from your favorite deli and bakery and still have absolutely amazing results.  
Whole pastrami (or sliced pastrami) can be wrapped and frozen for up to 2 months.  Leftover sliced pastrami can be kept in the fridge for up to 1 week. 

Nutrition

Calories: 417kcal | Carbohydrates: 32g | Protein: 51g | Fat: 7g | Saturated Fat: 1g | Polyunsaturated Fat: 1g | Monounsaturated Fat: 4g | Trans Fat: 1g | Cholesterol: 107mg | Sodium: 2755mg | Potassium: 685mg | Fiber: 4g | Sugar: 2g | Vitamin A: 16IU | Vitamin C: 79mg | Calcium: 84mg | Iron: 8mg

POST UPDATE: This recipe was originally published in May 2015, but was updated with improved tweaks to the recipe with new tips and photography and a fabulous new video in February 2022!

Fried Pickles

February 9, 2022 by Kris Longwell 6 Comments

A oval white platter filled with fried pickles nestled next to a small white bowl filled with Ranch dressing.

When done just right, these fried little pieces of heaven are addictively delicious.

You just can’t believe how yummy these little fried gems are. So easy to prepare and perfect when served along with Homemade Ranch Dressing. And they only take a matter of minutes to make!

A oval white platter filled with fried pickles nestled next to a small white bowl filled with Ranch dressing.

How to Make Fried Pickles

It’s hard to decide which is better, the joy in making this delicious treat, or actually eating it.

Okay, that’s easy. They are fun to make, but the taste is off-the-charts.

And they couldn’t be easier to prepare!

How to Get Them Extra Crunchy

We’ve been playing around with this recipe for years, and we finally discovered the secret to extra crispy pickles. Mustard and buttermilk, and then seasoned flour!

Breadcrumbs are fine, but they don’t get the extra crispy exterior that really makes these fried pickles sing.

EXPERT TIP: You’ll need to set up a simple dredging station to coat the pickles. Mix the buttermilk with the spicy buttermilk in one bowl and then whisk together the flour with the salt, pepper, and cayenne in another. Simply coat the pickle chips completely in the buttermilk, and then dredge in the flour. That’s it! Now they are ready to be fried.

A person dipping a pickle chip into a white bowl filled with a buttermilk and mustard mixture and then that chip being dredged in seasoned flour.

How to Air Fry or Bake Fried Pickles

We’ve got to say it, pickles that are battered and deep-fried produce the crunchiest and tastiest results of all the methods we’ve tried.

However, we completely understand that if you’re looking for a healthier option, you can absolutely air fry or bake. NOTE: For the air-fryer option, you’ll need to omit the wet batter.

  • Air Fry – Mix together the flour with salt, pepper, and cayenne pepper. For a boost of flavor, add a little garlic powder. Dry the pickles with a paper towel and sprinkle the seasoned flour all over them. Preheat your air fryer to 400°F. Spray the basket liberally with cooking spray. Air fry for 10 minutes. Flip the pickles over, spray them liberally with more cooking spray, and then cook for another 5 minutes.
  • Oven-Baked – Preheat oven to 450°F. Coat the pickles the same way as if you were deep-frying them: Dry pickles, dip in buttermilk/mustard mixture, then coat in seasoned flour. Spray a baking pan with cooking spray. Add the coated pickles to the pan without overlapping. Bake for 15 minutes. Flip them over and spray them liberally with cooking spray. Cook for another 15 minutes, or until crispy.

If you’re giving them a quick fry in vegetable oil, you’ll want to remove them just as they are golden brown and crispy.

A spider deep fryer catcher holding three fried pickles right out of the hot oil.

The Best Pickles To Use

We’ve tried many types of pickles when making this appetizer.

Originally, we started with a large whole dill pickle and then sliced it ourselves. We found that they were just a little too soft after being fried.

EXPERT TIP: For the best results, look for ‘pickle chips’ in the olives and pickles section of your supermarket. You’ll want chips that are about ¼-inch thick. We love going with Vlassic Sandwich Dill Chips. But there are so many varieties, you can really choose your favorite. Bread and butter, extra spicy, or even whole spears are great choices. Or a combination of them all!

A white oval platter filled with golden brown fried pickles.

These are such a hit whenever we serve these to guests.

They are perfect for parties or that big game-day spread.

They fry up so quickly, you can make a double batch in no time. Trust us…they really do go fast.

A rectangular platter filled with crispy fried pickles stack on top of each other.

How To Serve Fried Pickles

Fried pickles are wonderful by themselves, of course.

But everything is even better with a dipping sauce.

Our Homemade Ranch is an amazing accompaniment, and so is our Homemade Fresh Marinara. Both can be made up to 2 days in advance.

If you don’t have time to make dipping sauces, quality purchased varieties will work just fine. Be sure to serve the pickles nice and hot. If frying in batches, you can keep finished pickles in a low-temp oven until ready to serve.

A person dipping a fried pickle into a small bowl filled with Ranch dressing.

This is honestly one of our most-requested appetizers whenever we have guests over, especially for a pool day, or watching the big game, or just a fun last-minute get-together for some amazingly delicious food.

We serve this with our Homemade Sausage Bread and Loaded Potato Skins for the ultimate guilty-pleasure comfort food spread!

Every single bite is a taste sensation!

A hand holding up a fried pickle that has a bite taken out of it.

Ready to make a fun appetizer that folks will gobble up before your very eyes? Go for it!

And when you do, be sure to take a photo of them, post it on Instagram, and tag @HowToFeedaLoon and hashtag #HowToFeedaLoon!

A rectangular platter filled with crispy fried pickles stack on top of each other.
Print Recipe
5 from 3 votes

Fried Pickles

Fried Pickles are truly addictive and the perfect appetizer for serving guests for the big game, parties, or a fun weekend at home. The cayenne in the seasoned flour adds very little heat, just a nice depth of flavor.
Prep Time15 minutes mins
Cook Time21 minutes mins
Total Time36 minutes mins
Course: Appetizer
Cuisine: American Southern
Servings: 8 people
Calories: 268kcal
Author: Kris Longwell

Equipment

  • Deep fryer or sturdy skillet with an inch of vegetable oil

Ingredients

  • Vegetable oil for frying
  • 16 oz jar dill pickle chips
  • 1 cup buttermilk
  • 2 tablespoon stone-ground mustard
  • 1½ cup all-purpose flour
  • 1 teaspoon salt
  • 1 teaspoon black pepper freshly ground
  • 1 teaspoon cayenne pepper
  • Homemade Ranch for serving

Instructions

  • Heat the oil in your skillet or fryer to 350°F.
    Vegetable oil
  • Place the pickles on paper towels. Use dry paper towels to pat them completely dry.
    16 oz jar dill pickle chips
  • In one bowl or pan, mix together the buttermilk and mustard until fully combined.
    1 cup buttermilk, 2 tablespoon stone-ground mustard
  • In a second bowl, whisk together the flour with the salt, pepper, and cayenne pepper.
    1½ cup all-purpose flour, 1 teaspoon salt, 1 teaspoon black pepper, 1 teaspoon cayenne pepper
  • Working in batches, dip the pickles into the buttermilk mixture to completely coat. Next, dredge them in the flour mixture, using your fingers to help ensure the pickle is fully coated.
  • Add the coated pickles into the hot oil, and cook, flipping once or twice, until golden brown and very crispy, about 4 minutes. Use a spider or metal slotted spoon to transfer the fried pickles to a platter lined with paper towels. Continue with the remaining pickles.
  • Serve at once with your favorite dipping sauce (such as our Homemade Ranch).
    Homemade Ranch

Notes

See the video near the top of the blog post for visual guidance. If you like the video, please subscribe to our YouTube Channel. 
Look for pickle chips in the pickle section of your supermarket.  We like Vlassic Sandwich Dill Pickle Chips. They have good flavor, are nice and big, have the perfect thickness, and are already crunchy.  However,  go with whatever is your favorite type of pickle.  Bread and butter are really delicious, too. 
See the blog post if you'd rather air-fry or bake these pickles (psst....a quick deep-fry is the best, but these options are healthier, no doubt). 
These are best served hot. Although they're still tasty after they've cooled, they lose much of the crunchiness, which helps to make them so yummy! 

Nutrition

Calories: 268kcal | Carbohydrates: 21g | Protein: 4g | Fat: 12g | Saturated Fat: 4g | Polyunsaturated Fat: 1g | Monounsaturated Fat: 1g | Cholesterol: 3mg | Sodium: 861mg | Potassium: 131mg | Fiber: 2g | Sugar: 2g | Vitamin A: 261IU | Vitamin C: 1mg | Calcium: 66mg | Iron: 1mg

POST UPDATE: This recipe was originally published May, 2015, but was updated with improved tweaks to the recipe with new tips and photography and a fabulous new video in February, 2022!

Sausage Bread

February 6, 2022 by Kris Longwell 4 Comments

Four slices of sausage bread sitting next to the cut loaf of the bread all next two a bowl of marinara and two glasses of beer.

There are game-day favorite appetizers, and then there is this.

Unbelievably delicious and always a crowd favorite. Making the homemade pizza dough is a plus, but it’s still wonderful even with store-bought dough or from your favorite pizza joint. The caramelized onions put this over the top. Serve with homemade marinara!

Four slices of sausage bread sitting next to the cut loaf of the bread all next two a bowl of marinara and two glasses of beer.

How To Make Sausage Bread

Making Sausage Bread from scratch is really not difficult at all.

You can easily prepare the caramelized onions and cook the sausage in advance.

Assembly is fun, too. But just wait for the first slice.


NOTE: If you liked this video, please subscribe to our YouTube channel. Remember to click the ‘bell’ icon so you’ll never miss a new video!

How To Make Pizza Dough

Our Easy Pizza Dough is not hard to make. We knead by hand, but you could also use a stand mixer (with dough attachment) or even in a bread maker.

You may be wondering, what’s the difference between a stromboli and sausage bread or sausage roll. Typically, stromboli is filled with pepperoni and Italian meats whereas sausage bread is (not surprisingly) filled with sausage.

EXPERT TIP: You’ll need to allow about 90 minutes to rise and double in size. Find a warm (not too warm), non-drafty area for your dough. A cool oven works perfectly with the door closed and the oven light on.

A ball of pizza dough sitting on a floured black surface next to a rolling pin.

Onions that have been slow-cooked in butter or oil until they are reduced and deeply brown in color is a process of caramelizing.

It is a process that brings out the natural sugars in onions and brown them, giving the onions an irresistible sweet and savory taste.

EXPERT TIP: For this recipe, you’ll need two medium-sized onions. Peel them and then cut them into strips. As they caramelize, they will reduce greatly in size. Just enough for one sausage bread. If you were making French onion soup, for instance, you would use many more onions (like 8). The caramelized onions can be prepared up to 24 hours in advance.

A large blue oval Dutch oven filled with caramelized onions with a wooden spatula inserted into the pot.

Building the Perfect Sausage Roll

After the dough has doubled in size, it’s time to build the sausage roll.

On a lightly floured surface, use a rolling pin to roll out the dough to a rough 10″ by 15″ rectangle.

Leaving about 1 inch along the edges of the dough untouched. Add the following components, one after another:

  • Melted butter
  • Grated Parmesan Cheese
  • Caramelized onions
  • Cooked Italian sausage
  • Shredded mozzarella cheese

EXPERT TIP: Any kind of sausage will work here, but we really enjoy the mild heat from Italian hot sausage. It works nicely against the sweetness of the caramelized onions. To cook, simply remove the cases from the links, crumble into your skillet, and cook until browned. Discard excess grease if necessary.

A person sprinkling grated Parmesan cheese on a rectangular piece of pizza dough, and then caramelized onions being added, then cooked sausage, and then shredded mozzarella cheese.

Now, it’s time to roll the bread!

Starting on the long side of the dough, use your hands to begin rolling the dough over. Keep rolling until you reach the other side of the dough.

Transfer the dough, seam-side down onto a baking pan, preferably lined with parchment paper (for easy clean up).

EXPERT TIP: Brush on an egg wash that is comprised of 1 egg lightly beaten egg and 1 tablespoon of water. This will allow the bread to brown beautifully as it bakes. The addition of grated Parmesan and dried oregano on top is tasty and beautiful.

A person rolling up an uncooked stuffed sausage bread and then tucking in the sides, and then brushing an egg wash on top, and then sprinkling grated cheese on top.

Sausage Bread FAQs

  •  
  • Is it okay to use store-bought pizza dough? Of course! In many well-stocked supermarkets, you can even find fresh pizza dough, usually in the dairy section. Also, ask your local pizza joint or Italian restaurant. They often will sell you made-from-scratch pizza dough. You can also freeze homemade pizza dough for up to 2 months for future use.
  • What about bread dough instead of pizza dough? We love this! It will create a much softer loaf, but still amazingly delicious. You can go with homemade bread dough or even frozen bread dough from the freezer section of most well-stocked supermarkets.
  • What else is good in sausage bread? So many options! First, if you’re not a fan of the onions, leave them out! Even just sausage and cheese are delicious. We also love to include sautéed mushrooms, spinach, sun-dried tomatoes, and marinated artichoke hearts. Bottom line, anything that’s good on pizza would be great here.
  • How long will leftovers last? Sausage bread is definitely best served fresh from the oven, however, it is still very delicious reheated in the microwave for the next couple of days. Wrap leftovers (if there are any) in foil and keep them in the fridge.

A line up of sliced sausage bread sitting on a wooden cutting board next to a glass of beer.

Other Favorite Game-Day or Party Appetizers

Looking to complete your halftime or party spread? Check out these tried and true favorites:

Best-Ever Guacamole
Easy Hummus
Sausage-Stuffed Mushrooms
Loaded Potato Skins
Jalapeno Poppers
Swedish Meatballs
Classic TexMex Queso

And folks, every time we serve this delectable savory treat, it is ALWAYS one of the first items to go!  Can’t you see why? 

A pair of hands holding up sausage bread that has been cut in half revealing the sausage and caramelized onions.

What to Serve with Sausage Bread

This loaded bread is truly a taste sensation all on its own.

When you provide something folks to dip each slice into, you’ve reached an all-new level of yumminess.

Homemade marinara (or quality purchased) is our preferred choice. But homemade Ranch is another wonderful option. Make them both!

A person dipping a slice of sausage into a small white bowl of marinara sauce.

Ready to make an appetizer that will have your guests cheering non-stop? Go for it!

And when you do, be sure to take a photo, post it on Instagram, and tag @HowToFeedaLoon and hashtag #HowToFeedaLoon!

A line up of sliced sausage bread sitting on a wooden cutting board next to a glass of beer.
Print Recipe
No ratings yet

Sausage Bread

Sausage Bread is always one of the first items to go when we serve this to guests for a game-day gathering or party, or even just a fun weekend stay at home. Making the easy homemade pizza dough is awesome, but you can easily go with fresh dough purchased from the store or your local pizza/Italian joint. The onions and sausage can be made up to 24 hours in advance.
Prep Time15 minutes mins
Cook Time2 hours hrs
Pizza dough2 hours hrs
Total Time4 hours hrs 15 minutes mins
Servings: 8
Calories: 367kcal
Author: Kris Longwell

Equipment

  • Large sturdy skillet or Dutch oven for the onions
  • Baking sheet (lined with parchment paper)

Ingredients

  • 1 medium pizza dough
  • 6 tablespoon unsalted butter divided
  • 2 medium yellow onions peeled and cut into strips
  • 8 oz Italian sausage about 3 links, hot or sweet, casings removed
  • all-purpose flour
  • ¼ cup Parmesan cheese grated
  • 1 cup Mozzarella cheese greated
  • 1 egg
  • 1 teaspoon oregano dried
  • marinara sauce for serving

Instructions

  • If making from scratch, make the pizza dough.
  • Melt 4 tablespoon of butter over medium heat in a large skillet or Dutch oven over medium heat. Add the onions, and cook, stirring frequently, until reduced and dark brown, about 40 minutes. Let cool and set aside.
  • In a skillet over medium heat, add the crumbled sausage and cook until lightly browned and cooked through, about 12 to 15 minutes. Remove excess grease, if necessary. Let cool and set aside.
  • Preheat your oven to 375°F.
  • Lightly flour your work surface and roll the dough out to an approximate 10" x 15" rectangular, about ¼-inch in thickness (uniform thickness is more important than the size of the rectangle).
  • Melt the remaining 2 tablespoon of butter and brush it over the dough, leaving about 1 inch along the perimeters untouched.
  • Next, add the caramelized onions, sausage, and then mozzarella cheese.
  • Use your hands to roll the dough up starting on the longest side. Continue gently rolling until you've reached the end of the dough. Place the dough, seam-side down, on a baking sheet, preferably lined with parchment paper.
  • In a small bowl, make an egg wash by combining one lightly beaten egg with 1 tablespoon of water. Brush the egg wash all over the top and sides of the roll of bread. Sprinkle the top with extra grated Parmesan cheese and oregano.
  • Bake in the oven for 30 minutes, or until nicely browned all over.
  • Slice and serve at once with warmed marinara sauce on the side (or your favorite dipping sauce).

Video

Notes

See the video near the top of the blog post for visual guidance.  If you liked the video, please subscribe to our YouTube channel.  
The onions and sausage can be prepared up to 24 hours in advance.  Remember to resist placing hot onions or sausage on the unbaked dough. 
Remember to give yourself time to cook the onions, they will take about 40 minutes to caramelize and then another 15 to 20 minutes to cool down. 
The bread is best served fresh from the oven, but leftovers can be gently reheated in the microwave and will still be yummy. 
Unbaked sausage bread can be frozen for up to 1 month.  Thaw completely, and then bake for 30 to 40 minutes. 

Nutrition

Calories: 367kcal | Carbohydrates: 27g | Protein: 13g | Fat: 23g | Saturated Fat: 8g | Polyunsaturated Fat: 2g | Monounsaturated Fat: 8g | Trans Fat: 1g | Cholesterol: 78mg | Sodium: 709mg | Potassium: 139mg | Fiber: 1g | Sugar: 4g | Vitamin A: 416IU | Vitamin C: 3mg | Calcium: 129mg | Iron: 2mg

Roasted Cauliflower with Olives

February 3, 2022 by Kris Longwell 5 Comments

A rectangular serving platter filled with roasted cauliflower with olives sitting next to a couple glasses of white wine.

This is such a wonderful side dish for so many entrees.

The mild taste of the roasted cauliflower matches perfectly against the tangy green olives, capers, lemon zest, and fresh parmesan cheese. And it simply could not be easier to prepare, and is super healthy, too! This is great served with Roasted Chicken or Beef Brisket!


NOTE: If you liked this video, please subscribe to our YouTube channel. Remember to click the ‘bell’ icon so you’ll never miss a new video. Thank you!

How To Make Roasted Cauliflower with Olives

The hardest part (and it’s really not even hard), is cutting the cauliflower into florets. But like we said, it’s not really that hard. Just use a nice, large, sharp knife to carve out the core, and then cut away the florets. Easy!

In many well-stocked supermarkets, you can get pre-cut cauliflower. In a pinch, you can use frozen, although the texture will be very soft.

You may be asking: “Is cauliflower healthy?” In a word: Yes! Read more about that here.

A rectangular serving platter filled with roasted cauliflower with olives sitting next to a couple glasses of white wine.

The Ingredients You Will Need

This recipe is not only extremely pantry-friendly, but you can also adapt it to your own tastes.

Here are the simple ingredients we love using, but you feel free to adjust:

  • Fresh cauliflower, cut into florets
  • Extra-virgin olive oil
  • Lemon zest
  • Salt and pepper
  • Smoked paprika
  • Olives (we love a mixture of green and kalamata)
  • Capers
  • Fresh parsley
  • Grated Parmesan cheese

EXPERT TIP: The dish as written is 100% vegetarian. To make it 100% vegan, leave off the cheese.

Mix together the seasonings with the oil and lemon zest and then pour over the cut cauliflower in a large bowl.

A person pouring paprika oil over cauliflower florets in a large glass bowl.

Place the prepared cauliflower on a large baking sheet with your oven preheated to 400°F.

We line our baking sheets with parchment paper (or foil) for easy cleanup.

This recipe will comfortably feed 4 people as a side dish. If you are feeding more, simply increase the cauliflower to 2 heads and add more olives as desired. The original flavored oil quantity will still work with the increased veggies.

Seasoned cauliflower florets resting on a large baking sheet lined with parchment paper.

Roasted Cauliflower FAQs

Can the dish be made ahead of time? Sort of. You can easily prep all of the items and get the oil mixture ready to go. We recommend serving the dish right from the oven, or soon after. The cauliflower, though still tasty, loses its nice crisp toasty texture after it sits for several hours.
What other ingredients can be added? For the holidays, we make this and add cooked pancetta (preferably cut into chunky pieces) and fresh sage. You can also add other vegetables, such as broccoli, carrots, and quartered new potatoes. They will bake in the same amount of time.
How long will leftovers keep? As mentioned, you’ll lose some of the toasty texture, but leftovers will keep covered in the fridge for several days. The dish doesn’t freeze very well, as the overall texture becomes compromised.

The combination of roasted ingredients makes for a gorgeous presentation, too!

A large baking sheet filled with roasted cauliflower and olives with a wooden spatula off to the side.

Other Awesome Cauliflower Recipes

Cauliflower is one of our favorite ingredients to cook with. It’s versatile, easy to find, and when prepared right, amazingly delicious.

Here are some great recipes to try:

  • Buffalo Cauliflower Bites
  • Mac ‘ N Cheese with Roasted Cauliflower and Smoked Bacon
  • Whole Roasted Cauliflower with Herb Butter Sauce
  • Mashed Cauliflower with Roasted Garlic
  • Fried Cauliflower with Lemon

In the meantime, you’ve got to whip up a batch of this amazing Roasted Cauliflower with Olives.

EXPERT TIP: Garnishing the dish with freshly chopped parsley, toasted pin nuts, and grated parmesan cheese adds an unforgettable depth of flavor and texture that is just amazing.

A person using a micro-plane to grate a block of Parmesan cheese over a platter of roasted cauliflower and olives.

When To Serve

This dish is always a favorite when served to family, friends, and guests.

It’s so easy and is ideal for a busy weeknight meal. And, by the way, remember it’s very healthy.

But, it’s so vibrant and gorgeous, it’s really perfect for dinner parties and for holiday feasts.

A white rectangular serving platter filled with roasted cauliflower with olives garnished with parsley and grated Parmesan.

This has become a staple in our house and we’re certain you’ll feel the same way.

It’s deeply flavorful and so adaptable to your tastes.

Trust us, with one bite, you’ll be hooked.

A person holding up a large spoonful of roasted cauliflower, green and kalamata olives, and fresh herbs.

Ready to make an incredible side dish that just may steal the show from the main dish? Go for it!

And when you do, be sure to take a photo of it, post it on Instagram, and tag @HowToFeedaLoon and hashtag #HowToFeedaLoon!

A rectangular serving platter filled with roasted cauliflower with olives sitting next to a couple glasses of white wine.
Print Recipe
5 from 1 vote

Roasted Cauliflower with Olives and Lemon

Roast Cauliflower with Olives is deeply flavorful, healthy, easy to make, and can be adaptable to your own tastes. The roasting just enhances the natural flavors. Wonderful side dish any time of the year!
Prep Time15 minutes mins
Cook Time25 minutes mins
Total Time40 minutes mins
Course: Side
Cuisine: Vegetable
Servings: 4 people
Calories: 186kcal
Author: Kris Longwell

Equipment

  • 1 baking pan lined with parchment paper or foil for easy cleanup.

Ingredients

  • 1 head cauliflower cored and cut into 2-inch florets
  • ¼ cup extra-virgin olive oil
  • ¾ teaspoon Kosher salt
  • ½ ground black pepper
  • 1 teaspoon smoked paprika
  • 1 tablespoon lemon juice from 1 lemon
  • Zest from 1 lemon
  • ½ cup green olives pitted
  • ½ cup Kalamata olives pitted
  • 2 tablespoon capers drained
  • 2 tablespoon pine nuts toasted
  • 2 tablespoon parsley fresh, chopped, for garnish
  • 3 tablespoon Parmesan cheese freshly grated, for garnish, optional

Instructions

  • Preheat oven to 400F.
  • Place the cut cauliflower in a large bowl.
    1 head cauliflower
  • In a small bowl, whisk together the oil, salt, pepper, paprika, and lemon juice. In a separate large bowl, combine the cauliflower, olive oil, and lemon zest. Pour the mixture over the cauliflower and use two large spoons to mix and fully coat.
    ¼ cup extra-virgin olive oil, ¾ teaspoon Kosher salt, ½ ground black pepper, 1 teaspoon smoked paprika, 1 tablespoon lemon juice, Zest from 1 lemon
  • Spread the cauliflower onto a baking sheet lined with parchment paper (or foil).
  • Roast for 15 minutes, stirring halfway through with a wooden spoon.
  • Remove from the oven and stir in the olives, capers, and half of the toasted pine nuts. Return to the oven for another 10 minutes.
    ½ cup green olives, ½ cup Kalamata olives, 2 tablespoon capers, 2 tablespoon pine nuts
  • Remove from oven and carefully transfer to a serving platter. Garnish with remaining pine nuts, parsley, and grated Parmesan (if using). Serve at once.
    2 tablespoon parsley, 3 tablespoon Parmesan cheese

Video

Notes

See the video near the top of the blog post for visual guidance.  If you like the video, please subscribe to our YouTube channel. 
All of the prep work can be done for the dish up to a day in advance.  Mix together the EVOO, seasonings, and lemon zest, and then keep covered in the fridge.  Do the same for the cut cauliflower.  Once ready to be baked, the recipe is extremely simple and quick. 
You can also add in cut broccoli, carrot spears or slices, and/or bell pepper strips.  During the holidays, we often add cooked pancetta (cut into small cubes) and fresh sage.
Leftovers will keep in the fridge for several days (though it's never as it is fresh out of the oven). We don't recommend freezing.  

Nutrition

Calories: 186kcal | Carbohydrates: 10g | Protein: 5g | Fat: 14g | Saturated Fat: 2g | Polyunsaturated Fat: 1g | Monounsaturated Fat: 6g | Cholesterol: 3mg | Sodium: 1177mg | Potassium: 503mg | Fiber: 5g | Sugar: 3g | Vitamin A: 584IU | Vitamin C: 72mg | Calcium: 101mg | Iron: 1mg

POST UPDATE: This recipe was originally published in February 2015, but was updated with improved tweaks to the recipe with new tips and photography and a fabulous new video in February 2022!

Texas Chili

February 1, 2022 by Kris Longwell 17 Comments

A large blue bowl filled with Texas chili topped with cheese, onions, and jalapenos next to a glass of beer and a jar of pickles.

Ladies and gents, hold onto your bootstraps, this chili is one for the record books.

We’re thrilled to bring you our version of Texas Chili. No beans or whole tomatoes in sight, but unbelievable taste and texture, to boot. Give yourself a few hours, and you’ll have the best chili this side of the Rio Grande and beyond!

A large blue bowl filled with Texas chili topped with cheese, onions, and jalapenos next to a glass of beer and a jar of pickles.

How To Make Texas Chili

If you’re looking to make authentic Texas-style chili, you’ve come to the right place.

We love starting off with 2 to 3 lbs of cubed ribeye steak.

Building the flavor profile as you go is key to a deep, satisfying chili taste.

NOTE: If you liked this video, please subscribe to our YouTube channel. Remember to click the little ‘bell’ icon so you’ll never miss a new video!

Choosing the Right Cut of Beef

Lots of folks use beef ground chuck, which is wonderful, of course.

But we love good bite-sized chunks of super tender meat that you get with every bite.

Our favorite is boneless ribeye, but you could also go with a sirloin, strip steak, or beef tenderloin.

Two large boneless ribeye steaks on a cutting board next to a wooden bowl of spices.

A simple seasoning of salt and pepper is all that’s needed for the beef.

Browning the meat in a little olive oil locks in the flavor.

The meat will render some fat, so we drain the meat with a colander before returning it to the hot skillet.

A large blue Dutch oven filled with cooked ribeye piece of beef for Texas Chili.

The Best Seasonings for Texas-Style Chili

  • Top-notch chili powder
  • Garlic and onion powders
  • Cayenne and black peppers
  • Smoked paprika
  • Dried oregano (preferably Mexican)
  • Salt

After you’ve combined all the seasoning ingredients, we recommend dividing the mixture into thirds.

You’ll add tomato sauce, chicken, and beef stocks to the pot with the cooked beef and bring it to a nice simmer.

EXPERT TIP: Adding the seasoning mixture in equal portions over the course of an hour and a half, deepens the flavor and ensures all spices dissolve perfectly, and helps to thicken the chili.

A hand dumping a square container of chili seasoning into a pot of meat and sauce.

Building the Classic Flavor

After an hour and a half of simmering, all of the seasoning mixtures should have been added.

As the Texas chili simmers, it will reduce down and thicken to the perfect consistency, not thick like gravy, but definitely not runny either.

EXPERT TIP: For the final flavor boost, we add brown sugar, ground cumin, and a few dashes of our favorite hot sauce. These are best when added right at the end of cooking, otherwise, their flavor profile can become too dominant in the chili.

A wooden spoon holding up a spoonful of authentic Texas chili.

Authentic and Comforting

Folks, a bowl of our classic Texas Chili is about as comforting as they come.

You might also enjoy our white bean chili, turkey chili, or vegetarian chili, too. But we must admit, this Texas chili, sometimes called Texas Red, is our all-time favorite.

This could easily be doubled (or tripled) to feed a crowd.

An overhead view of a large bowl of chili topped with shredded cheddar, onions, and jalapenos.

Quality chili powder is important. You can find the very best in Fort Worth, Texas at Penderys…or easily peruse the endless selections of spice, chili powders, and more at www.Penderys.com.

Be sure to provide all the classic garnishes when serving Texas-style chili. Chopped onion, shredded cheddar (or Monterrey jack), and sliced jalapenos are a must. Sour cream and even cooked rice are popular additions, too.

If you’re looking for the perfect bowl of chili to serve, you’ve arrived!

A spoon lifting a helping of Texas-style chili from a bowl of the chili with cheese dripping off the sides.

Ready to make this best chili in town, or heck, in the world? Go for it! Yee-haw!

And don’t forget, when you make it, be sure to take a picture of it and post it on Instagram, and tag @HowtTofFeedaLoon and #HowToFeedaLoon!

A large blue bowl filled with Texas chili topped with cheese, onions, and jalapenos next to a glass of beer and a jar of pickles.
Print Recipe
5 from 2 votes

Texas Chili

This recipe is classic Texas-style chili. Bold. No beans. Bite-size chunks of steak. And slow-cooked. Incredible.
Prep Time15 minutes mins
Cook Time2 hours hrs 15 minutes mins
Total Time2 hours hrs 30 minutes mins
Course: Chili
Cuisine: Southern, U.S.
Servings: 6
Calories: 612kcal
Author: Kris Longwell

Equipment

  • 1 Large pot,such as a Dutch oven

Ingredients

  • ¼ cup chili powder
  • 2 tablespoon onion powder
  • 2 teaspoon garlic powder
  • 1 teaspoon black pepper
  • 1 teaspoon Cayenne pepper
  • 1 teaspoon oregano dried
  • 1 tablespoon smoked paprika
  • 1½ teaspoon salt more, to taste
  • 1 teaspoon Adobo seasoning
  • 2 teaspoon olive oil
  • 3 lbs boneless beef steak such as ribeye or sirloin, cut into bite-size pieces
  • 2 lbs ground beef 85% lean
  • 2 15 oz cans tomato sauce
  • 3 cups chicken stock
  • 3 cups beef stock
  • 2 tablespoon brown sugar light or dark
  • 2 tablespoon cumin ground
  • ½ cup tomato paste plus extra, if needed
  • Hot Sauce for garnish, such as Frank's or Tobasco
  • onion chopped, for garnish
  • cheddar cheese shredded, for garnish
  • jalapeno fresh or pickled, for garnish

Instructions

  • Combine the first 9 ingredients in a bowl; divide into thirds.
  • Heat oil in a large pot (Dutch oven works well) over medium heat.
  • Season meat with salt and pepper all over.
  • Cook meat in hot oil until browned all over. Drain. Add meat back to the pot.
  • Meanwhile, in a separate skillet, brown the ground beef until no longer pink. Season with salt and pepper. Drain excess grease. Add to the pot with the cooked meat.
  • Add tomato sauce, chicken stock, and beef stock.
  • Bring to a simmer and then add ⅓ of the chili powder mixture, after 30 minutes, add the next ⅓ of the chili powder mixture, and then after another 30 minutes, add the last ⅓ of the chili powder mixture and let simmer for another 30 minutes. (This will be approx. 1 ½ hours total).
  • Add in the brown sugar, ground cumin, and tomato paste and simmer for another 20 to 30 minutes, until desired thickness. If the chili still is thinner than you prefer, add more tomato paste.
  • Serve at once with garnishes on the side.

Video

Notes

See the video near the top of the blog post for visual guidance. If you liked the video, please subscribe to our YouTube channel. 
We love using nice cuts of boneless ribeye steaks.  But you can also use sirloin, strip steak, or beef tenderloin.  A combination of these works well, too.  1 or 2 lbs of cooked ground sirloin will stretch the chili, too, if desired (we add this in often).  We sometimes don't include the cooked ground beef, and sometimes we do. It definitely stretches the chili and provides even more beef flavor. In the video, we didn't include the cooked ground beef, but we usually do.  
Dividing the chili powder mixture into thirds before adding it to the chili makes this process easy. Simply combine all the seasoning ingredients (except the brown sugar and cumin) in a larger bowl.  And then just eyeball dividing into third into 3 smaller bowls.  
The consistency of the chili will seem thin at first.  But, over the course of the couple hours of cooking the chili will thicken and reduce down.
This can also be made in a slow cooker.  Brown the meat first, then add all remaining ingredients (except the brown sugar, cumin, and hot sauce) and cook on low for 8 to 10 hours (low on 4 to 5).  Stir in the brown sugar, cumin, and hot sauce in the final 30 minutes.
Common garnishes are chopped onion, shredded cheddar, fresh or pickled sliced jalapenos, dill and/or sweet pickles, sour creams, crackers, cornbread, and cooked rice. 
The chili will keep in the fridge (and even deepen in flavors) for up to 4 days.  The chili freezes wonderfully for up to 3 months. 

Nutrition

Calories: 612kcal | Carbohydrates: 20g | Protein: 53g | Fat: 26g | Saturated Fat: 9g | Polyunsaturated Fat: 3g | Monounsaturated Fat: 7g | Cholesterol: 142mg | Sodium: 828mg | Potassium: 1273mg | Fiber: 5g | Sugar: 8g | Vitamin A: 3708IU | Vitamin C: 1mg | Calcium: 104mg | Iron: 8mg

Chicken Burrito Bowl

January 30, 2022 by Kris Longwell 4 Comments

A white oval bowl filled with a chicken burrito bowl topped with guacamole and streaks of sour cream.

We, as so many folks, love the Mexican food chain Chipotle.

We particularly love the bowls, which are basically burritos without the tortillas. They are loaded with layers and layers of flavor. Well, there’s only one way to make them better…make them scratch, at home. Get ready, this is going to be fun.


NOTE: If you liked this video, please subscribe to our YouTube channel. Remember to click the ‘bell’ icon so you’ll never miss a new video!

How To Make a Chicken Burrito Bowl (Better Than Chipotle’s)

We are not here to talk bad about Chipotle! We’d NEVER do that!

Their food is fresh and so delicious.

So much so that we’re inspired to recreate it all from scratch, from home.

A white oval bowl filled with a chicken burrito bowl topped with guacamole and streaks of sour cream.

The Components You Will Need

As mentioned, the only way we can make this chicken burrito bowl better than Chipotle’s version is to make everything from scratch.

Don’t worry folks, much of this can be made in advance! (See NOTES for info this).

Here’s what we’ll be making:

Cilantro Lime Rice
Mexican Simmered Black Beans
Grilled Chipotle Chicken
Roasted Tomato Salsa
Salsa Verde
Skillet-Roasted Corn Salsa
Chopped Green Leaf Lettuce
Shredded Mexican Cheese
Best-Ever Guacamole
Mexican Crema (or sour cream)

EXPERT TIP: To get that authentic Mexican black beans to taste, we add epazote, which is a leafy green herb that can be found in the produce section of Latin/Mexican markets. Cilantro can be substituted if you can’t get to your local Mexican market.

A small wooden cutting board filled with grilled chopped chicken surrounded by bowls of salsa, beans, rice, lettuce, and sour cream.

How To Build the Chicken Burrito Bowl

Now, comes the fun part: Building the amazing Chicken Burrito Bowl!

In a bowl, add a layer of the rice. Next, a layer of the beans.

After chopping the chicken fresh from the grill, place a nice layer on top of the beans.

Next, add the salsas, then lettuce, guacamole, cheese, and top with the Mexican crema.

EXPERT TIP: Mexican crema or cream can be found in the dairy section of many well-stocked supermarkets, or at Latin/Mexican markets. If you can’t get Mexican crema, simply take sour cream and thin with a little milk or heavy cream. We place the cream in a squirt bottle and add streaks over the top of the bowl for a nice presentation.

A white oval bowl filled with rice, beans, and chicken, and then corn salsa being added, then guacamole, then sour cream from a squirt bottle.

When and How To Serve

We completely understand making all of these components is a lot for one person to do. Although much can be made in advance.

An incredibly fun way to serve this dish is to make a party out of it!

Have friends each bring one component of the dish and then have a burrito bowl party.

You can order the Chipotle bowls so people can make their very own, Chipotle-style!

Look at this bowl of amazingness!

A chicken burrito bowl pile high in a white oval dish with a gold fork next to it.

We really don’t mean to brag, honestly.

But, folks, you be the judge…which would you pick.

Pssst: Chipotle, if you’re listening…we love you! And yours is amazing, too!

A Chipotle burrito bowl on the left and another homemade burrito bowl on the right.

Ready to make the best burrito bowl this side of, well, Chipotle? Go for it!

And when you do, be sure to take a photo of it, post it on Instagram, and tag @HowToFeedaLoon and hashtag #HowToFeedaLoon!

A chicken burrito bowl pile high in a white oval dish with a gold fork next to it.
Print Recipe
5 from 1 vote

Chicken Burrito Bowl (Chipotle Copycat)

Chicken Burrito Bowl is truly better than the Chipotle version. We've gone the distance to show you how to recreate each component from scratch. Much can be made in advance (See NOTES). The chicken by itself is wonderful in burritos or tacos. We LOVE having a burrito bowl and having guests each bring one component and then let everyone build their own. FUN!
Prep Time4 hours hrs
Cook Time2 hours hrs
Total Time6 hours hrs
Course: Entree
Cuisine: American / Mexican
Servings: 8
Calories: 613kcal
Author: Kris Longwell

Equipment

  • Grill, gas or charcoal, or skillet

Ingredients

Make Ahead (and then reheat while making the chicken)

  • 3 cups Cilantro lime rice
  • 4 cups Mexican black beans

Make Ahead (no need to reheat)

  • 2 cups Roasted tomato salsa
  • 2 cups Salsa verde
  • 2 cups Skillet-roasted corn salsa

For the Chicken

  • ½ cup pineapple juice
  • 3 cloves garlic minced
  • 1 chipotle pepper chopped
  • 1 tablespoon adobo sauce from the can of chipotles
  • 3 tablespoon vegetable oil divided
  • ¼ cup white distilled vinegar
  • 2 teaspoon chili powder
  • 2 teaspoon cumin ground
  • 1 teaspoon oregano dried
  • 1 teaspoon Kosher salt plus more for finishing the chicken
  • ½ teaspoon black pepper
  • 2 lbs chicken thighs boneless, skinless

Soon Before Serving

  • 3 cups Guacamole
  • 2 cups Mexican cheese shredded, Chihuahua, Monterrey Jack, Cheddar
  • 3 cups green leaf lettuce chopped
  • 3 cups Mexican crema or sour cream

Instructions

Do Ahead

  • Prepare the roasted tomato salsa, salsa verde, and skillet-roasted corn salsa. Refrigerate until ready to serve.
  • Make the cilantro rice and Mexican beans. Reheat as the chicken is being prepared. You may need to add a little more to either dish if a little dry.
  • Place the chicken in a large baggie (or dish). Pour the marinade all over the chicken, and carefully press the air out of the baggie (if using). Use your hands to massage the marinade into the chicken all over. Place in the fridge for 1 to 8 hours (6 to 8 hours is best).

Prepare the Chicken

  • In a medium bowl, whisk together 2 tablespoon of the vegetable oil with all of the other ingredients except the chicken.
  • Fire up your grill to medium-high heat.
  • Remove the chicken from the bag (or dish). Place on the grill and cook until fully cooked (internal temperature of 165°F), turning a couple times. The chicken should be nice and charred in a few places.
  • Place on a cutting board and cut into bite-sized pieces. Sprinkle a little more salt all over the chicken. Set aside (keep warm in a low-temp oven, if possible).

Soon Before Serving

  • Make the guacamole, and get the lettuce, cheese, and Mexican crema prepped and ready to be served. Place the other bowl items in serving dishes as well.

How To Build the Bowls

  • In a bowl, add a layer of rice, then a layer of beans, then chicken. On top of the chicken add the salsas. Then a layer of lettuce and cheese. Top with guacamole and Mexican crema.

Video

Notes

See the video near the top of the blog post for visual guidance.  If you like the video, please subscribed to our YouTube channel.
The rice, beans, and chicken can all be made up to 3 days in advance.   
The 3 salsas can be made up to 5 days in advance.
Make the guacamole, and prep the lettuce, cheese, and Mexican crema (or sour cream) just before serving. 
All of this makes a wonderful burrito bowl party!  Have guests each bring 1 component of the bowl!

Nutrition

Calories: 613kcal | Carbohydrates: 22g | Protein: 30g | Fat: 31g | Saturated Fat: 6g | Polyunsaturated Fat: 6g | Monounsaturated Fat: 4g | Trans Fat: 1g | Cholesterol: 185mg | Sodium: 1100mg | Potassium: 903mg | Fiber: 7g | Sugar: 9g | Vitamin A: 2326IU | Vitamin C: 15mg | Calcium: 370mg | Iron: 2mg

Roasted Tomato Salsa

January 30, 2022 by Kris Longwell Leave a Comment

A colorful condiment bowl filled with roasted tomato salsa surrounded by tomatoes, corn tortilla chips, and a wedge of white onion.

In our books, a quality salsa is essential for Tex-Mex, Mexican, and Latin cuisine. We love our Homemade Mango Salsa, Restaurant-Style Salsa, Salsa Verde, and even Skillet-Roasted Corn Salsa. This Roasted Tomato Salsa is deep in flavor and so simple to prepare. Serve with homemade flour tortillas or corn tortillas!

A colorful condiment bowl filled with roasted tomato salsa surrounded by tomatoes, corn tortilla chips, and a wedge of white onion.
[feast_advanced_jump_to]

🍅 The Ingredients

With just a handful of fresh, simple ingredients—ripe tomatoes, serrano pepper, onion, garlic, cilantro, lime, and salt—this salsa delivers an amazingly authentic, vibrant flavor that tastes straight from a Mexican kitchen. Find ingredient notes (including substitutions and variations) below.

An arrangement of ingredients for roasted tomato salsa on a grey wooden background including whole tomatoes, serrano pepper, onion, garlic, cilantro, lime, and salt.

🌶️ Variations and Substitutions

  • Tomatoes: Use Roma or plum tomatoes for a thicker salsa, or vine-ripened tomatoes for a juicier, sweeter flavor. (Note: roasting fresh tomatoes intensifies their flavor and adds natural sweetness.)
  • Serrano pepper: Swap with a jalapeño for milder heat or add extra serranos for a spicier salsa. Remove the seeds and membranes to reduce heat while keeping flavor. (Note: roasting the chile mellows its spice and adds smokiness.)
  • White onion: You can use yellow onion for a stronger bite or red onion for a bit of color and sweetness.
  • Garlic: Fresh cloves are best, but roasted garlic adds a deeper, sweeter flavor if you prefer a milder garlic note.
  • Cilantro: If you’re not a fan, try flat-leaf parsley or fresh oregano for herbal brightness. (Note: add cilantro after blending to preserve its fresh flavor.)
  • Lime juice: Substitute with lemon juice or a splash of apple cider vinegar if limes aren’t available. Adjust to taste for brightness.
  • Salt: Start with less and adjust after blending—especially if serving with salted chips. (Note: salt enhances the roasted tomato and chile flavors, so don’t skip it.)

See the recipe card (with video) below for a full list of ingredients and measurements.

🔥 Tips and Tricks for Perfect Roasted Tomato Salsa

  • Roast until charred: Place tomatoes, onion, garlic, and the serrano pepper under the broiler or on a hot skillet until they’re blistered and slightly blackened. That char adds deep, smoky flavor—the key to authentic taste.
  • Don’t over-roast garlic: Remove the garlic cloves once golden and soft; if they burn, they’ll turn bitter.
  • Cool before blending: Let the roasted ingredients cool for a few minutes before blending—this helps the flavors settle and prevents a watery texture.
  • Pulse, don’t puree: For a rustic, restaurant-style salsa, pulse in a food processor or blender just until chunky. Over-blending can make it too smooth.
  • Adjust the heat: Taste after blending—add more roasted chile or a pinch of cayenne if you want extra spice.
  • Season last: Add lime juice and salt after blending and tasting. The acidity and salt balance the roasted sweetness of the tomatoes.
  • Let it rest: Chill the salsa for at least 30 minutes before serving. The flavors meld and deepen as it sits.
  • Storage tip: Store in an airtight container in the fridge for up to 5 days. The flavor actually improves after a few hours.

How To Make Roasted Tomato Salsa

A person holding an aluminum foil-lined baking sheet the is holding tomatoes that have been quartered, two serrano peppers, and a quarter of a white onion.
  1. Step 1: Turn you broiler on HIGH. Place the tomatoes, pepper(s), and onion on a baking sheet lined with foil and broil about 6 inches under the heating element.
A person using a pair of tongs to flip over vegetables that are being roasted on a baking rack on a baking sheet that has been lined with aluminum foil.
  1. Step 2: Flip the veggies after about 4 minutes.
A person holding a baking sheet lined with aluminum foil and is holding roasted tomatoes, peppers, and white onion.
  1. Step 3: Roast until charred in spots.
A person transferring chopped cilantro into a blender that is filled with roasted tomatoes, onions, peppers, and garlic.
  1. Step 4: Let the roasted veggies cool a bit. Remove the seeds from the pepper(s) and place all ingredients into your blender.
A person holding on to the handle of a blender that is filled with freshly puréed roasted tomato salsa.
  1. Step 5: Pulse until desired consistency is reached.
A person pouring roasted tomato salsa from a blender into a festive salsa bowl that is resting on a wooden cutting board.
  1. Step 6: Taste and add more salt and/or lime juice, if needed. Serve warm or at room temperature.

Expert Tip

1 serrano pepper provides enough spice to feel it on the backend as you swallow it down with a chip. However, if you prefer very little spice, then go with half of a serrano. Extra spicy? Go with 2 or 3 for super spicy. Remember to remove most of the seeds, unless you want extra heat.

🌮 How to Serve

  • This salsa is perfect when serving anything Mexican or Tex-Mex, but it’s also perfect for serving at parties, game-day, or just a relaxing weekend afternoon.
  • Warmed corn tortilla chips are fantastic, as well as flour or corn tortillas.
  • Serve it with all your favorite Mexican (or Tex-Mex) dishes such as Tex-Mex Beef Tacos, Chicken Tinga Tacos, Classic Cheese Enchiladas, or Authentic Chili Rellenos!

Expert Tip

This salsa is often served chilled or at room temperature, but it’s really amazing served warm, too.

🙋🏽‍♂️ Frequently Asked Questions

Can I make Roasted Tomato Salsa ahead of time?

Yes! It actually tastes better after a few hours as the flavors meld. Store it in the refrigerator for up to 5 days in an airtight container.

How spicy is Roasted Tomato Salsa?

t has a moderate heat from the serrano pepper, but you can easily adjust it—use half a pepper for mild heat or add an extra one for more spice.

Can I freeze Roasted Tomato Salsa?

You can, but the texture will soften slightly once thawed. It’s best enjoyed fresh or refrigerated for a few days.

What’s the best way to roast the ingredients for Roasted Tomato Salsa?

Broil or pan-roast the tomatoes, onion, garlic, and serrano until blistered and lightly charred. This brings out their natural sweetness and smoky flavor.

A person raising a triangular corn tortilla chip from a festive bowl filled with roasted tomato salsa.

💃🏻 More Amazing Recipes with Salsa

  • An overhead view of albondigas with salsa verde sauce in a large black cast-iron skillet with a wooden spoon in the pan.
    Mexican Meatballs with Salsa Verde (Albondigas)
  • A grilled tri-tip sliced on a cutting board topped with Santa Maria salsa
    Grilled Tri-Tip with Santa Maria Salsa
  • An arrangement of ingredients for grilled tacos al pastor on a white background including dried chiles, spices, pineapple, pork shoulder, sugar, vinegar, and corn tortillas.
    Grilled Tacos al Pastor
  • Two black bean and roasted chicken tostadas topped with corn salsa, shredded lettuce, and Mexican crema sitting on a scratched baking sheet.
    Black Bean and Roasted Chicken Tostada

Ready to make some of the best salsa this side of the Alamo? Go for it!

And when you do, be sure to take a photo of it, post it on Instagram, and tag @HowToFeedaLoon and hashtag #HowToFeedaLoon!

A festive bowl filled with roasted tomato salsa surrounded by corn tortilla chips.
Print Recipe
No ratings yet

Roasted Tomato Salsa

Roasted Tomato Salsa is a deeply flavorful salsa that comes together in no time at all. You can roast the veggies under the broiler, or also out on the grill, or in a cast-iron skillet. Roasting concentrates the flavors and gives a slightly smokey taste. Perfect for TexMex or serving at parties!
Prep Time10 minutes mins
Cook Time8 minutes mins
Total Time18 minutes mins
Course: Appetizer
Cuisine: Tex-Mex, Mexican
Servings: 8
Calories: 12kcal
Author: Kris Longwell

Equipment

  • 1 Blender, food processor, or forks/masher

Ingredients

  • 3 medium ripe tomatoes halved, or quartered
  • ¼ large onion skin removed
  • 1 serrano peppers ½ for mild, 1 for medium, 2 for extra spicy
  • ¼ cup cilantro chopped
  • 2 cloves garlic minced
  • 1½ teaspoon Kosher salt

Instructions

  • Preheat broiler to HIGH.
  • Place tomatoes, onion, and peppers on a baking sheet lined with foil. Place on a rack about 6 inches below the heating element. Roast for about 8 minutes, flipping the veggies halfway through. Keep an eye on them, don't let them burn!
    3 medium ripe tomatoes, ¼ large onion, 1 serrano peppers
  • Use a pair of tongs to transfer the roasted vegetables from the baking sheet into a blender or food processor. Add the cilantro, garlic, and salt and blend/process on Purée/High for about 30 seconds. Less for more chunky, or more for a smooth salsa. Taste and add more salt and/or lime, if needed.
    ¼ cup cilantro, 2 cloves garlic, 1½ teaspoon Kosher salt
  • Serve immediately warm, or store in an air-tight container and serve either chilled or room temperature.

Video

Notes

NOTE: Watch the video near the top of the recipe for visual guidance.
Instead of roasting under a broiler, you can also grill the veggies on a grilling rack, over direct high heat, for about 10 minutes, turning every now and then, until nicely browned and charred in spots.   You could also use a heavy-duty skillet, such as a cast-iron skillet.  Heat the skillet over high heat and toast the veggies until softened and brown in spots, about 5 to 8 minutes. 
The salsa will keep covered in the fridge for up to 5 to 7 days.  It freezes for up to 2 months.  
It’s great served chilled or room temp, but also warmed. 

Nutrition

Calories: 12kcal | Carbohydrates: 3g | Protein: 1g | Fat: 1g | Saturated Fat: 1g | Polyunsaturated Fat: 1g | Monounsaturated Fat: 1g | Sodium: 439mg | Potassium: 126mg | Fiber: 1g | Sugar: 1g | Vitamin A: 432IU | Vitamin C: 8mg | Calcium: 8mg | Iron: 1mg

Salsa Verde

January 30, 2022 by Kris Longwell 1 Comment

A person dipping a corn tortilla chip into a festive bowl filled with salsa verde.

We are salsa fanatics, and this is one of our all-time favorites.

Salsa is such a wonderful addition to your favorite TexMex and Mexican dishes, but also to have on hand for parties, game-day, or just relaxing on a weekend.  This comes together in about 15 minutes and is delicious served room temp or we think even better, warmed. 

A person dipping a corn tortilla chip into a festive bowl filled with salsa verde.

How To Make Salsa Verde

Verde means ‘green’ in numerous languages including Spanish, Portuguese, Italian, and Romanian.

To us, it just means a deliciously fresh-tasting salsa or sauce.

You won’t believe how easy it is to bring it all together. All you need is a grill, a blender, and about 15 minutes!


Preparing the Vegetables

We’re going to start off by roasting tomatillos and green peppers, such as a serrano.

Tomatillos are mild in taste and roast beautifully. They can be found in the produce section of most well-stocked supermarkets.

EXPERT TIP: Tomatillos are critical to making salsa verde. If you can’t locate any, we suggest purchasing a nice quality bottle (or canned) version which can usually be found in the Hispanic section of your market.

Place the tomatillos and serrano peppers on a grill pan and place over direct heat. Cook for about 8 minutes, turning occasionally until browned and lightly charred. If you don’t have a grill pan, you can simply roast the vegetables under the broiler on HIGH for about 8 minutes.

A circular grill pan filled with tomatillos and a serrano pepper that have been roasted and lightly charred.

Place the roasted tomatillos and peppers in a blender along with minced garlic, fresh cilantro, and salt in a blender or food processor.

Purée or Process until smooth.

EXPERT TIP: Salsa verde can be as spicy, or as mild, as you prefer. A simple guide for using peppers. 1 serrano or half of a jalapeno (with seeds removed) is mild. 2 serranos or 1 whole jalapeno is medium. 3 serranos and 1½ more jalapenos will give you a spicy salsa. Remember, the seeds and the ribs within the peppers deliver heat. Keep them in or remove them, according to your tastes.

A person holding onto the lid of a blender that is filled with puréed salsa verde.

When To Serve Salsa Verde

Think of this green salsa as you would any type of salsa, such as roasted tomato salsa, restaurant-style, skillet-roasted corn salsa, or even homemade mango salsa.

We serve this with our TexMex tacos, chicken burrito bowl, or even at a party or game day. It’s also amazing when served warm with warm homemade flour tortillas.

Of course, this salsa with a bowl of corn tortilla chips couldn’t be better!

A festive bowl filled with salsa verde and surrounded by corn tortilla chips.

Ready to make the best green salsa this side of San Antonio? Go for it!

And when you do, be sure to take a photo, post it on Instagram, and tag @HowToFeedaLoon and hashtag #HowToFeedaLoon!

A festive bowl filled with salsa verde and surrounded by corn tortilla chips.
Print Recipe
No ratings yet

Salsa Verde

Salsa Verde is a green salsa that can be as spicy or as mild as you desire. So fresh, simple, and just delicious. And it comes together in about 15 minutes!
Prep Time5 minutes mins
Cook Time8 minutes mins
Total Time13 minutes mins
Course: Appetizer
Cuisine: Mexican / TexMex
Servings: 8
Calories: 14kcal
Author: Kris Longwell

Equipment

  • Grill pan
  • Blender or food processor

Ingredients

  • 1 lb tomatillos outer husk removed
  • 1 serrano pepper or 2 for medium heat, 3 for spicy
  • 2 cloves garlic minced
  • ¼ cup cilantro fresh, chopped
  • 1 teaspoon Kosher salt heaping
  • ¼ cup yellow onion finely chopped

Instructions

  • Turn your grill to medium-high heat.
  • Place the husked tomatillos and pepper(s) on a grill rack. Place over direct heat on the grill and roast, turning occasionally, until browned and lightly charred in places, about 8 minutes.
  • Use a pair of tongs to transfer the roasted tomatillos to a blender. Use a small knife to cut away the stem of the pepper(s) and cut them in half, removing the seeds and ribs. Place the pepper(s) with the tomatillos in the blender.
  • Add the minced garlic, cilantro, and salt. Purée until smooth, about 30 seconds to 1 minute.
  • Serve warm, or cover and chill and then serve chilled or at room temperature.

Video

Notes

Tomatillos can be found in the produce section of most well-stocked supermarkets or at produce markets.  Tomatillos are a critical ingredient for salsa verde.  If you can't find fresh, then we recommend purchasing bottled or canned green salsa (or preferably salsa verde or verde sauce) that can be found in the Hispanic section of most markets.  
One serrano pepper (roasted) will produce a mild salsa.  Two peppers: Medium.  Three or more: Spicy.  Jalapenos (fresh or pickled) can be substituted.  See the blog post for exact measurements if using jalapenos. 
This salsa is great served room temperature or chilled, but we really love it served warm.
The salsa will keep covered in the fridge for up to 10 days and it freezes beautifully for up to 2 months. 

Nutrition

Calories: 14kcal | Carbohydrates: 3g | Protein: 1g | Fat: 1g | Saturated Fat: 1g | Polyunsaturated Fat: 1g | Monounsaturated Fat: 1g | Sodium: 294mg | Potassium: 150mg | Fiber: 1g | Sugar: 2g | Vitamin A: 513IU | Vitamin C: 9mg | Calcium: 9mg | Iron: 1mg

Baked Honey Mustard Chicken

January 26, 2022 by Kris Longwell 6 Comments

A spoon pouring a honey mustard glaze over slices of baked chicken arranged on a white oval serving platter.

Everyone is always looking for a new chicken dinner that truly is a winner. Guess what? Here it is.

This dish just works on so many levels. First and foremost, it’s incredibly tasty, juicy, and always a family favorite. Almost just as wonderful is how simple it is to prepare. From start to finish, this chicken dinner is on the table in about 45 minutes (with very little prep work).


NOTE: If you liked this video, please subscribe to our YouTube channel. Remember to click the ‘bell’ icon so you’ll never miss a new video!

How To Make Baked Honey Mustard Chicken

This recipe is extremely adaptable to whatever ingredients you have on hand.

The sauce can even be made hours in advance so all you have to do is pour it over the chicken, cover it, and bake.

Depending on the size of your chicken breasts, you can let them marinate for up to 12 hours (or overnight). Smaller pieces should marinate no longer than 6 hours (it’s okay to pour the sauce directly over the chicken and then bake immediately).

A white oval platter filled with layers of sliced baked honey mustard chicken garnished with sprigs of fresh parsley.

The Best Way To Cook Chicken Breasts

There are multiple methods for cooking chicken breasts. Here are some of our favorites:

Oven-Baked: This method is simple and we honestly feel produces the most consistently juicy meat. Start by covering the dish with foil, bake for 20 to 30 minutes (depending on the size of the breasts) at 400°F, uncover, and finish off uncovered for another 10 to 15 minutes.
Grilling: This is another favorite method of ours. Super simple and you’ll get that lovely smokey taste from the grill. Simply heat your grill to medium-high heat and place the breasts over direct heat. Grill, turning about every 5 minutes, until nicely charred and fully cooked (165°F). We don’t think the chicken is as juicy as oven-baked, but you get added flavor from the smokey grill.
Air Fry: Another fast and simple way to prepare chicken breasts. Brush the glaze all over the chicken breasts and then place in an oiled basked and cook at 350°F for 20 minutes. We feel this produces the least juicy chicken, but the ease of cooking in the air-fry is very tempting.

EXPERT TIP: This step is not 100% necessary, but we find searing the breasts first locks in flavor and juiciness. Simply brush a little olive oil all over the breasts, liberally salt and pepper all over, and then sear until lightly browned on both sides. If you’re crunched for time, skip this step.

Two large chicken breasts that are being seared in a black non-stick skillet over a gas stove.

The Ingredients You Will Need

In addition to the chicken breasts that we season with salt, pepper, and brush with olive oil, you’ll need some variation of the following ingredients to make the most amazing honey mustard glaze.

  • Stone Ground Mustard
  • Yellow Mustard
  • Honey
  • Italian Dressing
  • Garlic Powder
  • Dried Oregano

You can really go with any type of mustard, and there are plenty to choose from. Learn more about all types of mustards here.

We find the stone ground lends an extra punch of flavor, but not too much. It combined with the more yellow mustard produces the most amazing taste and texture. Of course, you could also go with Dijon, spicy brown, Creole, or any combination of your favorite mustards!

EXPERT TIP: The addition of Italian dressing gives this glaze a depth of flavor that is just spectacular. Of course, our homemade Italian dressing is wonderful, but you can certainly go with good-quality store-bought dressing and have stellar results.

A bowl filled with honey mustard sauce being poured over seared chicken breasts in a white baking dish.

We use a 9″x13″ baking dish to prepare our Baked Honey Mustard Chicken.

Lightly grease the dish with cooking spray, and then place the seared and seasoned chicken breasts in a flat row. Try not to have them overlap too much.

Pour the sauce directly over them, bake them covered at 400°F for 25 to 30 minutes, and then uncover for another 10 to 15 minutes.

EXPERT TIP: You’ll want the chicken to reach an internal temperature of 160°F. The chicken will rise another 5 degrees after you remove it from the oven. An instant-read thermometer ensures you’ve cooked your chicken perfectly.

A white 9 by 13-inch baking dish filled with three whole boneless skinless chicken breasts baked with a honey mustard sauce on them.

How To Serve Baked Honey Mustard Chicken

This really is the ultimate weeknight dinner, however, it is so juicy and delicious, it is perfect for serving to guests, too.

Our favorite sides include:

Maple Glazed Carrots
Roasted Broccoli with a Kick
Yellow Squash Casserole
Sautéed Mushrooms
Roasted Potatoes in Foil

EXPERT TIP: Three large chicken breasts (totaling 1½ to 2½ lbs) will easily feed a family of four. We slice the breasts into strips and drizzle that amazing sauce over the top. Leave some of the sauce for passing at the table.

A white dinner plate filled with slices of baked honey mustard chicken, sliced carrots, rice pilaf, next to a gold fork and a glass of iced tea.

Everyone is looking for a fabulous new chicken recipe, right?

Well, folks, we can safely say this is one of the best we’ve ever tried and served.

You’ll love how easy it is to prepare, and your loved ones will love how juicy and delicious it is!

A white dinner plate filled with 5 slices of cut baked honey mustard chicken sitting next to sliced carrots and rice pilaf also on the plate.

Ready to make a chicken dinner that everyone will be requesting time and time again? Go for it!

And when you do, be sure to take a photo of it, post it on Instagram, and tag @HowToFeedaLoon and hashtag #HowToFeedaLoon!

A white dinner plate filled with 5 slices of cut baked honey mustard chicken sitting next to sliced carrots and rice pilaf also on the plate.
Print Recipe
5 from 1 vote

Baked Honey Mustard Chicken

Baked Honey Mustard Chicken is one of the best weeknight dinners of all time. Go with boneless skinless chicken breasts and you and your family won't believe how juicy and deeply flavorful the dish is. And it's ready in under an hour!
Prep Time10 minutes mins
Cook Time40 minutes mins
Total Time50 minutes mins
Course: Entree
Cuisine: American
Servings: 4
Calories: 426kcal
Author: Kris Longwell

Equipment

  • 9"x13" baking dish

Ingredients

  • 2 lbs chicken breasts boneless, skinless
  • 2 tbs olive oil divided
  • Salt and pepper
  • Cooking spray

For the Honey Mustard Glaze/Sauce

  • ¼ cup yellow mustard
  • ¼ cup stone-ground mustard
  • ¼ cup honey
  • 2 tablespoon Italian dressing
  • 1 teaspoon garlic powder
  • 1 teaspoon oregano dried
  • parsley fresh, chopped, for garnish

Instructions

  • Preheat oven to 400°F.
  • Brush about 1 tablespoon of olive oil all over the chicken breasts. Liberally salt and pepper the chicken all over.
  • Heat the remaining tablespoon of oil in a large skillet (preferably non-stick) or medium-high heat. Add the chicken breasts (working in batches, if necessary), and cook until lightly browned on both sides. The chicken will not be cooked through at this point.
  • Lightly spray the baking dish with cooking spray or a small amount of oil.
  • Place the chicken breasts in the bottom of the dish. It's okay they overlap slightly.
  • In a separate bowl, mix together the honey mustard sauce ingredients until fully combined. Pour the sauce all over the top of the chicken. Cover with foil and bake in the oven for 25 minutes (if using extra large chicken breasts, let them bake for 30 minutes). Uncover and continue baking until an internal temperature reaches 160 to 165°F.
  • Remove the chicken and let rest for about 5 to 10 minutes. The chicken temperature will rise another 5 degrees. Either slice and serve, or serve each breast whole. If desired, drizzle sauce over the chicken and pass extra at the table.

Video

Notes

See the video near the top of the blog post for visual guidance. If you liked the video, please subscribe to our YouTube channel.  
Three 8 to 10-ounce chicken breasts will easily feed a family of four.  We slice them into medallions for easy serving.  Or, serve each breast whole.  Be sure to pass the sauce when serving. 
Boneless, skinless chicken thighs can be substituted in place of the breasts.    They will only take about a total of 20 to 25 minutes.  If serving bone-in, you'll need to increase the baking time by another 15 to 20 minutes.  An instant-read thermometer is critical in ensuring you've reached an internal temperature of 160 to 165°F. 
Any leftover chicken will keep covered in the fridge for up to 5 to 6 days and can be frozen for up to 2 months. 

Nutrition

Calories: 426kcal | Carbohydrates: 21g | Protein: 50g | Fat: 11g | Saturated Fat: 2g | Polyunsaturated Fat: 1g | Monounsaturated Fat: 8g | Trans Fat: 1g | Cholesterol: 145mg | Sodium: 687mg | Potassium: 914mg | Fiber: 1g | Sugar: 18g | Vitamin A: 101IU | Vitamin C: 3mg | Calcium: 40mg | Iron: 2mg

French Onion Soup

January 23, 2022 by Kris Longwell 9 Comments

Two white bowls filled with French onion soup with sliced toasted pieces of a baguette and spoons nearby.

Is there anything more comforting than a warm bowl of delicious soup? We think not.

Folks, this recipe does not disappoint. And this is one of those soups that just gets better after a day or two. You can easily make the beef stock at least 2 to 3 days in advance, which makes the soup preparation a snap!

Two white bowls filled with French onion soup with sliced toasted pieces of a baguette and spoons nearby.

How To Make French Onion Soup

There are a few not-so-secret secrets to making restaurant-quality French onion soup at home.

Get started on the stock ahead of time. Allow a little time to get the onions just right.

And don’t skimp on the cheese. And you’ll have the best soup you’ve ever tasted or served.


NOTE: If you like this video, please subscribe to our YouTube channel. Remember to click the ‘bell’ icon so you’ll never miss a new video!

How to Caramelize Onions

One of those “secrets” that we mentioned is caramelized onions.

This takes a little bit of time, but this step is what really delivers the classic French Onion flavor.

EXPERT TIP: You’ll need to start with 8 medium-sized yellow onions. It will seem like too much, but don’t worry, they will cook down. In about 1 hour you will have dark beautifully caramelized. Be sure to stir them at least every 15 minutes.

Want to know what happens during the caramelization process? Learn more by clicking here!

A large oval blue Dutch oven filled with uncooked onions and then the same pot filled the same onions that have been caramelized.

French Onion Soup FAQs

Do caramelizing the onions really make a difference? Yes. If you have to choose between caramelizing the onions or making the stock from scratch, go with caramelizing the onions. It’s really what delivers the classic taste.
Will store-bought beef stock work? Absolutely. We can honestly say that making our beef stock from scratch takes the soup to the next level, but good-quality purchased stock will still make a scrumptious soup.
What’s the best cheese to use? Traditionally Gruyere cheese is used. We grate ours in our food processor or on the side of a box grater. Perfectly acceptable substitutes are Swiss or Fontina. We don’t recommend mozzarella.

EXPERT TIP: Our recipe for homemade beef stock make enough for one batch of this soup. We often double the stock recipe. It freezes beautifully.

A person pouring beef stock into a blue Dutch oven filled with caramelized onions.

After you’ve deglazed the onions with white wine, and then added the stock, thyme, salt, and pepper, all you need to do is bring the soup to simmer for about 15 minutes.

During this time, toast your bread and get the cheese ready to go.

EXPERT TIP: As mentioned, we go with gruyere cheese. This can usually be found in the gourmet cheese section of most well-stocked supermarkets. You can either shred the cheese or slice it with a sharp knife.

Pour the soup into your bowls and then place one or two slices of toasted baguette slices and then liberally top with the cheese.

A hand sprinkling shredded Gruyere cheese over two slices of a baguette that have been toasted and sitting on a bowl of soup.

Other Classic Soups To Try

    • Chicken and Dumplings
    • Rustic Lentil Soup
    • Broccoli Cheddar Soup
    • Roasted Tomato and Basil Soup
    • Roasted Butternut Squash Soup
    • Cream of Mushroom Soup
    • Chicken Tortilla Soup
    • Classic Chicken and Noodle Soup
    • White Chili with Roasted Tomatillos

In the meantime, don’t you think it’s time to whip up a batch of this?

Two white bowls filled with French onion soup and topped with toasted bread slices and melted cheese.

Folks, this is the ultimate comfort soup.

You will not believe the response you will get when you serve this to family and friends.

Remember the secrets to the ultimate French onion soup: Homemade beef stock, caramelized onions, Gruyere cheese.

Every spoonful is an experience you won’t soon forget.

A spoon being raised out a bowl filled with French onion soup with cheese and onions dripping from the spoon.

Ready to make the most comforting soup this side of Paris? Go for it!

And when you do, be sure to take a photo of it, post it on Instagram, and tag @HowToFeedaLoon and hashtag #HowToFeedaLoon

A white bowl with two handles filled with French onion soup topped with toasted bread and melted cheese.
Print Recipe
No ratings yet

French Onion Soup

This is comfort at its best. You just can't do better than French Onion Soup...with homemade beef stock, caramelized onions, and Gruyere cheese...oh yes.
Prep Time15 minutes mins
Cook Time1 hour hr 30 minutes mins
Total Time1 hour hr 45 minutes mins
Course: Soup
Cuisine: French
Servings: 8 people
Calories: 382kcal
Author: Kris Longwell

Equipment

  • Large pot for caramelizing onions, i.e., Dutch oven

Ingredients

  • 8 tablespoon unsalted butter 1 stick
  • 8 medium yellow onions sliced
  • ½ cup dry white wine
  • 8 cups beef stock
  • 1 tablespoon thyme chopped, plus a little extra for garnish
  • 1 tablespoon Kosher salt
  • 6 slices bread i.e., from a baguette, toasted
  • 2 cups Gruyere cheese shredded or sliced

Instructions

  • Melt butter in large pot (Dutch oven works very well) over medium heat.
  • Add the onions.
  • Stir frequently (about every 10 to 15 minutes) for about 1 hour until the onions turn a dark brown color.
  • Add the wine and scrape (deglaze) the bottom of the pan with a spatula. Bring to a strong simmer for 4 to 5 minutes.
  • Add stock, thyme, and salt. Bring to a simmer for 15 minutes. Taste, and add more salt, if necessary.
  • Turn on the broiler. Ladle the soup into bowls.
  • Add a toasted piece of bread on top of the soup, and then place a handful of grated Gruyere cheese over the top.
  • Place under broiler and cook for about a few minutes, until cheese is golden on top (keep an eye on it, don't let it burn!).
  • Remove from oven and garnish with chopped thyme. Serve at once.

Video

Notes

See the video near the top of the blog post for visual guidance.  If you like the video, please subscribe to our YouTube channel.  
Don't skip caramelizing the onions.  It's critical to the classic taste.  The homemade beef stock really puts the soup over the top, but good-quality purchased beef stock will still yield a delicious soup.  You could add 1 tablespoon of purchased beef demi-glace for a deeply flavorful soup.
The homemade beef stock can be made weeks in advance.  It freezes beautifully. 
Leftover over soup will keep covered in the fridge for up to 5 days.  It freezes nicely for up to 2 months. 

Nutrition

Calories: 382kcal | Carbohydrates: 24g | Protein: 18g | Fat: 23g | Saturated Fat: 14g | Polyunsaturated Fat: 1g | Monounsaturated Fat: 7g | Trans Fat: 1g | Cholesterol: 66mg | Sodium: 1574mg | Potassium: 689mg | Fiber: 3g | Sugar: 8g | Vitamin A: 707IU | Vitamin C: 10mg | Calcium: 416mg | Iron: 2mg

POST UPDATE: This recipe was originally published in November 2017, but was updated with improved tweaks to the recipes with new tips and photography and a fabulous new video in January 2022.

Vegetable Stir-Fry

January 19, 2022 by Kris Longwell 6 Comments

A white dinner plate filled with vegetable stir-fry over brown rice with two chop sticks sitting on the side.

This is one of those dishes that happen to be very low calories, but extremely big in taste.  And that’s no joke!

We love all kinds of Asian cuisine, especially stir-fry. The sauce is classic Chinese and the vegetables are crisp, delicious, and so healthy! And, of course, it all comes together in a matter of minutes!  You can adapt the recipe to your favorite vegetables and those you have on hand. So much to love about this dish!

A white dinner plate filled with vegetable stir-fry over brown rice with two chop sticks sitting on the side.

How to Make Vegetable Stir-Fry

As mentioned, this stir-fry comes together very quickly.

You can easily prep all the veggies a day in advance which makes preparing the dish a snap.

And it is truly one of those meals that are as beautiful in presentation as it is in taste.


NOTE: If you liked this video, please subscribe to our YouTube channel. Remember to click the ‘bell’ icon so you’ll never miss a new video!

Which Veggies to Use

You really can’t go wrong when selecting veggies for vegetable stir-fry.

Here are our favorites:

  • Red, Yellow, and/or Green Bell Peppers
  • Brocolli florets
  • Carrots
  • Sugar snap peas
  • Mushrooms

Other delicious ingredients to include:

  • Tofu, firm
  • Water chestnuts, sliced
  • Bamboo shoots
  • Baby Corn
  • Napa cabbage
  • Bok choy

EXPERT TIP: Stir-frying is a method of cooking over very high heat. This is great for numerous reasons, including cooking at high heat quickly cooks the vegetables and proteins and retains much of the nutritional value. Also, the dish comes together very quickly. For this reason, it is extremely important to have your mise en place all set, meaning be sure to have all of your ingredients prepped and ready to go before you start to stir-fry.

We love to start by quickly cooking fresh garlic and ginger in a little bit of extra-virgin olive oil. This only takes about 30 seconds.

Minced garlic and fresh ginger being stirred fried in a black wok with a wooden spatula.

Once the garlic and ginger start to turn a light brown (after about 30 seconds), it’s time to add in all of the other vegetables.

You’ll want to stir-fry the veggies just until they begin to soften, once you add the sauce, they will soften even more.

EXPERT TIP: When you add all of the vegetables into the wok, it may seem like there are too many. Don’t worry, as the ingredients cook, they will reduce some in size. Don’t overcook, though! You want the veggies to remain crisp and bright in color.

A large black wok over a gas flame on a stove with vegetable stir-fry cooking inside it.

The Perfect Stir-Fry Sauce

This sauce is classic Chinese and really brings everything together beautifully.

We go with a combination of vegetable broth, oyster sauce, soy sauce, brown sugar, sesame oil, rice vinegar, and cornstarch.

EXPERT TIP: To keep this stir-fry 100% vegetarian and vegan, substitute hoisin sauce for the oyster sauce. You’ll still get that classic flavor. If you can’t find rice vinegar or rice wine vinegar, either omit it, or substitute white vinegar, apple cider vinegar, or distilled white vinegar.

Pour the sauce in, bring it to a quick boil, and then stir for about 1 minute. That’s all there is to it!

An Asian stir-fry sauce being poured into a wok filled with vegetable stir-fry.

Vegetable Stir-Fry FAQs

Do I have to use a wok to stir-fry? Absolutely not! This dish will come together beautifully in a nice large skillet. Be sure to go with one that will hold all the vegetables.
How many calories are in Vegetable Stir-Fry? Not a lot! Only 245 calories. We serve it over steamed brown rice. Healthy and so delicious. If you want additional soy sauce, consider low sodium.
Can it be made in advance? We definitely recommend prepping all of the ingredients in advance. You can even prep up to 24 hours in advance. Keep all the prepped veggies in a container with a lid in the fridge. Stir-fry just before serving.
Does it reheat well? Absolutely! In fact, you can even reheat in 30-second intervals on HIGH in your microwave. Leftovers will keep in the fridge for up to 5 days.

A black metal wok filled with vegetable stir-fry with a wooden spoon stuck in the side.

Other Classic Asian Dishes

We love all types of Asian cuisine, and here are some of our all-time favorites for you to try:

  • Beef and Broccoli Stir-Fry
  • Best Chicken Fried Rice
  • Chicken, Mushrooms, and Broccoli Stir-Fry
  • Sesame Chicken
  • Pork Dumplings in Peanut Sauce
  • Vegetarian Steamed Dumplings with Spicy Thai Sauce
  • Mongolian Beef
  • Kung Pao Shrimp

In the meantime, keep it super healthy with all that amazing stir-fry flavor!

A white circular plate filled with vegetable stir-fry with brown chop sticks sitting on the side of the bowl.

Ready to make one of the healthiest AND most delicious dishes in town? Go for it!

And when you do, be sure to take a photo of it, post it on Instagram, and tag @HowToFeedaLoon and hashtag #HowToFeedaLoon!

A white dinner plate filled with vegetable stir-fry over brown rice with two chop sticks sitting on the side.
Print Recipe
No ratings yet

Vegetable Stir-Fry

Vegetable Stir-Fry is amazingly healthy but even more delicious. Go with your favorite veggies but be sure to have everything prepped and ready to go before you start stir-frying because it all comes together very quickly!
Prep Time20 minutes mins
Cook Time10 minutes mins
Total Time30 minutes mins
Course: Entree
Cuisine: Chinese / American
Servings: 4
Calories: 176kcal
Author: Kris Longwell

Equipment

  • 1 Wok, or large skillet/saucepan

Ingredients

For the Sauce

  • ½ cup vegetable stock
  • 3 tablespoon oyster sauce See NOTES
  • 2 tablespoon soy sauce low-sodium
  • 1 tablespoon brown sugar
  • 1 teaspoon sesame oil
  • 1 teaspoon rice vinegar
  • 1 tablespoon corn starch
  • ½ teaspoon pepper white or black

For the Stir-Fry

  • 2 tablespoon vegetable oil
  • 2 teaspoon ginger fresh, minced
  • 3 cloves garlic minced
  • 1 crown broccoli cut into bite-sized florets
  • 1 red bell pepper cored, seeded, and cut into strips
  • 1 yellow bell pepper cored, seeded, and cut into strips
  • ¾ cup carrots peeled and cut into strips or sliced
  • 10 oz sugar snap peas
  • 1 lb mushrooms button, quartered
  • 10 oz water chestnuts drained, roughly chopped
  • 1 tablespoon sesame seeds for garnish, optional
  • 2 tablespoon scallions sliced, for garnish, optional

Instructions

For The Sauce

  • In a small-medium bowl, mix all the ingredients together, making sure the corn starch has dissolved. Set aside.

For the Stir-Fry

  • Heat the oil in your wok (or large skillet) over high heat until shimmering.
  • Add the garlic and ginger and stir for 30 seconds.
  • Add the remaining vegetables and stir to coat. Continue cooking and stirring until the vegetables are just starting to turn soft and the mushrooms are starting to release their liquid, about 4 minutes.
  • Add the sauce into the wok and stir to combine. Bring to a quick boil and let cook for 1 minute, stirring often.
  • Remove from heat and serve at once, garnishing with sesame seeds and chopped scallions, if desired.

Video

Notes

See the video near the top of the blog post for visual guidance.  If you like the video, please subscribe to our YouTube channel.
If you don't have a wok, you can prepare the dish in a large skillet/saucepan.  Make sure it's large enough to hold all of the veggies.
It's super important to have all of your veggies prepped and everything measured out and ready to go before you start to stir-fry.  It all comes together very quickly so you won't have time to stop and prep or measure. 
Leftovers will keep in the fridge for up to 5 days.  
We love to serve this over steamed brown rice. 

Nutrition

Calories: 176kcal | Carbohydrates: 33g | Protein: 9g | Fat: 3g | Saturated Fat: 1g | Polyunsaturated Fat: 1g | Monounsaturated Fat: 1g | Sodium: 1024mg | Potassium: 854mg | Fiber: 7g | Sugar: 13g | Vitamin A: 5852IU | Vitamin C: 143mg | Calcium: 85mg | Iron: 4mg

Homemade Monkey Bread

January 16, 2022 by Kris Longwell 6 Comments

An untouched circular loaf of homemade monkey bread on a circular white plate next to a couple mugs of coffee.

This is a sweet pull-apart bread that your loved ones will be talking about for months.

There is so much to love about this incredible bread. It’s somewhere in between cinnamon rolls, homemade bread, and a sticky dessert. But even better.  Perfect for the holidays, any special occasion, or just a fun weekend project.

An untouched circular loaf of homemade monkey bread on a circular white plate next to a couple mugs of coffee.

How To Make Homemade Monkey Bread

Making this from scratch is really not that difficult, you just need to give yourself some time.

Most of that time is allowing the dough to rise, twice. This means you can be doing other fun stuff while this is happening.

When you remove the pan from the bread, it is truly breathtaking.


NOTE: If you liked this video, please subscribe to our YouTube channel. Remember to click the ‘bell’ icon so you’ll never miss a new video!

What Kind Of Dough to Use

Many home cooks use canned biscuits or frozen dinner rolls when making monkey bread.

Although that’s still delicious, making the bread from scratch takes it all to the next level. There are different options when choosing yeast for baking, but for this recipe, we go with Instant Dry Yeast.

EXPERT TIP: You’ll want the dough to rise (or proof) in a warm, non-drafty area. The perfect place is your cool oven. Place it in the oven and turn on the interior light. That’s just enough warmth to facilitate rising dough.

A large ceramic bowl filled with risen bread dough.

Once the dough has doubled in size, it’s time to form the bread balls.

On a lightly floured surface, roll out the dough to a rough 12″x 15″ rectangle.

Melt half a stick of butter and mix together 1 cup of sugar with two teaspoons of ground cinnamon.

Pinch off a piece of dough somewhere between the size of a marble and a golf ball. Roll into a bowl, dip in the melted butter, roll in the sugar, and plop into a buttered bundt pan or angel food pan.

A person forming a ball of dough and then dipping into melted butter and then rolling it in a cinnamon and sugar mixture.

Once you used up all the dough, your pan will be filled about halfway.

Don’t worry, this is normal.

You’ll need to cover the pan with plastic wrap one more time, and let proof for another 60 to 90 minutes.

Uncooked balls of dough that are coated in butter and cinnamon sugar sitting in a greased bundt pan.

Making the Gooey Caramel Sauce

Near the end of the 2nd round of proofing, it’s time to make the super-easy sauce.

In a medium-sized saucepan, over medium heat, melt 1½ sticks (12 tbsp) of unsalted butter. Add ½ cup of dark brown sugar.

EXPERT TIP: Use a whisk to stir the brown sugar into the melted butter. Keep whisking and stirring until the butter is fully incorporated. It will eventually become a solid brown color (the yellow from the butter will no longer be visible).

Pour this over the risen bread balls and allow the sauce to seep down throughout the pan and on the sides.

Caramel sauce being poured from a saucepan onto a bundt pan filled with risen balls of bread dough.

When To Serve Monkey Bread

Monkey Bread made from scratch is truly something special.

Which means it’s perfect for serving on a special occasion.

Imagine serving this on Christmas morning. Or at a baby shower brunch. Or, just an easy-breezy Sunday morning.

EXPERT TIP: To serve this in the morning, allow the 2nd round of proofing to happen in the refrigerator overnight. Set out on the counter an hour before baking. And then bake about 45 minutes before serving.

A bundt pan filled with cooked monkey bread sitting on a baking rack.

Serving, Storing, and Reheating

This bread is so much fun to serve to guests because everyone has a great time pulling their own pieces of monkey bread. Be sure to serve nice and warm.

The bread will keep (if there is any left) covered, on the counter, for several days.

You can easily reheat the bread in the microwave for just a few seconds.

Homemade monkey bread with a few pieces missing on a white round platter next to a glass cup of coffee. wi

Of all the food that has come out of the “How To Feed a Loon” kitchen, this is, without a doubt, one of our all-time favorites.

It’s heartwarming, delicious, and just so much fun.

Perfect for serving family and friends. Just amazing.

A small white plate holding several pieces of monkey bread and a silver fork.

Ready to make the best monkey bread ever? Go for it!

And when you do, be sure to take a photo of it, post it on Instagram, and tag @HowToFeedaLoon and hashtag #HowtoFeedaLoon!

An untouched circular loaf of homemade monkey bread on a circular white plate next to a couple mugs of coffee.
Print Recipe
5 from 3 votes

Homemade Monkey Bread

Homemade Monkey Bread is always a huge hit when served to family and friends. Making the bread from scratch is not difficult, you just need to allow time. See NOTES for how to serve this fresh in the morning.
Prep Time15 minutes mins
Cook Time30 minutes mins
Proofing (Dough Rising)3 hours hrs
Total Time3 hours hrs 45 minutes mins
Course: Breakfast / Brunch
Cuisine: American
Servings: 8
Calories: 604kcal
Author: Kris Longwell

Equipment

  • 1 bundt cake pan or angel food cake pan

Ingredients

For the Dough

  • 1 cup whole milk warm, 115°F
  • ⅓ cup water warm 115°F
  • ¼ cup sugar
  • 2 tablespoon unsalted butter melted and slightly cooled
  • 2¼ teaspoon instant dry yeast or active dry yeast, 1 package
  • 3¼ cups all-purpose flour
  • 2 teaspoon salt

For the Monkey Bread

  • 4 tablespoon unsalted butter melted, plus more (softened) for greasing the pan
  • 1 cup sugar
  • 2 teaspoon cinnamon ground

For the Caramel Sauce

  • 12 tablespoon unsalted butter 1½ sticks
  • ½ cup brown sugar dark

Instructions

Make the Dough

  • In a large measuring cup, add the milk, water, melted butter, sugar, and yeast. Gently whisk. Set aside for about 5 minutes.
  • Meanwhile, in the bowl of a stand mixer with the dough hook attached, add the flour and salt. Mix with the dough hook for about 1 minute to combine.
  • With the mixer on medium-low, slowly pour the butter/yeast mixture into the flour. Continue mixing until a loose ball of dough forms. You may need to stop and scrape down the edges with a spatula.
  • Turn the mixer to medium and mix for 7 minutes, until the dough is soft and elastic.
  • Use your hands to remove the dough from the hook and bowl. Place on a lightly floured surface and gently knead the dough for about 30 seconds. Use your hands to shape the dough into a ball, smooth the edges with your fingers.
  • Spray a large bowl with cooking spray. Place the dough into the bowl and turn it over a couple of times to coat it with the oil. Cover with plastic wrap and place in a warm, non-drafty area for about 60 to 90 minutes, or until the dough has nearly doubled in size.

Form the Monkey Bread

  • After the dough has risen, transfer it from the bowl onto a lightly floured surface and use a rolling pin to roll the dough out to a rough 10"x 13" rectangle.
  • Grease the cake pan (bundt or angel food) liberally with softened butter and a paper towel. In a medium-sized bowl, mix together the sugar with the cinnamon. Melt the butter in a medium-sized bowl.
  • Use your fingers to pinch off a piece of dough and form it into a ball. It should be somewhere between a marble and a golf ball in size. Roll the dough in the melted butter and then roll it around in the sugar-cinnamon mixture. Place in the prepared pan. Repeat with the remaining dough, and fill the pan evenly (the pan will only be about half full at this point).
  • Cover the pan with plastic wrap and place in a warm, non-drafty area for another 60 to 90 minutes.

Finish Off the Monkey Bread

  • Preheat the oven to 350°F.
  • About 15 minutes before baking the bread, melt the butter in a saucepan over medium heat. Stir in the brown sugar and whisk until fully combined and uniform in color, about 4 minutes.
  • Remove the plastic wrap and gently pour the butter/brown sugar sauce all over the top. Very gently tap the sides of the pan to help the sauce seep down throughout the pan and bread. This takes a couple of minutes, you should see air bubbles appear as the sauce fills in around the bread balls.
  • Place in the oven and bake for 30 minutes.
  • Remove from oven and let rest for 5 to 10 minutes. Place a flat plate on the top of the pan and very carefully invert the pan. Tap on the pan in a few places to help the bread release from the pan. Gently remove the pan from the bread. Serve at once.

Video

Notes

See the video near the top of the post for visual guidance.  If you liked the video, please subscribe to our YouTube channel.
Instead of making the bread from scratch, you can use 2 cans of non-flaky biscuits or frozen dinner rolls.  No need to allow any time for proofing.  Though the monkey bread will still be delicious, the homemade bread takes it to another level.
To serve this in the morning, prepare the recipe as is all the way up to the 2nd round of proofing, but instead of letting the monkey bread proof in a warm, non-drafty area, cover with plastic wrap and place it in the fridge.  The next morning, allow the dough to rest on the counter for about an hour while you prepare the caramel sauce.  Bake as indicated in the recipe.
Leftovers can be covered and kept on the counter for up to several days, or refrigerated and cover for up to 5 or 6 days.  The cooked monkey bread can be frozen for up to 2 months. 

Nutrition

Calories: 604kcal | Carbohydrates: 85g | Protein: 7g | Fat: 24g | Saturated Fat: 11g | Polyunsaturated Fat: 1g | Monounsaturated Fat: 7g | Trans Fat: 1g | Cholesterol: 71mg | Sodium: 604mg | Potassium: 123mg | Fiber: 2g | Sugar: 46g | Vitamin A: 838IU | Vitamin C: 1mg | Calcium: 67mg | Iron: 3mg
  • « Previous Page
  • 1
  • …
  • 7
  • 8
  • 9
  • 10
  • 11
  • …
  • 21
  • Next Page »

Welcome!

Kris & Wesley (The Loon) live for fun, food, and fabulousness. "How to Feed a Loon" is a celebration of just that. Come join us on this joyous culinary ride.

More about us

Thanksgiving Favorites

  • A straight-on view of a glazed Cornish hen sitting on a bed of wild rice pilaf all on a white dinner plate with a fork nearby and another plate of the same in the background.
    Glazed Cornish Hens with Wild Rice Stuffing
  • A large oval platter holding five twice baked sweet potatoes that are topped with toasted marshmallows
    Twice Baked Sweet Potatoes
  • A Roast Turkey Breast with Herbs resting on a white platter garnished fresh sage leaves and lemon wedges and a large carving knife nearby.
    Roast Turkey Breast with Herbs
  • A square white baking dish filled with corn casserole next to a plate filled with the same.
    Corn Casserole
  • A large white platter of cooked and carved spatchcocked turkey with cranberries next to it.
    Spatchcocked Turkey
  • An overhead view of a square white baking dish filled with cornbread dressing and sausage and cranberries.
    Cornbread Dressing with Sausage and Cranberries

Popular Recipes

  • best-ever chicken salad recipe
    Best-Ever Chicken Salad
  • A white soup filled with roasted tomato basil soup next to sliced grilled cheese sandwiches.
    Roasted Tomato Basil Soup
  • Mahi Mahi tacos on a wooden table in a taco holder
    Amazing Mahi Mahi Tacos
  • A lemon wedge being squeezed onto a platter of chicken francese
    Chicken Francese
  • Southern Shrimp and Cheesy Grits recipe
    Southern Shrimp and Cheesy Grits
  • Slow Roasted Pork Shoulder on a platter with a side of gravy
    Slow Roasted Pork Shoulder

Footer

↑ back to top

Explore

  • Recipe Index
  • About Us
  • Subscribe

About

  • Privacy Policy
  • Contact

Copyright © 2025 How to Feed a Loon • This website contains affiliate links, which means that if you click on a product link, we may receive a commission in return. How To Feed a Loon is a participant in the Amazon Services LLC Associates Program, an affiliate advertising program designed to provide a means for sites to earn advertising fees by advertising and linking to Amazon.com.

Rate This Recipe

Your vote:


A rating is required
A name is required
An email is required