How To Feed A Loon

  • About Us
  • Recipe Index
    • Appetizers
    • Asian
    • Breads and Doughs
    • Cajun / Creole / Louisiana
    • Breakfast / Brunch
    • Comfort Food
    • Delectable Desserts
    • Entrees / Mains
    • Instant Pot
    • Italian
    • Pizza
    • Rubs, Spices and Sauces
    • Soups & Salads
    • Sides
    • Seafood
    • Southern
    • Mexican / Tex-Mex / Cal-Mex
    • Thanksgiving
    • Vegetarian
  • Videos
    • Recipe Videos
    • Web Stories
  • Work With Us
  • Contact
  • **Premium Access**
  • Recipes
menu icon
go to homepage
  • Soups
  • Recipes
  • About Us
  • Work With Us
  • Premium
subscribe
search icon
Homepage link
  • Soups
  • Recipes
  • About Us
  • Work With Us
  • Premium
×
Home » Recipe Index

Roast Rack of Lamb Persillade

December 17, 2023 by Kris Longwell 3 Comments

Two racks of lamb persillade standing upright on a white platter with the French bones intersecting each other in a "cathedral" style presentation.

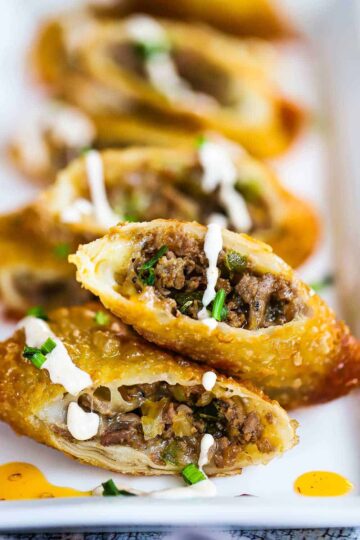
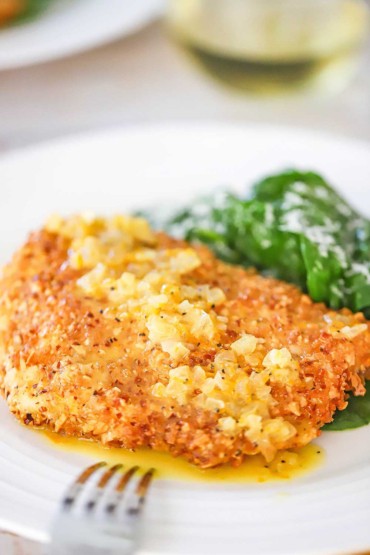
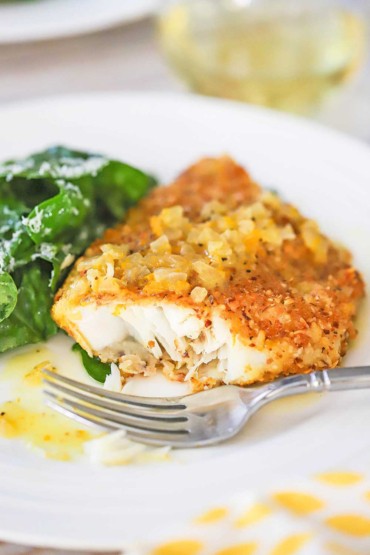
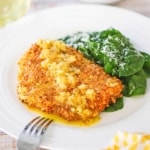
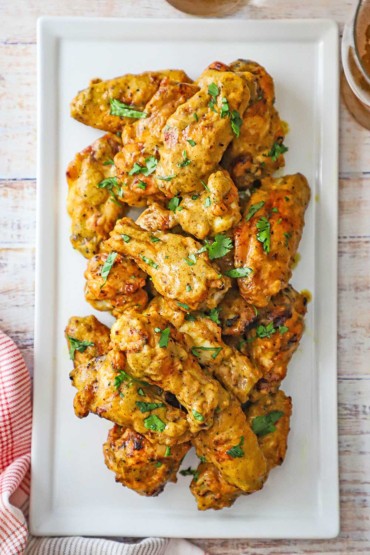
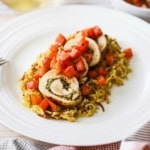
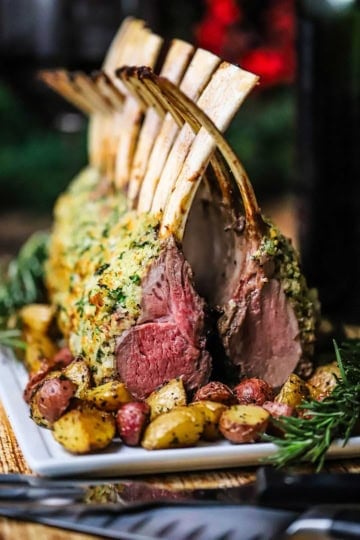
Roast Rack of Lamb Persillade is truly one of those special occasion roasts. Serve it “cathedral style” or as individual chops; either way, your guests will be blown away. And just wait until they take that first bite. Serve alongside roasted balsamic potatoes for an unforgettable feast.
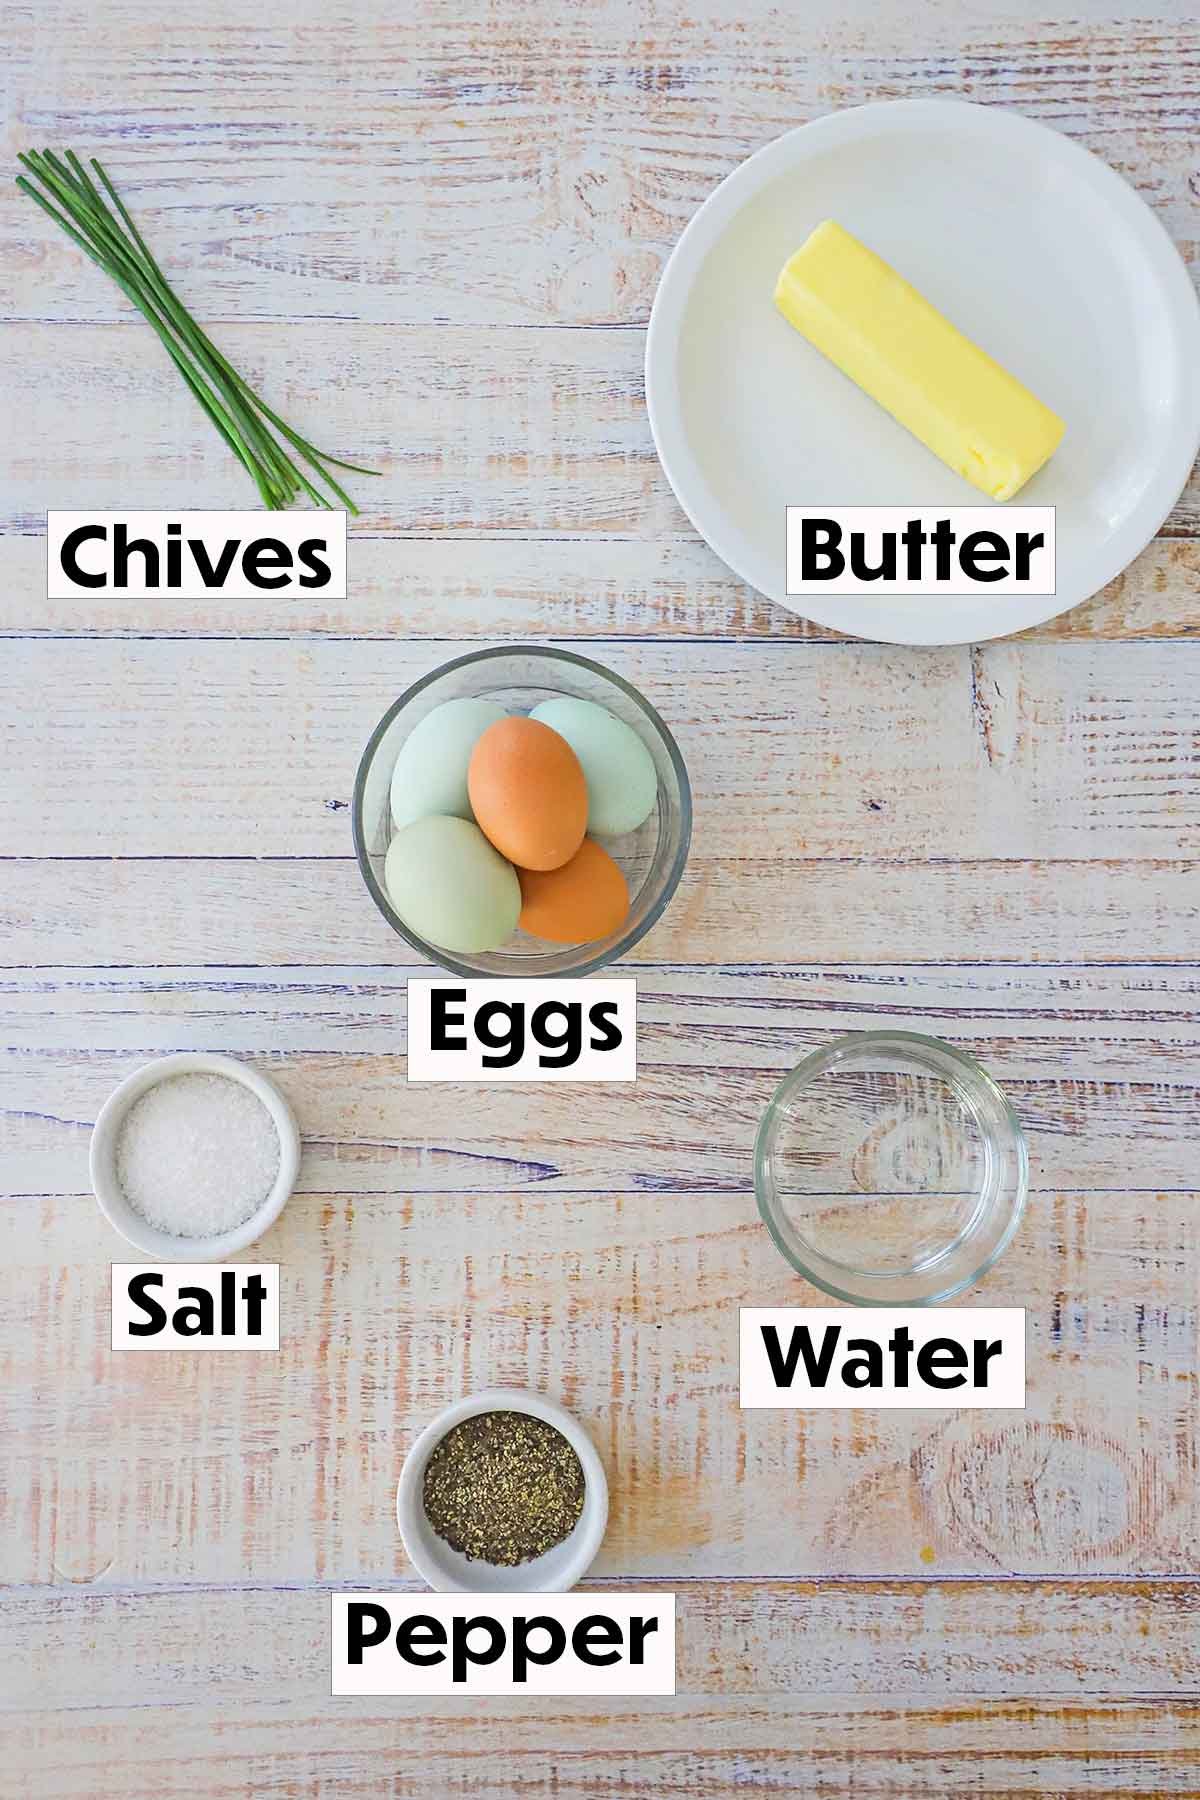
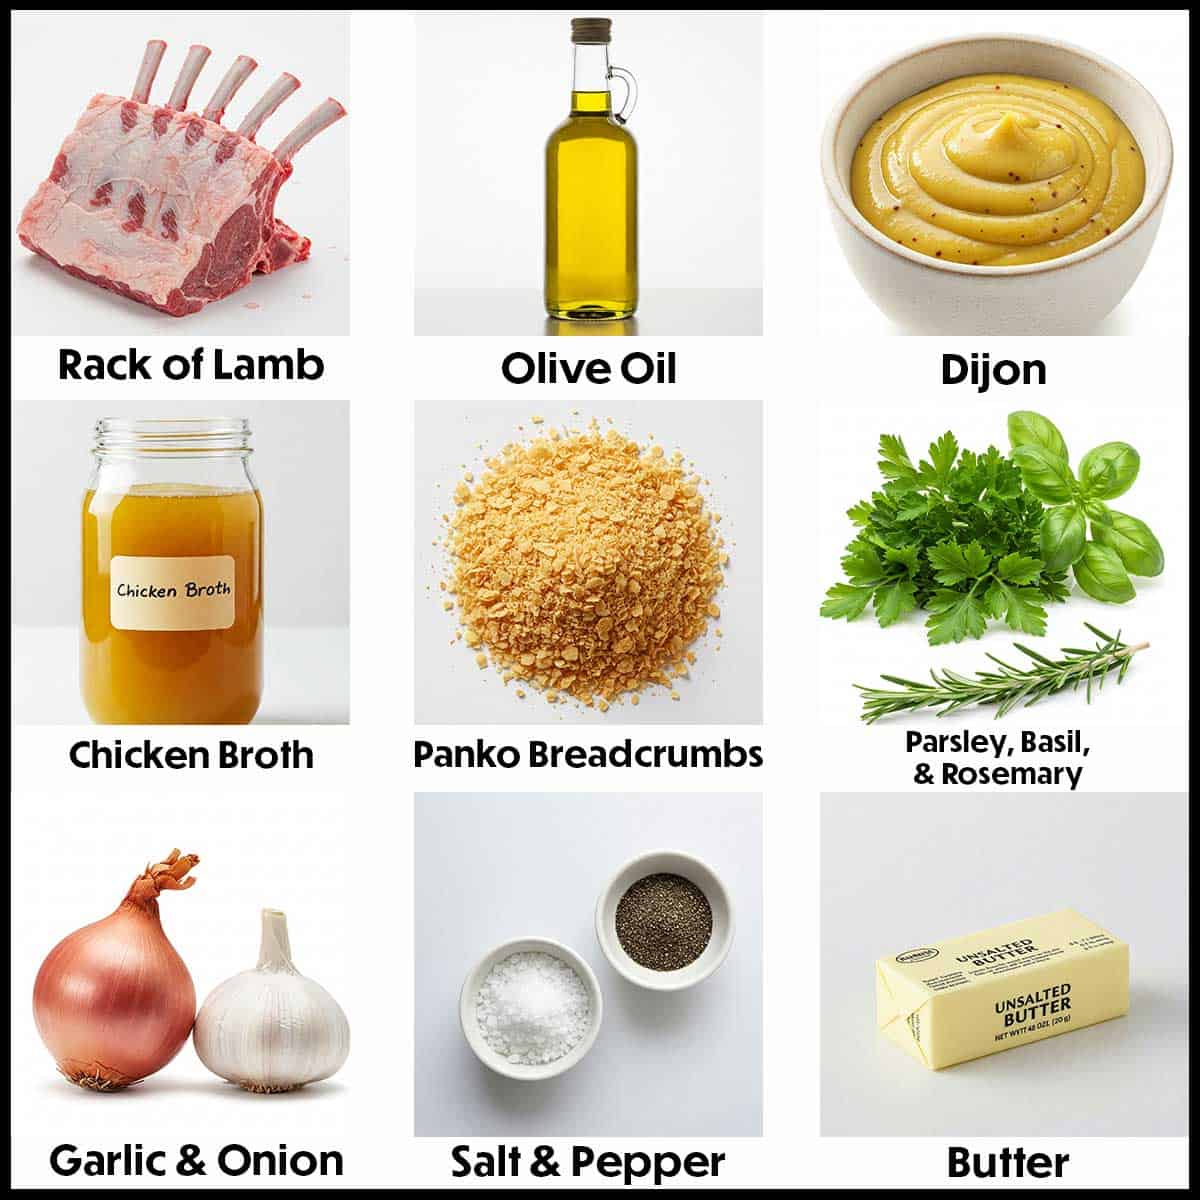
Two racks of lamb persillade standing upright on a white platter with the French bones intersecting each other in a "cathedral" style presentation.

🌿 The Ingredients

The fresh parsley, garlic, and herbs in the persillade blend infuse the tender lamb with vibrant, savory flavors while the breadcrumbs create a crispy, aromatic crust that elevates the roast into an unforgettable centerpiece. Find ingredient notes (including substitutions and variations) below.

An arrangement of ingredients for roast rack of lamb persillade on a white background including a Frenched rack of lam, olive oil, broth, breadcrumbs, herbs, garlic, onion, salt, pepper, and butter.

👉 Substitutions and Variations

  • Protein – Individual lamb chops can be used in place of the rack. You may be interested in a simpler recipe with our Grilled Marinated Lamb Chops. You could just skip the persillade (breadcrumb and herb topping). Veal shanks are another substitution.
  • Mustard – Dijon will add a depth of flavor to the roast. It also enables the persillade to adhere to the roast. Yellow mustard can also be used and will impart no flavor. For an extra punch of flavor, try spicy brown mustard or whole grain mustard.
  • Flavor enhancers – The fresh herbs work wonderfully with the succulent and rich lamb. We recommend parsley, basil, and rosemary, but sage, marjoram, and thyme are excellent choices, too, or any combination of them. If using dried herbs, then go with half the amount.

Find ingredient notes (including substitutions and variations) below.

Expert Tip

Quality counts! Select a high-quality rack of lamb with a good fat cap for the best flavor and texture. This roast is all about the quality of the meat. Don’t skimp (this is a special occasion!).

👩🏼‍🍳 How To Make Roast Rack of Lamb Persillade

A person using a pepper grinder to season an uncooked rack of lamb in a roasting pan.
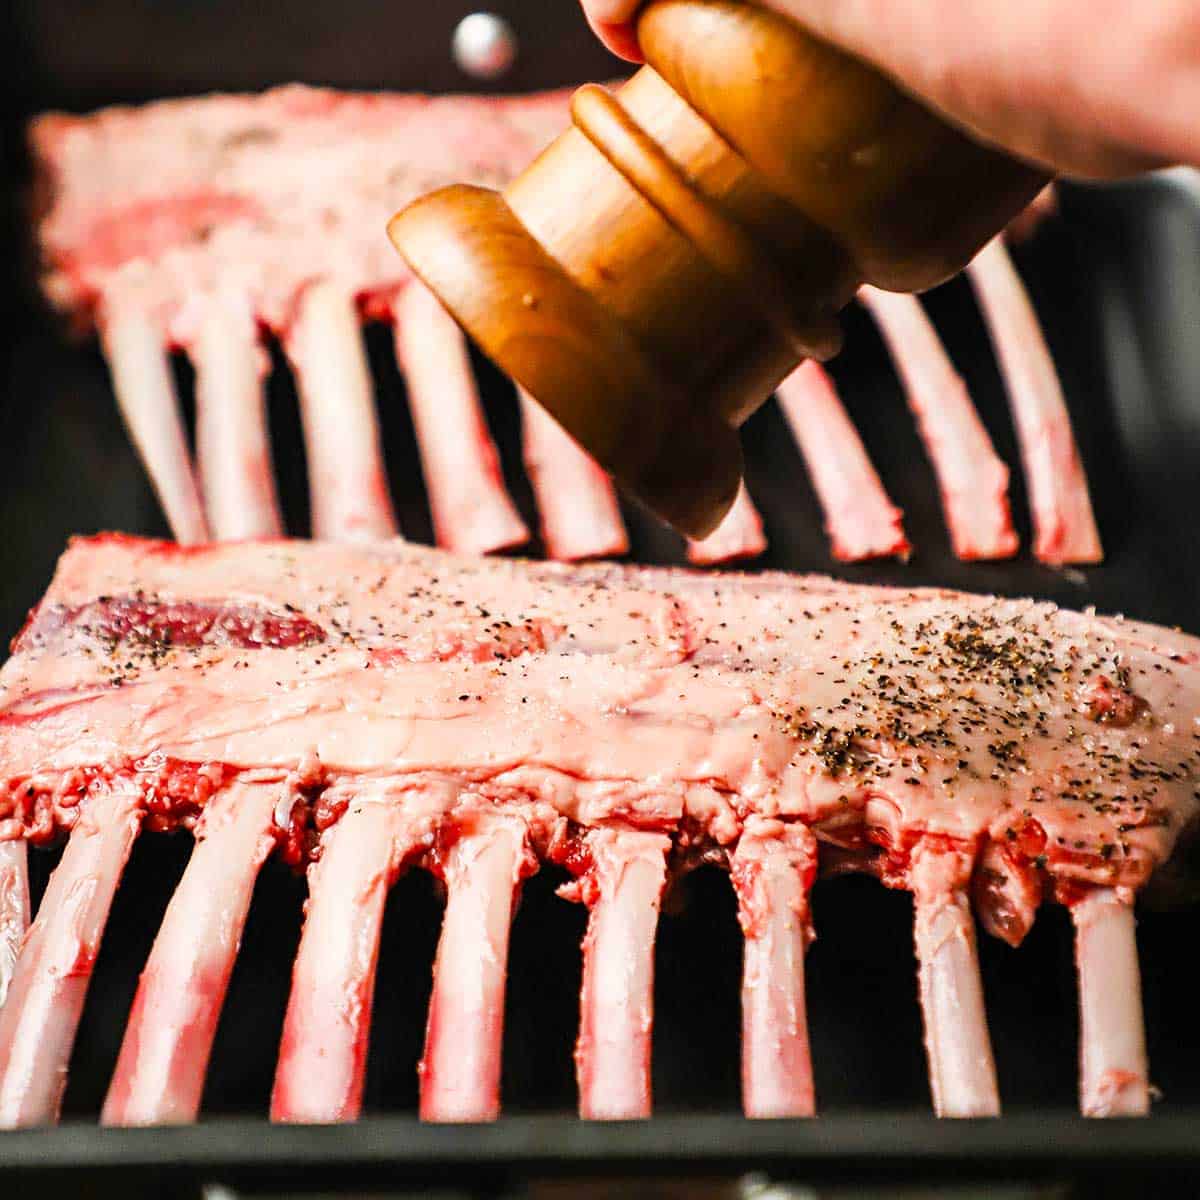
  1. Step 1: Brush oil all over the racks and season with salt and pepper. 
A glass bowl filled with a mixture of breadcrumbs and chopped fresh herbs.
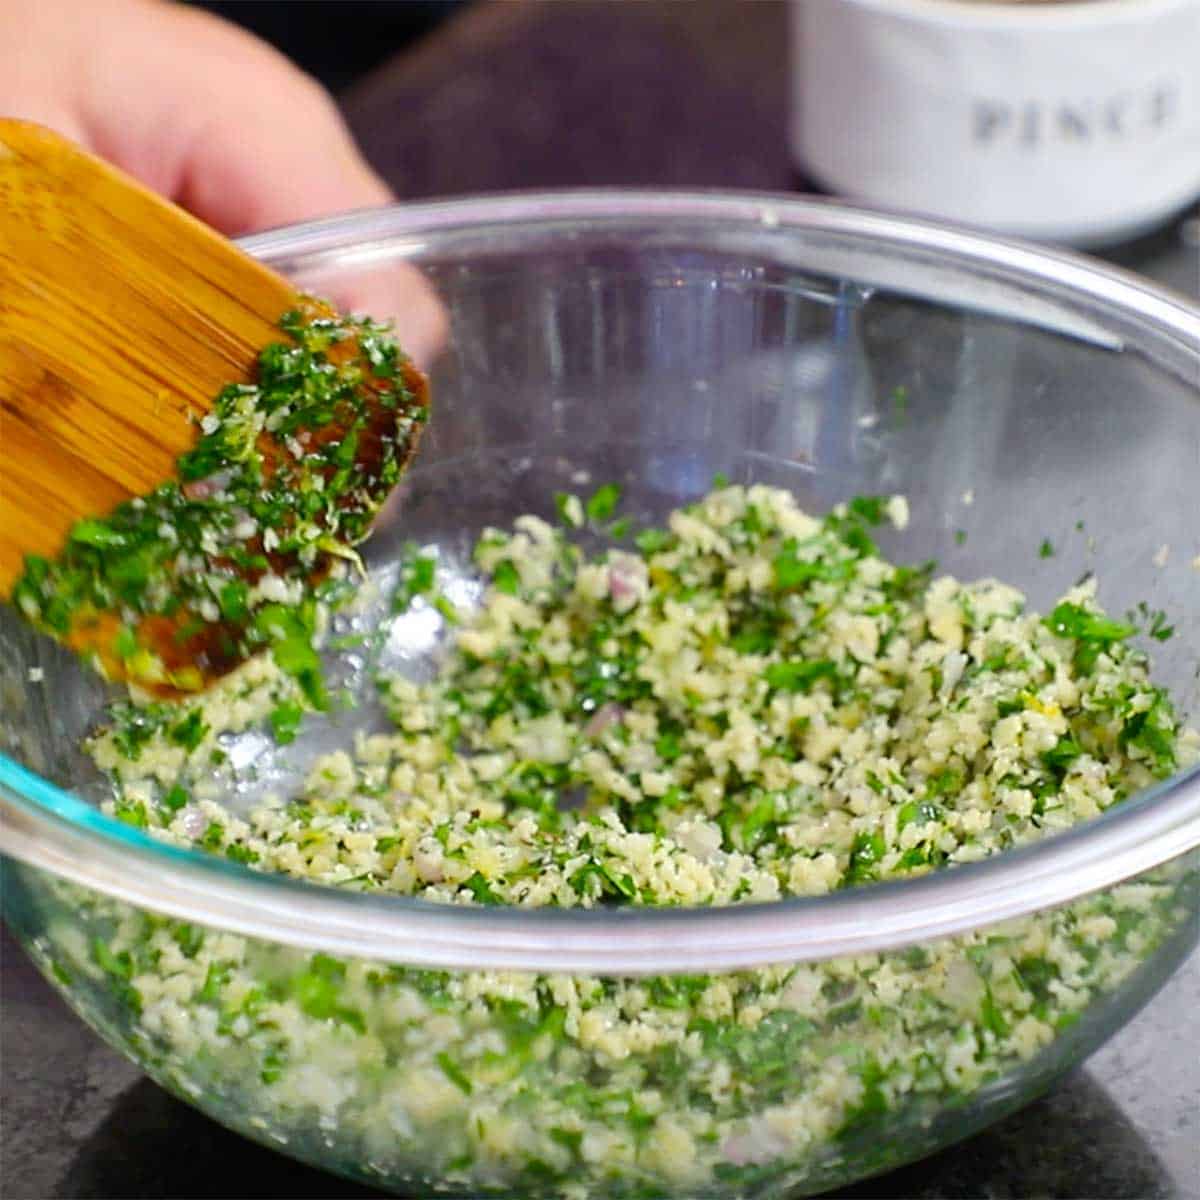
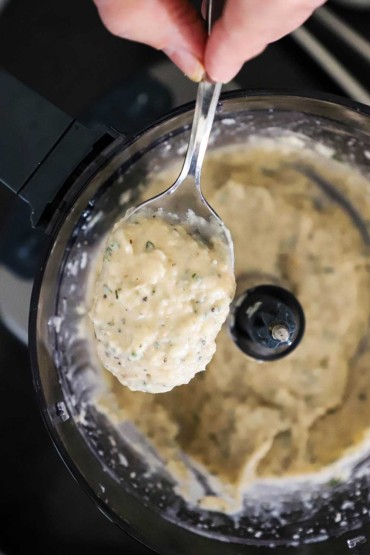
  1. Step 2: In a bowl, mix the breadcrumbs, herbs, shallots, garlic, butter, salt, and pepper. 
A person brushing Dijon mustard onto the top of a roasted rack of lamb that is in a roasting pan.
  1. Step 3: Roast racks in the pan for 20 minutes for medium-rare and then smear Dijon mustard over the meat.
A person pressing a breadcrumb and herb mixture onto the top of a roasted rack of lamb.
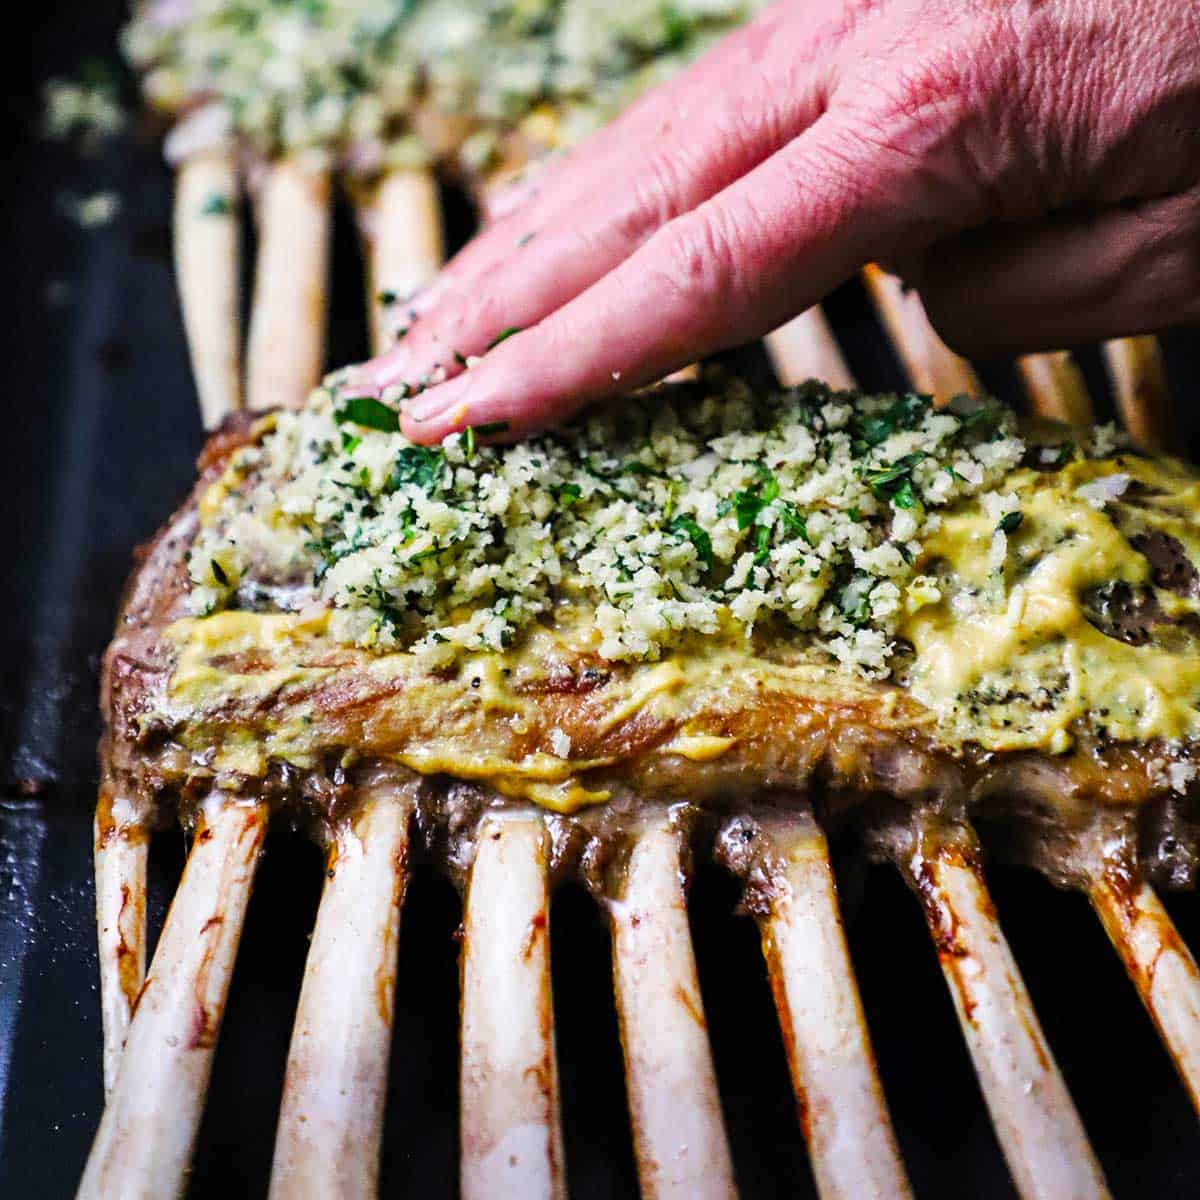
  1. Step 4: Press a thin layer of the persillade over the mustard (not too much!)
A pair of roast rack of lamb persillade in a black roasting pan.
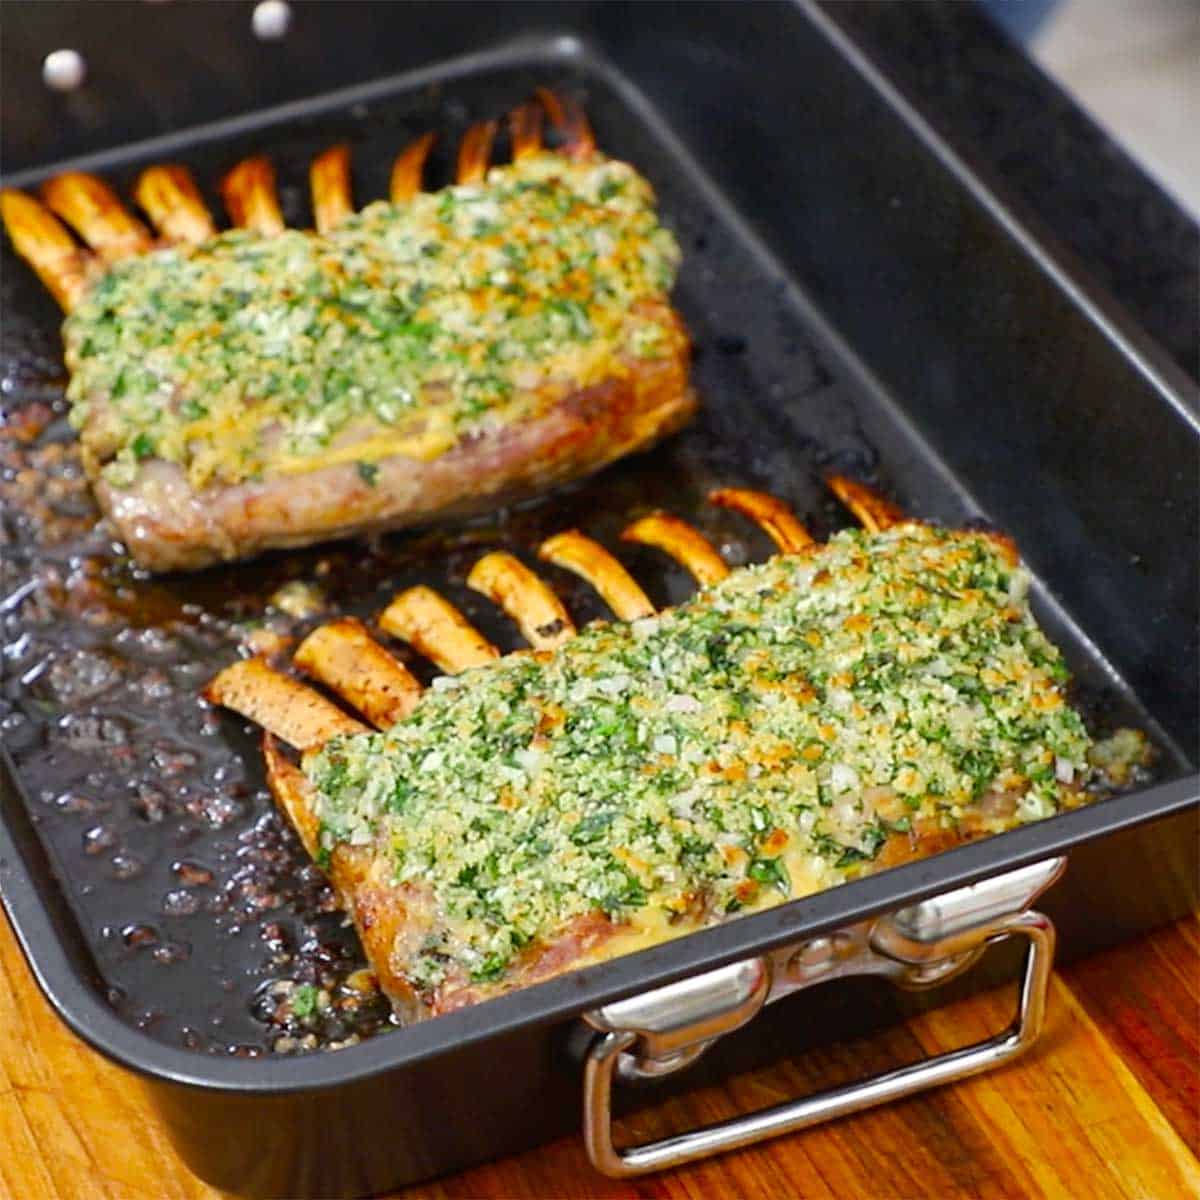
  1. Step 5: Broil for 2 to 3 minutes.
A person standing behind a platter that is holding a pair of roast rack of lamb persillade that are standing upright with their bones intersecting each other in a "cathedral" style presentation.
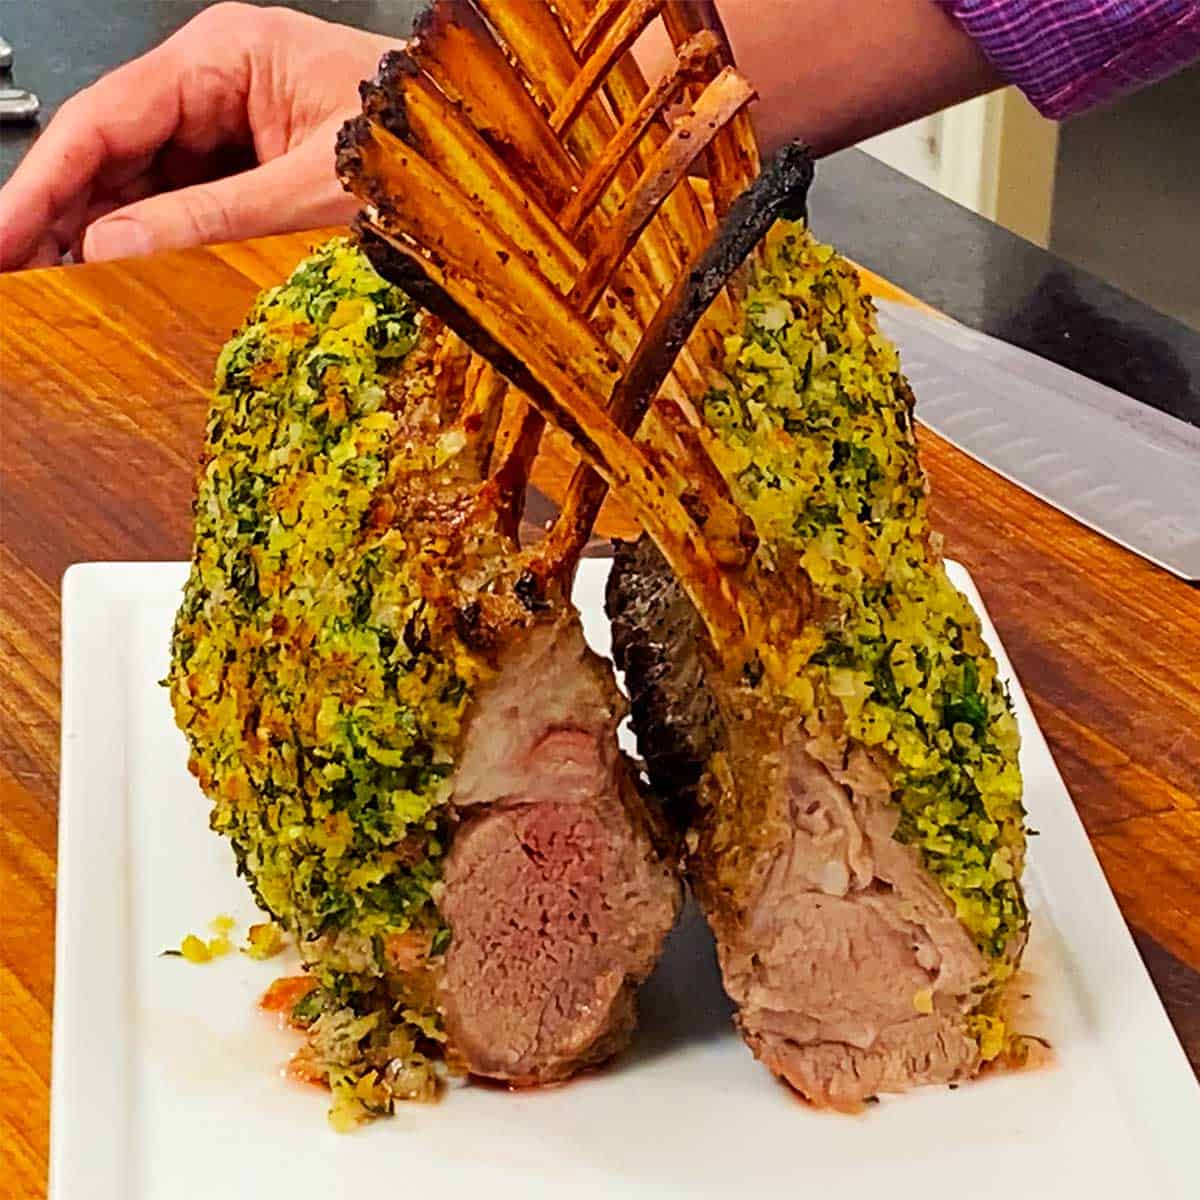
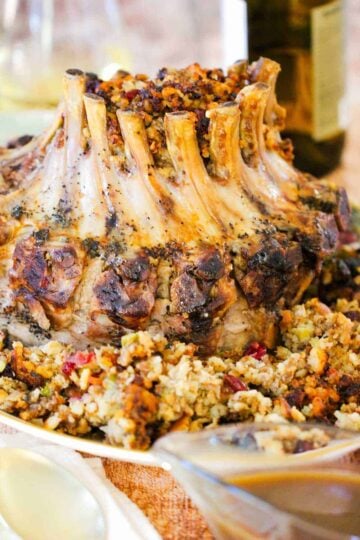
  1. Step 6: Let rest for 10 minutes, then arrange the two racks “cathedral-style.”

🍽️ How To Serve

  • After you’ve placed the racks packed with persillade under the broiler for a short amount of time (keep an eye on them and don’t let them burn!), you’ll want to let the racks rest for about 15 minutes.
  • For an epic presentation, carefully place the two racks on a platter, with the bones pointing upwards. Loosely interlock the bones to create a “cathedral-style” presentation.
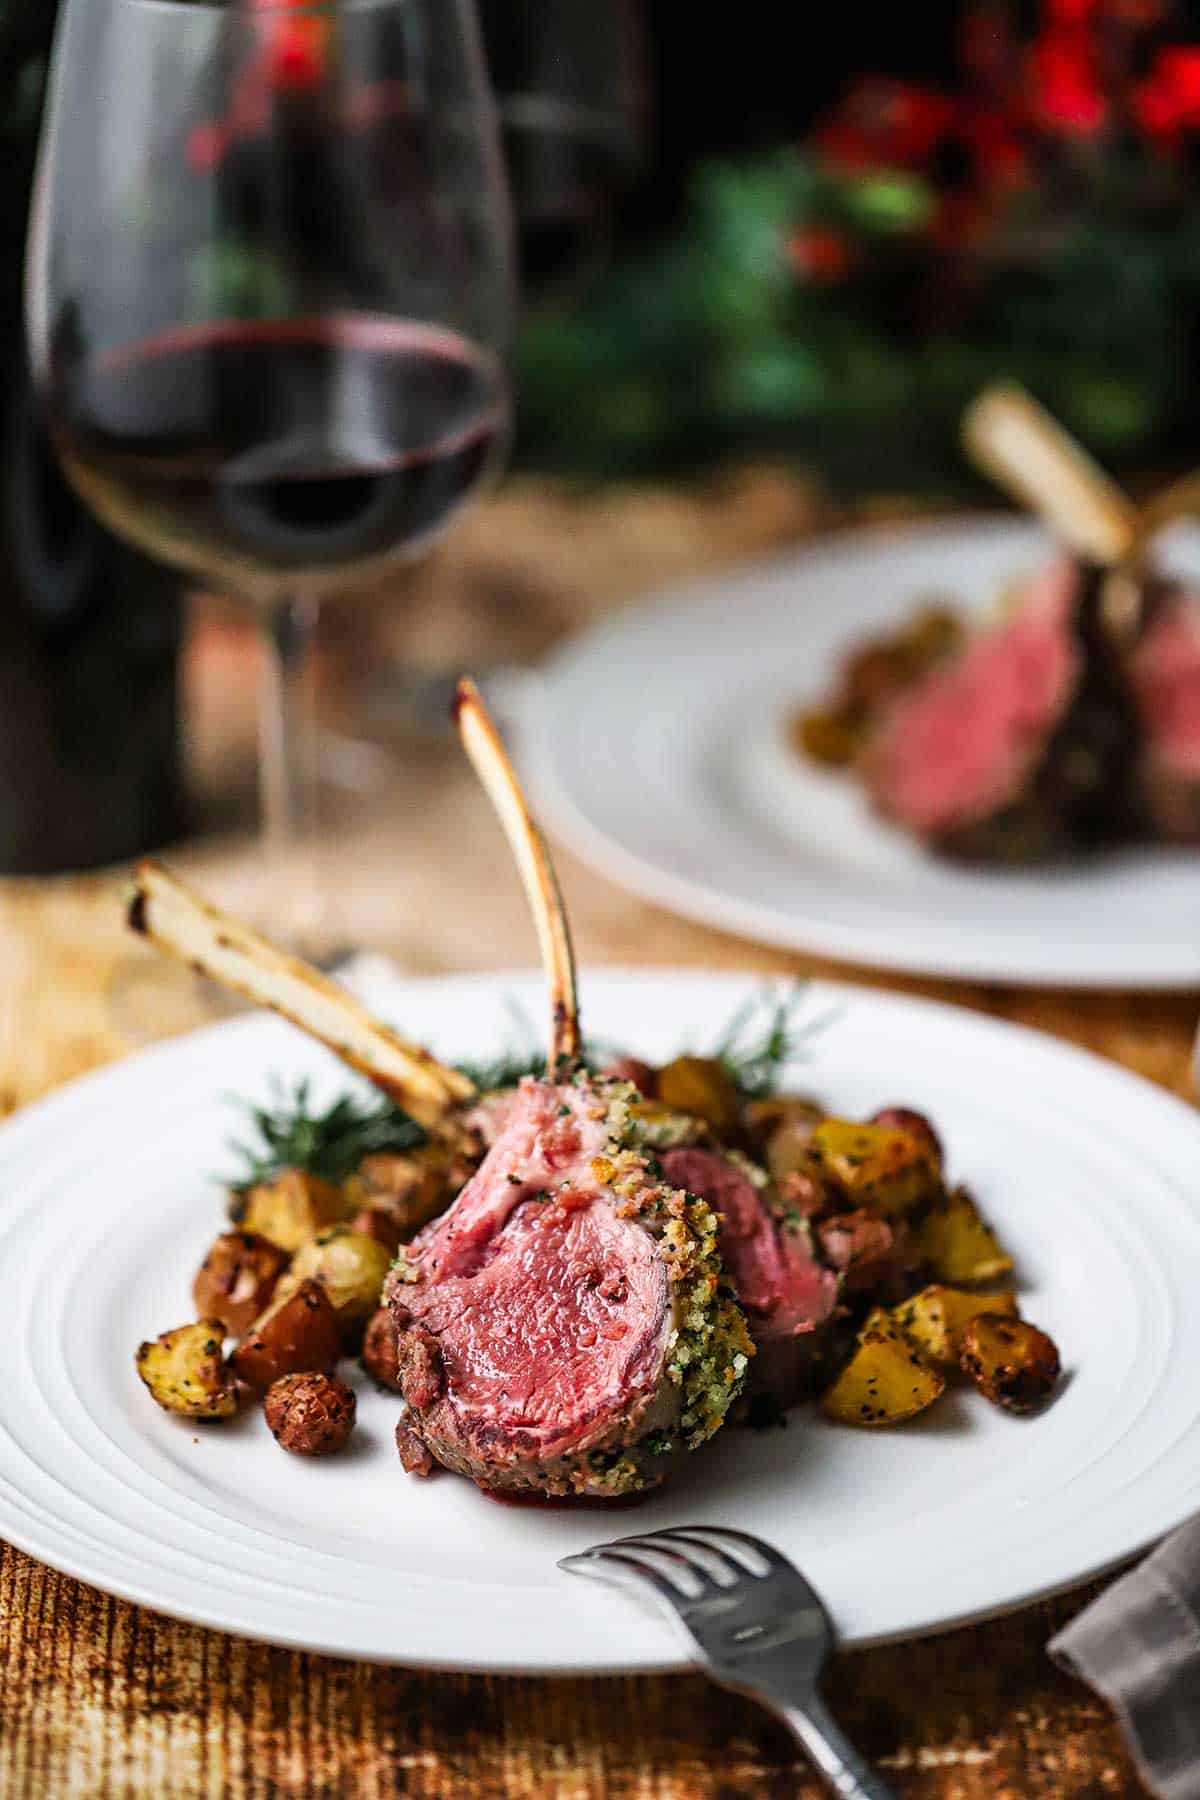
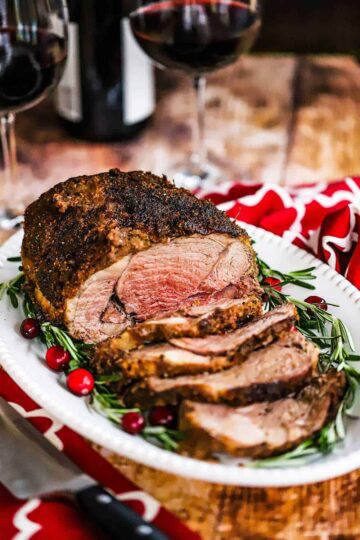
  • If you’d rather skip the cathedral presentation, go ahead and slice the chops and then place them on a large platter. Two chops are typically sufficient per serving. Don’t forget a nice sprinkling of coarse sea salt.
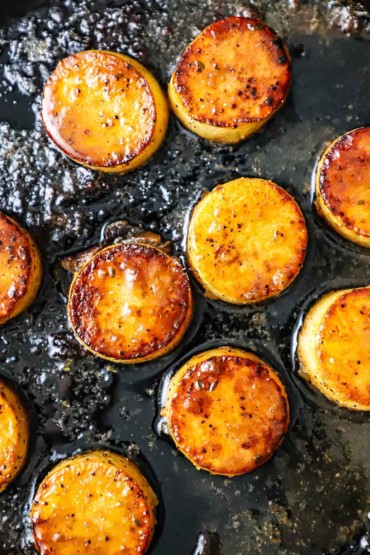
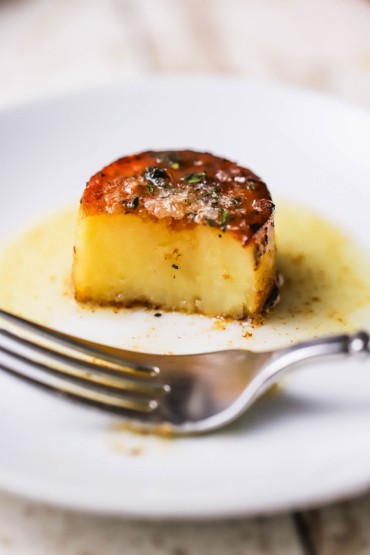
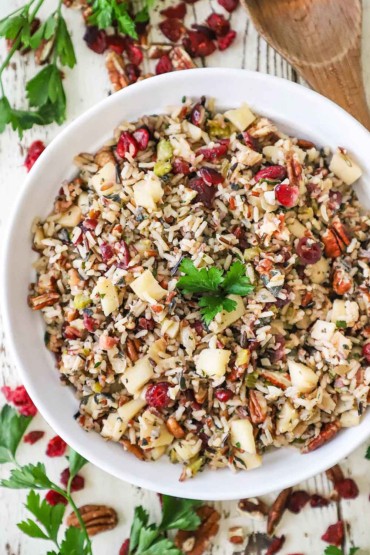
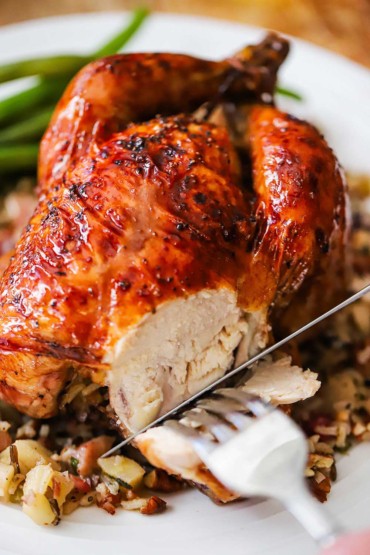
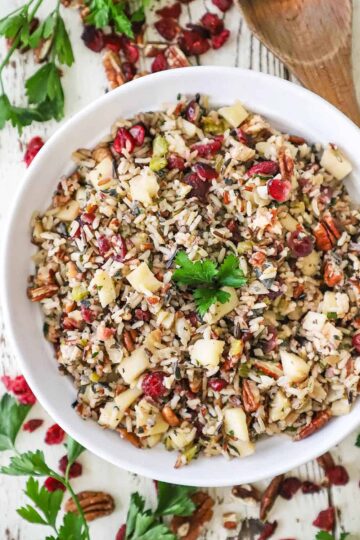
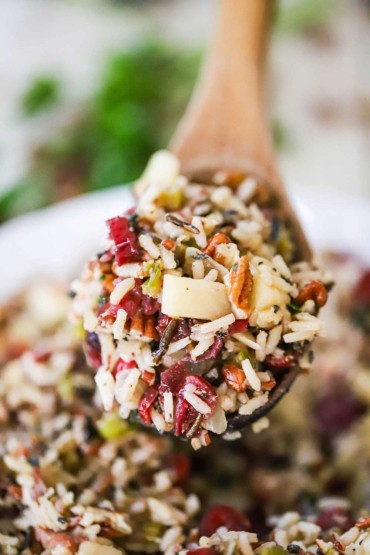
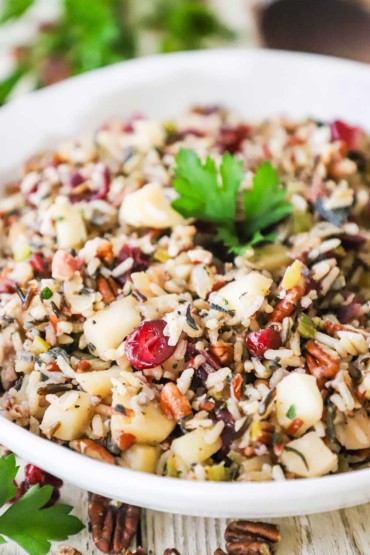
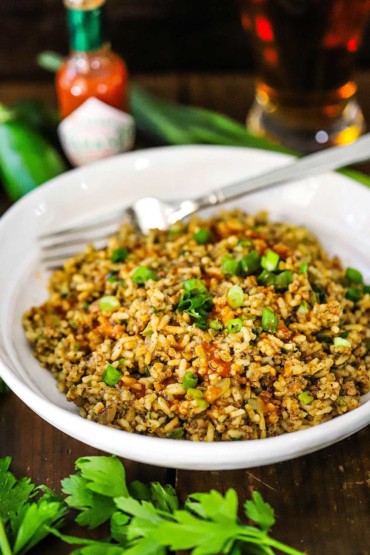
  • Serve this roast with balsamic roasted potatoes, maple-glazed carrots, or rice pilaf with cranberries and pecans.

🙋🏽‍♂️ Frequently Asked Questions

What herbs are traditionally used in a persillade for roast lamb?

Traditionally, persillade includes fresh parsley as the main herb, often combined with garlic. We love the addition of basil and rosemary to complement the lamb’s flavor.

Can I substitute breadcrumbs with a gluten-free alternative in the roast rack of lamb persillade?

Yes, you can substitute regular breadcrumbs with gluten-free options such as crushed gluten-free crackers, almond meal, or gluten-free panko to maintain the crispy texture without gluten.

How do you properly French the rack of lamb for a Persillade roast?

To French the rack of lamb, trim away the fat and meat from the ends of the rib bones to expose them cleanly, creating an elegant presentation and making it easier to handle and carve after roasting. Your butcher can do this easily for you.

A white dinner plate filled with a serving of two French lamb chops with roasted potato wedges around the chops.

🍠 Other Incredible Holiday Roasts

  • A fully cooked standing prime rib roast sitting upright on a white platter surrounded by fresh herbs.
    Standing Prime Rib Roast
  • Royal Crown Roast with Stuffing recipe
    Royal Crown Roast of Pork with Stuffing
  • A close-up view of a roasted boneless leg of lamb with garlic and herbs sitting on white platter garnished with rosemary sprigs and cranberries.
    Boneless Leg of Lamb with Garlic and Herbs
  • An oval white platter filled with slices of beef tenderloin with sprigs of rosemary along the edge and a glass or red wine sitting in the rear.
    Beef Tenderloin with Red Wine Sauce

Ready to make one of the most impressive holiday roasts of all time? Go for it!

And when you do, be sure to take a photo of it, post it on Instagram, and tag @HowToFeedaLoon and hashtag #HowToFeedaLoon!

Roast rack of lamb persillade on a white platter with fresh rosemary along the base of the roast.
Print Recipe
5 from 1 vote

Roast Rack of Lamb

Roast Rack of Lamb Persillade is so festive and just so flavorful. Get two racks of lamb and ask your butcher to French the ribs, which is a technique that cuts the meat away from the top of the chop to expose the bone. And use an instant-read thermometer to reach 125°F for rare or 135° for medium-rare. This is the perfect way to serve these incredible ribs!
Prep Time20 minutes mins
Cook Time30 minutes mins
Resting time15 minutes mins
Total Time1 hour hr 5 minutes mins
Course: Entree
Cuisine: French
Servings: 8 people
Calories: 158kcal
Author: Kris Longwell

Equipment

  • Roasting pan
  • Meat thermometer preferably digital

Ingredients

  • 2 racks lamb 1½ lb – 1¾ lbs, with 7 or 8 ribs, Frenched
  • 2 tablespoon olive oil
  • Kosher salt and freshly ground black pepper

For the Persillade

  • ¾ cup Panko bread crumbs
  • ⅓ cup parsley fresh, chopped
  • 1 tablespoon thyme fresh, chopped
  • 1 tablespoon rosemary fresh, chopped
  • 1 small shallot finely chopped
  • 2 cloves garlic chopped
  • 2 tablespoon chicken stock
  • 4 tablespoon unsalted butter melted
  • ½ teaspoon Kosher salt
  • ½ teaspoon black pepper freshly ground
  • ¼ cup Dijon mustard
  • coarse sea salt for serving

Instructions

  • Preheat oven to 450°F.
  • Brush olive oil all over the two racks and then sprinkle salt and pepper all over.
    2 racks lamb, 2 tablespoon olive oil, Kosher salt and freshly ground black pepper
  • Place the racks of lamb, fat-side up in a roasting pan and roast until an instant-read thermometer inserted into the thickest part of the lamb (but not touching the bone) registers 125°F for rare or 135°F for medium rare, about 20 – 25 minutes.
  • While the meat is roasting, in a medium-sized bowl, combine the bread crumbs, parsley, thyme, rosemary, shallots, garlic, stock, melted butter, salt, and pepper. Stir to fully combine. The mixture should be moist and will stay together when pressed.
    ¾ cup Panko bread crumbs, ⅓ cup parsley, 1 tablespoon thyme, 1 tablespoon rosemary, 1 small shallot, 2 cloves garlic, 2 tablespoon chicken stock, 4 tablespoon unsalted butter, ½ teaspoon Kosher salt, ½ teaspoon black pepper
  • Remove the lamb from the oven. Brush the Dijon mustard liberally over the tops of the racks. Press the persillade mixture on the tops of each rack. Use your hands to help adhere the crumb mixture to the racks.
    ¼ cup Dijon mustard
  • Turn your broiler on to HIGH.
  • Place the lamb under the broiler (about 4 inches) and broil until the topping is lightly browned, 2 – 3 minutes. Watch closely…don't let it burn!
  • Remove from the oven and allow the racks to rest for 10 to 15 minutes.
  • If desired, place the two racks on a platter, upright, with the bones interlocking to create a 'cathedral-style' presentation.
  • Use a large knife to slice each lamb chop. Sprinkle with coarse sea salt and serve at once.
    coarse sea salt

Video

Notes

NOTE: Watch the video near the top of the recipe for visual guidance.
The persillade can be made several hours in advance. 
Lamb is best when not overcooked, for it dries out easily. Medium-rare is traditional. Keep an eye on the internal temperature as actual oven temperatures can vary. You may need to turn the pan around to ensure even cooking. 
The lamb is best served soon after cooking. Leftovers are tasty, but they lose the juiciness that makes these chops so amazing. 

Nutrition

Calories: 158kcal | Carbohydrates: 7g | Protein: 2g | Fat: 19g | Saturated Fat: 4g | Polyunsaturated Fat: 1g | Monounsaturated Fat: 4g | Trans Fat: 0.2g | Cholesterol: 15mg | Sodium: 294mg | Potassium: 69mg | Fiber: 1g | Sugar: 1g | Vitamin A: 441IU | Vitamin C: 5mg | Calcium: 34mg | Iron: 1mg

POST UPDATE: This post was originally published in December 2016, but was updated with improved tweaks to the recipe with new tips and photography and a fabulous new video in December 2023!

Christmas Crostini

December 15, 2023 by Kris Longwell 3 Comments

An platter made from a tree stump topped with festive Christmas crostinis next to two glasses filled with red wine.

This really is the perfect holiday appetizer. So delicious and beautiful in presentation.

This is one of our favorite appetizers to serve during the holiday season, although it is so delicious, it’s ideal any time of the year. It’s always a crowd-pleaser, and most of the components can be made in advance. Serve warm or at room temperature! Serve this alongside sausage-stuffed mushrooms for perfect party fare!

An platter made from a tree stump topped with festive Christmas crostinis next to two glasses filled with red wine.

How To Make Christmas Crostini

The Ingredients You Will Need

The ingredients for this colorful crostini are not exotic, but they all come together to make an extremely satisfying, delicious appetizer. Here’s what you’ll need to have on hand:

Baguette – Sliced into ¼-inch pieces.
Garlic – You’ll need a couple of cloves halved and then four more that are minced.
Oil – Olive oil or extra-virgin olive oil.
Seasonings – Salt and pepper.
Spinach – Fresh is best. We recommend mature spinach (as opposed to baby spinach), but either will work. Thawed frozen spinach will work in a pinch.
White beans – Canned is perfectly fine. Cannellini or Great Northern beans are perfect. Garbanzo (aka Chickpeas) work, too.
Thyme – Fresh is best; if using dried, go with half of the quantity.
Lemon juice – The juice from one-half of a lemon gives just enough citrus. For a stronger lemon taste, juice both halves of the lemon.
Red bell peppers – Roasted. Jarred works perfectly.

EXPERT TIP: The bean purée should have the consistency of hummus. If you feel the texture is too thick, then add a couple of teaspoons of water and pulse a few more times.

A person holding up a spoon filled with a white bean purée over a food processor.

Tips for the Perfect Christmas Crostini

Toast the Baguette Slices Just Right – Ensure the baguette slices are toasted to a golden brown, providing a sturdy base for the toppings while adding a delightful crunch. Keep an eye on them as they can go from golden to burnt quickly.

Season the White Bean Purée – Season the white bean purée generously with thyme, garlic, and a hint of lemon juice to add depth of flavor and a creamy texture. Salt and pepper are essential. Taste and adjust seasonings and lemon as needed.

Sauté the Spinach with Care – Sauté the spinach until just wilted, seasoning it with a touch of garlic and salt to enhance its natural flavors. Give the spinach a rough chop before adding to the skillet.

Assemble with Precision – Assemble the crostini with a dollop of white bean purée, a small mound of sautéed spinach, and a strip of roasted red bell pepper, ensuring an even distribution of toppings for a balanced and visually appealing presentation.

A large silver skillet filled with wilted sautéed spinach with a wooden spatula off to the side.

How To Serve

We love to serve Christmas Crostini while the baguette slices are freshly toasted and still warm.

Place all the toppings out on your counter, and then as soon as the toasted baguette slices are ready, quickly assemble. We place them on platters and let guests grab them as they please.

You’ll love how quickly guests will gobble these festive appetizers up!

A close-up view of Christmas crostini with a layer of puréed white beans topped with a small amount of sautéed spinach and that topped with a strip of roasted red bell pepper.

Other Appetizer Recipes Perfect for Entertaining

We love serving all of these scrumptious recipes at parties throughout the year, but, they are especially wonderful during the holiday season.

Baked Brie with Praline Sauce
Naughty and Nice Spiced Nuts
Lamb Lollipops
Grissini (Italian Breadsticks)
Best-Ever Charcuterie Board
Sausage, White Bean, and Spinach Dip
Spanish Garlic Shrimp
Philly Cheesesteak Egg Rolls
Seared Shishito Peppers

These are all epic in their own right, but, in the meantime, aren’t these beauties catching your eye?

A side view of a platter filled with small toasted crostinis topped with a bean purée, sautéd spinach, and a strip of roasted red bell pepper.

These Christmas Crostinis are about as festive as you can get.

They are always such a huge hit when served to guests during the holidays. Folks love the appearance of them, and then they come back because of the taste.

And remember, the toppings can be made hours in advance. Easy, beautiful, and incredibly yummy. The perfect holiday appetizer!

An overhead view of a wooden circular platter filled with toasted crostinis topped with a white bean spread, spinach, and roasted red bell pepper.

Ready to make the best holiday appetizer of all time? Go for it!

And when you do, be sure to take a picture of them, post it to Instagram, and tag @HowToeFedaLoon and hashtag #HowToeFedaLoon!

A side view of a platter filled with small toasted crostinis topped with a bean purée, sautéd spinach, and a strip of roasted red bell pepper.
Print Recipe
No ratings yet

Christmas Crostini

Christmas Crostini is the perfect appetizer for your big holiday feast. So colorful and festive, and the flavors are divine. The bean puree and sauteed spinach can be prepared a couple of hours ahead of time, and then toast the bread and assemble just before your guests arrive!
Prep Time20 minutes mins
Cook Time20 minutes mins
Total Time40 minutes mins
Course: Appetizer
Cuisine: Appetizer
Servings: 12
Calories: 69kcal
Author: Kris Longwell

Ingredients

Crostini

  • 16 baguette slices each about ¼-inch thick
  • 2 tablespoon olive oil
  • 2 cloves garlic cut in half
  • Kosher salt

Toppings

  • ¼ cup olive oil
  • 4 cloves garlic minced
  • 1 15.5 oz can cannellini beans drained
  • 2 teaspoon thyme thyme, chopped
  • 1 tablespoon lemon juice usually the juice from half of a lemon
  • ½ teaspoon Kosher salt
  • ½ teaspoon black pepper
  • 8 oz spinach fresh, washed and stems removed
  • 2 roasted red bell peppers cut into 1 to 2-inch strips

Instructions

Make the Crostinis

  • Turn your broiler on HIGH with the top rack about 4 inches from the heating element.
    16 baguette slices
  • Brush one side of each bread slice with olive oil, and then rub the oiled side of the bread with the cut side of the garlic. Sprinkle a little salt onto the prepared bread slices.
    2 tablespoon olive oil, 2 cloves garlic, Kosher salt
  • Set the bread slices on a baking sheet. Broil until the bread is browned, about 2 minutes (keep an eye on them!). Remove from oven and set aside.

Make the Toppings

  • Heat the oil in a large skillet over medium-high heat. Add the garlic and sauté until soft and aromatic, about 3 to 4 minutes. Turn off the heat.
    ¼ cup olive oil, 4 cloves garlic
  • Add the drained beans, thyme, lemon juice, salt, and pepper to your food processor. Tilt the skillet with the garlic oil and spoon out about 2 tablespoon of the garlic oil and add to the food processor. It's okay to leave some of the sautéed garlic in the oil. Process until smooth, about 30 seconds. If the purée is too thick, add a little more lemon juice or water. Transfer to a bowl and set aside.
    1 15.5 oz can cannellini beans, 2 teaspoon thyme, 1 tablespoon lemon juice, ½ teaspoon Kosher salt, ½ teaspoon black pepper
  • Heat the skillet with the remaining garlic oil over medium heat. Add the spinach and sauté, stirring often, until it wilts, about 3 to 4 minutes. Season with salt and pepper and set aside.
    8 oz spinach

Assemble the Crostinis

  • Top each toasted bread slice with about a tablespoon of the bean puree. Then add a pinch of the sauteed spinach. Then add one strip of the roasted red bell pepper.
    2 roasted red bell peppers
  • Arrange on a serving platter and serve at once.

Video

Notes

See the video near the top of the blog post for visual guidance. If you liked the video, please subscribe to our YouTube channel. 
The bean purée and sautéed spinach can be prepared several hours before serving. We don't recommend assembling the crostinis until no more than a half hour before serving (the bread can become soggy if you assemble too far in advance).
The recipe can easily be doubled or tripled if serving a large group. 

Nutrition

Calories: 69kcal | Carbohydrates: 2g | Protein: 1g | Fat: 7g | Saturated Fat: 1g | Polyunsaturated Fat: 1g | Monounsaturated Fat: 5g | Sodium: 197mg | Potassium: 125mg | Fiber: 1g | Sugar: 0.1g | Vitamin A: 1821IU | Vitamin C: 10mg | Calcium: 26mg | Iron: 1mg

POST UPDATE: This post was originally published in December 2014, but was updated with improved tweaks to the recipe with new tips and photography and a fabulous new video in December 2023!

Gingerbread Cake with Lemon Sauce

December 13, 2023 by Kris Longwell 16 Comments

A square slice of gingerbread cake sitting in a small pool of lemon sauce and topped with a small pile of lemon zest.

This is a holiday tradition at our house, and once you try it, we think it will become one at your home, too.

Sugar and spice and everything nice is what this delicious dessert is all about. The cake is spectacular by itself, but the slightly sweet lemon sauce truly puts it over the top. It’s the perfect ending after a feast with your holiday roast and favorite side dishes. Loved by kids and adults alike.

A square slice of gingerbread cake sitting in a small pool of lemon sauce and topped with a small pile of lemon zest.

How To Make Gingerbread Cake with Lemon Sauce


NOTE: If you liked this video, please subscribe to our YouTube channel. Remember to click the little ‘bell’ icon so you’ll never miss a new video. Thank you!

The Ingredients You Will Need

The ingredients for this wonderful cake and lemon sauce are simple and many you very likely will already have on hand. A stand mixer (or hand mixer) makes bringing the batter together a snap.

For the Cake:
Flour – All-purpose
Spices – Ground cinnamon, ground ginger, and a little salt
Baking soda – Check the date, if it’s past its prime, get a new box
Butter – Unsalted
Brown sugar – Light or dark, but we prefer light
Molasses – Go with a good quality brand, if possible
Eggs – Room temperature, if possible
Milk – Whole

For the Lemon Sauce:
Sugar – Granulated
Butter – Unsalted
Cream – Heavy whipping cream is best, but half and half can be substituted
Lemon – You’ll need lemon zest and lemon juice
Cornstarch – Combined with water to make a slurry

EXPERT TIP: You can use a 9×9″ or 10×10″ pan for the cake. We highly recommend greasing the pan with softened butter (or shortening) and then dusting with flour, tapping out excess. This will ensure the cake can easily be removed from the pan, if desired.

A golden gingerbread cake batter being poured into greased and floured square metal baking pan.

Tips for Making the Perfect Gingerbread Cake

Don’t Overmix the Batter – Mix the batter until just combined to avoid overdeveloping the gluten, which can result in a tough cake.

Add lemon Zest to the Sauce – Be sure to incorporate freshly grated lemon zest into the sauce to infuse it with a bright citrus flavor that complements the rich gingerbread. A zester is a great (and inexpensive) tool to have on hand.

Warm the Sauce – Warming the lemon sauce before serving is highly recommended. Pour the warm lemon sauce over the cake to enhance its moistness and add a delightful contrast of flavors.

EXPERT TIP: To remove the cake from the pan, let it cool for about 10 minutes, and then run a sharp knife around the edges. Then, place a cutting board on the top of the pan and quickly invert. The cake should gently come right out of the pan. Next, gently use your hands to flip the cake over and onto a baking rack.

A whole square fully baked gingerbread cake sitting on a baking rack over a festive holiday place mat and in front of shiny red berries and green holly.

How To Serve and How To Store

This cake is absolutely wonderful when served warm or at room temperature. You can make the cake two to three days in advance. After slicing and cutting the cake, you can easily (and gently) reheat it in the microwave. The sauce can be gently heated over medium-low heat in a saucepan on the stove.

Be sure to save extra lemon zest to top each sauced piece of cake before you serve it o guests.

The cake can easily be stored in a container with a tight-fitting lid, either in the refrigerator or on the counter. The cake can also be frozen for up to 2 months. Allow to completely thaw and come to room temperature before serving.

A square piece of gingerbread cake being lifted with a metal spatula from the entire cake.

Other Classic Holiday Dessert Recipes to Try

There are so many things to love about the Christmas season. Holiday sweet treats are near the top of that list. Here are some of our favorites that we’re pretty sure you and your family will love, too:

Yule Log (Bûche de Noël)
Holiday Chocolate Toffee
Red Velvet Sandwich Cookies
Classic Red Velvet Cake
Christmas Bundt Cake
Homemade Pecan Pie
Biscotti with Pistachios and Dried Cherries
Homemade Monkey Bread
Grandma’s Homemade Kolaches

These are all nothing short of amazing and we love them all. But, in the meantime, isn’t this cake catching your eye?

A large silver spoon being used to drizzle a lemon sauce over a square piece of gingerbread cake.

This incredibly delicious dessert is quintessential holiday fare.

It is also surprisingly easy to make and can even be prepared a day or two in advance.

If desired, you could substitute a cream cheese topping in place of the lemon sauce, but, we have to say, the lemon sauce is truly something special. It just goes so well with the gingerbread cake.

Every single bite is a holiday celebration to remember!

A straight-on view of a square piece of gingerbread cake with lemon sauce sitting on a white dessert plate with a bite out of it.

Ready to make the best Christmas dessert in town? Go for it!

And when you do, be sure to take a photo of it, post it on Instagram, and tag @HowToFeedaLoon and hashtag #HowToFeedaLoon!

A straight-on view of a square piece of gingerbread cake with lemon sauce sitting on a white dessert plate with a bite out of it.
Print Recipe
5 from 4 votes

Gingerbread Cake with Lemon Sauce

Gingerbread Cake with Lemon Sauce is the perfect holiday dessert! What spells the holidays more than gingerbread? Match it with this luscious lemon sauce, and you'll be in holiday heaven!
Prep Time15 minutes mins
Cook Time35 minutes mins
Resting time15 minutes mins
Total Time1 hour hr 5 minutes mins
Course: Dessert
Cuisine: Dessert
Servings: 8 people
Calories: 568kcal
Author: Kris Longwell

Equipment

  • 9x9" or 10x10" baking pan or dish

Ingredients

  • 2½ cups all-purpose flour plus extra for dusting pan
  • 1½ teaspoon cinnamon ground
  • 1 teaspoon ginger ground
  • ½ teaspoon baking soda
  • ½ teaspoon salt
  • ½ cup unsalted butter 1 stick, softened
  • ¾ cup brown sugar light
  • ¾ cup molasses
  • 2 eggs
  • 1 cup whole milk

For the Lemon Sauce

  • 1 cup granulated sugar
  • ½ cup unsalted butter 1 stick
  • ¾ cup heavy cream
  • 1 tablespoon lemon juice
  • 2 teaspoon lemon zest
  • 2 tablespoon cornstarch with 2 tablespoon water

Instructions

  • Preheat oven to 350°F.
  • Grease the 9x9 (or 10x10) baking pan and dust with flour.
  • Combine flour, cinnamon, ginger, baking soda, and salt in a medium bowl.
    2½ cups all-purpose flour, 1½ teaspoon cinnamon, 1 teaspoon ginger, ½ teaspoon baking soda, ½ teaspoon salt
  • In a stand mixer (or with a hand mixer), cream (mix) together the butter and sugar on medium speed until light and fluffy, about 4 to 5 minutes.
    ½ cup unsalted butter, ¾ cup brown sugar
  • Add molasses and then eggs one at a time. Mix until completely combined.
    ¾ cup molasses, 2 eggs
  • Add flour mixture alternately with milk. (Add about a third of the flour mixture, then a third of the milk, and repeat until all is in the bowl). Mix just until combined. Don't overmix!
    1 cup whole milk
  • Pour batter evenly into prepared pan.
  • Bake for 30 to 35 minutes, or until a toothpick inserted in the center comes out clean.
  • Cool on a wire rack.
  • Top with lemon sauce and sprinkle with grated lemon zest.

Make the Lemon Sauce

  • Combine the sugar, butter, cream, lemon juice, and lemon zest in a medium saucepan. Cook over medium heat until butter is melted, stirring constantly
    1 cup granulated sugar, ½ cup unsalted butter, ¾ cup heavy cream, 1 tablespoon lemon juice, 2 teaspoon lemon zest
  • Reduce heat to low and simmer for a few minutes. Stir in the cornstarch slurry (2 tablespoon cornstarch combined with 2 tablespoon water). Continue stirring until slightly thickened. Remove from the heat and let cool for at least 10 minutes (it will continue to thicken as it cools off).
    2 tablespoon cornstarch

Video

Notes

See the video near the top of the blog post for visual guidance. If you liked the video, please subscribe to our YouTube channel. 
The cake can be made up to 3 days before serving, although, fresh out of the oven (and then resting about 15 minutes) is pretty amazing. The sauce can be made a day or so in advance, too, simply reheat over low heat in a saucepan on the stove. 
Leftovers will keep covered on the counter for 5 days or in the fridge for a week. The cake can also be frozen for up to 2 months. Let thaw completely and then bring to room temperature before serving. 

Nutrition

Calories: 568kcal | Carbohydrates: 101g | Protein: 7g | Fat: 26g | Saturated Fat: 12g | Cholesterol: 136mg | Sodium: 283mg | Potassium: 604mg | Fiber: 1g | Sugar: 70g | Vitamin A: 1146IU | Vitamin C: 1mg | Calcium: 155mg | Iron: 4mg

POST UPDATE: This post was originally published in December 2014, but was updated with improved tweaks to the recipe with new tips and photography and a fabulous new video in December 2024! 

Chocolate Toffee with Almonds

December 10, 2023 by Kris Longwell 17 Comments

A close-up view of a stack of square chunks of chocolate toffee with almonds sitting on brown wax paper.

If there was ever a candy that was made for the holiday season, this has got to be right near the top of the list!

One of our favorite culinary components of the holidays is Christmas candy. Our family has a tradition of feasting on a big bowl of chili and homemade cornbread on Christmas Eve, and then enjoying these delectable sweet treats while opening gifts. We do recommend doubling or tripling the recipe as it always goes fast! Happy Holidays!

A close-up view of a stack of square chunks of chocolate toffee with almonds sitting on brown wax paper.

How To Make Chocolate Toffee with Almonds

The Ingredients You Will Need

There are really just a handful of ingredients needed to make the classic candy. Here’s what you’ll need to have on hand:

Nuts – We love sliced almonds, but you could use whatever your favorite nut is. Pecans are delicious.
Butter – Unsalted (and a little water)
Sugar – Granulated
Milk chocolate – We love Hershey’s milk chocolate bars, but you could also use morsels (used in cookies). Dark chocolate and white chocolate are delicious, too.
Coarse sea salt – This is optional, but we love the depth of flavor it adds.

EXPERT TIP: The most important part of making perfect toffee is to start by heating the butter, water, and sugar over low heat. Once it starts to gently boil, keep gradually increasing the heat (not too fast) until you reach a peanut butter color, and most importantly, your candy thermometer reaches 305°F.

Warm toffee being poured from a metal bowl onto sliced almonds spread over parchment paper on a silver baking pan.

Tips for Making Perfect Chocolate Toffee

Use a Candy Thermometer – To ensure the toffee reaches the correct temperature and consistency, use a candy thermometer to monitor the cooking process closely.

Stir Consistently – Stir the toffee mixture constantly to prevent it from burning and to ensure even cooking.

Allow Proper Cooling Time – Allow the toffee to cool at room temperature or in the refrigerator until it reaches the desired hardness before breaking it into pieces. We recommend at least 1 to 2 hours.

EXPERT TIP: Have your chocolate bars unwrapped and ready to go before you start making the toffee. Once you pour the toffee over the almonds, you need to immediately place the chocolate over the hot toffee. And then wait a few minutes, and then start smearing the melty chocolate with a spatula or knife.

Two small red spatulas being used to smear Hershey chocolate bars that are partially melting over a layer of warm toffee on top of almond slivers.

How To Serve and Store

It’s very important to allow the toffee to completely harden before storing and serving. Otherwise, the chocolate will be soft and make guests have messy fingers.

We use a large, sharp knife to cut the toffee into square or rectangular pieces. You could also break the bark into pieces with your hands.

Store them in holiday tins or any kind of container with a tight-fitting lid. We like to keep ours refrigerated, but that’s not completely necessary.

An overhead view of a rectangular shape of sliced almonds topped with toffee and then melted chocolate.

Other Holiday Sweet Recipes to Try

We just love the holidays. And these sweet creations are part of the reason why. These are some of our favorite recipes, and we’re certain you and your loved ones will feel the same way:

Red Velvet Sandwich Cookies

Homemade Peppermint Bark
Grandma’s Red Velvet Cake
Christmas Bundt Cake
Holiday Spiced Nuts
Biscotti with Pistachios and Cherries
Traditional Pecan Pie
Sweet Potato Pie with Pecan Topping
Homemade Monkey Bread

These are all perfect for celebrating the holiday season. But, in the meantime, aren’t these sweet treats grabbing your eye?

A close-up view of a pile of chocolate toffee with almond and sea salt in a festive red and white checkered Christmas tin.

We have loved this chocolate toffee during the holiday season for many, many years.

It is fun to prepare, and be sure to follow these steps closely, and you’ll get perfect toffee every single time. Be sure not to cook the butter and sugar mixture over too high of heat.

Merry Christmas to all, and the happiest of holidays to your family from ours!

An overhead view of a Christmas candy tin filled with square pieces of chocolate toffee with red ribbon along the side of the tin.

Ready to make the best holiday sweet treat this side of the North Pole? Go for it!

And when you do, be sure to take a photo of it, post it on Instagram, and tag @HowToFeedaLoon and hashtag #HowToFeedaLoon!

A close-up view of a stack of square chunks of chocolate toffee with almonds sitting on brown wax paper.
Print Recipe
5 from 2 votes

Holiday Chocolate Toffee

Chocolate Toffee with Almonds is the perfect holiday sweet treat. It's super easy to make and is everyone's favorite candy! Be sure to top it off with some nice coarse sea salt, or finishing salt...it adds a layer of flavor that is incredible.
Prep Time10 minutes mins
Cook Time15 minutes mins
Resting / Chill Time1 hour hr 30 minutes mins
Total Time1 hour hr 55 minutes mins
Course: Candy
Cuisine: Holiday Dessert
Servings: 8 people
Calories: 413kcal
Author: Kris Longwell

Equipment

  • Parchment paper
  • Candy thermometer

Ingredients

  • 1½ cups almonds sliced
  • 1 cup unsalted butter 2 sticks
  • 2 tablespoon water
  • 1 cup sugar
  • ½ teaspoon vanilla extract
  • 7 milk chocolate bars unwrapped
  • coarse sea salt optional

Instructions

  • Place a piece of parchment paper (about 10x12") on a baking pan or cutting board.
  • Spread the almonds across the parchment paper.
    1½ cups almonds
  • In a medium-sized saucepan, melt the butter with the water and sugar over low heat, stirring frequently. Once the mixture starts to gently boil, slowly and gradually increase the heat. Use a candy thermometer to keep an eye on the temperature of the toffee. The mixture should begin to turn an amber color. Stir continuously, but not too vigorously. Once the temperature reaches 305°F, take the pan off the heat and stir in the vanilla extract. Once combined, immediately pour the toffee over the almonds.
    1 cup unsalted butter, 2 tablespoon water, 1 cup sugar, ½ teaspoon vanilla extract
  • Place the unwrapped chocolate bars over the warm toffee. Let it rest for about 5 minutes. Use a spatula (or the back of a spoon) to smear the melty chocolate until smooth.
    7 milk chocolate bars
  • Sprinkle the sea salt over the top, if desired. We think it adds great flavor, but don't overdo it!
    coarse sea salt
  • Allow the chocolate toffee to rest on the counter or in the refrigerator for 1 to 2 hours (or overnight) until fully set and solid.
  • Use a sharp knife to cut the toffee into pieces (or break it up with your hands).
  • Store in a container with a tight-fitting lid.

Video

Notes

See the video near the top of the blog post for visual guidance. If you liked the video, please subscribe to our YouTube channel. 
The most important thing to remember when making the toffee is to keep the temperature low, especially at the beginning. After the butter melts, bring the heat up just enough for the mixture to barely come to a boil. Then, slowly and gradually, continue increasing the heat until it turns the color of peanut butter and, most importantly, reaches 305°F on your candy thermometer. 
If your butter and sugar separate during the heating process, add 2 teaspoons of water and use a whisk to vigorously mix the mixture. This should help bring it back together. 
Be sure to let the chocolate completely cool before breaking up the toffee. We keep the toffee in a container in the fridge, but you can also store it on the counter. 
The toffee will keep for a couple of weeks. 

Nutrition

Calories: 413kcal | Carbohydrates: 31g | Protein: 6g | Fat: 22g | Saturated Fat: 9g | Polyunsaturated Fat: 4g | Monounsaturated Fat: 7g | Trans Fat: 1g | Cholesterol: 61mg | Sodium: 876mg | Potassium: 204mg | Fiber: 3g | Sugar: 26g | Vitamin A: 709IU | Calcium: 80mg | Iron: 1mg

POST UPDATE: This post was originally published in December 2017, but was updated with improved tweaks to the recipe with new tips and photography and a fabulous new video in December 2023!

Fried Cauliflower with Lemon

December 6, 2023 by Kris Longwell 4 Comments

An overhead view of a black circular plate filled with a pile of fried cauliflower with lemon with a row of lemon wedges off to the side of the plate.

We first learned about this amazing dish when we were researching classic dishes that are enjoyed by families during Hanukkah.

It is a traditional Sephardic dish, and we just love the texture and flavor. It is such a delicious combination of spice, lemon, and crunchy-on-the-outside and tender-on-the-inside. All you need is a little extra coarse sea salt and a few squeezes of lemon. However, it would be delicious served with our Rosemary and Garlic Aioli!

An overhead view of a black circular plate filled with a pile of fried cauliflower with lemon with a row of lemon wedges off to the side of the plate.

How To Make Fried Cauliflower with Lemon


NOTE: If you liked this video, please subscribe to our YouTube channel. Remember to click the little ‘bell’ icon so you’ll never miss a new video. Thank you!

The Ingredients You Will Need

There are not a lot of ingredients in this dish. Turmeric is common. We upped the flavor profile with smoked paprika and cayenne. Here’s what you’ll need to have on hand:

Cauliflower florets – Fresh is definitely best, and can be prepped hours in advance. If using frozen, let thaw completely and then dry completely.
Flour – All-purpose.
Seasonings – Turmeric, cayenne, smoked paprika, salt, and pepper. Turmeric can be found in the ‘gourmet’ spice section of most well-stocked supermarkets.
Lemon zest – From 2 large lemons. Use a zester, microplaner, or the small holes on a box grater.
Eggs – Lightly beaten.
Oil – For frying. Canola oil or vegetable oil are great choices.
Parsley, lemon wedges, sea salt – For garnish.

EXPERT TIP: Boiling the cauliflower florets for 4 to 5 minutes helps to achieve the ideal texture. Don’t boil for more than 5 minutes, and we recommend immediately transferring them to an ice bath to stop the cooking. Over-cooking them will result in “mushy” cauliflower.

An overhead view of a medium-sized pasta pot filled with cauliflower florets that are being boiled.

Tips for Perfect Fried Cauliflower with Lemon

Cut into Uniform Florets – Cutting the cauliflower into uniform florets ensures even cooking and consistent texture.

Coat Evenly – Make sure to coat the cauliflower florets evenly with the seasoning mixture to ensure that each piece is well-seasoned.

Fry in Batches – Fry the cauliflower in batches to prevent overcrowding the pan, which can lead to uneven cooking and soggy results.

Squeeze Lemon Juice Before Serving – Squeeze fresh lemon juice over the fried cauliflower just before serving to add a bright, citrusy flavor that complements the earthy spices and adds a refreshing touch.

EXPERT TIP: Be sure to dry the cauliflower thoroughly before dredging in the seasoned flour and eggs. Also, sprinkling the cauliflower with salt before dredging ensure they are sufficiently seasoned. Placing the battered florets back in the flour will yield extra crispy cauliflower.

Three images with the first being a person dredging cauliflower florets in a pan filled with seasoned flour, and then the florets in an egg bath, and then back in the flour again.

How To Serve

As mentioned, this is a popular dish to serve during the Hanukkah season. It’s wonderful to set out as an appetizer before the main feast, but it also makes a nice side dish.

Be sure to have plenty of lemon wedges and coarse sea salt for guests to help themselves.

These are definitely best served piping hot, soon after frying. You can do all of the prep up to dredging the florets hours in advance.

A close-up view of a black plate filled with a pile of fried cauliflower topped with chopped parsley and coarse sea salt.

Other Delicious Hanukkah Recipes to Try

There are so many wonderful options for dishes when developing a Hanukkah feast. Here are a few of our favorites.

Matzo Ball Soup (not traditional at Hanukkah, but is perfectly acceptable).
Classic Latkes (Potato Pancakes)
Maple Glazed Carrots
Slow-Cooker Brisket
Brisket with Carrots and Apricots
Hasselback Potatoes
Jelly-Filled Doughnuts

And, once again, these amazing fried pieces of cauliflower will round out an ideal Hanukkah feast.

A person squeezing a lemon wedge over black circular plate filled with fried cauliflower and lemon wedges.

Whether you celebrate Hanukkah or not, you will absolutely love this dish.

We love to whip up a batch when watching the big game on Sunday, having friends over, or just looking for an appetizer that’s different than standard hot wings!

Every time we serve this fried cauliflower, we get rave reviews and folks always want the recipe. So tasty and beautiful, too!

A close-up view of a piece of fried cauliflower with lemon that has been pierced with a fork and is being held up.

Ready to make the best holiday (or anytime) appetizer in town? Go for it!

And when you do, be sure to take a photo of it, post it on Instagram, and tag @HowToFeedaLoon and hashtag #HowToFeedaLoon!

An overhead view of a black circular plate filled with a pile of fried cauliflower with lemon with a row of lemon wedges off to the side of the plate.
Print Recipe
No ratings yet

Fried Cauliflower with Lemon

This Fried Cauliflower with Lemon is so flavorful and we just love the crunchy outside and the soft cauliflower on the inside. This is perfect for Hanukkah or really any time of the year. So flavorful, and just so delicious!
Prep Time20 minutes mins
Cook Time12 minutes mins
Total Time32 minutes mins
Course: Appetizer, Side Dish
Cuisine: Jewish
Servings: 6 people
Calories: 194kcal
Author: Kris Longwell

Equipment

  • Sturdy skillet for frying

Ingredients

  • 1 large cauliflower cored and cut into 1" florets.
  • Kosher salt
  • canola oil or vegetable, for frying
  • 1½ cups all-purpose flour
  • 1 tablespoon ground turmeric
  • 1 tablespoon smoked paprika
  • 1 teaspoon cayenne pepper
  • 1 teaspoon black pepper plus more, to taste
  • 2 tablespoon lemon zest plus lemon wedges for serving
  • 4 eggs
  • 1 tablespoon fresh parsley chopped, for garnish
  • Coarse sea salt for finishing, optional

Instructions

  • Bring a large pot of salted water to a boil.
  • Add cauliflower and cook until just tender, about 5 minutes.
    1 large cauliflower
  • Using a slotted spoon, transfer to an ice bath, then drain and pat dry with paper towels. Sprinkle the cauliflower all over with salt.
    Kosher salt
  • Heat 2" oil in a large saucepan until a deep-fry thermometer reaches 350°F, or when a small piece of bread turns golden in the oil after about 1 minute.
    canola oil
  • In a large bowl, mix the flour, turmeric, cayenne, paprika, 2 teaspoons salt, pepper, and lemon zest.
    1½ cups all-purpose flour, 1 tablespoon ground turmeric, 1 tablespoon smoked paprika, 1 teaspoon cayenne pepper, 1 teaspoon black pepper, 2 tablespoon lemon zest
  • In a separate bowl, whisk the eggs.
    4 eggs
  • Working in batches, dredge the cauliflower in the seasoned flour, shaking off excess, then into the eggs, shaking off excess, and then back into the flour for another dredging.
  • Fry, flipping as needed, until golden and crisp, about 4 to 5 minutes.
  • Using a slotted spoon, transfer to paper towels to drain.
  • Place on a platter, sprinkle parsley on top, and a little coarse sea salt (if using). Serve at once with lemon wedges on the side.
    1 tablespoon fresh parsley, Coarse sea salt

Video

Notes

See the video near the top of the blog post for visual guidance. If you liked the video, please subscribe to our YouTube channel. 
We recommend using freshly cut cauliflower, however, if using frozen, make sure it is fully thawed and then completely dried. 
These are definitely best served piping hot, soon after being fried. For this particular dish, we don't recommend oven-baking in place of frying. Don't squeeze the fresh lemon juice on the fried cauliflower until just before serving, or, let guests squeeze the lemon wedge on their own. 
Leftovers will keep for a day or so but they will lose their crunch. 

Nutrition

Calories: 194kcal | Carbohydrates: 32g | Protein: 10g | Fat: 12g | Saturated Fat: 2g | Cholesterol: 109mg | Sodium: 473mg | Potassium: 507mg | Fiber: 4g | Sugar: 3g | Vitamin A: 337IU | Vitamin C: 71mg | Calcium: 55mg | Iron: 3mg

POST UPDATE: This recipe was originally published in December 2017, but was updated with improved tweaks to the recipe with new tips and photography, and a fabulous new video in December 2023!

Green Enchilada Casserole with Chicken

December 3, 2023 by Kris Longwell 4 Comments

A square slice of a green enchilada casserole with layers of roasted chicken, sauce, roasted peppers, and melted cheddar cheese.

If you love Mexican cuisine and if you love a good casserole, this recipe is bound to be a favorite.

One of our favorite dishes to serve is Chicken Enchiladas with Verde (Green) Sauce. This recipe is similar to that but in casserole form. We give you several options for bringing the dish together. It can be a quick dish to bring to the table on a weeknight, or you can go the extra distance, and turn it into a fun weekend project. Either way is a true family favorite casserole!

A square slice of a green enchilada casserole with layers of roasted chicken, sauce, roasted peppers, and melted cheddar cheese.

How To Make Green Enchilada Casserole with Chicken


NOTE: If you liked this video, please subscribe to our YouTube channel. Remember to click the little ‘bell’ icon so you’ll never miss a new video. Thank you!

The Ingredients You Will Need

As mentioned, there are some shortcuts you can take when putting together this casserole, especially if you’re pressed for time. We’ve outlined these shortcuts (or substitutions) below.

For the Green (Verde) Sauce (you can easily use quality canned sauce, rather than making it from scratch).

Tomatillos – Found in the produce section of many well-stocked supermarkets, or at farmer’s markets.
Serrano chilis – Be sure to remove the seeds, unless you want your sauce to be spicy. Jalapeño pepper can be substituted.
Onion – A large white onion, cut into slices, works great, but you can also use a yellow or red onion.
Garlic – Peeled and cut in half, lengthwise.
Cilantro – Fresh is best.
Oil – Vegetable, peanut, or canola are all acceptable options.
Broth – Chicken or vegetable. For the deepest flavor, make the broth or stock from scratch.
Mexican crema – Found in the dairy section of many well-stocked supermarkets, or at Hispanic markets. Half and half, heavy cream, or sour cream thinned with milk are all perfectly fine substitutes.
Seasoning – Salt and pepper.

For the Casserole:
Corn tortillas – Quickly passed through hot vegetable oil in a skillet. You can skip this step and simply heat them for a minute or two in your microwave. You want them very pliable.
Oil – Vegetable (for the tortillas)
Roasted chicken – Roast 2 large bone-in, skin-on chicken breasts that have been brushed with oil and seasoned with salt and pepper. Rotisserie chicken makes a great substitution.
Roasted poblanos – Be sure to remove as many seeds as possible. Green bell peppers can be substituted, but the flavor will be not the same. You can find whole green chiles (poblanos) in the Mexican/Hispanic section of many markets.
Cheese – Shredded cheddar and Monterey Jack are excellent options.
Toppings – Pico de gallo and sour cream are our favorites.

EXPERT TIP: Poblano peppers are mild and can be found in the produce section of many supermarkets. Roast them about 6 inches under the broiler until charred in place. Place in a bowl and cover for 15 minutes. The skin can then be easily peeled off. Cut away the stem and pod of seeds.

A person holding up a poblano pepper that has been roasted and cut open with the seeds removed.

Tips for Make Perfect Green Enchilada Casserole with Chicken

When Possible, Use Fresh Ingredients – Opt for fresh, high-quality ingredients such as tomatillos, poblanos and roasted chicken for the best flavor and texture.

Layer the Components Evenly – Layer the corn tortillas, roasted chicken, green enchilada sauce, and roasted tomatillo peppers evenly to ensure that each bite has a balanced combination of flavors.

Allow the Flavors to Meld – Let the casserole sit for a few minutes after baking to allow the flavors to meld together, resulting in a more cohesive and flavorful dish. It also won’t burn your guests’ tongues!

Garnish with Fresh Toppings – Garnish the casserole with fresh toppings such as fresh pico de gallo, guacamole, chopped jalapeños, and/or a drizzle of crema (or sour cream) to add brightness and contrast to the dish.

EXPERT TIP: The recipe for the green sauce might make a little more than you need. But, don’t skimp when layering the casserole. The tortillas will absorb much of the sauce, adding to the taste and texture. If you have extra, save for another use, or ladle some on each plate before adding a slice of the casserole.

Three images showing first roasted poblano peppers being placed in a dish, and then green sauce being ladled over the peppers, and then that being topped with shredded cheese.

How To Serve, Store, and Reheat

This recipe, as written, serve about 12 people. However, it can easily be cut in half, and leftovers keep wonderfully for up to 5 to 7 days.

As mentioned, it’s best to allow the casserole to rest for at least 10 to 15 minutes, not only to cool a bit, but to let the flavors continue to meld.

If you have extra sauce, ladle a small pool in the center of each plate and the place a serving of the casserole on top. You can’t have too much of this amazing sauce.

Leftovers are amazing, and, possibly even better the next day! Simply bake (covered) in a 350°F for about 30 minutes, or until heated through and serve with your favorite toppings.

An overhead view of a nine by thirteen white casserole dish filled with a tortillas, cheese, roasted peppers, and enchilada sauce, baked until golden.

Other Comforting Casserole Recipes to Try

Everyone loves a good casserole, right? They are perfect for serving a hungry family, or bringing to a fun potluck dinner. Here are some of our favorite that we’re certain you and your family will love, too:

King Ranch Casserole
Chicken Spaghetti Casserole
The Best Tuna Casserole
Broccoli and Cheddar Casserole with Rice
Chili Cheese Dog Casserole
Chicken and Sage Casserole
Oyster Casserole
Chicken and Rice Casserole with Broccoli and Cheese
Mexican Lasagna

These are all so comforting, without a doubt. But, in the meantime, isn’t this dish of pure comfort food calling your name?

A close-up view of a green enchilada casserole with a serving missing in a white dish with pico de gallo sprinkled on top.

This casserole truly hits all the right boxes. It’s easily adaptable to tastes, budgets, and timeframes.

It is always a family favorite.

And leftovers are even better the next day. Make this and get ready for endless rave reviews!

A square slice of a green enchilada casserole being raised up on a metal spatula.

Ready to make the most comforting casserole this side of El Paso? Go for it!

And when you do, be sure to take a photo of it, post it on Instagram, and tag @HowToFeedaLoon and hashtag #HowToFeedaLoon!

A straight-on view of a square slice of green enchilada casserole topped with chopped tomatoes and cilantro.
Print Recipe
No ratings yet

Green Enchilada Casserole with Chicken

This casserole is the ultimate in Tex-Mex/Mexican comfort food. You can take shortcuts and use canned roasted chiles and even green enchilada sauce, if desired. You can even use crushed corn tortilla chips in place of the corn tortillas, or go with flour tortillas! And, the recipe can easily be cut in half.
Prep Time30 minutes mins
Cook Time1 hour hr 30 minutes mins
Resting Time10 minutes mins
Total Time2 hours hrs 10 minutes mins
Course: Entree
Cuisine: American / TexMex
Servings: 10
Calories: 547kcal
Author: Kris Longwell

Equipment

  • 9"x13" baking dish

Ingredients

  • 12 poblano peppers Or a large can of roasted chiles (1 lb)

For the Green Chili Sauce

  • 2 lbs tomatillos husks removed
  • 3 to 4 serrano peppers stems removed
  • 1 large white onion cut into thick slices
  • 6 cloves garlic slice in half, lengthwise
  • ½ cup cilantro fresh, roughly chopped
  • ¼ cup vegetable oil
  • 4 cups chicken broth or vegetable broth
  • 1½ cups Mexican crema or half and half
  • 1½ teaspoon Kosher salt
  • ½ teaspoon black pepper

For Assembling the Casserole

  • vegetable oil for quick-frying tortillas
  • 18 corn tortillas
  • 4 cups rotisserie chicken 2 chickens, meat removed and chopped
  • Salt and pepper
  • 4 cups shredded cheese cheddar and/or Monterey Jack
  • 2 tablespoon cilantro chopped, for garnish
  • pico de gallo or salsa, for serving
  • sour cream or Mexican crema, for serving

Instructions

Do Ahead - Roast the Peppers

  • Turn your broiler to HIGH and place the top rack 6 inches from the heating element.
    12 poblano peppers
  • Place the peppers on a baking pan and put on the rack. Roast for about 10 minutes, turning the peppers once they start to blacken. The peppers will be charred in places but not completely burned.
  • Put the peppers in a heat-proof bowl and cover with plastic wrap for 15 minutes.
  • Remove the peppers from the bowl and when cool enough to handle, use your fingers to pull the skin away. Use a knife to remove the stem and then cut open the pepper, and remove the pod of seeds. Repeat with all peppers. Set aside.

Make the Green (Verde) Sauce

  • Position a rack 6 inches under the broiler in your oven. Turn the broiler to HIGH.
  • Place the tomatillos, serrano peppers, onion slices, and garlic on a baking pan or dish. Place on the rack under the broiler and roast until slightly charred, about 10 to 12 minutes.
    2 lbs tomatillos, 3 to 4 serrano peppers, 1 large white onion, 6 cloves garlic
  • Carefully transfer the roasted vegetables to a blender (or food processor). Add the cilantro and blend until smooth, about 30 seconds.
    ½ cup cilantro
  • Heat the oil (2 tbsp) in a large saucepan over medium heat. Add the tomatillo mixture and cook, stirring often, for about 3 to 5 minutes. Add the broth and simmer until the sauce is thick enough to coat the back of a spoon, about 20 minutes.
    ¼ cup vegetable oil, 4 cups chicken broth
  • Remove from heat and stir in the cream, 1½ teaspoon of salt and ½ teaspoon black pepper. Set aside.
    1½ cups Mexican crema, 1½ teaspoon Kosher salt, ½ teaspoon black pepper

Assemble the Casserole

  • Heat oven to 350°F.
  • Heat 1 tablespoon vegetable oil in a medium-sized skillet over medium heat. Carefully pass a tortilla through the hot oil, flipping immediately. Place on a paper towel-lined plate. Repeat with remaining tortillas. Each tortilla should only be in the oil for a few seconds. Use a spatula, or two forks to handle the tortillas.
    18 corn tortillas, vegetable oil
  • Use a ladle to spread about a quarter of the sauce across the bottom of a 9x13" baking dish. Add a layer of tortillas (4 whole tortillas and then another one cut in half. See video for reference). Add another layer of sauce. Place half of the chicken over the sauce. Sprinkle salt over the chicken (unless it is already salted). Top with one-third of the cheese and half of the roasted poblanos. Add another layer of tortillas, and then a layer of sauce, the rest of the chicken, and the rest of the poblanos. Top with one more layer of tortillas, a final layer of sauce, and then cheese.
    4 cups rotisserie chicken, Salt and pepper, 4 cups shredded cheese
  • Bake the casserole for 25 to 30 minutes, or until lightly browned on top and bubbly. Let rest for 5 to 10 minutes before slicing. Garnish with chopped cilantro, and passed pico de gallo and sour cream (or Mexican crema).
    pico de gallo, sour cream, 2 tablespoon cilantro

Video

Notes

See the video near the top of the blog post for visual guidance. If you liked the video, please subscribe to our YouTube channel. 
To roast your own chicken, lightly brush two chicken bone-in, skin-on chicken breasts with olive oil and then season with salt and pepper. Roast in a 350°F for 40 minutes, or until an internal temperature of 165°F is reached. Let cool and then pull the meat from the bone and either chop or shred. 
Quick-frying the corn tortillas makes them pliable and gives them the authentic enchilada taste. However, you can wrap them in a lightly damp paper towel and then place them in the microwave and cook on HIGH for 30 seconds to one minute. This will make them pliable. 
Leftovers will keep (covered) in the fridge for 5 to 7 days. Reheat (covered with foil) in a 350°F oven for 20 to 30 minutes. The casserole can be frozen for up to 3 months.  

Nutrition

Calories: 547kcal | Carbohydrates: 39g | Protein: 43g | Fat: 21g | Saturated Fat: 8g | Polyunsaturated Fat: 1g | Monounsaturated Fat: 3g | Cholesterol: 147mg | Sodium: 1481mg | Potassium: 672mg | Fiber: 8g | Sugar: 10g | Vitamin A: 1174IU | Vitamin C: 128mg | Calcium: 353mg | Iron: 2mg

Seared Shishito Peppers

November 29, 2023 by Kris Longwell 6 Comments

An overhead view of a white serving plate filled with a pile of seared shishito peppers all next to a couple of limes and a small jar of sea salt.

These gems are always such a crowd-pleaser and couldn’t be easier to make!

Legend has it that 9 out of 10 shishito peppers are very mild, but that the tenth pepper has some major heat!  Well, that isn’t just legend, it’s true, but don’t worry, the hot ones aren’t that hot. You will be amazed at how guests will gather around the stove as you sear these up. They are addictively delicious! And come together in minutes!

An overhead view of a white serving plate filled with a pile of seared shishito peppers all next to a couple of limes and a small jar of sea salt.

How to Make Seared Shishito Peppers


NOTE: If you liked this video, please subscribe to our YouTube channel. Remember to click the little ‘bell’ icon so you’ll never miss a new video. Thank you!

The Ingredients You Will Need

The shishito peppers are clearly the star of this wonderful appetizer. All you need is a little citrus and coarse salt to bring them to life. Here’s what you’ll need to have on hand:

Oil – Olive, vegetable, or canola are all good choices.
Shishito peppers – Found in the produce section of many supermarkets, as well as Trader Joes, Sprouts, Whole Foods, or you can order them online.
Lime zest – From a couple of fresh limes. If you don’t have a zester, you can rub a line on the small wholes of a box graters.
Shallots – Finely chopped. This is optional, but we think it adds a nice addition to the flavor of the peppers. Don’t add them until the peppers are almost ready. If you add them too soon, they will burn.
Coarse salt – Also know as finishing salt. Maldon Sea Salt is fantastic, but any kind of coarse sea salt will work, too.

EXPERT TIP: As shishito peppers continue to ripen, they will go from green to red. The red peppers carry much more heat. Look for a bag with all green peppers, or mostly all green.

A person holding a bunch of uncooked shishito peppers in the palms of his hands.

Tips for Making Perfect Seared Shishito Peppers

Use a Hot Skillet – A hot skillet is key for getting a nice sear on the peppers without overcooking them.

Don’t Overcrowd the Skillet – Cook the peppers in batches if necessary to avoid overcrowding the skillet, which can cause them to steam instead of sear.

Season Generously: Season the peppers generously with coarse sea salt to bring out their flavor and add texture, and top with finely chopped shallots and lime zest for a bright, zesty finish. Remember, don’t add the shallot until the very end.

A large stainless steel skillet filled with shishito peppers and chopped shallots that are being sautéed.

Other Party Appetizer Recipes to Try

The following recipes are some of favorite appetizers to serve when we’re having a gathering of family and friends.

Sausage-Stuffed Mushrooms
Parmesan Bacon Gougères (Puff Balls)
Philly Cheesesteak Egg Rolls (to come)
Sausage, Bean, and Spinach Dip
Southern Crab Beignets
Spanish-Style Garlic Shrimp
Oysters Rockefeller
Beef Negimaki
Pork Pot Stickers

These are all spectacular in their own right. But, in the meantime, aren’t these gems catching your eye?

A person holding up a single seared shishito pepper that has been sprinkled with lime zest and coarse sea salt.

If you are looking for a new party appetizer that is sure to be a big hit with guests, these shishito peppers will surely fit the bill.

Be sure to warn your party-goers that every now and then someone may get a pepper that packs some heat.

And be sure let everyone gather round as you sear them in the skillet. Serve nice and hot and get ready for rave reviews!

A straight-on view of a white serving dish filled with seared shishito peppers that are topped with coarse sea salt and lime zest.

Ready to make the best party appetizer in town? Go for it!

And when you do, be sure to take a photo of it, post it on Instagram, and tag @HowToFeedaLoon and hashtag #HowToFeedaLoon!

An overhead view of a white serving plate filled with a pile of seared shishito peppers all next to a couple of limes and a small jar of sea salt.
Print Recipe
No ratings yet

Seared Shishito Peppers

These seared shishito peppers really might be the perfect finger party food appetizer. So delicious and so simple to make. They are mild (well, most of them are) and so flavorful. Delicious!
Prep Time5 minutes mins
Cook Time15 minutes mins
Total Time20 minutes mins
Course: Appetizer
Cuisine: American / Japanese
Servings: 6 people
Calories: 28kcal
Author: Kris Longwell

Equipment

  • 1 Large skillet

Ingredients

  • 1 tablespoon olive oil
  • 8 oz. shishito peppers
  • Zest 2 limes
  • Coarse sea salt to taste
  • ¼ cup shallot minced (optional)

Instructions

  • Heat the oil over medium heat. Toss in the peppers, and cook, stirring occasionally.
    1 tablespoon olive oil, 8 oz. shishito peppers
  • After the pepper skins have started to blister slightly, add a pinch of the lime zest and a pinch of the sea salt. Stir to incorporate.
    Zest 2 limes, Coarse sea salt
  • Once tender and lightly blistered (about 8 - 10 minutes), remove from heat and stir in the shallots.
    ¼ cup shallot
  • Transfer to a serving platter and garnish with a little more lime zest and plenty of sea salt (to taste).

Video

Notes

See the video near the top of the blog post for visual guidance. If you liked the video, please subscribe to our YouTube channel. 
Shishito peppers can be found in the produce section of some supermarkets. Trader Joe's, Sprouts, and Whole Foods also carry them. They can also be purchased online. 
These are best served nice and hot right out of the skillet, but they are still incredibly tasty even after they've cooled off. 
The recipe can be doubled or tripled if serving to a crowd. We recommend doing them in batches. Folks enjoy watching them become blistered as you sear them in the skillet. 

Nutrition

Calories: 28kcal | Carbohydrates: 2g | Protein: 0.2g | Fat: 2g | Saturated Fat: 0.3g | Polyunsaturated Fat: 0.2g | Monounsaturated Fat: 2g | Sodium: 1mg | Potassium: 33mg | Fiber: 0.3g | Sugar: 1g | Vitamin A: 0.4IU | Vitamin C: 1mg | Calcium: 4mg | Iron: 0.1mg

POST UPDATE: This recipe was originally published in August 2015, but was updated with improved tweaks to the recipe with new tips and photography, and a fabulous new video in November 2023!

Tuscan Chicken with White Beans and Spinach

November 26, 2023 by The Loon 23 Comments

An overhead view of a large black cast-iron skillet filled with four pieces of Tuscan chicken with white beans and spinach.

Let’s hear it for the one-pot wonder! Everyone (well, almost everyone) loves a good chicken-chicken dinner! And this is so delicious and so easy!

We just love a dish that is easy enough for it to be a fantastic busy weeknight meal, but is also so spectacular that it could be the star attraction for a wonderful dinner party. It’s a meal all in and of itself. Finish the meal off with an Italian Rustic Ricotta Cheesecake! 

An overhead view of a large black cast-iron skillet filled with four pieces of Tuscan chicken with white beans and spinach.

How To Make Tuscan Chicken with White Beans and Spinach

The Ingredients You Will Need

The ingredients in this dish a very straightforward, and many you might already have in your pantry or fridge. Here’s what you’ll need to have on hand:

Seasonings – Salt and pepper.
Butter – Unsalted.
Chicken – We recommend bone-in, skin-on chicken thighs for great flavor. You could absolutely substitute boneless chicken thighs or breasts, too. See NOTES.
Shallots – Finely chopped, or chopped onion.
Garlic – Minced.
Herbs – Fresh basil and parsley, chopped.
White wine – Chardonnay or Sauvignon Blanc are great choices. Avoid cooking wine. If you prefer not to cook with wine, just omit it.
Chicken stock or broth – Can substitute vegetable broth, if desired.
Spinach – Baby spinach is perfectly fine. Mature spinach is a great choice, too; just be sure to thoroughly wash it and then remove the stems. If using frozen, let it completely thaw and then squeeze out all of the water.
White beans – Canned is great. Go with Cannelloni or Great Northern. Chickpeas (aka Garbanzo) would also be delicious. Be sure to drain them.
Tomatoes – Fire-roasted can be found in the canned tomato section of most well-stocked supermarkets. You could go with just regular diced tomatoes, too. Be sure to drain them.

EXPERT TIP: When you’re done searing the chicken pieces, the chicken won’t be fully cooked yet. That happens when you finish the dish off in the oven.

A straight-on view of four bone-in, skin-on chicken thighs that have been seared in butter in a cast-iron skillet.

Tips for Making Perfect Tuscan Chicken

Properly Sear the Chicken Thighs – Sear the chicken thighs in melted butter (or olive oil) in a hot skillet to develop a golden-brown crust, which will enhance the flavor and appearance of the dish.

Use Quality Ingredients – Choose high-quality fire-roasted tomatoes, fresh spinach, and white beans for the best flavor and texture.

Deglaze the Pan with White Wine – Deglaze the skillet with good-quality white wine to lift the flavorful browned bits from the bottom, adding depth and richness to the sauce. Simmer until the wine has mostly evaporated.

Simmer to Marry Flavors – Allow the dish to simmer gently to allow the flavors to meld together, creating a harmonious and well-balanced sauce.

A wooden spoon in a cast-iron skillet that is filled with a simmering sauce of white beans, spinach, and tomatoes.

How To Serve

This dish is wonderful served directly from the skillet. Make sure guests (or family members) are aware that the pot is hot.

You can also transfer the sauce to a nice, large platter and then top with the chicken and pass it family style.

Of course, you can easily plate individual servings, too. All you really need to serve alongside this dish is warm, crusty Italian bread!

A close-up view of Tuscan chicken with white beans and spinach in a large black cast-iron skillet.

Other Amazing Chicken Recipes To Try

Chicken is such a versatile protein and is loved by families around the world. Here are some of our favorites that we are sure you and your loved ones will love, too.

Creamy Tuscan Chicken
Chicken Saltimbocca with White Wine Butter Sauce
Baked Teriyaki Chicken
Caprese-Stuffed Chicken Breasts
Chicken Fricasse
Easy Chicken Florentine
Classic Chicken Piccata
Authentic Chicken Marsala
Chicken Francese
Baked Honey-Mustard Chicken
Classic Mexican Chicken Molé
Roasted Chipotle Chicken
Creamy Chicken Tikki Masala
Authentic Chicken Curry

These are all true winners, but, in the meantime, isn’t this dish grabbing your eye right about now?

An overhead view of two antique dinner bowls filled with a serving of Tuscan chicken on top of a white bean, spinach, and tomato sauce.

We love all kinds of dishes made with chicken, but this may be our favorite. It’s really that good.

And don’t you just love preparing a dish that tastes like you’ve been working on it for hours, when, in fact, it took less than 1 hour to bring to the table?

Whatever you do, be sure to have plenty of bread to serve so family and guests can soak up the amazingly delicious sauce!

A person using a piece of a loaf of Italian bread to scoop up a Tuscan sauce of tomatoes and beans from a dinner bowl with seared chicken in it.

Ready to make the best chicken dinner in town? Go for it!

And when you do, be sure to take a photo, post it on Instagram, and tag @HowToFeedaLoon and hashtag #HowToFeedaLoon!

An overhead view of a large black cast-iron skillet filled with four pieces of Tuscan chicken with white beans and spinach.
Print Recipe
5 from 7 votes

Tuscan Chicken with White Beans and Spinach

This is a deeply flavorful one-pot recipe that comes together in less than an hour. Serve with warm, crusty bread for a delicious, fulfilling meal. Great for a busy weeknight meal, but elegant and scrumptious enough for a wonderful dinner party.
Prep Time15 minutes mins
Cook Time25 minutes mins
Total Time40 minutes mins
Course: Entree
Cuisine: American / Italian
Servings: 4 people
Calories: 376kcal
Author: Kris Longwell

Equipment

  • Cast-iron skillet

Ingredients

  • 1 tablespoon olive oil
  • 4 to 6 chicken thighs skin-on, bone-in
  • Kosher salt and black pepper
  • 2 tablespoon unsalted butter
  • 1 small shallot chopped, about ¼ cup
  • 3 cloves garlic minced
  • ½ cup white wine
  • ½ cup chicken stock
  • 2 cups spinach baby, or mature, washed and stems removed
  • 1 tablespoon basil fresh, chopped
  • 1 tablespoon parsley fresh, chopped
  • 1 15 oz. can fire-roasted tomatoes drained
  • 1 15 oz. can white beans drained, such as cannelloni or Great Northern

Instructions

  • Preheat oven to 400°F.
  • Brush olive oil all over the chicken thighs. Season the chicken with salt and pepper.
    1 tablespoon olive oil, 4 to 6 chicken thighs, Kosher salt and black pepper
  • Heat the butter in a large oven-safe skillet over medium heat.
    2 tablespoon unsalted butter
  • Add the chicken, skin side down, and sear for 10 minutes, or until the skin is golden and crispy on the outside. Flip the thighs over and cook for another 3 minutes. Remove the chicken from the skillet onto a platter. Discard all but 2 tablespoon of butter/grease from the pan.
  • Return the pan to the stove over medium heat. Add the shallots and sauté for about 3 to 4 minutes, or until soft. Add the garlic and sauté for another 30 seconds to 1 minute.
    1 small shallot, 3 cloves garlic
  • Add the wine and cook until almost completely evaporated, about 2 minutes. Stir in the chicken stock and bring to a simmer. Add the spinach and simmer until completely wilted, about 1 to 2 minutes.
    ½ cup white wine, ½ cup chicken stock, 2 cups spinach
  • Stir in the basil, parsley, 1 teaspoon salt, and ½ teaspoon pepper. Simmer for a few minutes.
    1 tablespoon basil, 1 tablespoon parsley
  • Stir in the tomatoes and beans. Nestle the chicken into the sauce, skin-side up.
    1 15 oz. can fire-roasted tomatoes, 1 15 oz. can white beans
  • Place in the oven and bake until the internal temperature of the chicken reaches 165°F, usually about 15 minutes. Remove from the oven and serve at once, garnishing with extra chopped parsley (if desired).

Video

Notes

See the video near the top of the blog post for visual guidance. If you liked the video, please subscribe to our YouTube channel. 
Boneless, skinless chicken breasts can be substituted for the thighs. Brush them with oil and then season with salt and pepper. Sear each side for about 5 minutes. 
Baby spinach is perfectly fine to use with this dish. We usually prefer mature, fresh spinach, but baby spinach is great for this recipe because it's already washed and is easy to use. If using frozen, let it completely thaw, and then squeeze out excess water before adding to the sauce. 
An instant-read thermometer will ensure the chicken is fully cooked (165°F). Or, until the juices run clear. 
Leftovers will keep in the fridge for up to 5 days. Reheat in a 350°F oven for about 15 to 20 minutes. 

Nutrition

Calories: 376kcal | Carbohydrates: 5g | Protein: 20g | Fat: 15g | Saturated Fat: 7g | Polyunsaturated Fat: 5g | Monounsaturated Fat: 4g | Trans Fat: 0.3g | Cholesterol: 127mg | Sodium: 146mg | Potassium: 408mg | Fiber: 1g | Sugar: 1g | Vitamin A: 1783IU | Vitamin C: 7mg | Calcium: 38mg | Iron: 2mg

POST UPDATE: This recipe was originally published in September, 2014, but was updated with improved tweaks to the recipe with new tips and photography and a fabulous new video in November, 2023!

Grandma’s Homemade Kolaches

November 22, 2023 by Kris Longwell 64 Comments

An overhead view of a baking pan filled with freshly baked kolaches topped with poppyseed filling and cream cheese filling.

Homemade pastries are just something special. And these delectable treats are nothing short of amazing.

Grandma Longwell was an amazing cook and baker. She was also 100% Czech, as are these pastries. This recipe is in honor of her and the joy she and Grandpa Longwell brought to the entire family. These were her specialty, along with her homemade cinnamon rolls.

An overhead view of a baking pan filled with freshly baked kolaches topped with poppyseed filling and cream cheese filling.

How To Make Homemade Kolaches

The Ingredients You Will Need

As with any pastry, you’ve got to start with a good dough. Grandma made lots of baked goods, and she used the same dough for most of her pastries and breads. Here’s what you’ll need to have on hand:

For the Dough:
Milk – Whole milk is best, warmed to 105 to 115°F.
Sugar – Granulated.
Unsalted butter – Melted and then cooled.
Yeast – Either Instant (aka Rapid Rise) or Active Dry.
Flour – All-purpose.
Salt – Table salt or Kosher

For the Cream Cheese Filling:
Cream cheese – Room temperature.
Sugar – Granulated.
Egg – Just the yolk.
Vanilla extract – Go with good quality, if possible.

For the Poppyseed Filling:
Poppyseeds – Found in the ‘spice’ section of most well-stocked supermarkets.
Flour – All-purpose.
Unsalted butter – Chilled.
Ground cinnamon – Can substitute vanilla extract, if desired.

EXPERT TIP: For the first round of proofing, we recommend placing the dough in an oiled bowl, covering it tightly with plastic wrap, and then placing it in the refrigerator overnight. If you are pressed for time, you can cover the dough and then place it in a warm, non-drafty area for 1 to 2 hours, or until the dough almost doubles in size.

A large ceramic bowl filled with risen bread dough.

Tips for Making Perfect Kolaches

Allow Enough Time for Proofing the Dough – Ensure the dough is soft and pliable by using the right amount of flour and allowing it to rise properly. Overnight for the first proofing and then 90 minutes to 2 hours for the second rise is recommended. This will result in light and fluffy kolaches.

Properly Seal the Fillings – When forming the kolaches, ensure the fillings are well-sealed within the dough to prevent any leakage during baking.

Brush with a Glaze and Top with Struesel – Before baking, brush the kolaches with melted butter and then top with a simple struesel. This will add a shine and a touch of sweetness to the finished pastries.

EXPERT TIP: Place the cut dough onto a baking sheet that is lined with parchment paper and then allow it to rise again. Don’t worry if they don’t completely double in size; they will expand considerably during the baking process.

A person using a spoon to transfer a mound of cream cheese filling into a well of an uncooked kolache pastry.

The Best Kolache Fillings

As mentioned, we love making cream cheese and poppyseed fillings.

However, other delicious fillings for homemade kolaches include prunes, apricots, cherries, blueberies, and even cottage cheese.

Create a small well in the center of each dough ring and then fill it with the prepared fillings.

NOTE: The fillings can easily be made 1 to 2 days in advance of baking.

An overhead view of poppyseed and cream cheese filled kolaches sitting on a baking rack with a blue linen napkin underneath it.

When to Serve Homemade Kolaches and How To Store Them

These pastries are incredible when served fresh out of the oven or even at room temperature with a warm cup of coffee.

Grandma would have numerous Tupperware containers filled with all types of pastries, pies, and more.

These are perfect for serving at breakfast, but also make a wonderfully sweet ending to a delicious dinner.

Wondering about the history of Kolaches and why they’re so popular in Texas? Read about the history

A straight-on view of a poppyseed filled kolache sitting on a baking rack next to more kolaches and a mug of black coffee.

Other Classic Baking Recipes to Try

Everyone loves a baked goodie, right? Especially when it’s made from scratch and homemade. Here are some of our favorites that we’re certain you’ll love, too:

Homemade Cinnamon Rolls
Orange Sweet Rolls
Cinnamon Raisin Swirl Bread
Monkey Bread
Blueberry Hand Pies (Pop Tarts)
Country White Bread
Cloverleaf Dinner Rolls
Pumpkin Butterscotch Bread
Jumbo Lemon Blueberry Muffins
Banana Nut Bread
Zucchini Bread
Bacon Parmesan Gougéres

These are all amazing and delicious in their own special way. But, in the meantime, isn’t the grabbing your eye?

A straight-on view of a half-eaten poppyseed filled kolache on a white dessert plate with a fork next to it.

Ready to make the best pastry this side of Prague? Go for it!

And when you do, be sure to take a photo of them, post it on Instagram, and tag @HowToFeedaLoon and hashtag #HowToFeedaLoon!

An overhead view of a baking pan filled with freshly baked kolaches topped with poppyseed filling and cream cheese filling.
Print Recipe
4.91 from 22 votes

Homemade Kolaches

Nothing conjures memories of special times with family more than when I'm making a batch of Grandma's Homemade Kolaches. They take a little TLC, but they are so worth it. Make sure to let the dough double in size once in a lightly oiled bowl, and then again once the pastries have been formed.  Pastry perfection. 
Prep Time30 minutes mins
Cook Time18 minutes mins
Proofing3 hours hrs
Total Time3 hours hrs 48 minutes mins
Course: Breakfast and Dessert
Cuisine: Czech
Servings: 8
Calories: 636kcal
Author: Kris Longwell

Ingredients

Kolach Dough

  • 1 cup whole milk lukewarm, 105° - 120°F
  • ½ cup sugar
  • 5 tablespoon unsalted butter melted and then cooled
  • 3 large eggs room temperature
  • 2¼ teaspoon active dry yeast or Instant Yeast (aka: Rapid Rise)
  • 5 cups all-purpose flour
  • 1 teaspoon salt
  • 2 tablespoon unsalted butter melted, for brushing the uncooked kolaches

Cream Cheese Topping

  • 8 oz cream cheese, softened
  • ¼ cup granulated sugar
  • 1 egg yolk
  • 1 teaspoon vanilla extract

Blueberry Topping

  • ½ cup granulated sugar
  • ¼ cup cornstarch
  • ¼ teaspoon ground cinnamon
  • 2 cups fresh blueberries
  • 2 tablespoon fresh lemon juice

Cherry Topping

  • ¼ cup granulated sugar
  • 2 tablespoon cornstarch
  • 1 15 oz can pitted sour cherries (Drain, but save the juice)

Poppy Seed Topping

  • ⅓ cup poppyseeds
  • ¼ cup sugar
  • 1 tablespoon all-purpose flour
  • ¼ cup whole milk
  • 1 tablespoon unsalted butter
  • ½ teaspoon vanilla extract

Streusel Topping

  • ¾ cup sugar
  • ½ cup all-purpose flour
  • ¼ cup unsalted butter chilled, cubed
  • ¼ teaspoon cinnamon ground

Instructions

Prepare the Dough

  • Add the lukewarm milk, sugar, cooled butter, eggs, and yeast to the bowl of a stand mixer. Mix everything together using the paddle attachment.
    1 cup whole milk, ½ cup sugar, 5 tablespoon unsalted butter, 3 large eggs, 2¼ teaspoon active dry yeast
  • Add 4½ cups of flour and salt to the mixture. Mix on low just until the dough starts to come together. Use your hands to remove the dough from the paddle attachment. Remove the paddle and replace it with the dough hook. Mix (knead) on medium for 6 to 7 minutes until the dough is soft and is starting to pull away from the bowl, adding another ¼ to ½ cup of flour as needed.
    5 cups all-purpose flour, 1 teaspoon salt
  • Remove the dough from the bowl and smooth it into a ball with your hands. The dough will be quite sticky. This is normal. Spray a large bowl with cooking spray and place the dough in the bowl. Turn the dough over to coat it with oil all over. If desired, brush melted butter over the top of the dough. Cover with plastic wrap and place in a warm, non-drafty area until it has doubled in size, usually about 2 hours. Or, place in the refrigerator for overnight or up to 12 hours.
  • On a floured work surface, roll out the dough to ½-inch thickness.
  • Using a 2½-inch cookie cutter, an inverted metal can, or an inverted glass, cut rounds from the dough. Re-roll the scraps, and cut more rounds.
  • Place each round on a parchment paper-lined baking sheet, about 1 inch apart from each other, cover with a damp towel, and let rise at room temperature until nearly doubled in size, about 45 minutes to 2 hours.
  • Preheat oven to 350°F.
  • Using your thumb, press 1 large indentation into the center of each round, leaving a ½-inch wide rim. Spoon about 1 tablespoon of topping into the indentations. Liberally sprinkle the streusel over the tops of the kolaches. Brush the melted butter all over the edges of the kolaches.
    2 tablespoon unsalted butter
  • Bake until golden brown, about 15 to 25 minutes (depending on the size of the kolaches). 
  • Transfer to a wire rack and let cool

Cream Cheese Topping

  • Place all of the cream cheese topping ingredients in a food processor and process until smooth. Or, mix with a hand mixer.
    8 oz cream cheese, softened, ¼ cup granulated sugar, 1 egg yolk, 1 teaspoon vanilla extract

Blueberry Topping

  • In a medium saucepan, combine the sugar, cornstarch, and cinnamon. 
    ½ cup granulated sugar, ¼ cup cornstarch, ¼ teaspoon ground cinnamon
  • Add the blueberries and lemon juice and cook over medium heat, stirring, until the sugar dissolves.
    2 cups fresh blueberries, 2 tablespoon fresh lemon juice
  • Reduce the heat to low and simmer until thickened, about 8 minutes. Let cool. 

Cherry Topping

  • In a medium saucepan, combine the sugar and cornstarch.
    ¼ cup granulated sugar, 2 tablespoon cornstarch
  • Stir in the reserved cherry juices and cook, stirring often, over medium heat, until the mixture thickens, about 8 minutes.
    1 15 oz can pitted sour cherries
  • Remove from the heat and stir in the cherries. Let cool. 

Poppy Seed Topping

  • In a medium-sized bowl, mix together the poppy seeds, sugar, and flour.
    ⅓ cup poppyseeds, ¼ cup sugar, 1 tablespoon all-purpose flour
  • Heat the milk in a medium saucepan over medium heat. Once it starts to simmer, add the poppy seed mixture and stir constantly until slightly thickened. Remove from the heat and stir in the butter and vanilla. Let it rest for at least 15 minutes (it will thicken as it cools off).
    ¼ cup whole milk, 1 tablespoon unsalted butter, ½ teaspoon vanilla extract

Streusel Topping

  • In a medium-sized bowl, add all of the ingredients. Use a pastry cutter, two forks, or your fingers to create a crumbly texture. Set aside.
    ¾ cup sugar, ½ cup all-purpose flour, ¼ cup unsalted butter, ¼ teaspoon cinnamon

Video

Notes

See the video near the top of the post for visual guidance.  If you liked the video, please subscribe to our YouTube channel. 
The fillings can be made several days in advance.
The kolaches will keep in an air-tight container on the counter for 4 to 5 days.  They'll keep in the fridge for up to a week.  They can be frozen for up to 2 months.

Nutrition

Calories: 636kcal | Carbohydrates: 120g | Protein: 13g | Fat: 11g | Saturated Fat: 6g | Polyunsaturated Fat: 1g | Monounsaturated Fat: 3g | Trans Fat: 1g | Cholesterol: 116mg | Sodium: 46mg | Potassium: 189mg | Fiber: 3g | Sugar: 52g | Vitamin A: 402IU | Vitamin C: 1mg | Calcium: 64mg | Iron: 4mg

POST UPDATE: This recipe was originally published in January, 2014, but was updated with improved tweaks to the recipe, new tips and photography, and a fabulous new video in November, 2023!

Leftover Turkey Risotto with Butternut Squash and Asparagus

November 19, 2023 by Kris Longwell 2 Comments

An overhead view of a large silver skillet filled with risotto with left-over turkey, roasted butternut squash, and asparagus.

Trying to think of something unique and delicious to do with all that leftover Thanksgiving turkey? This is your answer!

This dish is a perfect way to use up some of your scrumptious leftover turkey from the holiday feasts. Making homemade risotto is easier than you might think. Starting with made-from-scratch chicken stock (or turkey), puts the dish over the top. And leftovers are also amazing!

An overhead view of a large silver skillet filled with risotto with left-over turkey, roasted butternut squash, and asparagus.

How to Make Leftover Turkey Risotto

The Ingredients You Will Need

This risotto is so wonderfully delicious, we have it all year long. When we don’t have loads of leftover turkey in the fridge, then we go with roasted chicken! Here’s what you’ll need to have on hand:

Pancetta – Cubed. This can usually be found in the deli area of most well-stocked supermarkets. You can substitute bacon for the pancetta. To make the dish vegetarian, omit the pancetta.
Arborio rice – This can be found in the dried rice section of most supermarkets. If you can find it, try Carnaroli (usually only at Italian markets). These types of Italian rice yield a creamy texture that you’re looking for.
White wine – Go with a decent Chardonnay or Sauvignon Blanc. 99.5% of the alcohol will cook off. If you do not want to cook with wine, simply omit it.
Butternut squash – Cut into bite-sized pieces. Most produce sections have it already pre-cut and packaged. This is the way to go.
Asparagus – Cut about 1 inch off the stem. Then cut into bite-sized pieces. We prefer the thicker asparagus rather than the extra-thin. But that’s a matter of taste.
Oil – Olive oil or extra-virgin is what you’ll want to coat the vegetables.
Seasonings – Salt and pepper are all you need. See NOTES regarding salt levels.
Broth or stock – Homemade is definitely what makes this dish special. Be sure to have it heated before you start. And you’ll want to have extra on hand.
Parmesan cheese – Grated, preferably from a block.
Parsley – Flat-leaf. For garnish.

EXPERT TIP: Roasting the butternut squash and asparagus is very simple. The squash takes 30 minutes to roast. After 20 minutes, simply add the asparagus. Give them all a stir every now and then.

A person using a wooden spatula to lift up several pieces of roasted butternut squash over a baking sheet filled with more of the squash and pieces of roasted asparagus.

Tips for Making Perfect Leftover Turkey Risotto

Use Homemade Stock – Use our roasted chicken stock recipe to make turkey stock, which will infuse the risotto with rich, savory flavors from the leftover turkey. Make sure the stock is heated before adding it to the rice.

Add the Stock in Stages – You’ll want to add no more than about a cup of the hot stock to the rice. Let it fully absorb the liquid, and then add another cup. Continue doing this until the rice is just barely al dente.

Incorporate the Roasted Vegetables at the Right Time: Add the roasted butternut squash and asparagus towards the end of the risotto cooking process to maintain their texture and prevent them from becoming mushy.

Watch The Salt Levels – Because you are using ingredients that have probably already been prepared (ie, leftover turkey, stock), they are already well seasoned with salt, so take caution when adding more salt to the risotto. Start with a ½ tsp, and then taste near the end, and add more if needed.

A person pouring chicken stock from a metal ladle into a large silver skillet filled with arborio rice and crispy pancetta.

Risotto should almost feel creamy in texture. When you spoon a helping onto a plate or bowl, it should gently spread, like an ocean wave, or, as they say in Italian, “all’onda”. Meaning “on the wave.” It should be creamy and not a blob of sticky rice.

We serve this risotto with warm, crusty Italian bread.

Let folks serve themselves directly from the skillet, or plate the risotto for them.

EXPERT TIP: Add the turkey and roasted vegetables in the last 5 minutes of cooking. You just want to heat them through. You may still need to add more hot stock at this point. Remember to keep it creamy in texture!

A person adding pieces of cooked turkey into a skillet filled with cooked risotto and pieces of roasted butternut squash and asparagus.

Other Recipes to Use Leftover Turkey

There are all kinds of ways to use leftover turkey from the big Thanksgiving feast. Here are some of our favorites:

Leftover Turkey Enchiladas with Red Sauce
Turkey Tetrazzini
Day After Thanksgiving Panini
Leftover Turkey and Dressing Casserole
Monte Cristo
Kentucky Hot Brown
Chicken and Rice Casserole with Broccoli (Substitute turkey for chicken)

These are all amazing and the perfect way to use leftover turkey. But, in the meantime, isn’t this dish catching your eye?

A straight-on view of a shallow white dinner bowl filled with risotto with left-over turkey, roasted butternut squash, and asparagus.

This dish is so comforting and can easily be adapted to each family’s own tastes.

If you don’t have extra turkey on hand, then grab a rotisserie chicken from the supermarket and sub it in for the turkey.

We can’t stress enough that making the broth first really elevates the risotto. But, even good-quality store-bought will work, too.

Every bite is a true taste sensation!

A dinner fork that has pierced roasted asparagus, left-over turkey, and butternut squash, and is being raised up.

Ready to make the best turkey dish since, well, since Thanksgiving? Go for it!

And when you do, be sure to take a photo of it, post it on Instagram, and tag @HowToFeedaLoon and hashtag #HowToFeedaLoon!

A straight-on view of a shallow white dinner bowl filled with risotto with left-over turkey, roasted butternut squash, and asparagus.
Print Recipe
4 from 1 vote

Leftover Turkey Risotto with Roasted Butternut Squash and Asparagus

This risotto is the perfect way to use up leftover turkey from the holidays. However, it is also fantastic with roasted chicken. Either roast it yourself (see NOTES) or use a rotisserie chicken from the market. Making the stock from scratch puts this dish over the top!
Prep Time15 minutes mins
Cook Time45 minutes mins
Total Time1 hour hr
Course: Entree
Cuisine: Italian
Servings: 6 people
Calories: 553kcal
Author: Kris Longwell

Equipment

  • Large skillet
  • Wooden spoon

Ingredients

  • 7 cups chicken stock heated
  • 4 oz pancetta cubed
  • ¼ cup shallots chopped
  • 1½ cup Arborio rice
  • ½ cup white wine
  • Kosher salt and black pepper
  • 2 tablespoon olive oil
  • 2 cups butternut squash cut into bite-size pieces
  • 8 oz asparagus ends cut off and cut into bite-size pieces
  • 2 cups turkey fully cooked, or cooked chicken
  • ¼ cup pine nuts lightly toasted
  • ¼ cup Parmesan cheese grated
  • 1 tablespoon flat-leaf parsley chopped, for garnish

Instructions

  • Preheat oven to 400° F. Heat the stock/broth over medium-low heat in a pot.
    7 cups chicken stock
  • Cook the pancetta in a large skillet over medium heat until just starting to get crisp. Add the shallots and cook for another 3 to 4 minutes, until softened.
    4 oz pancetta, ¼ cup shallots
  • Add the rice and cook, stirring often, until lightly toasted, about 6 minutes. Add the wine and cook until almost completely evaporated, a couple more minutes. Stir in ½ teaspoon salt and ½ teaspoon black pepper (See NOTES regarding salt levels).
    1½ cup Arborio rice, ½ cup white wine, Kosher salt and black pepper
  • Ladle in enough of the hot stock to just cover the rice. Stir frequently with a wooden spoon until almost all of the stock has been absorbed by the rice. Continue this process until the rice is soft and just barely al dente. This will take about 25 to 30 minutes, and you'll use between 6 to 7 cups of stock. Once the rice is almost tender, do a taste test. Add a little more salt, if needed.
  • Meanwhile, add the butternut squash to a bowl and toss with 1 tablespoon of olive oil and a liberal pinch of salt and pepper. Place the coated squash on a baking sheet and place it in the oven. In the same bowl, toss the asparagus with 1 tablespoon olive oil and a pinch of salt and pepper. Set the asparagus aside.
    2 tablespoon olive oil, 2 cups butternut squash, 8 oz asparagus
  • After 20 minutes of roasting, add the asparagus and cook for 10 minutes more. (Total baking time: Squash: 30, Asparagus: 10). Remove from the oven and set aside.
  • Add the roasted vegetables and cooked turkey (or chicken) to the risotto. Add a little more stock. The rice should have a creamy texture.
    2 cups turkey
  • Remove from heat and stir in toasted pine nuts (save some for topping the risotto) and Parmesan cheese.
    ¼ cup pine nuts, ¼ cup Parmesan cheese
  • Garnish with parsley, pine nuts, and a little more freshly grated Parmesan. Serve at once.
    1 tablespoon flat-leaf parsley

Video

Notes

See the video near the top of the blog post for visual guidance. If you liked the video, please subscribe to our YouTube channel. 
To use roasted chicken, start with one or two skin-on, bone-in chicken breasts. Brush all over with olive oil and then liberally salt and pepper. Place on the baking sheet (the same you'll be using to roast the butternut squash and asparagus). Total baking time: Chicken 45 minutes / Squash: 30 minutes / Asparagus: 10 minutes.
Remember to heat the stock before adding the rice. Add the stock in stages (about 1 cup at a time). 
Be careful with adding salt. Your leftover turkey and stock may already be well seasoned with salt. Start with just a ½ teaspoon to the rice, and then do a taste test near the end of the cooking process and add more, if needed. 
Leftovers can be reheated in the oven (350°F) for 20 minutes, or just heat in the microwave on HIGH for a couple of minutes, or until heated through. Leftovers will keep covered in the fridge for up to 5 days. 

Nutrition

Calories: 553kcal | Carbohydrates: 60g | Protein: 24g | Fat: 18g | Saturated Fat: 6g | Polyunsaturated Fat: 5g | Monounsaturated Fat: 6g | Trans Fat: 0.05g | Cholesterol: 48mg | Sodium: 635mg | Potassium: 773mg | Fiber: 4g | Sugar: 7g | Vitamin A: 5371IU | Vitamin C: 14mg | Calcium: 103mg | Iron: 5mg

POST UPDATE: This recipe was originally published in March 2014, but was updated with improved tweaks to the recipe with new tips and photography, and a fabulous new video in November, 2023!

Fondant Potatoes (Melting Potatoes)

November 15, 2023 by Kris Longwell 13 Comments

A close-up view of a two rows of fondant potatoes on a white platter and topped with sea salt and fresh herbs.

This is, without a doubt, our favorite way to prepare potatoes.

We love all kinds of potatoes, from classic French fries to best-ever mashed potatoes. But, folks, these luscious potatoes are like none you’ve ever made or served before. Fondant is French for “melting,” and they literally melt in your mouth. They are what you would call a “special occasion” dish, but you’ll want to make them constantly, after one bite.

A close-up view of a two rows of fondant potatoes on a white platter and topped with sea salt and fresh herbs.

How To Make Fondant Potatoes

The Ingredients You Will Need

Believe it or not, there are just a handful of ingredients for these spectacular potatoes. There are a couple of ingredients that put them in a league of their own, starting with the duck fat. Here’s what you’ll need to have on hand:

Potatoes – Starchy is what you want. Gold or Russet work great. Outside North America: Sebago and King Edward are great choices.
Fat or Oil – Duck fat is our recommendation. It can be found in many supermarkets, including Whole Foods. Bacon grease will work, too, as well as pork lard. Vegetable oil will even work.
Seasonings – Salt and pepper are all you need.
Butter – Unsalted, cubed.
Broth – Homemade chicken stock is great, but store-bought is just fine. Vegetable broth works great, too.
Garlic – Whole cloves, cut in half, lengthwise.
Herbs – Sprigs of thyme are perfect.
Coarse salt – Any kind of finishing salt is excellent. Coarse sea salt works; Maldon Flakey Sea Salt is wonderful.

EXPERT TIP: To form perfect cylinders, use a 1½” cookie cutter to cut a 2″ tall piece of circular potato (2nd photo below). Or, peel each potato, cut the ends off, and then use a sharp knife to form a 2-inch cylinder (1st photo below).

Two images showing a person using a chef's knife to cut a potato into a 2-inch sphere and another showing a person using a cookie cutter to from a 2-inch potato sphere.

Tips for Making Perfect Potatoes Fondant

Use the Right Potatoes – Use a starchy potato such as Russet or Yukon Gold for the best texture. Don’t use waxy potatoes, such as red potatoes.

Cut the Potatoes Evenly – Cut the potatoes into even, thick slices to ensure that they cook evenly and have a consistent texture. A cookie-cutter makes this a snap. Use excess potatoes to make mashed potatoes.

Use a Combination of Oil and Butter – Use a combination of unsalted butter and oil to cook the potatoes, which will give them a nice, crispy texture and rich flavor. Duck fat delivers incredible taste.

Baste the Potatoes – Basting the potatoes with the cooking liquid during the cooking process and then right after will help to keep them moist and tender, and add flavor.

Four photos, the first is a person placing potato spheres in a skillet, and the next is the spheres being seared, and then chicken stock pouring in, and then the stock simmering with the potatoes.

How To Cook Fondant Potatoes

Think of cooking the potatoes like searing meat or sea scallops. You’ll start them off in a hot skillet with oil, preferably duck fat.

You can move them around occasionally in the skillet, especially if there are hot spots over the heat. They should turn a nice golden color before you flip them and sear the other side.

Finishing them off in the oven with butter, garlic, herbs, and stock allows the potatoes to absorb the liquid (except the oil) and become extremely tender (hence the name: Fondant, which translates to ‘melting’).

Baste at least once during the baking process.

An overhead view of fondant potatoes being seared in a black cast-iron skillet filled with melted duck fat.

How To Serve

When you and your family try these potatoes, you’ll immediately understand why these are considered a “special occasion” dish.

They are spectacular to serve alongside a steak at an elegant dinner party. They are also wonderful to serve family-style during the holiday season.

But, honestly, they are so simple to prepare, they are fun to whip up for a Sunday night dinner at home.

You can plate them alongside the main protein (ie, steak) and then serve. Or, you can do what we like to do, and place them all on a platter and then drizzle the sauce over the potatoes and top with herbs and sea salt.

A person using a silver spoon to pour melted butter over a potato sphere that has been seared and roasted.

Other “Special Occasion” Side Dish Recipes to Try

These potatoes are show-stoppers, without a doubt, but the following side dishes are also sure to create a room full of “oohs” and “ah’s”, too.

Potato Dauphinoise (French au Gratin Potatoes)
Crispy Hasselback Potatoes
Gourmet Green Bean Casserole
Braised Green Beans with Tomatoes
Sautéed Broccolini with Garlic and Lemon
Roasted Whole Cauliflower with Herb Butter Sauce
Cauliflower Mash with Roasted Garlic
Sautéed White Beans with Tomatoes, Garlic, and Sage
Cream of Sweet Corn Casserole
Cheese and Asparagus Soufflé
Maple Braised Carrots
Stuffed Tomatoes

These are all amazing, without a doubt. But, in the meantime, aren’t these calling your name?

A close-up view of a row of fondant potatoes topped with coarse salt and chopped fresh thyme.

If you are looking for a side dish that is truly something special, you need to look no further. This is it.

Every single bite is an absolute taste sensation.

And, they are honestly as beautiful and so unique in appearance as they are spectacular in taste. They are truly that good.

A front view of a half-eaten fondant potato sitting on a small white plate with a fork next to it.

Ready to make the best potato dish you’ve ever tried, tasted, or served? Go for it!

And when you do, be sure to take a photo of it, post it on Instagram, and tag @HowToFeedaLoon and hashtag #HowToFeedaLoon!

A close-up view of a two rows of fondant potatoes on a white platter and topped with sea salt and fresh herbs.
Print Recipe
5 from 6 votes

Potatoes Fondant (Melting Potatoes)

Potatoes Fondant are called "melting potatoes" because they do just that...they melt in your mouth. If you can't find duck fat, then go with bacon grease or just plain vegetable oil. You'll still have stunning potatoes.
Prep Time15 minutes mins
Cook Time55 minutes mins
Total Time1 hour hr 10 minutes mins
Course: Side Dish
Cuisine: French
Servings: 4
Calories: 223kcal
Author: Kris Longwell

Equipment

  • Sturdy skillet that can go in the oven such as a cast-iron skillet

Ingredients

  • 4 lbs potatoes starchy, such as russet or gold
  • 3 tablespoon duck fat see NOTES, divided
  • Salt and pepper
  • 4 tablespoon unsalted butter cubed
  • 4 cloves garlic peeled and cut in half, lengthwise, and then smashed with the side of a knife
  • 3 sprigs thyme fresh
  • 1½ cups chicken stock
  • coarse sea salt for finishing

Instructions

  • Preheat oven to 400°F.
  • Peel the potatoes, and then cut the ends off each side. Use a sharp knife to cut the potato into 1 to 2-inch cylinders. Use a sharp knife to shave off the edges to make straight-edge cylinders, or use a 1½" cookie cutter to cut out the cylinders. (See the video for reference.) Save excess potatoes to make mashed potatoes.
    4 lbs potatoes
  • Place the potatoes in a large bowl. Add 1 tablespoon of the duck fat and season liberally with salt and pepper. Toss the potatoes to fully coat. Set aside.
    3 tablespoon duck fat, Salt and pepper
  • Heat the remaining 2 tablespoon duck fat in a large oven-safe skillet over medium-high heat. Place the potato cylinders into the skillet and sauté until golden brown on the underside, moving occasionally to achieve even browning, about 7 to 8 minutes.
  • Turn each potato and sear again for another 7 to 8 minutes (moving occasionally) until browned.
  • Add the butter, garlic, thyme, and chicken stock to the pan and bring to a boil. Remove from the heat and place in the oven for 20 minutes. After 10 minutes, spoon the sauce over the potatoes. After 20 minutes, most of the liquid should be gone, leaving only the butter.
    4 tablespoon unsalted butter, 4 cloves garlic, 3 sprigs thyme, 1½ cups chicken stock
  • Remove from the oven and discard the garlic and thyme. Spoon the sauce over the tops of the potatoes.
  • Plate the potatoes, and then spoon more of the butter sauce over the top. Garnish on top with a little chopped thyme and a sprinkling of the coarse salt. Serve at once.
    coarse sea salt

Video

Notes

See the video near the top of the blog post for visual guidance. If you liked the video, please subscribe to our YouTube channel. 
Duck fat can be found in many well-stocked supermarkets near where shortening and oils are sold. Whole Foods sells it. Bacon grease, pork lard, or even vegetable oil can be used in place of duck fat. 
These potatoes are best served warm, but they are still delicious at room temperature. 
The potatoes can be cut and then kept in water for several hours before proceeding with the recipe. Be sure to pat them dry completely. 

Nutrition

Calories: 223kcal | Carbohydrates: 4g | Protein: 3g | Fat: 18g | Saturated Fat: 9g | Polyunsaturated Fat: 2g | Monounsaturated Fat: 5g | Trans Fat: 0.5g | Cholesterol: 42mg | Sodium: 131mg | Potassium: 114mg | Fiber: 0.2g | Sugar: 1g | Vitamin A: 388IU | Vitamin C: 2mg | Calcium: 15mg | Iron: 0.4mg

Glazed Cornish Hens with Wild Rice Stuffing

November 12, 2023 by Kris Longwell 4 Comments

A straight-on view of a glazed Cornish hen sitting on a bed of wild rice pilaf all on a white dinner plate with a fork nearby and another plate of the same in the background.

These gems may be smaller, but they are just as big in taste and presentation.

During the holiday season, you may be looking for an alternative to a centerpiece turkey as your main course. These small hens are deeply flavorful, gorgeous in presentation, and easy on the wallet. Perfect for serving a small or medium-sized gathering. And the wild rice stuffing is holiday fare at its very best.

A straight-on view of a glazed Cornish hen sitting on a bed of wild rice pilaf all on a white dinner plate with a fork nearby and another plate of the same in the background.

How To Make Glazed Cornish Hens with Wild Rice Stuffing


NOTE: If you liked this video, please subscribe to our YouTube channel. Remember to click the little ‘bell’ icon so you’ll never miss a new video. Thank you!

The Ingredients You Will Need

All of the components for both the hens and the rice are easily found at your local market. Here’s what you’ll need to have on hand:

For the Rice Pilaf Stuffing:
Rice – We recommend a wild rice blend of white, brown, white, and wild rice.
Chicken stock – Use this to cook the rice instead of water. Go with vegetable stock/broth to keep it vegetarian.
Oil – Olive or extra-virgin olive.
Onion and celery – Chopped.
Garlic – Minced.
Apple – We use Granny Smith, but Fuji and Red Delicious are great options, too. Be sure to cut it into bite-size cubes.
Dried cranberries – Sweetened or unsweetened, whatever you prefer. Both are wonderful.
Pecans – Roughly chopped. Can substitute almonds, too. Check with guests first for any nut allergies.
Herbs – Sage and parsley. Fresh is definitely best.
Seasonings – Salt and pepper.

For the Birds and Glaze:
Cornish game hens – 1½ lbs are great, but anywhere between 1 and 2 lbs will work. They are usually found in the frozen meat section at your local supermarket.
Seasonings – Salt and pepper.
Butter – Unsalted, melted.
Port – We recommend Ruby (not Tawny). Sherry can be substituted in a pinch. If cooking with alcohol is not an option, substitute apple cider.
Sugar – Granulated.
Cinnamon – Sticks are best.
Cloves – Whole.
Garlic – Whole cloves, sliced cut half, lengthwise.
Ginger – Fresh, sliced.

EXPERT TIP:This wild rice stuffing can be prepared up to 1 day in advance. It’s delicious served warm or room temperature. We stuff the bird with it to enhance the flavor of the hen during the cooking process.

An overhead view of a white bowl filled with a wild rice pilaf with pecans and cranberries, as well as cubed apples, pancetta, and herbs.

Tips for Perfect Glazed Cornish Hens

Use High-Quality Hens – Seek out hens that are fresh and free-range for the best flavor and texture. Check with your local butcher. Don’t worry, though, frozen hens from the supermarket will yield delicious results, too.

Go with a Decent Ruby Port – No need to break the bank when purchasing a ruby port. However, don’t go with the cheapest. We go with Porto Valdouro Ruby Port. It adds a rich, sweet flavor to the hens.

Use a Meat Thermometer: We highly recommend using a meat thermometer to ensure that the hens are cooked to the correct temperature. Insert the probe into the thickest part of the bird. The internal temperature should reach 170 to 175°F to ensure a fully cooked hen.

EXPERT TIP: You’ll only need to stuff about ½ to ¾ cup of the rice stuffing into the cavity of the hen. The stuffing adds flavor to the hen while cooking. You’ll have plenty of the stuffing for a separate serving at the table.

A person holding an uncooked Cornish hen upright while stuffing the cavity with a wild rice with pecans and cranberries stuffing.

How To Cook the Cornish Hens

You will roast the hens in two stages. First, with an extra hot oven at 425°F. Then, you’ll want to lower the heat to 375°F and then begin the basting process.

The total roasting process will take about an hour, maybe a little longer, depending on the size of your hens and how often you open the oven door.

The glaze adds a deep amber color on the skin of the bird. The sugars in the glaze can easily burn, so you’ll need to keep a close eye on them.

Have plenty of small pieces of foil ready to cover spots on the bird that are starting to get a little too brown. You’ll only need to baste 3 to 4 times.

A person using a pastry brush to apply a ruby port glaze to a partially cooked Cornish hen sitting on a baking rack in a roasting pan.

How To Serve

These hens are truly ideal for serving a small gathering during the holidays (a fabulous feast for 2). But, you can also make enough to feed a larger gathering.

We recommend plating them for you and your loved one(s). They can be a little difficult to navigate from the roasting pan to the plate.

However, if serving multiple guest, simply the hens side-by-side on an attractive platter and garnish with extra sprigs of sage, parsley, and maybe a few clusters of fresh cranberries.

EXPERT TIP: Though the rice pilaf is delicious at room temperature, we recommend serving for the feast warm. Simply reheat in a baking dish covered with foil during the final 15 to 20 minutes of roasting the hens.

An overhead view of two glazed Cornish hens on a platter with wild rice stuffing flanked by a bowls of green beans and more stuffing.

Other Classic Turkey Day Dishes

The Cornish hens will be the centerpiece of your Thanksgiving feast. But, just as important (some may argue the following are even MORE important) are the sides and desserts. Here are some of our favorites:

Mom’s Thanksgiving Dressing
Best-Ever Mashed Potatoes
Twice-Baked Sweet Potatoes
Brussel Sprouts Gratin
Gourmet Green Bean Casserole
Southern Oyster Casserole
Cloverleaf Dinner Rolls
Classic Pumpkin Pie
Best Pecan Pie

These are truly the best sides. Don’t you think they would be perfectly served alongside this masterpiece?

A close-up view of a port-glazed Cornish hen sitting on top of a bed of wild rice pilaf on a white dinner plate.

There are numerous options for when you are considering what the main dish should be for your holiday feast. A perfectly roasted turkey, spatchcock turkey, or roasted turkey breast with herbs are all amazing choices.

But, if you’re looking for something a little different, and on a smaller scale, you should really consider these glazed Cornish hens.

Of course, they are wonderful during the holiday season. But, because they are so easy and quite affordable, they are an ideal dinner choice throughout the year.

A person using a silver steak knife to cut away a slice of meat from the side of a glazed Cornish hen sitting on bed of wild rice on a white plate.

Ready to try something a little different (but equally as delicious) for Thanksgiving this year? Go for it!

And when you do, be sure to take a photo of it, post it on Instagram, and tag @HowToFeedaLoon and hashtag #HowToFeedaLoon!

A straight-on view of a glazed Cornish hen sitting on a bed of wild rice pilaf all on a white dinner plate with a fork nearby.
Print Recipe
5 from 2 votes

Glazed Cornish Hens with Wild Rice Stuffing

These deeply flavorful Cornish hens are cooked to perfection with a deeply flavorful port glaze. A delicious mix of sweet and savory and quintessential holiday flavors. The rice can be made up to 24 hours in advance and reheated in a covered dish in the oven as the hens are roasting.
Prep Time20 minutes mins
Cook Time1 hour hr
Cook time for the rice30 minutes mins
Total Time1 hour hr 50 minutes mins
Course: Entree
Cuisine: Thanksgiving
Servings: 4
Calories: 452kcal
Author: Kris Longwell

Equipment

  • Roasting pan with rack
  • Kitchen twine

Ingredients

For the Rice Pilaf Stuffing

  • 2¼ cups wild rice blend cooked with chicken (or veggie) broth
  • chicken stock for cooking the rice
  • 3 tablespoon unsalted butter divided
  • 4 oz pancetta cubed
  • 1 Granny Smith apple peeled, cored, and cut into small cubes
  • 1 cup onion chopped
  • 1 cup celery chopped
  • 3 cloves garlic minced
  • ½ cup dried cranberries sweetened or regular
  • 1 cup pecans roughly chopped
  • 2 tablespoon sage fresh, chopped
  • 1 tablespoon parsley fresh, chopped
  • 1 teaspoon Kosher salt
  • ½ teaspoon black pepper

For the Hens

  • Salt and pepper
  • 4 1½ lb Cornish hens giblets removed if included
  • 2 tablespoon unsalted butter melted

For the Glaze

  • 1 cup port Ruby is recommended
  • 2 tablespoon unsalted butter
  • ¼ cup sugar
  • 3 cinnamon sticks
  • 6 whole cloves
  • 4 cloves garlic sliced in half
  • 6 slices ginger fresh

Instructions

Prepare the Rice Pilaf Stuffing

  • Prepare the rice according to the package instructions. Use broth (chicken or vegetable) in place of the water. Once cooked, place in a large bowl. Set aside.
    2¼ cups wild rice blend, chicken stock, 3 tablespoon unsalted butter
  • Heat a large skillet over medium heat. Add the pancetta and cook until almost crisp. If more than 1 tablespoon of rendered grease, tilt the pan and spoon the excess out. You'll need to leave about 1 tablespoon of the grease. Stir in the apples and cook for 2 to 3 minutes, until the apples start to soften. Transfer to bowl with rice.
    4 oz pancetta, 1 Granny Smith apple
  • In the same skillet, heat 2 tablespoon of the butter over medium heat. Add the onion and celery and sauté until soft, about 4 minutes. Add the garlic and sauté for another 30 seconds to 1 minute. Transfer to the bowl with the rice, pancetta, and apples.
    1 cup onion, 1 cup celery, 3 cloves garlic
  • To the bowl, add the cranberries, pecans, sage, parsley, 1 teaspoon salt, and ½ teaspoon black pepper. Stir together with a large wooden spoon until fully mixed. Set aside.
    ½ cup dried cranberries, 1 cup pecans, 2 tablespoon sage, 1 tablespoon parsley, 1 teaspoon Kosher salt, ½ teaspoon black pepper

Prepare the Hens

  • Preheat oven to 425°F.
  • Liberally salt and pepper the cavities of each hen.
    Salt and pepper, 4 1½ lb Cornish hens
  • Stuff each hen with ½ to ¾ cup of the rice stuffing. Tie the legs together with kitchen twine.
  • Add about ¼-inch of water to the roasting pan. Place rack in pan. Place the birds on the rack, breast-side up. Brush the breasts and legs of the hens with melted butter. Liberally salt and pepper all over the tops of the hens.
    2 tablespoon unsalted butter
  • Roast in the oven for 20 minutes while you prepare the glaze.

Make the Glaze and Finish Off the Hens

  • In a medium saucepan over medium-high heat, add the port, butter, sugar, cinnamon sticks, cloves, garlic halves, and ginger. Bring to a boil and then lower the heat to medium and simmer for about 15 minutes, until it has reduced to about ½ cup and has thickened somewhat.
    1 cup port, 2 tablespoon unsalted butter, ¼ cup sugar, 3 cinnamon sticks, 6 whole cloves, 4 cloves garlic, 6 slices ginger
  • If desired, strain the sauce/glaze through a fine-mesh sieve.
  • After 20 minutes of roasting, remove the hens from the oven. Lower the oven temperature to 375°F. Brush the glaze all over the tops of the hens, including the wings and legs. Return to the oven, and roast for another 45 to 55 minutes, basting another 3 times, every ten minutes or so.
  • Keep a close eye on the hens. If spots are starting to brown a little too much, cover with a piece of foil. Use a meat thermometer to cook the hens until they reach an internal temperature of 170 to 175°F.
  • Remove the hens from the oven and let rest for 5 to 10 minutes.
  • Serve immediately with additional rice pilaf on the side.

Video

Notes

See the video near the top of the blog post for visual guidance. If you liked the video, please subscribe to our YouTube channel. 
The rice stuffing can be made up to 24 hours in advance. It is best served warm or at room temperature. (we prefer serving it warm). To reheat, place in a dish, cover with foil, and place in the oven during the last 20 minutes of roasting the hens. 
Be sure to keep an eye on the hens once you start adding the glaze. If spots start getting too brown, add small pieces of foil. This will require you to open your oven periodically. This may cause the cooking time to be a bit longer. A meat thermometer ensures you the hens will be fully cooked. 170 to 175°F is highly recommended.
 

Nutrition

Calories: 452kcal | Carbohydrates: 26g | Protein: 8g | Fat: 19g | Saturated Fat: 8g | Polyunsaturated Fat: 7g | Monounsaturated Fat: 4g | Trans Fat: 1g | Cholesterol: 72mg | Sodium: 547mg | Potassium: 483mg | Fiber: 8g | Sugar: 36g | Vitamin A: 873IU | Vitamin C: 9mg | Calcium: 121mg | Iron: 2mg

Wild Rice Pilaf with Pecans and Cranberries

November 12, 2023 by Kris Longwell 4 Comments

An overhead view of a white bowl filled with a wild rice pilaf with pecans and cranberries, as well as cubed apples, pancetta, and herbs.

This dish has all those amazing autumnal flavors, but it’s so good, you’ll enjoy it all year long.

Rice is so versatile, and this pilaf is about as good as they come. Perfect for the holidays, but also scrumptious alongside fish, chicken, or grilled veggies. Of course, it just doesn’t get better when paired with our classic glazed Cornish hens. And it can be made up to 24 hours in advance of serving!

An overhead view of a white bowl filled with a wild rice pilaf with pecans and cranberries, as well as cubed apples, pancetta, and herbs.

How To Make Wild Rice Pilaf with Pecans and Cranberries

The Ingredients You Will Need

The components in the pilaf are familiar, but can easily be adapted to your own tastes. Here’s what you’ll need to have on hand:

Wild rice blend – Go with your favorite type of packaged wild rice. We love a blend of brown, red, white, and wild. Royal Blend is our favorite.
Chicken stock – Homemade is great, but good-quality store-bought is just fine. Vegetable stock is a great option, too.
Butter – Unsalted.
Pancetta – Cubed.
Apple – Granny Smith is our favorite. Fuji or Red Delicious are great choices, too.
Onion and celery – Chopped.
Garlic – Minced.
Dried cranberries – Sweetened or unsweetened. You can substitute any dried fruit, if desired.
Pecans – Roughly chopped.
Herbs – Fresh sage and parsley.

An overhead view of a white ceramic bowl filled with wild rice stuffing with pecans and cranberries as well as cubed apples, pancetta, and herbs.

Tips for Making the Best Wild Rice Pilaf

Cook Down the Apples – Quickly sautéing the apples with the partially cooked pancetta will not only soften them, but will add an amazing depth of flavor to the apples.

Use Fresh Herbs – Use fresh sage and parsley for a bright, herbaceous flavor that complements the nutty wild rice and sweet cranberries. Fresh is superior to dried, but dried can be used in a pinch. Use half the amount of fresh.

Cook the Rice in Chicken Broth – Cooking the rice in chicken broth instead of water will infuse it with extra flavor and make it more savory.

A large wooden spoon holding up a heaping helping of wild rice with pecans and cranberries stuffing.

How To Serve

This rice pilaf is wonderful served warm or at room temperature. You can make it up to several days in advance.

If making in advance, keep it chilled in the refrigerator, covered, until about an hour before serving. Let it come to room temperature before serving.

It is wonderful served as a side dish for a wonderful summertime grill feast, but also during the holidays. It is a show-stopper when served with glazed Cornish hens stuffed with this amazing pilaf.

A straight-on view of a glazed Cornish hen sitting on a bed of wild rice pilaf all on a white dinner plate with a fork nearby and another plate of the same in the background.

Other Classic Side Dishes to Try

It’s been said that a main protein is only as good as its supporting dishes. Well, that may or may not be true, but there is no doubt that these side dishes will rival any main dish you put on the table.

Cilantro Lime Rice

Lobster Mac and Cheese
Roasted Whole Head of Cauliflower
Gourmet Broccoli and Cheddar Casserole
White Bean and Albacore Tuna Salad
Classic Candied Yams
Best Stewed Okra and Tomatoes
Roasted Broccoli with a Kick
Shaved Brussels Sprouts with Pancetta and Balsamic
Sautéed White Beans with Sage, Tomatoes, and Garlic

These are all amazing in their own right. But, in the meantime, isn’t this bowl of yumminess catching your eye?

A close-up view of a white serving bowl filled with wild rice pilaf with pecans and cranberries.

Ready to make the best side dish in town? Go for it!

And when you do, be sure to take a photo of it, post it on Instagram, and tag @HowToFeedaLoon and hashtag #HowToFeedaLoon!

An overhead view of a white bowl filled with a wild rice pilaf with pecans and cranberries, as well as cubed apples, pancetta, and herbs.
Print Recipe
5 from 1 vote

Wild Rice Pilaf with Pecans and Cranberries

This pilaf is the perfect side dish in so many ways. The recipe can easily be adapted to you and your family's own likes. It's perfect in the warm months, but especially wonderful during the holidays.
Prep Time20 minutes mins
Cook Time15 minutes mins
Rice cooking15 minutes mins
Total Time50 minutes mins
Course: Side Dish
Cuisine: American
Servings: 6
Calories: 306kcal
Author: Kris Longwell

Ingredients

  • 2¼ cups wild rice blend
  • chicken stock for cooking the rice
  • 3 tablespoon unsalted butter divided, for the rice and then for the veggies
  • 4 oz. pancetta cubed
  • 1 Granny Smith apple peeled, cored, and cut into small cubes
  • 1 medium onion chopped, about 1 cup
  • 3 stalks celery chopped, about 1 cup
  • 3 cloves garlic minced
  • ½ cup dried cranberries
  • 1 cup pecans roughly chopped
  • 2 tablespoon sage fresh, chopped
  • 1 tablespoon parsley fresh, chopped
  • 1 teaspoon Kosher salt
  • ½ teaspoon black pepper

Instructions

  • Prepare the rice according to the package instructions. Use broth (chicken or vegetable) in place of the water. Once cooked, place in a large bowl. Set aside.
    2¼ cups wild rice blend, chicken stock, 3 tablespoon unsalted butter
  • Heat a large skillet over medium heat. Add the pancetta and cook until almost crisp. If more than 1 tablespoon of grease has rendered, tilt the pan and spoon the excess out. You'll need to leave about 1 tablespoon of the grease. Stir in the apples and cook for 2 to 3 minutes, until the apples start to soften. Transfer to the bowl with the rice.
    4 oz. pancetta, 1 Granny Smith apple
  • In the same skillet, heat 2 tablespoon of the butter over medium heat. Add the onion and celery and sauté until soft, about 4 minutes. Add the garlic and sauté for another 30 seconds to 1 minute. Transfer to the bowl with the rice, pancetta, and apples.
    1 medium onion, 3 stalks celery, 3 cloves garlic
  • To the bowl, add the cranberries, pecans, sage, parsley, 1 teaspoon salt, and ½ teaspoon black pepper. Stir together with a large wooden spoon until fully mixed.
    ½ cup dried cranberries, 1 cup pecans, 2 tablespoon sage, 1 tablespoon parsley, 1 teaspoon Kosher salt, ½ teaspoon black pepper
  • Serve at once. If desired, place in a baking dish and cover with foil. 20 minutes before serving, place in a 350°F oven to heat.

Video

Notes

See the video near the top of the blog post for visual guidance. If you liked the video, please subscribe to our YouTube channel. 
This recipe is very adaptable to your own tastes. You can vary the dried fruits, nuts, and herbs. To make this 100% vegetarian, leave out the pancetta and use vegetable stock for making the rice. Sauté the apples in a little butter, or don't worry about sautéing them at all. 
The rice can be made up to 24 hours in advance. Follow the last step in the recipe for reheating. 
Leftovers will keep covered in the fridge for up to 5 days. 

Nutrition

Calories: 306kcal | Carbohydrates: 18g | Protein: 5g | Fat: 14g | Saturated Fat: 4g | Polyunsaturated Fat: 3g | Monounsaturated Fat: 7g | Trans Fat: 0.3g | Cholesterol: 28mg | Sodium: 432mg | Potassium: 243mg | Fiber: 4g | Sugar: 12g | Vitamin A: 355IU | Vitamin C: 5mg | Calcium: 47mg | Iron: 1mg

Bacon Parmesan Gougères

November 8, 2023 by Kris Longwell 2 Comments

An overhead view of a pile of bacon parmesan gourgeres on a square white wax piece of paper.

These truly are the perfect party appetizers. Light, airy, and deeply flavorful.

These puffs of yumminess are made using the French “Choux Pastry” technique. The dough is the same that is used for French eclairs. These savory bite-sized puffs of pastry really are the perfect party appetizer. They pair perfectly with a nice bottle of Champagne.

An overhead view of a pile of bacon parmesan gourgeres on a square white wax piece of paper.

How To Make Bacon Parmesan Gourèges

NOTE: If you liked this video, please subscribe to our YouTube channel. Remember to click the little ‘bell’ icon so you’ll never miss a new video. Thank you!

The Ingredients You Will Need

The ingredients for this pastry are simple and straight-forward. It’s really about bringing it all together, but more on that in a moment. Here’s what you’ll need to have on hand:

Bacon – 4 thick slices or 6 regular cut slices. Remember to save the bacon grease.
Milk – Whole is highly recommended.
Butter – Unsalted. Doesn’t need to be at room temperature.
Seasonings – Salt, onion powder, cayenne pepper, dried oregano
Sugar – Granulated
Flour – Bread flour is best, but all-purpose will yield decent results, too.
Eggs – These should be room temperature, if possible.
Chives – Finely chopped.
Parmesan cheese – Freshly grated from a block is best.

EXPERT TIP: The dough will be very thick and sticky. Continue to cook it in your medium-sized saucepan until you reach an internal temperature of 170°F.

A ball of pastry dough in a medium-sized saucepan with a wooden spoon next to it.

Tips for Making the Perfect Bacon Parmesan Gourgères

Don’t Skip Any Steps – Follow the recipe carefully to ensure that the dough is made correctly, which will give the gougères their light, airy texture. Make sure the dough has cooled somewhat before adding the eggs.

Use a Piping Bag – Piping the dough onto the baking sheet gives the gougères a uniform shape and size. If this isn’t possible, use a small ice cream scoop.

Bake Until Golden Brown – Bake the gougères until they’re golden brown and crispy on the outside, which will give them a nice crunch and help the bacon and cheese flavors to develop.

EXPERT TIP: Use an instant-read thermometer to ensure the dough has cooled to about 145°F before adding the eggs. Add the eggs one at a time and make sure each one is completely incorporated before adding the next one.

A person transferring a whole egg from a small glass bowl into the bowl of a stand mixer filled with batter.

How To Serve

As mentioned, these are truly the perfect party appetizer. We love serving them during the holidays, but they are great for any occasion.

They are scrumptious by themselves, but you could also serve them with a nice honey mustard dressing, or even homemade ranch.

Though they are wonderful at room temperature, they are truly at their best fresh out of the oven. The dough can be made up to 12 hours in advance.

EXPERT TIP: For uniform size, use a 1½-inch cookie cutter to draw circles on parchment paper and use this as a guide to pipe the batter. Then, moistened your fingers with water and press the tips down to form a small mound of dough.

Several rows of bacon parmesan gougères mounds of dough on a parchment paper on a baking sheet.

Other Party Appetizer Recipes to Try

If you want to take your party to the next level, consider serving any (or all) of the following delectable appetizers:

Southern Crab Beignets
Warm Sausage, Spinach, and White Bean Dip
Marinated Olives
Classic Cheese Ball
Baked Brie with Praline Sauce
Philly Cheesesteak Egg Rolls (to come)
Homemade Crab Rangoons
Sausage-Stuffed Mushrooms

These are all just so amazing. But, in the meantime, aren’t these tantalizing puffs catching your eye?

A small white dessert plate holding two parmesan bacon gourgeres next to a plate full of them.

If you’re looking for a party appetizer that is not too heavy, and the ideal finger food, these French pastries are for you.

Airy on the inside, and crispy on the outside.

Perfect for a special gathering of friends and loved ones. They pair perfectly with Champagne.

A person holding a parmesan bacon gourgere that has been split in two so the puffed interior is visible.

Ready to make the best party appetizer in town? Go for it!

And when you do, be sure to take a photo of them, post it on Instagram, and tag @HowToFeedaLoon and hashtag #HowToFeedaLoon!

An overhead view of a pile of bacon parmesan gourgeres on a square white wax piece of paper.
Print Recipe
No ratings yet

Bacon Parmesan Gougères

These puffs are truly the perfect party appetizer. You and your guests won't be able to eat just one. Rich, savory, and puffy! Serve them freshly baked, however, the dough can be made up to 12 hours in advance.
Prep Time20 minutes mins
Cook Time40 minutes mins
Resting time in the oven15 minutes mins
Total Time1 hour hr 15 minutes mins
Course: Appetizer
Cuisine: French
Servings: 8 people
Calories: 193kcal
Author: Kris Longwell

Equipment

  • 2 baking sheets lined with parchment paper
  • Piping bags with ½-inch tip

Ingredients

  • 4 strips thick-sliced bacon
  • ½ cup whole milk
  • 4 tablespoon unsalted butter ½ stick
  • 1 teaspoon Kosher salt
  • 1 teaspoon onion powder
  • ½ teaspoon sugar
  • ½ teaspoon cayenne
  • 1 teaspoon dried oregano
  • 1¼ cups bread flour sifted
  • 4 large eggs
  • 1¼ cups Parmesan cheese grated from a block
  • 1 tablespoon chives finely chopped

Instructions

  • Preheat the oven to 400°F and line 2 baking sheets with parchment paper. Use a 1½-inch cookie cutter to draw circles on the parchment paper about 1 to 2 inches apart. Flip the paper over, so the ink is on the underside of the paper.
  • Cook the bacon in a large skillet over medium heat until crisp. Transfer the bacon to a plate lined with paper towels, and save the rendered grease, about ¼ cup. Chop the bacon is cool (you should have about ½ cup).
    4 strips thick-sliced bacon
  • Bring the milk, ½ cup water, the butter, and the reserved bacon grease to a simmer in a medium saucepan over medium heat.
    ½ cup whole milk, 4 tablespoon unsalted butter
  • Mix in the salt, onion powder, sugar, cayenne, and oregano.
    1 teaspoon Kosher salt, 1 teaspoon onion powder, ½ teaspoon sugar, ½ teaspoon cayenne, 1 teaspoon dried oregano
  • Add the flour and stir with a wooden. The dough will be very thick and sticky. It should form a ball. Continue to heat the dough in the saucepan until an internal temperature reaches 170°F, about 5 minutes. Remove from the heat and let the dough cool to 140°F.
    1¼ cups bread flour
  • Transfer the dough to a bowl of your mixer with the paddle attachment.
  • One at a time, add the eggs, mixing on medium speed until each is incorporated into the dough.
    4 large eggs
  • On low speed, mix in 1 cup of Parmesan, the bacon, and the chives until just combined.
    1¼ cups Parmesan cheese, 1 tablespoon chives
  • Transfer the dough to a pastry bag fitted with a ½-inch tip. Pipe about 2 inches of the dough onto each circle on the parchment paper. Press the tips of the dough down with moistened fingers. (have a small bowl of water nearby).
  • Top the puffs with equal amounts of the remaining Parmesan.
  • Bake until puffed and golden, about 20 minutes. Turn the oven off and use a large wooden spoon to crack the oven open for 15 minutes (see video for reference). Serve warm.

Video

Notes

See the video near the top of the blog post for visual guidance. If you liked the video, please subscribe to our YouTube channel. 
Remember to let the dough cool down before mixing in the eggs. They don't have to become room temperature but should be around 140°F. This takes about 15 to 20 minutes to cool down. 
The pastry dough can be made 1 to 2 days in advance. Keep covered in the fridge and let come to room temperature before piping the dough.
If you don't have pastry bags, use a spoon (or ice cream scoop) to form small balls on the parchment paper. 

Nutrition

Calories: 193kcal | Carbohydrates: 16g | Protein: 9g | Fat: 11g | Saturated Fat: 6g | Polyunsaturated Fat: 0.5g | Monounsaturated Fat: 3g | Trans Fat: 0.2g | Cholesterol: 28mg | Sodium: 548mg | Potassium: 65mg | Fiber: 1g | Sugar: 1g | Vitamin A: 390IU | Vitamin C: 0.4mg | Calcium: 210mg | Iron: 0.3mg

POST UPDATE: This recipe was originally published in August 2017, but was updated with improved tweaks to the recipe with new tips and photography and a fabulous new video in November 2023!

Philly Cheesesteak Egg Rolls

November 5, 2023 by Kris Longwell 7 Comments

A close-up view of a row of Philly cheesesteak egg rolls that have been split in half and sitting on a white platter.

Of all the appetizers we’ve ever created or served, this may be the most amazing of all of them.

If you love Philly Cheesesteaks and if you love Chinese Egg Rolls, you are going to fall madly in love with this over-the-top delicious party appetizer. Your guests will be blown away when you serve these at your next gathering. Trust us on this one!

A close-up view of a row of Philly cheesesteak egg rolls that have been split in half and sitting on a white platter.

How To Make Philly Cheesesteak Egg Rolls

The Ingredients You Will Need

There are a handful of key ingredients to put this party appetizer over the top in deliciousness. Here’s what you’ll need to have on hand:

Ribeye steak – Freeze it and then let it thaw for 45 minutes before slicing it. You can also use any kind of good-quality strip steak.
Oil – Olive oil or vegetable oil for sautéing.
Onion – Chopped.
Green bell pepper – Seeded and chopped.
Seasonings – Salt and pepper.
Soy sauce – Can use regular or low-sodium.
Provolone cheese – Buy a ½ lb block from your supermarket deli and then shred it with your food processor or a box grater.
Egg roll wrappers – Usually found with the vegan ingredients in the produce section (or cold section) of many supermarkets.
Water – For sealing the egg rolls.
Oil – Vegetable, for frying.
Hot chili oil – Optional, but it adds great depth of flavor to the egg rolls.
Sour cream topping – Just a combination of sour cream and mayonnaise mixed with chili powder and garlic powder.
Chives – Finely snipped, for garnish.

EXPERT TIP: For the perfect filling, we recommend freezing your steak, letting it thaw somewhat, and then very carefully slicing on a mandolin or with a sharp knife. After cooking with the onions and peppers, pulse the mixture a few times in your food processor (or with a knife).

A close-up view of thin strips of ribeye steak and sautéed onion and green bell pepper pieces cooking in a silver skillet.

Tips for Perfect Philly Cheesesteak Egg Rolls

Use Ribeye Steak – Ribeye steak is the traditional cut of meat used in Philly cheesesteaks and will give your egg rolls the most authentic flavor.

Use High-Quality Cheese – Use a top-notch melty cheese such as provolone for the best authentic flavor and texture. Get a block from the deli and shred it.

Roll the Egg Rolls Tightly – Roll the egg rolls tightly to prevent them from falling apart during frying and to ensure that they cook evenly.

Fry Until Golden Brown – Fry the egg rolls until they’re golden brown and crispy on the outside, which will give them a nice crunch and help the cheese to melt and become gooey.

EXPERT TIP: To roll the egg rolls, place about 1 tablespoon of the cheese down the middle of the egg roll wrapper, from one corner to the other. Top with about ¼ cup of the meat mixture. Top with more cheese, and then roll, sealing the ends. Rub the edges of the wrapper with water to help the wrapper completely seal.

Four images of a person filling an egg roll wrapper with Philly cheesesteak meat and then completing the process of rolling and sealing it.

How To Bake or Air Fry the Egg Rolls

Frying the egg rolls in hot oil (340 to 345°F) gives them the crispiest, most authentic taste and texture. However, you can bake them or cook them in your air fry, too, if desired.

To bake them, simply assemble as directed and then brush them all over with vegetable oil. Place on baking sheets lined with parchment paper and bake in a 400°F oven for 16 to 18 minutes, until browned and crispy.

To air-fry them, first spray the basket of your air fryer with olive oil or cooking spray. Place the egg rolls in the basket and spray the tops of them with more oil. Air fry for 6 minutes at 400°F, then flip them over and air fry for another 6 minutes.

Or, deep-fry them in oil until crispy. Flip frequently so they will brown evenly.

Two Philly cheesesteak egg rolls in a metal spider over a cast-iron skillet filled with hot oil.

Other Amazing Party Appetizers to Try

If you are throwing a fabulous party, you’ll want to have plenty of fabulous appetizers. Here is a collection of true winners:

Sausage-Stuffed Mushrooms
Oysters Rockefeller
Bacon Parmesan Gougères
Marinated Olives
Spanish-Style Garlic Shrimp
Warm Sausage, Spinach, and White Bean Dip
Southern Crab Beignets
Beef Negimaki
Seared Shishito Peppers

These are absolutely amazing appetizers that are always a hit when served to guest. But, in the meantime, aren’t these grabbing your attention?

An overhead view of a platter of four Philly cheesesteak egg rolls that have been split in half and drizzled with a sour cream sauce.

If you’re looking for an appetizer to serve at your party that will literally have everyone raving, this is the one.

You can make the egg rolls up to a day in advance. Simply keep them covered and in the refrigerator. You can even freeze them for a couple of months.

Quickly fry and then serve them. Brace yourself for plenty of ‘ooh’s’ and ‘ah’s’!

A Philly cheesesteak egg roll that has been cut in half and the two halves are sitting on a white plate upright.

Ready to make the best party appetizer of all time? Go for it!

And when you do, be sure to take a picture of them, post it on Instagram, and tag @HowToFeedaLoon and hashtag #HowToFeedaLoon!

A close-up view of a row of Philly cheesesteak egg rolls that have been split in half and sitting on a white platter.
Print Recipe
5 from 2 votes

Philly Cheesesteak Egg Rolls

This may be the most delicious appetizer we've ever made or served. The Philly cheesesteak mixture combined with the melty provolone cheese wrapped up in a crunchy fried egg roll wrapper is just amazing. The chili oil and sour cream sauce bring it all together.
Prep Time20 minutes mins
Cook Time30 minutes mins
Total Time50 minutes mins
Course: Appetizer
Cuisine: American
Servings: 4
Calories: 723kcal
Author: Kris Longwell

Equipment

  • Large skillet for frying or a deep fryer
  • mandolin or sharp knife
  • Food processor or sharp knife

Ingredients

  • 1 lb ribeye steak frozen, and then thawed for 45 minutes
  • 1 tablespoon olive oil
  • 1 medium onion chopped
  • 1 green bell pepper seeded and chopped
  • 1 tablespoon soy sauce
  • ½ teaspoon Kosher salt
  • ½ teaspoon black pepper ground
  • 6 egg roll wrappers
  • 2 cups Provolone cheese grated
  • vegetable oil for frying
  • chili oil optional, for serving
  • 2 tablespoon chives snipped

For the Sour Cream Sauce

  • ½ cup sour cream
  • ½ cup mayonnaise
  • 1 teaspoon chili powder
  • 1 teaspoon garlic powder

Instructions

  • Once the steak has started to thaw a bit (not too much), very carefully slice the steak on your mandolin set at ⅛" or slice with a sharp knife. You won't be able to slice the entire steak. Save what you can't slice on the mandolin for another use.
    1 lb ribeye steak
  • Heat the oil in a large skillet over medium heat. Add the onion and peppers and sauté until soft, about 4 minutes. Stir in the soy sauce and cook for another minute.
    1 tablespoon olive oil, 1 medium onion, 1 green bell pepper, 1 tablespoon soy sauce
  • Add the steak and cook, stirring often, until no longer pink. Stir in the salt and pepper. Carefully transfer the meat mixture to your food processor and pulse a few times (don't over-process, just need a rough chop). Or, give the meat mixture a rough chop with a large knife. Set aside.
    ½ teaspoon Kosher salt, ½ teaspoon black pepper
  • Place an egg roll wrapper on a cutting board and moisten your fingers with water. Rub water along the edges of the wrapper. Place about 1 tablespoon of the grated Provolone cheese down the middle of the wrapper, from one corner to the other. Spoon about ¼ cup of the meat mixture over the cheese and top with another tablespoon of cheese.
    6 egg roll wrappers, 2 cups Provolone cheese
  • Fold one edge of the wrapper over the filling and tuck in the other side. Fold in the ends to seal. Roll the wrapper to completely seal. Set aside and repeat the process until all the meat mixture has been used. You should have 6 to 8 egg rolls.
  • Meanwhile, heat the vegetable oil in a large sturdy skillet (or your deep fryer) to 340°F. Working in batches, very carefully lower the egg rolls into the hot oil, not overcrowding the pan. Use metal tongs (or a couple of forks) to turn the egg rolls in the oil, working to have the rolls turn golden, without burning in any spots. Remove to a paper towel-lined plate. Repeat with remaining egg rolls.
    vegetable oil
  • Meanwhile, mix together the sour cream sauce ingredients.
    ½ cup sour cream, ½ cup mayonnaise, 1 teaspoon chili powder, 1 teaspoon garlic powder
  • To serve, slice the egg rolls in half, on the diagonal. Drizzle hot chili onto a platter and then place the cut rolls on the platter. Spoon some of the sour cream sauce over the top and sprinkle on chives. Serve at once.
    chili oil, 2 tablespoon chives

Video

Notes

See the video near the top of the blog post for visual guidance. If you liked the video, please subscribe to our YouTube channel. 
If you don't want to slice the steak, you can substitute thinly sliced roast beef from the deli department at your supermarket. But, the thinly sliced steak delivers authentic taste and texture. 
The egg rolls can be assembled up to 12 hours in advance. Keep covered in the fridge and let come to room temperature before frying. 
See the blog post for instructions on how to bake or air-fry the egg rolls. 

Nutrition

Calories: 723kcal | Carbohydrates: 19g | Protein: 44g | Fat: 26g | Saturated Fat: 11g | Polyunsaturated Fat: 9g | Monounsaturated Fat: 10g | Trans Fat: 0.1g | Cholesterol: 145mg | Sodium: 790mg | Potassium: 581mg | Fiber: 2g | Sugar: 4g | Vitamin A: 1123IU | Vitamin C: 27mg | Calcium: 562mg | Iron: 3mg

Cream Cheese Apple Bars with Pecan Streusel

November 1, 2023 by Kris Longwell 6 Comments

A close-up view of a cream cheese apple bar with pecan streusel topping sitting on a white dessert plate.

This delectable dessert is the true celebration of everything we love about baking in the fall!

Perfect served warm, room temperature, or even chilled. We love to serve it with homemade warm caramel sauce, but, honestly, it’s amazing on its own. Perfect for the holiday season and beyond.

Cream cheese apple bars with pecan streusel on a white plate

How to Make Cream Cheese Apple Bars with Pecan Streusel


NOTE: If you liked this video, please subscribe to our YouTube Channel. Remember to click the little ‘bell’ icon so you’ll never miss a new video. Thank you!

The Ingredients You Will Need

Nothing exotic with this recipe at all. Below is what you’ll need to have on hand.

For the Shortbread Crust
Pecans – Roughly chopped
Brown sugar – Light or brown, whatever you prefer or have on hand.
Butter – Softened to room temperature.
Vanilla extract
Flour – All-purpose
Salt – Kosher

For the Cream Cheese Filling
Cream cheese – Room temperature.
Sugar – Granulated.
Eggs – Room temperature, if possible.
Lemon – Both zest and juice.
Vanilla extract

For the Apple Filling
Apples – We recommend Granny Smith.
Sugar – Granulated
Spices – Cinnamon, nutmeg, and allspice.
Lemon – Zest and juice.
Vanilla extract

For the Streusel
Brown sugar – Light or dar, whatever you prefer or have on hand.
Flour – All-purpose.
Oats – Old-fashioned.
Toffee bits – Heath is our favorite.
Pecans – Chopped
Salt – Kosher.
Butter – Softened to room temperature.

EXPERT TIP: Be sure to let the crust cool on a wire rack before spreading the cream cheese filling over the top of it. It only takes about 15 to 20 minutes for the crust to cool.

cream cheese batter pouring onto crust for cream cheese apple bars

Tips for Making Perfect Cream Cheese Apple Bars

Make Sure Butter and Cream Cheese are Room Temperature – This will allow you to make a flaky, tender crust and very creamy filling.

Use a Food Processor – This makes the pecans a uniform size for the crust and makes preparing it easy and fast.

Let the Bars Cool Completely – Letting the bars cool completely before cutting will allow them to set and make them easier to cut cleanly. If you want to serve warm, simply reheat in the microwave or on a low-temp oven.

EXPERT TIP: We love all types of apples, but we find that Granny Smith apples work best.

Diced apples for cream cheese apple bars

How To Serve

As mentioned, these can be served warm, room temperature, or even chilled.

We like to cut them into bars once they have completely cooled off. Be sure to chill them so the filling will completely set. You can serve them warm right out of the oven, but they will be a little messy (see video for reference).

It’s not necessary, but a drizzle of homemade caramel sauce truly puts them over the top.

Pecan Oatmeal streusel in a glass bowl

Other Fall Baking Recipes to Try

Fall is such a glorious time for baking. Here are some of our favorite recipes that we’re pretty certain you and your family will love, too!

Apple and Caramel Pie
Sweet Potato Pie with Pecan Topping
Homemade Apple Pie
Classic Pumpkin Pie
Pumpkin Whoopie Pies
Homemade Pecan Pie
Sweet Potato Bundt Cake with Brown Sugar Frosting
Butterscotch and Pumpkin Bread
Banana Nut Bread
Apple Cider Doughnuts

These are all wonderful in their own way, but, in the meantime, aren’t these bars calling your name?

Cream cheese apple bars on a spatula

If you’re looking for a delicious fall dessert that will put a smile on the faces of the one’s you love…you’ve come to the right place.

These are even better with a drizzle of warm caramel sauce of the top.

Make these bars, and you will have lots of happy folks in your home.

Cream cheese apple bars with pecan streusel on a white plate.

Ready to make the best fall dessert in town? Go for it!

And when you do, be sure to take a photo of it, post it on Instagram, and tag @HowToFeedaLoon and hashtag #HowToFeedaLoon!

A close-up view of a cream cheese apple bar with pecan streusel topping sitting on a white dessert plate.
Print Recipe
5 from 2 votes

Cream Cheese Apple Bars with Pecan Streusel

These Cream Cheese Apple Bars with Pecan Streusel are the quintessential fall dessert to fall in love with.  So heartwarming and a little decadent...they are simply divine.  You can serve them warm, but we love them chilled with a little warmed caramel sauce drizzled over the top. Heavenly. 
Prep Time40 minutes mins
Cook Time45 minutes mins
Cool30 minutes mins
Total Time1 hour hr 25 minutes mins
Course: Dessert
Cuisine: American
Servings: 12 people
Calories: 752kcal
Author: Kris Longwell

Equipment

  • 9"x13" baking dish

Ingredients

For the Pecan Shortbread Crust

  • 1 cup pecans chopped
  • ½ cup brown sugar light or dark
  • 1 cup unsalted butter 2 sticks, room temperature
  • ½ teaspoon vanilla extract
  • 2¼ cups all-purpose flour
  • ½ teaspoon Kosher salt
  • 2 tablespoon butter softened, for greasing the dish

For the Cream Cheese Filling

  • 2 8 oz. packages cream cheese softened, room temperature
  • ¾ cup sugar
  • 2 large eggs
  • ½ teaspoon lemon zest
  • 1 teaspoon lemon juice
  • 1 teaspoon vanilla extract

For the Apple Filling

  • 3 large Granny Smith apples peeled, cored and chopped
  • 3 tablespoon sugar
  • 1 teaspoon cinnamon
  • ½ teaspoon nutmeg
  • ½ teaspoon allspice
  • ½ teaspoon lemon zest
  • ½ teaspoon lemon juice
  • 1 teaspoon vanilla extract

For the Pecan-Oatmeal Streusel

  • 1 cup brown sugar light or brown
  • 1 cup all-purpose flour
  • 1 cup old-fashioned oats
  • ½ cup toffee bits we use Heath bar bits
  • ½ cup pecans chopped
  • ½ teaspoon Kosher salt
  • ¾ cup unsalted butter softened, room temp
  • 1 cup caramel sauce, warmed purchased or homemade, optional

Instructions

Make the Pecan Shortbread Crust

  • Preheat oven to 350°F.
  • In a food processor, pulse together the pecans and the sugar for 30 seconds.
    1 cup pecans, ½ cup brown sugar
  • In a mixer, on medium speed, beat the butter, vanilla, and pecan/sugar mixture until creamed and fluffy, about 2 minutes.  Mix in the flour and salt until just combined.
    1 cup unsalted butter, ½ teaspoon vanilla extract, 2¼ cups all-purpose flour, ½ teaspoon Kosher salt
  • Press the shortbread into the bottom of a 9"x13" baking dish that has been well-greased with butter, shortening, or cooking spray.  Use a fork to puncture the crust all over.
    2 tablespoon butter
  • Bake for 15 minutes until lightly browned.  Remove from oven and let cool on a wire rack. 

Prepare the Cream Cheese Filling

  • In a medium bowl, mix (stand mixer our hand-held mixer) beat the cream cheese and sugar until smooth.
    2 8 oz. packages cream cheese, ¾ cup sugar
  • One at a time, add the eggs, beating well after each addition.
    2 large eggs
  • Add the lemon zest and lemon juice along with the vanilla and beat until combined.  
    ½ teaspoon lemon zest, 1 teaspoon lemon juice, 1 teaspoon vanilla extract
  • Spread the filling over the cooled shortbread. 

Prepare the Apple Filling

  • In a separate bowl, stir together the apples, sugar, cinnamon, nutmeg, allspice, lemon zest, lemon juice, and vanilla.
    3 large Granny Smith apples, 3 tablespoon sugar, 1 teaspoon cinnamon, ½ teaspoon nutmeg, ½ teaspoon allspice, ½ teaspoon lemon zest, ½ teaspoon lemon juice, 1 teaspoon vanilla extract
  • Spread the apple mixture over the cream cheese mixture. 

Prepare the Pecan-Oatmeal Streusel

  • In a medium bowl, stir together brown sugar, flour, oats, toffee bits, pecans, and salt.  Carefully fold in the butter with a fork, until incorporated. The mixture will be a bit crumbly. 
    1 cup brown sugar, 1 cup all-purpose flour, 1 cup old-fashioned oats, ½ cup toffee bits, ½ cup pecans, ½ teaspoon Kosher salt, ¾ cup unsalted butter
  • Sprinkle the streusel over the apples. 

Finish Off the Bars

  • Bake until set, about 30 minutes.  Let cool for 30 minutes on a rack.
  • Serve warm, or cover and chill in the refrigerator.  Serve with warm caramel sauce, if desired. 
    1 cup caramel sauce, warmed

Video

Notes

See the video near the top of the blog post for visual guidance. If you liked the video, please subscribe to our YouTube channel. 
Remember to set your butter and cream cheese out at least 2 hours before you start preparing the bars. 
The bars can easily be cut after the dish has completely cooled. You can serve them warm out of the oven, but the cream cheese filling will ooze a bit.
The bars will keep covered in the fridge for up to 7 days. They can be frozen for several months. 

Nutrition

Calories: 752kcal | Carbohydrates: 89g | Protein: 7g | Fat: 32g | Saturated Fat: 9g | Polyunsaturated Fat: 4g | Monounsaturated Fat: 7g | Trans Fat: 1g | Cholesterol: 118mg | Sodium: 248mg | Potassium: 237mg | Fiber: 4g | Sugar: 55g | Vitamin A: 1085IU | Vitamin C: 3mg | Calcium: 63mg | Iron: 3mg

POST UPDATE: This recipe was originally published in September 2018, but was updated with improved tweaks to the recipe with new tips and photography and a fabulous new video in November 2023!

Chicken and Broccoli Stir-Fry with Mushrooms

October 29, 2023 by Kris Longwell 2 Comments

A straight-on view of a shallow bowl filled with steamed white rice topped with chicken and broccoli stir-fry with chop sticks on the side of the bowl.

If you love Chinese take-out, you are going to flip for this recipe.

We love all kinds of stir-fry, but there is something extra special with this particular recipe. Seek out the fermented black beans, if possible. They add an umami flavor that is just amazing. And, of course, perfectly steamed rice makes it all come together perfectly.

A straight-on view of a shallow bowl filled with steamed white rice topped with chicken and broccoli stir-fry with chop sticks on the side of the bowl.

How To Make Chicken and Broccoli Stir-Fry with Mushrooms


NOTE: If you liked this video, please subscribe to our YouTube channel. Remember to click the little ‘bell’ icon so you’ll never miss a new video! Thank you!

The Ingredients You Will Need

You may need to make a quick trip to your favorite Asian food market to grab a couple of items listed below, or, order them online.

Here’s What You’ll Need to Have on Hand

Fermented Black Beans – These are critical to giving this stir-fry its amazing umami taste. You can’t substitute regular black beans. You’ll need to go to an Asian market or order them online.
Chinese Cooking Wine (Shaoxing Wine) – This can be found in the Asian section of many well-stocked supermarkets, at Asian markets, or online. A perfectly fine substitute is a good-quality dry Sherry.
Chicken – We recommend boneless, skinless chicken thighs. The dark meat adds depth of flavor. However, boneless, skinless chicken breasts will work, too. Cut into bite-sized chunks.
Seasonings – Salt and pepper
Sesame Oil – Found in the Asian section of most well-stocked supermarkets, or Asian markets, or online.
Peanut Oil – This is ideal for high-heat stir-frying. Vegetable oil can be substituted. We don’t recommend stir-frying with olive oil.
Garlic – Minced.
Ginger – Be sure to use fresh garlic. Chop it finely.
Broccoli – Fresh florets are definitely best, but frozen could be used in a pinch. Allow to thaw completely and pat it dry.
Shallot – Chopped finely. White or red onion can be substituted.
Chicken Stock – Either stock or broth can be used.
Mushrooms – We love using ‘straw’ mushrooms, roughly chopped (or broken). These can be found at your Asian food market or online. Sliced button mushrooms can be substituted. Stir-fry them before you add the broccoli.
Steamed Rice – Or cooked lo mein noodles.
Thai Basil – Chopped. This is for garnish and is optional. Regular basil is a good substitute.
Soy Sauce – For serving.

EXPERT TIP: Cut the broccoli into bite-sized florets. As they stir-fry, they will reduce in size. Don’t overcook them. They will soften very quickly in the high heat.

A person transferring broccoli florets from a white bowl into a wok on a gas stove with sautéed shallots, ginger, and garlic in it.

Tips For Perfect Chicken and Broccoli Stir-Fry with Mushrooms

Allow The Chicken to Marinate – The sesame oil imparts a delicious flavor to the seasoned chicken. Allow it to chill in the sesame oil for at least 20 minutes, or up to overnight.

Get the Fermented Black Beans – Fermented black beans are a traditional ingredient in Chinese stir-fries and add a rich, savory flavor to the dish. Easily order them online or find them at your local Asian market.

Stir-Fry Quickly Over High Heat – Stir-fry the chicken and vegetables quickly over high heat to retain their crisp texture and prevent them from becoming overcooked and mushy.

EXPERT TIP: ‘Mise en place’ (everything in its place) is critical when stir-frying. All components of the dish cook very quickly, which is why it is important to have everything prepped and easy to reach once you start cooking.

Chunks of cooked chicken thighs transferring from a white bowl into a wok on a gas stove that is filled with sautéed mushrooms, broccoli, and vegetables.

How To Serve

First, you’ll need to decide if you want to serve the dish over cooked rice or noodles. Both are wonderful choices.

When serving, either have the rice (or noodles) in a large bowl and allow guests to place as much as they want on the plates, or, go ahead and provide the rice (or noodles) on the plates and let guests top it with the stir-fry.

We love to serve it with chopped Thai basil (or just regular basil) and soy sauce. Low-sodium soy sauce is always a good option.

EXPERT TIP: If you don’t have a wok, this dish can easily be prepared in a large skillet.

An overhead view of a wok filled with stir-fried chicken, broccoli, and mushrooms with a wooden spoon inserted off to the side.

Other Classic Chinese “Take Out” Recipes to Try

We just love cooking all kinds of Asian dishes at home. Here are some of our favorites that we’re pretty sure you will love, too.

Beef and Broccoli Stir-Fry
Vegetable Stir-Fry
Authentic General Tso’s Chicken
Crispy Sesame Chicken
Kung Pao Shrimp
Mongolian Beef
Classic Chicken Fried Rice
Pork Dumplings with Peanut Sauce
Slow-Cooker Chicken Chow Mein

These are all absolutely amazingly delicious. But, in the meantime, isn’t this calling your name right now?

An overhead view of two shallow bowls filled with white rice topped with chicken and broccoli stir-fry both sitting next to a bowl of white rice.

This is one of our favorite Chinese dishes to prepare at home.

Leftovers, just like take-out, keep perfectly fine in the fridge and can easily be reheated in the microwave or on the stove the next day (but, it’s definitely best when served fresh).

If you can’t find the fermented beans, just omit them. You won’t get that extra umami burst of flavor, but it will still be delicious.

EXPERT TIP: The addition of soy sauce is optional, but we love the added depth of flavor it provides.

A person pouring soy sauce from a small ceramic jug onto a bowl filled with chicken and broccoli stir-fry over steamed white rice.

Ready to make a dish that will rival any Chinese takeout in town? Go for it!

And when you do, be sure to take a photo of it, post it on Instagram, and tag @HowToFeedaLoon and hashtag #HowToFeedaLoon!

A close-up view of a shallow bowl filled with a layer of white rice topped with chicken and broccoli stir-fry with mushrooms.
Print Recipe
No ratings yet

Chicken and Broccoli Stir-Fry with Mushrooms

Once you get a hold of all of the ingredients, this stir-fry is easy to prepare but is very authentic in taste. Find fermented black beans and straw mushrooms in your local Asian market, or online. Be sure to get your wok piping hot, and do all the prep work before you start cooking!
Prep Time20 minutes mins
Cook Time12 minutes mins
Total Time32 minutes mins
Course: Entree
Cuisine: Asian / American, Chinese
Servings: 4 people
Calories: 368kcal
Author: Kris Longwell

Equipment

  • Wok or large skillet

Ingredients

  • ¼ cup fermented black beans
  • ½ cup Chinese cooking wine aka: Shaoxing wine, can substitute Sherry
  • 1 lb chicken thighs boneless, skinless, cut into pieces
  • Salt and pepper
  • 1 tablespoon toasted sesame oil
  • 2 tablespoon cornstarch
  • 2 tablespoon peanut oil
  • 4 cloves garlic minced
  • 1 tablespoon ginger fresh, peeled and finely chopped
  • 6 oz broccoli florets 3¾ to 4 cups, fresh
  • 1 medium shallot chopped, usually about ½ cup
  • ¼ cup chicken stock
  • 1 15 oz. can straw mushrooms drained, whole or broken (see NOTES)
  • ½ cup Thai basil leaves for garnish (optional), chopped
  • 3 cups steamed white rice

Instructions

Prep the Beans and Chicken

  • In a bowl, soak the black beans in the wine for 20 minutes, or up to overnight. Drain, reserving the wine.
    ¼ cup fermented black beans, ½ cup Chinese cooking wine
  • In another bowl, liberally season the chicken pieces with salt and pepper. Pour the sesame oil over the chicken and then stir until fully coasted. Cover and chill for at least 20 minutes, or up to overnight.
    1 lb chicken thighs, Salt and pepper, 1 tablespoon toasted sesame oil

Stir-Fry

  • In a small bowl, make a slurry by mixing together the cornstarch with 1 to 2 tablespoon water. The mixture should be slightly thick, but not paste. Adjust with a little more cornstarch (or water), if necessary.
    2 tablespoon cornstarch
  • Heat the peanut oil over high heat in your wok or large skillet.
    2 tablespoon peanut oil
  • Add the chicken and stir-fry, until starting to brown, about 3 minutes.
  • Transfer the chicken to a bowl (don't worry, you're not done cooking it yet).
  • Add the garlic, ginger, and black beans to the wok and stir-fry until fragrant, about 30 seconds.
    4 cloves garlic, 1 tablespoon ginger
  • Add the broccoli and shallots and stir-fry for 1 minute.
    6 oz broccoli florets, 1 medium shallot
  • Add the stock, reserved wine, ½ teaspoon salt, and cornstarch slurry. Stir to combine.
    ¼ cup chicken stock
  • Return the chicken to the pan, add the mushrooms, and stir-fry for another minute or so until the sauce thickens somewhat.
    1 15 oz. can straw mushrooms
  • Serve immediately over rice (or noodles), and garnish with the basil, if using, and soy sauce passed at the table.
    ½ cup Thai basil leaves, 3 cups steamed white rice

Video

Notes

See the video near the top of the blog post for visual guidance. If you liked the video, please subscribe to our YouTube channel. 
We love the taste of dark chicken meat (ie, chicken thighs), however, boneless, skinless chicken breasts can be substituted with no problem. 
Fermented beans are actually soybeans that have been salted and then fermented. They can be found at Asian markets or online (see link in the post). Canned black beans are not a good substitute. If you can't get them, just omit them. 
Straw mushrooms can be found in Asian markets or online. If you can't get them, you can use sliced fresh mushrooms. Sauté them along with the vegetables, before adding the broccoli. 
Leftovers will keep covered in the fridge for up to 5 days. Reheat in the microwave on HIGH for 1 to 2 minutes, or on the stove over medium heat. 

Nutrition

Calories: 368kcal | Carbohydrates: 2g | Protein: 16g | Fat: 2g | Saturated Fat: 0.2g | Sodium: 15mg | Fiber: 1g | Sugar: 0.5g | Calcium: 3mg | Iron: 0.2mg

POST UPDATE: This recipe was originally published in January, 2017, but was updated with improved tweaks to the recipe with new tips and photography and a fabulous new video in October, 2023.

Louisiana Dirty Rice

October 25, 2023 by Kris Longwell 10 Comments

A straight-on view of a white serving bowl filled with Cajun dirty rice topped with chopped scallions and several dashes of cayenne hot sauce.

If you love Louisiana cuisine, Cajun to be exact, then you’ve probably enjoyed this dish plenty of times. Making it at home is so much fun!

We’re not born and raised in Louisiana, but, we visit as often as we can, and every single time we fall in love with the people and cuisine even more than the last. This classic dish is one of our favorites and easy to prepare at home. Be sure to make a batch of perfectly steamed rice, and you’ll be set.

A straight-on view of a white serving bowl filled with Cajun dirty rice topped with chopped scallions and several dashes of cayenne hot sauce.

How To Make Cajun Dirty Rice


NOTE: If you liked this video, please subscribe to our YouTube channel. Remember to click the little ‘bell’ icon so you’ll never miss a new video. Thank you!

The Ingredients You Will Need

Legend has it that this dish is called ‘dirty’ because it looks ‘dirty.’ We think it looks beautiful, especially after you take that first bite. The ingredients can be adapted to your own likings, but chicken livers, ground pork, and rice are common.

Oil – Vegetable, canola, or olive are all acceptable.
Pork – Ground. We’ve tried breakfast sausage before, and it’s delicious, too, but not commonly used.
Chicken livers – Found in the poultry section of most well-stocked supermarkets. Sometimes they are in the frozen section.
Seasonings – Salt, pepper, and chili powder (cayenne is more common, but we love a good-quality chili powder).
Onion – Finely chopped.
Celery – Finely chopped.
Garlic – Minced.
Jalapeño – Seeded and finely chopped. Leave some of the seeds in for extra heat.
Oregano – Dried is great. Double the amount if using fresh.
Rice – Steamed. It should be wet and not dried out.
Scallions – Chopped.
Parsley – Chopped, optional. It’s for garnishing.

EXPERT TIP: As you are cooking the puréed chicken livers and ground pork, it’s good if it sticks to the pan a little. You want to get an almost crusty texture.

A straight-on view of a large cast-iron skillet partially filled with Cajun dirty rice with a wooden spoon inserted into the middle.

Tips For Making Perfect Cajun Dirty Rice

Don’t Forget the Chicken Livers -Chicken livers are a traditional ingredient in dirty rice and add a rich, earthy flavor to the dish. Purée them in a blender or food processor.

Cook the Livers and Pork on High Heat – Let the livers and pork rest on the hot skillet without stirring periodically. It will start to stick to the pan. Then scrape it up. This adds wonderful texture to the dirty rice.

Use Long-Grain Rice – Steamed long-grain rice is the traditional rice used in dirty rice and will give the dish a fluffy texture and nutty flavor. Instant-rice can be used in a pinch, but long-grain is best.

A large bowl of cooked white rice being transferred into a large skillet of a simmering sauce with cooked sausage, scallions, and herbs.

How To Serve

This dish is filling and makes a nice main coarse meal. However, it’s also an amazing side dish to some of the classic entree dishes listed below.

It also reheats beautifully. Simply reheat in a skillet over medium heat with a few more splashes of chicken broth.

Be sure to serve it with your favorite hot sauce, such as Crystals, Louisiana-Style, or Tabasco!

We love to serve it family-style right out of the skillet we prepare it in.

An overhead view of a large black cast-iron skillet filled with Cajun dirty rice with a big wooden spoon inserted into the middle of it.

Other Classic Louisiana-Style Recipes to Try

If you love Cajun, Creole, New Orleans, or any style of Louisiana cuisine, you will absolutely love these classic dishes. Just remember: New Orleans is not considered Cajun or Creole, although there is plenty of Cajun food served there.

Classic Jambalaya
Crawfish Étoufée
Shrimp and Okra Gumbo
Chicken and Sausage Gumbo
Creole Chicken and Rice
Red Beans and Rice
Fried Catfish Po-Boy
Authentic Muffuletta
Classic Beignets

These are all nothing short of amazing. But, in the meantime, isn’t this bowl of yumminess catching your eye?

An overhead view of a white serving bowl filled with a pile of Cajun directy rice with a fork stuck on the side and fresh scallions and parsley along the outside of the bowl.

Dirty Rice has a long, challenging history, and comes from a dark place in the United State’s history. But it is steeped in tradition and has found its place in culinary excellence.

This dish has been a mainstay in our home for many years.

We also know it is very near and dear to so many, especially generations from Cajun country down in beautiful Louisiana.

This is sure to become a family favorite. And, don’t worry about the chicken livers. No one will identify the flavor. It just gives a depth of taste that is truly wonderful.

A large wooden spoon raising a heaping pile of Cajun dirty rice from a large black skillet filled with the same.

Ready to make the best Cajun dish this side of the Bayou? Go for it!

And when you do, be sure to take a photo of it, post it on Instagram, and tag @HowToFeedaLoon and hashtag #HowToFeedaLoon!

A straight-on view of a white serving bowl filled with Cajun dirty rice topped with chopped scallions and several dashes of cayenne hot sauce.
Print Recipe
5 from 2 votes

Louisiana Dirty Rice

Dirty Rice, often called Cajun Rice, is deeply flavorful and is perfect for a main dish, but also makes a wonderful side. Don't worry about the chicken livers, once puréed, they cook easily and don't make the dish taste like liver. They just add a depth of flavor that is wonderful.
Prep Time15 minutes mins
Cook Time20 minutes mins
Preparing the rice30 minutes mins
Total Time1 hour hr 5 minutes mins
Course: Entree or Side Dish
Cuisine: Cajun, Louisiana
Servings: 6 people
Author: Kris Longwell

Ingredients

  • 3 tablespoon vegetable oil
  • 8 oz ground pork
  • ¼ cup chicken livers (about 4 oz), puréed
  • 1½ teaspoon Kosher salt
  • ½ teaspoon ground black pepper
  • ½ teaspoon chili powder
  • 1¾ cups chicken stock
  • 1 medium onion chopped
  • 2 stalks celery stalks chopped
  • 3 cloves garlic minced
  • 1 jalapeño stemmed, seeded, and finely chopped
  • 1 tablespoon oregano dried
  • 3 cups steamed rice (recipe below)
  • 1 bunch scallions chopped, plus extra for garnish
  • 2 tablespoon parsley chopped
  • Louisiana-style hot sauce for serving

Steamed Rice

  • 1½ cup long-grain rice
  • 2 cups water
  • 2 bay leaves
  • Pinch Kosher salt

Instructions

  • In a large skillet, heat the oil over high heat. Once hot, add the pork and chicken livers and cook, stirring, until browned.
    3 tablespoon vegetable oil, 8 oz ground pork, ¼ cup chicken livers
  • Add salt, pepper, and chili powder and stir often, but not constantly: The idea is to get the meat to stick to the pan and get a little crusty.
    1½ teaspoon Kosher salt, ½ teaspoon ground black pepper, ½ teaspoon chili powder
  • Add ¼ cup of the chicken stock and simmer until it has evaporated, allowing the meat mixture to get browned and crusty and stick to the pan once again.
    1¾ cups chicken stock
  • Add the onion, celery, garlic, jalapeño, and oregano and cook, stirring, until the veggies are nicely browned and crusty and beginning to stick to the pan.
    1 medium onion, 2 stalks celery stalks, 3 cloves garlic, 1 jalapeño, 1 tablespoon oregano
  • Add the rice (recipe below), the remaining 1½ cups broth, the scallions, and parsley.  Stir until the liquid is absorbed and the rice is heated through, about 5 minutes.  
    3 cups steamed rice, 1 bunch scallions, 2 tablespoon parsley
  • Serve at once, garnishing with extra chopped scallions and hot sauce on the side.
    Louisiana-style hot sauce

How to Make Perfectly Steamed Rice

  • Combine the rice, water, bay leaves, and salt in a medium pan and bring to a boil over medium-high heat.
    1½ cup long-grain rice, 2 cups water, 2 bay leaves, Pinch Kosher salt
  • Reduce the heat to low, cover with a tight-fitting lid, and simmer for 15 to 20 minutes.
  • Remove from the heat, and keep covered for an additional 5 minutes.
  • Remove the lid, cool for a few minutes, and then fluff the rice with a fork. 

Video

Notes

See the video near the top of the blog post for visual guidance. If you liked the video, please subscribe to our YouTube channel. 
Chicken livers can usually be found in containers in the poultry section of most well-stocked supermarkets. Sometimes they are frozen. Chicken livers are traditional for dirty rice. They don't make the rice have a strong chicken liver taste at all. If desired, you can leave them out and you'll still have a tasty dish. 
Leftovers will keep covered in the fridge for up to 6 to 7 days. It can be frozen for up to 4 to 6 months. Reheat in a skillet over medium heat with a few splashes of broth. 

POST UPDATE: This recipe was originally published in January, 2014, but was updated with improved tweaks to the recipe with new tips and photography and a fabulous new video in October, 2023!

Hungarian Goulash

October 15, 2023 by Kris Longwell 8 Comments

An overhead view of a black cast-iron pot filled with Hungarian goulash with chunks of beef, yellow potatoes, red bell peppers, and a brown sauce.

This recipe might be a little different than the goulash your mom used to make.

The flavors in this traditional stew are deeply satisfying and will warm you on a chilly night. No need to purchase an expensive cut of beef because the slow cooking in the savory sauce will turn it into melt-in-your-mouth delicious. Serve with cloverleaf dinner rolls for a comfort meal your family will devour.

An overhead view of a black cast-iron pot filled with Hungarian goulash with chunks of beef, yellow potatoes, red bell peppers, and a brown sauce.

How To Make Hungarian Goulash

NOTE: If you liked this video, please subscribe to our YouTube channel. Remember to click the little ‘bell’ icon so you’ll never miss a new video. Thank you!

The Ingredients You Will Need

Bacon – Go with regular slice or thick slice, they both are excellent.
Beef – Pick a roast that is nicely marbled, but not expensive. A chuck roast is best.
Seasonings – Salt, pepper, smoked paprika, caraway seeds, and fresh oregano (or dried, if necessary).
Onions – Chopped
Tomato paste – For depth of flavor.
Wine – We prefer a good white wine (Chardonnay), but you could also go with a red (Cabernet).
Beef broth – Broth or stock is great. You could substitute chicken broth.
Red bell pepper – Seeded and cut into strips.
Potatoes – Yukon gold are great, quartered.
Egg noodles – Cooked until just tender.
Sour cream – For garnish
Parsley – Optional, but it makes a nice garnish.

EPXERT TIP: Cut the meat into bite-sized chunks and then brown it in the bacon grease. The meat won’t be fully cooked, but will later as it slowly simmers in the sauce.

An overhead view of a black pot filled with chunks of chuck roast that have been browned in olive oil.

Tips for Perfect Hungarian Goulash

Use the Right Cut of Meat – Choose a tough, fatty cut of beef, such as chuck or brisket, that will become tender and flavorful when slow-cooked.

Use Hungarian Paprika – Hungarian paprika is the key ingredient in goulash, and using a high-quality, fresh paprika will give your dish an authentic flavor. Smoked paprika is a great choice, too.

Cook Slowly – Goulash is a slow-cooked dish that requires patience and time to develop its rich flavor and tender texture.

Add Sour Cream at the End – Adding a dollop of sour cream at the end of cooking will give the goulash a creamy, tangy flavor that complements the rich, savory beef and paprika.

EXPERT TIP: Don’t add the potatoes or bell peppers until the last hour of cooking. If you add them too soon, they will be extremely soft and even mushy.

A person dumping quartered chunks of gold potatoes into a pot of simmering chunks of beef, bell peppers in a beef sauce.

How To Serve

You’ll want to serve this right out of the pot with a nice big ladle.

Be sure to have plenty of sour cream on hand.

We love to serve the stew over cooked egg noodles, but it’s also delicious over steamed rice.

A close-up view of a white bowl filled with Hungarian goulash over egg noodles and topped with a dollop of sour cream.

Other Amazing Stew Recipes to Try

There is nothing much more hearty than a comforting stew. Here are some of our favorites that we are certain you and your family will love.

Hearty Beef Stew
Slow-Cooker Beef Stew
Smoked Ham and White Bean Stew
Pozole (Pork and Hominy Stew)
Classic Brunswick Stew
French Chicken Stew
Instant Pot Smoked Sausage Stew
Cioppino (San-Francisco-Style Seafood Stew)

These are all amazing, without a doubt. But isn’t this catching your eye right about now?

A straight-on view of two bowls of Hungarian goulash sitting next to two tall glasses of amber beer.

This version is different than the Americanized version that so many of us remember.

It takes a little more effort, but, boy, oh boy, is it worth it.

And, leftovers are even better the next day, and it freezes beautifully.

We guarantee you that this goulash will become and instant family favorite!

A close-up view of a white bowl that is filled with Hungarian goulash tossed with egg noodles and a portion of it missing.

Ready to make the best stew this side of Budapest? Go for it!

And when you do, be sure to take a photo of it, post it on Instagram, and tag @HowToFeedaLoon and hashtag #HowToFeedaLoon!

An overhead view of a black cast-iron pot filled with Hungarian goulash with chunks of beef, yellow potatoes, red bell peppers, and a brown sauce.
Print Recipe
No ratings yet

Authentic Hungarian Goulash

Hungarian Goulash is different from the Americanized version which is similar to Italian meat sauce. This hearty stew is packed with melt-in-your-mouth beef, tender potatoes, and a savory paprika and caraway sauce that will warm you to the bones.
Prep Time20 minutes mins
Cook Time3 hours hrs 30 minutes mins
Total Time3 hours hrs 50 minutes mins
Course: Entree / Stew
Cuisine: Hungarian
Servings: 8 people
Calories: 441kcal
Author: Kris Longwell

Equipment

  • Large pot with lid A Dutch oven or cast-iron pot works well.

Ingredients

  • 4 slices bacon roughly chopped
  • 2 lbs beef chuck or rump, trimmed of any large pieces of fat, and cut into ¼-inch cubes
  • Salt and pepper
  • 2 medium onions chopped, about 2 cups
  • 3 cloves garlic minced
  • 1 tablespoon paprika preferably Hungarian, or smoked
  • 1 teaspoon caraway seeds
  • 1 tablespoon fresh oregano or 1 teaspoon dried
  • 1 tablespoon tomato paste
  • 1 cup white wine
  • 2 cups beef broth
  • 1 red bell pepper seeded and cut into 1-inch strips
  • 1 lb yellow potatoes peeled and cut into ¾-inch cubes
  • 1 cup sour cream for serving
  • 2 tablespoon fresh parsley chopped, for garnish (optional)

Instructions

  • In a large pot or Dutch oven, cook the bacon until crisp. Remove with a slotted spoon onto a paper towel-lined plate. Set aside. Leave the rendered bacon grease in the pot.
    4 slices bacon
  • Season the beef liberally with salt and pepper. Over medium heat, add the beef to the hot bacon grease and cook until no longer pink on the outside, stirring often, about 10 minutes. Remove the beef from the pot onto a large platter.
    2 lbs beef, Salt and pepper
  • Pour off all but about 2 tablespoon of the grease. Add the onions and sauté over medium-high heat until soft, about 3 to 4 minutes. Add the garlic, and sauté for another minute. Stir in the paprika, caraway seeds, oregano, tomato paste, wine, beef broth, 1 teaspoon salt, and ½ teaspoon pepper. Bring to a boil.
    2 medium onions, 3 cloves garlic, 1 tablespoon paprika, 1 teaspoon caraway seeds, 1 tablespoon fresh oregano, 1 tablespoon tomato paste, 1 cup white wine, 2 cups beef broth
  • Preheat oven to 300°F.
  • Turn the heat off from the pot and stir in the seared beef. Cover and place in the oven for 2 hours.
  • Remove from the oven and carefully take the lid off. Add the reserved bacon, bell peppers, and potatoes. Stir to combine. Place the lid back on and return to the oven for another hour.
    1 red bell pepper, 1 lb yellow potatoes
  • Remove from oven and gently stir. Serve warm, with sour cream and chopped parsley (if using) as garnish.
    1 cup sour cream, 2 tablespoon fresh parsley

Video

Notes

See the video near the top of the blog post for visual guidance. If you liked the video, please subscribe to our YouTube channel. 
Slow-Cooker Method:
  1. Cook bacon, then remove.  Sear seasoned beef in hot bacon grease. Remove and sauté onions and garlic. 
  2. Place beef and onions in your slow cooker and mix in the seasonings, tomato paste, wine, and broth. 
  3. Cook on LOW for 6 hours. Uncover and stir in the reserved bacon, bell peppers, and potatoes. Cook for another 2 hours. 
Leftovers will keep covered in the fridge for up to 1 week and can be frozen for several months. 

Nutrition

Calories: 441kcal | Carbohydrates: 7g | Protein: 23g | Fat: 18g | Saturated Fat: 6g | Polyunsaturated Fat: 2g | Monounsaturated Fat: 5g | Trans Fat: 1g | Cholesterol: 105mg | Sodium: 401mg | Potassium: 543mg | Fiber: 1g | Sugar: 3g | Vitamin A: 1196IU | Vitamin C: 24mg | Calcium: 72mg | Iron: 3mg

POST UPDATE: This recipe was originally published in November 2017, but was updated with improved tweaks to the recipe with new tips and photography and a fabulous new video in October, 2023!

Beer-Braised Kielbasa with Peppers

October 11, 2023 by Kris Longwell 10 Comments

A straight-on view of an antique bowl filled with beer-braised kielbasa and pepper and mashed potatoes sitting next to a tall glass of amber beer.

This dish is the definition of comfort food, especially when the temperatures start to drop outside.

If you like sausage, you are going to absolutely love this dish. Finding top-notch kielbasa from your local butcher is great, but, this dish is so good that store-bought kielbasa (or any fully-cooked sausage) works great. The sauce over best mashed potatoes will probably change your life.

A straight-on view of an antique bowl filled with beer-braised kielbasa and pepper and mashed potatoes sitting next to a tall glass of amber beer.

How To Make Beer-Braised Kielbasa With Peppers


NOTE: If you liked this video, please subscribe to our YouTube channel. Remember to click the little ‘bell’ icon so you’ll never miss a new video! Thank you!

The Ingredients You Will Need

Oil – Olive oil or vegetable oil are both excellent choices.
Kielbasa – Check with your local butcher. Make sure the sausage has been smoked and is fully cooked. If not, you’ll need to fully cook the sausage first. Store-bought kielbasa is great, too. Any type of smoked sausage will work.
Onion – Yellow or white, cut into thin slices. It will cook down as it is being sautéed.
Bell pepper – Red is our favorite, but you could go with green or yellow, or a combination of them.
Flour – All-purpose, this helps thicken the sauce a bit.
Beer – Pick your favorite ale or lager. We don’t recommend stout beer, or flavored beer (lemon infused).
Thyme – Fresh is best, if using dried, cut the quantity in half.
Stock – Chicken, broth or stock. Beef broth can be substituted, too.
Seasonings – Salt and pepper is all that’s needed.
Mashed potatoes – For serving. Don’t skip this! The sauce was made for it!

EXPERT TIP: Slice the kielbasa at an angle. This gives a little more surface area for each medallion and it looks really nice, too! Be sure to sauté them until nicely browned in spots. They don’t all have to be 100% browned or charred.

A close-up view of medallions of kielbasa sausage that are being sautéed in an oval Dutch oven with a wooden spatula.

Tips for Perfect Beer-Braised Kielbasa with Peppers

Use a Good-Quality Kielbasa – Using a high-quality kielbasa will give your dish a better flavor and texture.

Brown the Kielbasa First – Browning the kielbasa in a skillet before braising it will give it a nice crispy texture and added flavor.

Use a Flavorful Beer – Choose a beer with a rich, full flavor to add depth and complexity to the dish.

A person pouring beer from a brown bottle into a large Dutch oven filled with broth and sautéed onions and red bell peppers.

How To Serve

This dish comes together fairly quickly, however, it can be made up to a couple days in advance, and then reheated on the stove until bubbly.

We love to serve this right out of the pot.

Homemade mashed potatoes are an absolute must. Easy homemade cloverleaf rolls are always a nice touch. Anything that can be use to mop up that amazing sauce is a big bonus.

EXPERT TIP: After you’ve sautéed the kielbasa medallions, you’ll need to remove them from the pot. Place them on a large platter and then transfer them to the sauce and simmer for just another 15 to 20 minutes!

A person dumping sautéed medallions of kielbasa sausage into a Dutch oven from an oval platter.

Other Heart-Warming Sausage Recipes to Try

We love cooking with sausage. It’s versatile and adds such a depth of heartiness to any meal. Here some of our favorites that we are certain you and your family will love, too

Black Bean with Sausage Soup
Grilled Bratwurst Sliders with Beer Cheese Sauce
Sausage and Peppers Hero
Braised Bratwurst with Sauerkraut
Authentic German Currywurst
Fettuccini with Creamy Sausage Sauce
Jambalaya with Sausage, Shrimp, and Chicken
Instant Pot Smoked Sausage Stew

But in the meantime, let’s get back to this amazing Beer-Braise Kielbasa with Peppers!

An overhead view of an oval Dutch oven filled with beer-braised kielbasa and onions with a large wooden spoon inserted into it.

There is just something so fantastic about braising this sausage with the onion and red bell pepper with a good ale. The beer and apple cider impart an amazing flavor and makes the best gravy.

And you won’t believe the smell as it simmers in your kitchen.

It is perfect for entertaining and is always a huge hit. The recipe can easily be doubled and is perfect for game-day gatherings, tailgating, or just a fun Sunday at home.

A close-up view of an antique bowl filled with a helping of beer-braised kielbasa and peppers next to a pile of mashed potatoes and gravy.

Ready to make the most amazing pot of comfort food on the block? Go for it!

And when you do, be sure to take a photo of it, post it on Instagram, and tag @HowToFeedaLoon and hashtag #HowToFeedaLoon!

A close-up view of an antique bowl filled with a helping of beer-braised kielbasa and peppers next to a pile of mashed potatoes and gravy.
Print Recipe
4.67 from 3 votes

Beer-Braised Kielbasa with Peppers

This Beer-Braised Kielbasa with Peppers recipe is so comforting and packed with bold flavor. Be sure to get a nice good ale, quality apple cider, and your favorite sausages...and you'll be very happy. And remember, this dish is perfect with homemade mashed potatoes!
Prep Time15 minutes mins
Cook Time45 minutes mins
Total Time1 hour hr
Course: Entree
Cuisine: American / German
Servings: 6 people
Calories: 613kcal
Author: Kris Longwell

Equipment

  • Dutch oven or sturdy large pot with lid

Ingredients

  • 2 tablespoon olive oil
  • 2 lbs kielbasa cut into slices on a diagonal
  • 1 large yellow onion thinly sliced
  • 1 large red bell pepper seeded and thinly sliced
  • 2 tablespoon all-purpose flour
  • 1 cup ale
  • ½ cup apple cider
  • 2 tablespoon thyme thyme, chopped
  • 1½ cups chicken stock
  • 1 teaspoon Kosher salt
  • ½ teaspoon black pepper
  • Mashed potatoes for on the side

Instructions

  • In a large sturdy pot, preferably a Dutch oven, warm the olive oil over medium-high heat.
    2 tablespoon olive oil
  • Add the sausages and cook until browned, about 12 to 15 minutes, stirring frequently.
    2 lbs kielbasa
  • Transfer kielbasa to a plate and set aside.
  • Add the onion and bell pepper to the pot and reduce the heat to medium. Cook until tender, about 5 minutes.
    1 large yellow onion, 1 large red bell pepper
  • Add the flour and cook, stirring, for 2 to 3 minutes.
    2 tablespoon all-purpose flour
  • Whisk in the ale and cider and then add the thyme, stock, salt, and pepper, continuing to whisk until blended.
    1 cup ale, ½ cup apple cider, 2 tablespoon thyme, 1½ cups chicken stock, 1 teaspoon Kosher salt, ½ teaspoon black pepper
  • Bring the mixture to a boil.
  • Return the sausages to the pot and cover, while reducing the heat to medium-low.
  • Cook for 15 minutes.
  • Uncover and continue cooking for another 5 minutes, allowing the sauce to slightly thicken.
  • Serve at once with mashed potatoes on the side.
    Mashed potatoes

Video

Notes

See the video near the top of the blog post for visual guidance. If you liked the video, please subscribe to our YouTube channel. 
If you don't want to cook with beer, then increase the broth/stock by 1 cup.  The flavor won't be quite the same, but it will still be delicious. 
The dish can be made up to several days before serving. Reheat on the stove until bubbly and heated through.  It can also be frozen for several months. Completely thaw before reheating. 
Leftovers will keep in the fridge for 5 to 6 days. 

Nutrition

Calories: 613kcal | Carbohydrates: 15g | Protein: 24g | Fat: 19g | Saturated Fat: 4g | Cholesterol: 108mg | Sodium: 1415mg | Potassium: 567mg | Fiber: 2g | Sugar: 5g | Vitamin A: 1022IU | Vitamin C: 44mg | Calcium: 42mg | Iron: 3mg

POST UPDATE: This recipe was originally published in February 2018 but was updated with improved tweaks to the recipe with new tips and photography and a fabulous new video in October 2023!

Fluffiest Scrambled Eggs

October 8, 2023 by Kris Longwell 6 Comments

An overhead view of fluffiest scrambled eggs on a white plate topped with finely snipped chives and a gold fork on the plate, too.

If you thought there was no way to elevate scrambled eggs to an unforgettable culinary experience, we’re here to show you the way. Serve these alongside homemade Southern buttermilk biscuits and a nice bowl of fruit, and you’ll have as good a breakfast as you’ve ever experienced.

A white plate filled with the fluffiest scrambled eggs that have been garnished with snipped chives and a glass of orange juice nearby.

🥚 Recipe Ingredients

Only a handful of ingredients are required, but the eggs are most important. Find ingredient notes (including variations) below.

Ingredients for farm-fresh scrambled eggs including eggs, butter, salt, pepper, water, and chives all arranged on a white background.

🐔 Ingredients Notes and Variations

  • Fresh eggs – Seek out farm fresh eggs, and you will not be disappointed. If you don’t know anyone with chickens, then seek out a farmer’s market. If not, go with top-notch organic eggs from a good market.
  • Butter – Not much is needed. We recommend unsalted, but salted will work, too, just don’t oversalt later.
  • Water – This is the secret to the fluffiest eggs. Cream is a common and delicious addition, but won’t yield as fluffy eggs as water. Think “steam.”
  • Seasoning – Kosher salt, and if desired, freshly ground black pepper.
  • Additional flavor enhancers – Snipped chives are delicious to sprinkle on top. Just as the eggs are almost done, you can stir in some cheese, such as bits of brie, small shreds of fontina, are shavings of Parmesan.

Expert Tip

We can’t stress enough how using farm fresh eggs makes a world of difference. Ask your neighbors if they know where you could find them. Google it. There are lots of folks who have a chicken coop and love to share their eggs.

👩🏼‍🍳 How To Make the Fluffiest Scrambled Eggs

A glass bowl filled with eggs that have been vigorously whisked so that air bubbles are visible on the surface of the eggs.
  1. Step 1: Crack fresh eggs into a bowl and whisk vigorously until air bubbles appear.
Butter that has been melted over low heat in a large black non-stick skillet with a red spatula resting in the pan.
  1. Step 2: Melt butter over very low heat, swirling the skillet to cover the bottom of the pan. 
A person pouring whisked whole eggs into a skillet with a thin layer of melted butter in the bottom of it.
  1. Step 3: Add water to eggs without stirring, then transfer to the skillet and let them sit without disturbing them.
A person using a red spatula to gently move slightly set eggs from the outer edges in a large non-stick skillet.
  1. Step 4: Use a spatula to move eggs that are beginning to set towards the center of the skillet. 
A person sprinkling salt onto a pile of freshly prepared fluffy scrambled eggs in a black non-stick skillet.
  1. Step 5: Continue until eggs are almost completely cooked and season with salt. 
A white plate filled with a serving of fluffiest scramble eggs that are garnished with chopped chives with piece of buttered toast nearby.
  1. Step 6: Serve at once, garnished with snipped chives.

🍳 The Tools You Will Need

  • Sturdy, medium-sized bowl – For whisking the eggs.
  • Metal whisk – Not too large. The smaller kind makes it easier to whisk with lots of elbow grease.
  • Non-stick skillet – This is critical. If you have a smaller non-stick skillet, you may want to cook the eggs in batches.
  • Rubber spatula – This is for gently pushing the eggs to the center as they slowly begin to cook.

🙋🏽‍♂️ Frequently Asked Questions

Where can I find farm-fresh eggs?

Start by asking neighbors and friends. Lots of folks have chicken coops and have plenty of eggs. Google nearby farms that offer fresh eggs.

How far in advance can fluffiest scrambled eggs be made?

The eggs are so delicious, they are still yummy even after they cool off. But, they are definitely best served fresh from the skillet. If making a large batch, place them in a covered pan and place in a low-temperature oven (250°F) until ready to serve.

Why do I sometimes see cream in scrambled eggs?

Lots of chefs and home cooks add a splash of cream to the scrambled eggs. It adds a luxuriousness to the eggs. However, the cream will keep the eggs from being quite as fluffy. But, they are excellent either way.

A pile of fluffiest scrambled eggs topped with snipped chives on a white dinner plate with a gold fork sitting next to it.

🌞 Other Classic Egg Recipes

  • A serving of huevos rancheros on a black plate garnished with crumbled Cotija cheese and chopped fresh cilantro.
    Authentic Huevos Rancheros
  • An overhead view of a large skillet filled with shakshuka with a spoon in it sitting next to a white bowl filled with poached eggs in a tomato sauce with pita triangles scattered around.
    Shakshuka
  • A white plate with Eggs Blackstone with Sausage being drizzled with hollandaise sauce
    Eggs Blackstone with Sausage
  • A large red skillet filled with an Italian skillet scramble next to a white bowl filled with fresh fruit.
    Italian Skillet Scramble

Ready to make the absolute best eggs of all time? Go for it!

And when you do, be sure to take a photo of them, post it on Instagram, and tag @HowToFeedaLoon and hashtag #HowToFeedaLoon!

A white plate filled with the fluffiest scrambled eggs that have been garnished with snipped chives and a glass of orange juice nearby.
Print Recipe
5 from 4 votes

Fluffiest Scrambled Eggs

Follow these steps to a 'T' and you'll be amazed at how delicious simple scrambled eggs can actually be. We encourage you to make the effort to seek out farm-fresh eggs. They make a big difference!
Prep Time5 minutes mins
Cook Time8 minutes mins
Total Time13 minutes mins
Course: Breakfast
Cuisine: American / French
Servings: 2
Calories: 101kcal
Author: Kris Longwell

Equipment

  • 1 metal whisk and bowl for whisking eggs in
  • 1 12" non-stick skillet

Ingredients

  • 4 farm-fresh eggs
  • 2 tablespoon unsalted butter
  • 2 tablespoon water
  • 1 pinch Kosher salt
  • Ground black pepper optional
  • 2 tablespoon chives finely chopped, optional

Instructions

  • Crack the eggs into a medium-sized bowl. Use your whisk to vigorously mix the eggs for 1 to 2 minutes. Air bubbles should be visible.
    4 farm-fresh eggs
  • Meanwhile, heat your skillet over low heat. Add the butter and swirl it around until completely melted.
    2 tablespoon unsalted butter
  • Add the water to the top of the whisked eggs. Don't stir! Carefully transfer the heavily whisked eggs to the skillet. Don't stir the eggs. Let them rest until just beginning to set in places (usually 2 to 3 minutes).
    2 tablespoon water
  • Use your silicone spatula to gently push the eggs (that have begun to set) toward the middle of the skillet, allowing the runny, uncooked eggs to run into the area on the skillet that is open.
  • Continue this process until the eggs are almost fully scrambled. Remove from heat and keep slowly stirring the eggs and sprinkle in a healthy pinch of salt, and pepper, if using. The heat from the skillet will finish cooking the eggs. Don't overcook!
    1 pinch Kosher salt, Ground black pepper
  • Serve at once, garnishing with snipped chives, if using.
    2 tablespoon chives

Video

Notes

NOTE: Watch the video near the top of the recipe for visual guidance.
Do your best to seek out farm-fresh eggs. The fresher, the better. Ask friends and/or Google “farmer’s markets” in your area. If you can’t get your hands on any, go with organic eggs from a good market. You’ll still get amazing results. 
Low heat is important. 
The recipe can easily be doubled or even tripled. 

Nutrition

Calories: 101kcal | Carbohydrates: 0.1g | Protein: 0.2g | Fat: 11g | Saturated Fat: 7g | Polyunsaturated Fat: 0.4g | Monounsaturated Fat: 3g | Trans Fat: 0.5g | Cholesterol: 30mg | Sodium: 22mg | Potassium: 12mg | Fiber: 0.1g | Sugar: 0.1g | Vitamin A: 480IU | Vitamin C: 2mg | Calcium: 7mg | Iron: 0.1mg

Almond Crusted Cod with Orange Sauce

October 4, 2023 by Kris Longwell 25 Comments

A straight-on view of a white plate with a serving of almond crusted cod sitting next to a spinach salad topped with grated parmesan.

If you love a dish that is easy to prepare but delivers big on taste and is gorgeous, too, then you will absolutely adore this recipe.

The combination of almonds and fresh orange may seem unusual, but there is something about this dish that just absolutely works. Cod is affordable and cooks up flakey and not fishy tasting at all. We love it for classic fish and chips, too. And this dish comes together in about 30 minutes!

A straight-on view of a white plate with a serving of almond crusted cod sitting next to a spinach salad topped with grated parmesan.

How To Make Almond Crusted Cod with Orange Sauce

The Ingredients You Will Need

For the Sauce

Oil – Olive oil or extra-virgin olive oil
Shallot – Finely minced. It can substitute finely chopped yellow or white onion.
Orange juice and orange zest – Fresh is definitely best and recommended.
Vinegar – Champagne is wonderful, but white wine vinegar works great, too.
White wine – Go with a decent drinking wine (not cooking wine). Dry is best, such as Chardonnay or Sauvignon Blanc.
Butter – Unsalted.

For the Fillets

Fresh cod – Found in the seafood department of most supermarkets. You could also go with tilapia, halibut, flounder, or even catfish.
Seasonings – Salt and pepper are all you need.
Flour – All-purpose.
Eggs – Lightly beaten with a tablespoon of water or milk.
Almonds – Chopped in your food processor. Process them until almost completely pulverized, but it’s okay to leave some texture, but not too chunky.
Breadcrumbs – Panko is great, but regular bread crumbs work, too.
Parmesan cheese – Go with a good-quality Parmesan. Pecorino-Romano is a great choice. Be sure to get grated, not shaved.
Olive oil – For lightly frying. See NOTES for more information on this.

EXPERT TIP: Set up a “dredging station” by utilizing three pans or shallow bowls. The first pan will be for the flour, the second for the egg wash, and the third for the almond mixture. Be sure to shake the excess egg off the filet before pressing it into the almond mixture. Use your fingers to help the almond mixture adhere to the fillets.

A person holding up an uncooked fillet of cod that is in a baking pan filled with a breading of pulverized almonds, Parmesan cheese, and breadcrumbes.

Tips for Perfect Almond Crusted Cod

Fresh Is Best – Seek out a fish department (or monger) that you trust. Avoid frozen cod in the freezers in supermarkets. The cod behind the counter may have been previously frozen, but it’s still better than the pre-packaged frozen variety.

Leave Some Texture with the Almonds – You definitely don’t want the almonds in your food processor too chunky, because they will come off during the light frying. But, don’t process them to the point that they’re practically powder. A little texture delivers great taste and a crunchy breading.

Lightly Fry – You’ll need to add enough oil to your skillet to reach halfway up the fillet. Get the oil to where it’s shimmering and almost smoking. Be very gentle when flipping the fillets over; you don’t want to lose any of the breading.

EXPERT TIP: We find that lightly frying the breaded cod in oil delivers that extra-crispy crust. However, you can bake them in a 410°F oven for 10 minutes, and then flip and bake for another 8 minutes, or until crispy. They can also be baked in your air-fryer (see NOTES).

A fillet of cod that has an almond and Parmesan breading on it and is a cast-iron skillet lightly frying in olive oil.

How To Serve

We love to serve this amazing seafood dish alongside a spinach salad with a simple orange vinaigrette.

To make the orange vinaigrette, simply stir together:

  • 2 tablespoon Champagne vinegar (or white wine vinegar)
  • 2 tablespoon Dijon mustard
  • Zest of one orange
  • 1 tablespoon orange juice
  • 3 tablespoon honey
  • ½ teaspoon Kosher salt

Next, whisk in ⅓ cup of extra-virgin olive oil until fully combined. You could also place all ingredients in a jar with a tight-fitting lid and shake vigorously until emulsified.

EXPERT TIP: After making the sauce, keep it warm on the stove while you bread and fry the fish. We like to transfer the warm sauce into a small bowl and allow guests to pour the sauce over their cod.

A dinner spoon being used to drizzle an orange shallot sauce over an almond crusted fillet of cod next to a spinach salad.

Other Amazing Seafood Recipes to Try

We love all kinds of seafood dishes, and here are some of our all-time favorites:

Parmesan-Crusted Cod with Romesco Sauce
Classic Fish and Chips
Mediterranean-Style Baked Red Snapper
Mediterranean Tuna Steaks
Baked Tilapia in Lemon Butter Sauce
Grilled Swordfish
Pan-Seared Halibut with Vegetables
Salmon Puttanesca
Poached Salmon with Capers and Hollandaise Sauce
Seared Haddock with Mushroom Agrodolce Sauce

These are all truly amazing, but isn’t this dish calling your name right about now?

A close-up view of an almond crusted cod with orange sauce next to a small pile of a spinach salad on a white dinner plate.

This dish is so delicious that we’ve had folks who don’t love seafood say they love it.

The crispy almond exterior is such a perfect match to the flaky, tender fillet of cod. And then the orange sauce seals the deal.

As mentioned, this is so beautiful in presentation, it’s wonderful to serve to guests, but it’s so easy (and affordable) that it makes an ideal weeknight dinner at home, too!

A close-up view of a fillet of almond crusted cod with orange sauce that has bite taken out of it and is on a white dinner plate.

Ready to make the best seafood dish in town? Go for it!

And when you do, be sure to take a photo of it, post it on Instagram, and tag @HowToFeedaLoon!

A close-up view of an almond crusted cod with orange sauce next to a small pile of a spinach salad on a white dinner plate.
Print Recipe
5 from 14 votes

Almond Crusted Cod with Orange Sauce

The flavors in this dish work wonderfully together. We love to serve this alongside a spinach salad lightly dressed with a vibrant orange vinaigrette (see blog post for recipe).
Prep Time15 minutes mins
Cook Time15 minutes mins
Total Time30 minutes mins
Course: Seafood
Cuisine: American
Servings: 4 people
Calories: 468kcal
Author: Kris Longwell

Ingredients

For the Sauce

  • 1 tablespoon olive oil
  • ½ shallot finely chopped, about ¼ cup
  • Zest of one orange
  • ¼ cup orange juice
  • ¼ cup white wine
  • 2 tablespoon Champagne vinegar or white wine vinegar
  • 2 tablespoon unsalted butter

For the Almond-Crusted Cod

  • 2 lbs cod fresh, cut four fillets
  • Kosher salt and freshly ground black pepper
  • 1 cup all-purpose flour
  • 2 eggs
  • 1 cup almonds sliced and processed in a food processor (should still have almond bits, don't completely pulverize)
  • 1 cup panko breadcrumbs
  • ¼ cup Parmesan cheese
  • olive oil for frying, See NOTES

Instructions

Make the Sauce

  • In a medium-sized saucepan, heat 1 tablespoon olive oil over medium heat.
    1 tablespoon olive oil
  • Add the shallots and cook until soft, about 3 to 5 minutes. Stir in the orange zest and cook for another minute.
    ½ shallot, Zest of one orange
  • Add the orange juice, wine, vinegar, ½ teaspoon salt, and ¼ pepper. Cook until reduced to about half, approximately 4 to 5 minutes.
    ¼ cup orange juice, ¼ cup white wine, 2 tablespoon Champagne vinegar
  • Remove from heat and stir in the butter. Stir until butter has melted and is incorporated. Keep warm over low heat while you prepare the cod.
    2 tablespoon unsalted butter

Prepare the Almond Crusted Cod

  • Lightly season the cod fillets with salt and pepper.
    2 lbs cod, Kosher salt and freshly ground black pepper
  • Set up a dredging station by adding the flour in one medium-sized pan or bowl, the eggs with 1 tablespoon of water, lightly blended, in another medium bowl, and then the almonds, breadcrumbs, Parmesan, 1 teaspoon salt, and ½ teaspoon pepper in a third medium bowl.
    1 cup all-purpose flour, 2 eggs, 1 cup almonds, 1 cup panko breadcrumbs, ¼ cup Parmesan cheese
  • Coat each fillet first with the flour, shaking off excess, and then dipping into the egg bath, shaking off excess, and then coating with the almond mixture. Let fillets rest for about 5 minutes while you heat the oil.
  • In a large skillet, heat the olive oil over medium-high heat until shimmering and almost starting to smoke.
    olive oil
  • Add the fillets and cook until golden brown on each side, about 2 to 3 minutes per side. Carefully remove from skillet.
  • Place a cooked fillet on each plate and spoon the sauce over the top. Serve at once passing extra sauce on the side.

Video

Notes

See the video near the top of the blog post for visual guidance. If you liked the video, please subscribe to our YouTube channel. 
When lightly frying the breaded cod, add enough oil to your skillet so the fillet will be about half covered (about ¼ inch deep). See the blog post for instructions on baking the fish. 
It's important to use a non-stick skillet. You may need to fry the fillets in batches. You can keep cooked fillets in a low-temp oven (250°F) until all have been prepared. Keep the sauce warm over low heat until ready to serve. 
The sauce can be made several hours in advance. Simply reheat over low heat. The fish can be breaded and refrigerated for up to 4 hours before frying. 

Nutrition

Calories: 468kcal | Carbohydrates: 45g | Protein: 58g | Fat: 16g | Saturated Fat: 7g | Polyunsaturated Fat: 5g | Monounsaturated Fat: 7g | Trans Fat: 0.2g | Cholesterol: 199mg | Sodium: 367mg | Potassium: 1354mg | Fiber: 6g | Sugar: 4g | Vitamin A: 465IU | Vitamin C: 10mg | Calcium: 257mg | Iron: 5mg

POST UPDATE: This recipe was originally published in May 2018, but was updated with improved tweaks to the recipe with new tips and photography and a fabulous new video in October 2023!

Lazy Day Blueberry Cobbler

October 1, 2023 by Kris Longwell 20 Comments

An overhead view of a black cast-iron skillet that is full of an untouched blueberry cobbler with crusty lightly browned edges.

For many, many years, that has been one of our all-time favorite desserts in the world to prepare.

This recipe requires only a few, simple ingredients and comes together very quickly. Serving it with a big scoop of vanilla ice cream is a must.

An overhead view of a black cast-iron skillet that is full of an untouched blueberry cobbler with crusty lightly browned edges.

How To Make Lazy Day Blueberry Cobbler


NOTE: If you liked this video, please subscribe to our YouTube channel. Remember to click the little ‘bell’ icon so you’ll never miss a new video. Thank you!

The Ingredients You Will Need

The list of ingredients you’ll need to make this delicious dessert is not long and very pantry-friendly. Here’s what you’ll need to have on hand:

Butter – Unsalted is what we recommend.
Sugar – Granulated.
Self-rising flour – See NOTES for other options.
Milk – Whole is best.
Lemon juice – From 1 lemon.
Vanilla extract – Don’t skip this ingredient, it adds a wonderful depth of flavor.
Blueberries – Fresh is definitely best, but, frozen will work, too.

EXPERT TIP: We use our 8″ cast-iron skillet to make this cobbler, but you could use any 8×8″, 9×9″, or even 10×10″ baking dish. Be sure to whisk the batter until smooth and silky. A few small lumps are just fine. Pour directly over the melted butter without stirring.

A thick creamy batter being poured into a cast-iron skillet that has a layer of melted butter in it.

Tips for Perfect Lazy Day Blueberry Cobbler

Don’t Stir – Once you’ve whisked together the batter, simply pour it over the melted butter. Don’t stir! The butter is pushed to the edges and forms an amazing crust along the edge of the pan.

Use Fresh – Fresh blueberries really do make a difference. Of course, you can go with frozen, but, just remember, fresh is best! See NOTES about other fruit options.

Lest Rest – When the cobble is ready, it is molten hot. For the safety of your guests, you’ll need to let it rest for about 10 minutes. This also allows the cobbler to settle into the pan, which delivers the perfect texture.

A person dumping fresh blueberries from a glass measuring cup into a cast-iron skillet filled with uncooked cobbler batter.

How to Serve

This cobbler is best served nice and warm after resting for about 10 minutes out of the oven.

It’s also completely addictive once it becomes room temperature. To reheat, simply place in a microwave-safe bowl and cook on HIGH for about 30 to 60 seconds.

And we can’t express this enough: Vanilla ice cream makes the cobble even better. The melting ice cream almost forms a crystallization with the hot crust. It’s indescribable and irresistible!

An overhead view of a cast-iron skillet containing blueberry cobbler with a portion of the cobbler missing and a wooden spoon inserted into the side.

Other Amazing Fruit Dessert Recipes To Try

There are so many reasons to love this blueberry cobbler. But, here are some other fruit desserts that you will absolutely love, too!

Homemade Blueberry Hand Pie (Pop Tarts)
Peach Cobbler
Cherry Pie
Peach Crisp
Lemon Meringue Pie
Best-Ever Fruit Tart
Classic Apple Pie
Key Lie Pie
Strawberry Pavlova

These fruit desserts are all just amazing. But, in the meantime, isn’t this cobbler (with ice cream) calling your name?

An overhead view of a white serving bowl filled with a helping of blueberry cobbler topped with a scoop of vanilla ice cream with a spoon off to the side.

This cobbler is called ‘lazy day’ because it’s so easy, that you can practically make it in your sleep!

And while that is true, the end result is nothing short of spectacular. The crispy, crunchy sweet crust matched against the deeply flavorful blueberries with a touch of lemon and vanilla is just sensational.

You may need to make a double batch. The dessert promises to get gobbled up fast!

A spoon holding up a helping of blueberry cobbler over a bowl of the same.

Ready to make the easiest and most delicious dessert in town? Go for it!

And when you do, be sure to take a photo of it, post it on Instagram, and tag @HowToFeedaLoon and hashtag #HowToFeedaLoon!

An overhead view of a black cast-iron skillet that is full of an untouched blueberry cobbler with crusty lightly browned edges.
Print Recipe
5 from 3 votes

Lazy Day Blueberry Cobbler

This Lazy Day Blueberry Cobbler could not be more delicious and could not be easier to make. Serve with vanilla ice cream! Amazing!
Prep Time15 minutes mins
Cook Time50 minutes mins
Resting time10 minutes mins
Total Time1 hour hr 15 minutes mins
Course: Dessert
Cuisine: American
Servings: 6 people
Calories: 330kcal
Author: Kris Longwell

Equipment

  • 8" cast-iron skillet or 8x8", 9x9", or 10x10" baking dish

Ingredients

  • ¼ cup unsalted butter ½stick
  • 1¼ cups sugar divided
  • 1 cup self-rising flour
  • 1 cup whole milk
  • Juice from 1 lemon 1 to 2 tbsp
  • 1 teaspoon vanilla extract
  • 2 cups fresh blueberries
  • Vanilla ice cream for serving

Instructions

  • Preheat the oven to 375°F.
  • Place the butter in your cast-iron skillet (or dish) and place in the oven while it preheats.
  • Meanwhile, in a medium bowl, whisk together 1 cup of sugar, the flour, milk, lemon juice, and vanilla extract until smooth.
  • Take the skillet/dish out of the oven and swirl the melted butter around to evenly coat the bottom of the pan/dish.
  • Pour the batter over the melted butter (don't stir).
  • Sprinkle the blueberries evenly over the top.
  • Sprinkle the remaining ¼ cup of sugar over the top.
  • Bake until golden and bubbly! About 40 to 45 minutes.
  • Remove from the oven and let it rest for about 10 minutes. Serve with ice cream and enjoy!

Video

Notes

See the video near the top of the blog post for visual guidance. If you liked the video, please subscribe to our YouTube channel. 
If you don't have self-rising flour, you can use regular all-purpose flour combined with ½ teaspoon of baking powder and ¼ teaspoon of baking soda.
In place of blueberries, canned sour cherries in water are delicious, too. Don't drain the cherries, simply pour directly over the batter (without stirring) and then top with the ¼ cup sugar. Bake for the same amount of time. 
Leftovers can easily be heated in the microwave. Leftovers will keep covered for several days on the counter and 1 week in the fridge. 

Nutrition

Calories: 330kcal | Carbohydrates: 59g | Protein: 4g | Fat: 13g | Saturated Fat: 6g | Polyunsaturated Fat: 0.5g | Monounsaturated Fat: 2g | Trans Fat: 0.3g | Cholesterol: 25mg | Sodium: 17mg | Potassium: 86mg | Fiber: 1g | Sugar: 44g | Vitamin A: 303IU | Calcium: 56mg | Iron: 0.2mg

POST UPDATE: This recipe was originally published in June 2014, but was updated with improved tweaks to the recipe with new tips and photography and a fabulous new video in September 2023!

Grilled Curry Chicken Wings

September 29, 2023 by Kris Longwell 2 Comments

An overhead view of a pile of grilled curry chicken wings topped with chopped cilantro on a white rectangular platter.

If you like curry dishes as much as we do, and you are a fan of chicken wings, just wait until you make these!

Homemade curry powder is so much easier to make than you might think, and it really puts these wings over the top. However, any good quality store-bought version will work, too. These wings are saucy and incredibly flavorful. And they are easy to prepare!

An overhead view of a pile of grilled curry chicken wings topped with chopped cilantro on a white rectangular platter.

How To Make Grilled Curry Chicken Wings


NOTE: If you liked this video, please subscribe to our YouTube channel. Remember to click the little ‘bell’ icon so you’ll never miss a new video. Thank you!

The Ingredients You Will Need

Chicken Wings – Flats and drumettes. If you can only find full wings, then cut the tip away (discard, or save for making stock), and then cut the flat (wingette) from the drumette.
Seasonings – Salt, pepper, garlic powder, smoked paprika.
Butter – Unsalted.
Curry powder – Homemade or purchased. Check the spice level. Madras curry powder carries more heat. Homemade is easy and has a mild spice level.
Coconut milk – Unsweetened. Can usually be found in the Asian section of most supermarkets. Or online.
Fish sauce – Usually found in the Asian section of many supermarkets. Soy sauce can be substituted for fish sauce.
Chili garlic paste or sauce – Found in the Asian section of most supermarkets. Or online. Sriracha sauce can be substituted.

EXPERT TIP: No need to let the wings marinate for a long period of time with the seasonings. Once coated, they are ready to be grilled, baked, or fried.

An overhead view of a large glass bowl filled with uncooked chicken wings that have been seasoned with salt, pepper, and paprika.

Tips for Perfect Grilled Curry Chicken Wings

Go with Top-Notch Curry – As mentioned, making curry powder from scratch is so much easier than you might think. If purchasing, go with a quality brand. Morton and Basset is good. Make sure it’s not been on the shelf for over a year.

Grill Over High Heat – You want the skin on the wings to be super crispy. High heat always helps to achieve this. Crank your grill as high as it will go and cook directly over the heat. Frying the wings will deliver the crispiest wing.

Serve Piping Hot – These wings really are delicious at room temperature or even heated up the next day. But, they are at their very best fresh off the grill and tossed with the hot curry coconut sauce.

About twenty seasoned chicken wings cooking on the grates of a gas gril.

How To Serve

As mentioned, these are definitely served best, fresh off the grill and immediately tossed in the warm curry coconut sauce. We pile them high on a platter and let folks grab wings as they like.

They are perfect for parties, game day gathering, or just a fun afternoon at home.

Be sure to sprinkle plenty of fresh chopped cilantro all over the top of the wings. It really compliments the flavor profile of the wings perfectly.

Since they are fairly saucy, and so flavorful, no dipping sauce is needed.

A yellow curry coconut sauce being transferred from a silver saucepan into a bowl filled with grilled party wings.

Other Delicious Curry Dishes to Try

We just love just about anything with curry. And that includes Indian dishes that don’t use curry, but other seasonings, such as garam masala that delivers a very similar taste. Here are some of our favorites:

Authentic Chicken Curry
Shrimp Curry with Homemade Jamaican Curry Powder
Curry Chicken Salad
Curry Turkey Burgers with Grilled Pineapple
Creamy Chicken Tikka Masala
Thai Beef with Red Curry Sauce
Thai Green Curry Chicken

These are all so amazingly delicious and deep in flavor. But, for right now, aren’t these wings calling your name?

A straight-on view of a pile of grilled curry chicken wings on a white rectangular platter.

Folks, there is no doubt about it, we are absolutely wing fanatics. We love every flavor from Classic Buffalo Wings to Garlic Parmesan Wings.

And these curry wings are right up there with the best of them.

The curry flavor is not overpowering and is comforting and everything you want in a chicken wing. Truly wing perfection!

A person holding a grilled curry chicken wings with a few pieces of chopped cilantro stuck to the wing.

Ready to make the best (and most unique) wing on the block? Go for it!

And when you do, be sure to take a photo of them, post it on Instagram and tag @HowToFeedaLoon and hashtag #HowToFeedaLoon!

A close-up view of grilled curry chicken wings topped with chopped cilantro on a white platter.
Print Recipe
No ratings yet

Grilled Curry Chicken Wings

These wings are a twist on the classic and are loaded with an amazing flavor profile. The curry powder is subtle and works perfectly against the creamy coconut milk and the slight heat from the chili garlic paste. Truly spectacular!
Prep Time15 minutes mins
Cook Time25 minutes mins
Total Time40 minutes mins
Course: Appetizer
Cuisine: American
Servings: 6
Calories: 342kcal
Author: Kris Longwell

Equipment

  • Gas, charcoal, or electric grill See NOTES for other methods of cooking the wings

Ingredients

  • 2 lbs chicken wings flats and drumettes
  • 1 teaspoon Kosher salt
  • ½ teaspoon black pepper
  • 1 teaspoon garlic powder
  • 1 teaspoon smoked paprika
  • ¼ cup unsalted butter
  • 1 teaspoon all-purpose flour
  • 2 tablespoon curry powder
  • 1 cup coconut milk unsweetened
  • 1 tablespoon fish sauce
  • 2 tablespoon chili garlic sauce or paste
  • ¼ cup cilantro chopped, for garnish

Instructions

  • Heat your grill to medium-high heat for indirect AND direct-heat grilling.
  • Place the wings in a large bowl. In a small bowl, mix together the salt, pepper, garlic powder, and paprika. Sprinkle the seasonings over the wings and stir together until all the wings are coated.
  • Place the wings on the indirect heat (no heat) side of the grill and cook for 10 minutes, flipping after about 5 minutes.
  • Transfer the wings to the direct heat side of the grill and cook for another 15 minutes, flipping occasionally. The wings will be charred and fully cooked. They should have an internal temperature of 165°F and juices run clear. Test a large drumette for doneness. You may need to grill a little longer if not cooked completely through.
  • While the wings are grilling, make the sauce by melting the butter in a medium saucepan over medium heat. Stir in the curry powder and flour and cook, stirring often, for 1 minute.
  • Stir in the coconut milk, fish sauce, chili garlic sauce, and a pinch of salt. Simmer for 5 to 10 minutes.
  • Remove the wings from the grill and place in a heatproof bowl. Toss the wings with the sauce and serve at once, garnishing with the chopped cilantro.

Notes

See the video near the top of the blog post for visual guidance. If you liked the video, please subscribe to our YouTube channel.
Other methods of cooking the wings:
  • Oven - Bake for 50 to 60 minutes until golden brown and cooked through.
  • Deep-fry - Fry in 350°F oil for 11 minutes until golden and cooked through. 
  • Air-Fryer - Spray with cooking spray before seasoning. Air fry at 400°F for 10 minutes. Open the basket, flip the wings, and air fry for another 8 minutes.  
The wings are definitely best served hot from the grill tossed in the warm sauce. However, they are still yummy at room temperature. Reheat in a 350°F oven until warmed through, about 15 to 20 minutes. 
Leftovers will keep, covered, in the fridge for up to 5 days. 

Nutrition

Calories: 342kcal | Carbohydrates: 5g | Protein: 16g | Fat: 22g | Saturated Fat: 8g | Polyunsaturated Fat: 3g | Monounsaturated Fat: 4g | Trans Fat: 0.5g | Cholesterol: 83mg | Sodium: 969mg | Potassium: 272mg | Fiber: 1g | Sugar: 1g | Vitamin A: 587IU | Vitamin C: 1mg | Calcium: 32mg | Iron: 3mg

Grilled Buffalo Shrimp

September 24, 2023 by Kris Longwell 7 Comments

A white oval platter filled with a pile of grilled buffalo shrimp with two small jars filled with blue cheese dressing and celery sticks on each side of the dish.

These Grilled Buffalo Shrimp with Homemade Blue Cheese Dressing are fiery, flavorful, and perfect for summer cookouts or game‑day spreads. Juicy shrimp are quickly grilled for a smoky char, then tossed in tangy buffalo sauce and paired with a creamy, cooling blue cheese dressing that elevates every bite to the next level.

A white oval platter filled with a pile of grilled buffalo shrimp with two small jars filled with blue cheese dressing and celery sticks on each side of the dish.
[feast_advanced_jump_to]

🍤 The Ingredients

Made with just a handful of simple ingredients—plump shrimp, hot sauce, butter, and a few pantry spices—this recipe shines when paired with a cool, tangy homemade blue cheese dressing. Find ingredient notes (including substitutions and variations) below.

An arrangement of ingredient for Grilled Buffalo Shrimp on a wooden grey background including uncooked shrimp, seasonings, hot sauce, butter, olive oil, blue cheese dressing, and celery.

👉 Substitutions and Variations

  • Shrimp: Large shrimp work best, but medium shrimp or even prawns can be used. If using frozen, thaw completely and pat dry before grilling.
  • Hot Sauce: A vinegar‑based hot sauce like Frank’s RedHot gives the classic buffalo flavor. Swap with sriracha for a spicier twist or a smoky chipotle sauce for depth.
  • Butter: Balances the heat and adds richness. For a dairy‑free option, use ghee or plant‑based butter.
  • Smoked Paprika: Regular paprika plus a pinch of cumin or a dash of liquid smoke gives a similar smoky depth.
  • Chili Powder: Swap with cayenne pepper (for more heat), chipotle powder (for smoky spice), or a blend of paprika and cumin for a milder option.
  • Blue Cheese Dressing: Homemade gives the best flavor, but store‑bought works if you’re short on time. Homemade Ranch Dressing can be substituted if you’re not a fan of blue cheese.
  • Grilling Alternative: No grill? Cook the shrimp under the broiler or in a hot skillet for a similar char and flavor.

See the recipe card (with video) below for a full list of ingredients and measurements.

☑️ Tips and Trips for Perfect Grilled Buffalo Shrimp

  • Don’t overcook the shrimp: Shrimp cook quickly—just 2–3 minutes per side. Pull them off the grill as soon as they turn pink and opaque to keep them juicy.
  • Use skewers for easy grilling: Thread shrimp onto skewers to prevent them from falling through the grates and to make flipping easier.
  • Pat shrimp dry: Removing excess moisture helps the seasoning stick and gives you a better sear.
  • Control the heat: Add more butter to the buffalo sauce for a milder flavor, or an extra splash of hot sauce for fiery shrimp.
  • Make the dressing ahead: The blue cheese dressing tastes even better if prepared a few hours—or even a day—in advance, giving the flavors time to meld.
  • No grill? No problem: You can broil or pan‑sear the shrimp for similar results if grilling isn’t an option.

Expert Tip

If you’re using wooden skewers, soak them in water for at least 20–30 minutes before threading the shrimp—this prevents them from burning or breaking apart on the grill.

👩🏼‍🍳 How To Make Grilled Buffalo Shrimp

A person using a small whisk to combine the seasonings in a small bowl for Grilled Buffalo Shrimp.
  1. Step 1: In a small bowl, mix together the rub ingredients.
A large glass bowl filled with uncooked shelled shrimp that has been tossed with chili powder and other seasonings.
  1. Step 2: Place the shrimp in a bowl and toss with the rub.
Six rows of seasoned shrimp that are on skewers and are being grilled until slightly charred on a gas grill.
  1. Step 3: Grill the shrimp until pink and cooked through.
A silver saucepan that is filled with simmering hot sauce, melted butter, and a teaspoon of garlic powder with a wooden spatula on the side of the pan.
  1. Step 4: Heat the butter, hot sauce, garlic powder, and pepper in a saucepan.
Warm buffalo sauce being poured from a saucepan into a ceramic bowl that is filled with grilled shrimp.
  1. Step 5: Place wings in a bowl and toss with the sauce.
A person plunging a grilled buffalo shrimp into a small jar filled with homemade blue cheese dressing.
  1. Step 6: Serve at once with homemade blue cheese dressing.

Expert Tip

Shrimp are sold by count per pound in the United States. The number on the label will indicate the number of shrimp in the package. If it reads 21/25, you know there should be from 21 to 25 shrimp in each pound.

🍽️ How To Serve

  • You will want to serve these just as you would Classic Buffalo Chicken Wings.
  • We love to place them in a pile in the center of a large oval platter and then flank them with cut celery pieces and a couple of small jars of the homemade blue cheese dressing.
  • You could also serve them with homemade ranch dressing.

🙋🏽‍♂️ Frequently Asked Questions

Can I make Grilled Buffalo Shrimp with Homemade Blue Cheese Dressing ahead of time?

You can prepare the blue cheese dressing in advance, but the shrimp are best grilled and served fresh to keep them juicy and flavorful.

What kind of shrimp should I use for Grilled Buffalo Shrimp with Homemade Blue Cheese Dressing?

Large or jumbo shrimp work best for grilling, but medium shrimp can be used if that’s what you have on hand.

How spicy is Grilled Buffalo Shrimp with Homemade Blue Cheese Dressing?

It has a medium kick, but you can adjust the heat level by adding more or less hot sauce to the buffalo sauce.

Can I cook Grilled Buffalo Shrimp with Homemade Blue Cheese Dressing without a grill?

Yes! You can broil the shrimp in the oven or sear them in a hot skillet for a similar charred flavor.

A person using a spoon to drizzle Buffalo sauce over a platter filled with grilled buffalo shrimp with celery sticks resting on the sides of the dish.

🔥 Other Amazing “Buffalo” Recipes

  • A pile of grilled chicken wings with buffalo sauce resting on a wooden board next to a jar of blue cheese dressing and cut strips of celery.
    Easy Grilled Chicken Wings with Buffalo Sauce
  • A rectangular white serving platter filled with buffalo cauliflower bites sitting next to a bowl of blue cheese dressing.
    Buffalo Cauliflower Bites
  • A buffalo chicken sandwich on a wooden board with blue cheese dressing dripping off the side.
    Buffalo Chicken Sandwich
  • An overhead view of pile of classic Buffalo wings on a black circular plate also holding celery sticks and a small jar of blue cheese dressing.
    Classic Buffalo Wings

Ready to make the best shrimp appetizer this side of Buffalo, NY? Go for it!

And when you do, be sure to take a photo of it, post it on Instagram, and tag @HowToFeedaLoon and hashtag #HowToFeedaLoon!

A white oval platter filled with a pile of grilled buffalo shrimp with two small jars filled with blue cheese dressing and celery sticks on each side of the dish.
Print Recipe
5 from 3 votes

Grilled Buffalo Shrimp

If you like Buffalo hot wings, and if you like grilled shrimp, you are going to love these Grilled Buffalo Shrimp! Be sure to make the homemade blue cheese dressing, it's super easy and takes the dish to the next level. This is a crowd-pleaser without a doubt!
Prep Time15 minutes mins
Cook Time8 minutes mins
Total Time23 minutes mins
Course: Appetizer
Cuisine: American
Servings: 6 people
Calories: 113kcal
Author: Kris Longwell

Equipment

  • 4 to 6 wooden or metal skewers

Ingredients

  • Homemade Blue Cheese Dressing click for easy recipe
  • 1 teaspoon Kosher salt
  • 1 teaspoon black pepper divided (½ teaspoon for the shrimp and ½ for the sauce)
  • 1 teaspoon garlic powder divided (½ teaspoon for the shrimp and ½ for the sauce)
  • ½ teaspoon onion powder
  • ¼ teaspoon smoked paprika
  • ¼ teaspoon chili powder
  • ¼ teaspoon cayenne pepper
  • 18 large shrimp peeled and deveined
  • 2 tablespoon olive oil
  • 4 tablespoon unsalted butter
  • ¼ cup hot sauce Frank’s is good
  • celery cut into strips

Instructions

Do Ahead

  • Make the blue cheese dressing and chill, covered, until ready to serve.
    Homemade Blue Cheese Dressing

Prepare the Shrimp

  • Prepare your grill for direct cooking over medium heat.
  • In a small bowl, mix together the salt, pepper (½ tsp), onion powder, garlic powder (½ tsp), paprika, chili powder, and cayenne pepper.
    1 teaspoon Kosher salt, 1 teaspoon black pepper, 1 teaspoon garlic powder, ½ teaspoon onion powder, ¼ teaspoon smoked paprika, ¼ teaspoon chili powder, ¼ teaspoon cayenne pepper
  • Place the shrimp in a large bowl and toss with the olive oil. Sprinkle the seasonings all over them. Toss until they are well coated.
    18 large shrimp, 2 tablespoon olive oil
  • Skewer all of the shrimp.
  • Grill the shrimp, turning once, until just cooked through, 8 to 10 minutes.
  • Meanwhile, heat the butter, hot sauce, ½ teaspoon garlic powder, and½ teaspoon black pepper in a small saucepan over medium heat until simmering.
    4 tablespoon unsalted butter, ¼ cup hot sauce
  • Remove grilled shrimp from the skewers and place them in a clean heat-proof bowl. Pour the sauce over the shrimp. Toss to coat.
  • Serve immediately with blue cheese dip and celery.
    celery

Video

Notes

NOTE: Watch the video near the top of the recipe for visual guidance.
For extra heat, double the amount of cayenne. 
These are definitely best served hot, right from the grill; however, they are still delicious at room temperature. 
The shrimp can also be cooked in a skillet with butter or oil until pink and slightly curled, about 7 to 10 minutes. 

Nutrition

Calories: 113kcal | Carbohydrates: 1g | Protein: 0.3g | Fat: 10g | Saturated Fat: 4g | Polyunsaturated Fat: 1g | Monounsaturated Fat: 3g | Trans Fat: 0.3g | Cholesterol: 20mg | Sodium: 655mg | Potassium: 32mg | Fiber: 0.2g | Sugar: 0.2g | Vitamin A: 351IU | Vitamin C: 8mg | Calcium: 6mg | Iron: 0.2mg

POST UPDATE: This recipe was originally published in August 2017, but was updated with improved tweaks to the recipe with new tips and photography and a fabulous new video in September 2023!

Authentic Borracho Beans

September 20, 2023 by Kris Longwell 21 Comments

An overhead view of a large oval Dutch oven filled with borracho beans with a wooden spoon inserted into the middle of them.

If you love Mexican cuisine, then you are going to want to have this recipe in your rotation, without a doubt.

The smell of these beans as they are simmering on your stove is intoxicatingly delicious. This makes sense since borracho beans translate to “drunken” beans. But don’t worry, they cook in just one bottle of beer. They are the perfect side dish for tacos, enchiladas, chicken molé, and more!

An overhead view of a large oval Dutch oven filled with borracho beans with a wooden spoon inserted into the middle of them.

How To Make Authentic Borracho Beans


NOTE: If you liked this video, please subscribe to our YouTube channel. Remember to click the little ‘bell’ icon so you’ll never miss a new video. Thank you!

The Ingredients You Will Need

Just a handful of ingredients are slow-cooked for several hours to produce an amazingly deeply flavored pot of beans. Here’s what you’ll need to have on hand:

Dried beans – Pintos are traditional, but you could substitute red kidney, cannelloni, or even black-eyed peas. Soaking them overnight is best, but see notes for expediting this.
Stock or broth – Chicken is what we use, but you could use vegetable or even beef broth or stock.
Mexican beer – We use Dos Equis, but other options include Modelo, Tecate, Corona, Victoria, or whatever beer you have on hand. You can omit the beer completely if desired and still get good flavor.
Water – You’ll add more water as the beans simmer for several hours.
Pork – Salt pork, ham bone, or ham hocks are all great choices.
Bacon – Thick cut is our favorite.
Onion -Chopped
Jalapeño peppers – Seeded and finely chopped. Leave some seeds in for a little extra heat.
Garlic – Minced.
Cilantro – Fresh is best. Chopped.
Tomatoes – Roughly chopped, they’ll completely cook down as they simmer.
Seasonings – Cumin, oregano, salt, and pepper.

EXPERT TIP: Next time you have a bone-in ham, be sure to keep the ham bone and freeze it and then use it when making borracho beans. If you don’t have a ham bone, go with a salt pork from the grocery store, usually found near bacon and lunch meats in your local grocery store. See the NOTES about using a salt pork.

A person pouring a beer into a large Dutch oven filled with chicken stock and a ham bone.

Tips for Perfect Borracho Beans

Soak the Beans – Soaking them overnight ensures they cook evenly and become very tender.

Use a Quality Broth or Stock – Homemade broth or stock is best, but store-bought is perfectly fine. Just be sure to go with a quality brand. It makes a big difference.

Maintain a Soupy Consistency – As the beans simmer, much of the liquid will evaporate. This is normal, but you’ll need to add more water to maintain a somewhat soup consistency. See the video for visual reference.

EXPERT TIP: If you have a Hispanic market near you, seek out pork lard. It adds a depth of flavor to the beans that is truly authentic and incredibly tasty.

A person dumping sautéed onions and jalapeños into pot filled with chopped tomatoes, a hambone, and chicken stock.

How to Serve

As mentioned, these beans are a wonderful side dish to all of your favorite Mexican/Tex-Mex dishes.

We serve them in small cups, but any kind of bowl will work. Because they are soupy, they need some sort of a vessel to hold them in.

You can place the pot on the table with a ladle and let family and friends serve themselves, if desired.

To re-heat, simply heat over medium heat on the stove and add about another cup of water or broth. They are even better the next day!

A person using a ladle to transfer a helping of borracho beans into a small white cup filled with the beans.

Other Mexican or Tex-Mex Side Dish Recipes

No Mexican or Tex-Mex platter would be right without the classic sides. Here are some our favorites that are authentic and incredibly delicious:

Authentic Refried Beans
Slow-Cooked Mexican Black Beans
Mexican Rice
Cilantro-Lime Rice
Elote (Mexican Corn on the Cob)
Mexican-Style Cream Corn
Best-Ever Guacamole
Homemade Flour Tortillas

These are all amazing, for sure. But, these beans are about as yummy as they come and the perfect side dish.

An overhead view of a white platter filled with a serving of Mexican rice, grilled chicken, and a bowl of borracho beans surrounded by bowls of the same.

Mexican and Tex-Mex cuisines are some of the most popular types of food in the world.

We love refried beans, especially when serving beef fajitas or chicken fajitas.

But there is something extra special about these borracho beans. They warm you to the bone, and are so delicious and filling, they can make a meal by themselves! Just serve with tortillas.

These are the real deal and your family will absolutely love them (and you!).

A close-up view of a white ceramic cup filled with a serving of borracho beans on a platter surrounded by rice and grilled chicken.

Ready to make the best beans this side of the Rio Grande? Go for it!

And when you do, be sure to take a photo of them, post it on Instagram, and tag @HowToFeedaLoon and hashtag #HowToFeedaLoon!

An overhead view of a large oval Dutch oven filled with borracho beans with a wooden spoon inserted into the middle of them.
Print Recipe
5 from 6 votes

Authentic Borracho Beans

These Borracho Beans are about as comforting of a pot of food as you'll ever make.  Warm, delicious, and wonderful any time of the year.  Allowing the beans overnight ensures they will cook evenly and be perfectly tender.
Prep Time20 minutes mins
Cook Time3 hours hrs
Soak8 hours hrs
Total Time11 hours hrs 20 minutes mins
Course: Side Dish
Cuisine: TexMex / Mexican
Servings: 8 people
Calories: 341kcal
Author: Kris Longwell

Equipment

  • Large pot or Dutch oven 7 to 9 quart

Ingredients

  • 1 lb pinto beans dried
  • 4 cups chicken stock
  • 1 bottle beer preferably Mexican, not dark
  • 2 cups water plus more as the beans simmer
  • 1 pound salt pork or ham bone or ham hocks, See NOTES
  • 6 slices bacon roughly chopped
  • 1 medium onion chopped
  • 2 jalapeno peppers seeded and finely chopped
  • 3 cloves garlic minced
  • 2 tablespoon pork lard optional
  • ½ cup cilantro fresh, chopped
  • 2 tomatoes roughly chopped
  • 1 teaspoon ground cumin
  • 1 teaspoon dried oregano
  • 1 teaspoon salt See NOTES
  • 1 teaspoon black pepper

Instructions

  • Soak the beans overnight.  The next day, drain and add beans into a large pot. 
  • Add the stock, beer, water, and salt pork (or ham bone) to the pot and simmer on low for 1½ hours.  Stir occasionally to prevent the beans from sticking to the bottom of the pot. 
  • Meanwhile, cook the bacon in a large skillet over medium-high heat until crisp. Remove to a paper towel-line plate.
  • Pour out all but 2 tablespoon of the bacon grease from the skillet and then heat over medium heat.
  • Add the onion, peppers and garlic and cook until soft, about 3 to 4 minutes.
  • Add to the simmering beans the cooked bacon and sautéed vegetables, along with the pork lard (if using), cilantro, tomatoes, cumin, oregano, black pepper, and salt (to taste). Simmer for another 1½ hours, or until the beans are tender. Stir occasionally and add more water to maintain a "soupy" consistency.

Video

Notes

See the video near the top of the blog post for visual guidance. If you liked the video, please subscribe to our YouTube channel. 
If you forget to soak the beans overnight, you have two options:
  • Hot soak - Cover the beans with 10 cups of water in a large pot, and bring to a boil for 3 minutes. Turn off the heat, cover, and let the beans sit for 4 hours. Then proceed with the recipe. 
  • Quick soak - Cover the beans with 6 cups of water in a large pot, and bring to a boil for 3 minutes. Turn off the heat, cover, and let the beans sit for 1 hour. Then proceed with the recipe. 
If cooking with salt pork, be sure to taste the beans before adding salt. Some salt porks are very salty and others are not. If yours is salty, you may need to add very little salt. Add the salt near the end of the simmering process.
Pork lard adds an amazing depth of flavor and gives the beans a very authentic taste. Pork lard can be found at your local Hispanic food market. 
Reheat beans over medium heat on the stove and add more water or stock to reach the "soupy" consistency. Leftovers will keep in the fridge for up to 6 to 7 days.  They freeze nicely for months. 

Nutrition

Calories: 341kcal | Carbohydrates: 24g | Protein: 14g | Fat: 17g | Saturated Fat: 8g | Polyunsaturated Fat: 4g | Monounsaturated Fat: 6g | Trans Fat: 0.02g | Cholesterol: 63mg | Sodium: 712mg | Potassium: 342mg | Fiber: 6g | Sugar: 4g | Vitamin A: 376IU | Vitamin C: 11mg | Calcium: 50mg | Iron: 2mg

POST UPDATE: This recipe was originally published in August 2015 but was updated with improved tweaks to the recipe and new tips and photography and a fabulous new video in September 2023!

Authentic Eggplant Parmesan

September 17, 2023 by Kris Longwell 66 Comments

A square slice of baked eggplant parmesan being lifted from the dish with mozzarella strands hanging from the spatula.

This dish is about as 100% Italian-American comfort food as you will find.  This is one of those ‘spend-a-few-hours-in-the-kitchen-on-a-Saturday-afternoon’ dishes,  but, boy, oh by, is it truly magical.

The eggplant makes the perfect vehicle for this baked dish of yumminess.  The homemade marinara sauce puts it over the top. And it can also be made in advance, and then baked an hour or so before serving! I mean, come on…just look at this:

A square slice of baked eggplant parmesan being lifted from the dish with mozzarella strands hanging from the spatula.

How to Make Eggplant Parmesan


NOTE: If you liked this video, please subscribe to our YouTube channel. Remember to click the little ‘bell’ icon so you’ll never miss a new video. Thank you!

The Ingredients You Will Need

Although eggplant parmigiana (or parmesan) is vegetarian, it’s not the type of dish you’d probably want to consume every day for every meal. There is a lot of cheese and the eggplant is fried…but for that ‘special’ occasion dish, it can’t be beaten!

We start out with our classic homemade fresh marina. As with so many stellar Italian dishes, the quality of the dish comes down to the quality of the sauce.

Next, breading the eggplant slices and then quickly frying them makes the texture of the dish literally melt-in-your mouth good.

This fried eggplant parmesan recipe produces a dish that is so comforting and classic all at the same time.

A platter of fried eggplant discs for authentic eggplant parmesan

We love using fresh mozzarella because it delicious and also melts beautifully.

You can easily purchase a block of fresh mozzarella and slice it yourself.

Or, you can use shredded. No matter what, you’re going to love the cheese results.

A baking dish of eggplant parmesan with layers of fresh mozzarella being layered in.

The Origins of the Dish

There is so much to love about eggplant parmesan. First, and foremost, of course, is the taste.

But you can easily make this in advance and then just simply stick it in the oven to bake prior to serving. It also freezes perfectly, too. Just let it thaw, and then bake and serve.

The recipe (Parmigiana di Melanzane, in Italian) has its roots firmly planted in Southern Italy and has been served for many, many generations. Learn more about its delicious origins here.

A white dinner plate with a square serving of eggplant parmesan sitting in thin layer of marinara sauce.

Other Classic Italian Recipes To Try

Eggplant Parmesan is one of our all-time favorite dishes, but here are some other classic recipes that you are absolutely going to love, too:

Eggplant Rollatini
Homemade Beef Ravioli with Tomato Sauce
Classic Meat Lasagna
Best-Ever Baked Ziti
Stuffed Manicotti
Italian Stuffed Shells
Chicken Parmesan
Shrimp Marinara
Pasta Carbonara
Penne alla Vodka

Want to make eggplant parm in your air fryer? Here’s a recipe that is truly amazing.

These are all classic and unbelievably delicious. But, in the meantime, isn’t this dish calling your name?

Authentic Eggplant Parmesan in a baking white dish.

This is a dish that we feel confident will be one that goes into your regular rotation.

Warm, cheesy, and just so incredibly satisfying.

Folks…the time has come to make this classic baked Italian-American favorite! 

Eggplant Parmesan in a white plate with fresh marinara sauce.

Ready to make the best dish this side of Italy? Go for it!

And when you do, be sure to take a photo, post it on Instagram, and tag @HowToFeedaLoon and hashtag #HowToFeedaLoon!

A white dinner plate with a square serving of eggplant parmesan sitting in thin layer of marinara sauce.
Print Recipe
5 from 19 votes

Authentic Eggplant Parmesan

This authentic eggplant Parmesan is pure Italian-American comfort food in a single dish. The eggplant makes for the perfect vehicle for the gooey mozzarella cheese and homemade marinara sauce. You can make it up to 24 hours in advance and then bake just before serving!
Prep Time45 minutes mins
Cook Time1 hour hr
Total Time1 hour hr 45 minutes mins
Course: Entree
Cuisine: Italian, Italian / American
Servings: 8 people
Calories: 420kcal
Author: Kris Longwell

Equipment

  • 10"x10" baking dish, or 9"x13" baking dish

Ingredients

  • 2 medium eggplants
  • 2 cups all-purpose flour
  • vegetable oil for frying, or heat your deep fryer
  • 6 large eggs
  • 2 cups Parmesan cheese grated
  • 1 tablespoon flat-leaf parsley fresh, chopped, plus extra for garnish
  • 1 teaspoon Kosher salt
  • ½ teaspoon black pepper freshly ground
  • 4 cups homemade marinara sauce
  • 3 cups mozzarella cheese fresh, sliced, or grated

Instructions

  • Prepare the marinara sauce (can be done up to 2 days in advance)
  • Cut the ends off the eggplant and discard them. Cut each eggplant into ¼-inch round slices and sprinkle salt over each of the rounds.
  • Place in a colander for 30 to 40 minutes.
  • Rinse eggplant rounds under cool water to remove salt. Dry with paper towels.
  • Next, in a deep, heavy saucepan, heat the oil to 350°F, or heat your deep fryer to 350°F. (If you don't have a deep-frying thermometer, the oil will be hot enough when it creates a sheen, and a small piece of bread sizzles when tossed in the oil.)
  • Meanwhile, spread the flour out on a large platter or in a pan.
  • In a shallow bowl, whisk the eggs together with ½ cup of the grated Parmesan cheese, the parsley, and the salt.
  • Coat each slice of eggplant with flour and shake off excess.
  • Dip the eggplant, a slice at a time, in the egg mixture and let any excess drip off.
  • Fry the eggplant slices, 3 to 4 at a time, for about 3 to 5 minutes, or until they are golden brown and tender.
  • Remove them with a slotted spoon and place them on paper towels to drain and cool.
  • Preheat oven to 350°F.
  • Spread 1 cup of marinara sauce over the bottom of a large baking dish.
  • Arrange a layer of eggplant slices over the sauce (they can slightly overlap, if necessary).
  • Spread a thin layer of marinara sauce over the eggplant.
  • Sprinkle ½ cup of the mozzarella and a thin layer of Parmesan cheese over the sauce.
  • Repeat, layer the eggplant, marinara sauce, mozzarella, and Parmesan cheese to top the pan.
  • End with a layer of eggplant and about ¼ cup marinara sauce spread over the top of it.
  • Sprinkle a good handful of Parmesan cheese on top of the sauce.
  • Bake the eggplant for about 45 to 50 minutes, or until bubbly and lightly browned on top.
  • Let the pan sit for 15 to 30 minutes until cool enough to serve.
  • Cut into slices and serve with warm marinara sauce and grated Parmesan on the side.

Video

Notes

See the video near the top of the blog post for visual guidance. If you liked the video, please subscribe to our YouTube channel. 
The marinara sauce can be made several days in advance. Keep covered in the fridge until ready to use. It can also be frozen for several months. 
If you prefer, you can bake the battered eggplant at 375°F for 20 minutes. You can air-fry them for 6 minutes at 350°F, then open the basket, flip them over, and air-fry for another 2 to 3 minutes.
The dish can be prepared up to 24 hours in advance of baking. Keep covered in the fridge. Let sit out on the counter for 30 minutes to an hour before baking.
Leftovers will keep in the fridge (covered) for up to 5 days. Reheat in the oven at 350°F for about 20 minutes or cook on HIGH in your microwave in 1-minute intervals until hot and bubbly. 

Nutrition

Calories: 420kcal | Carbohydrates: 33g | Protein: 27g | Fat: 20g | Saturated Fat: 11g | Cholesterol: 190mg | Sodium: 866mg | Potassium: 402mg | Fiber: 4g | Sugar: 5g | Vitamin A: 748IU | Vitamin C: 3mg | Calcium: 544mg | Iron: 3mg

POST UPDATE: This recipe was originally published in June 2016, but was updated with improved tweaks to the recipe with new tips and photography and a fabulous new video in September 2023!

Fried Catfish Po-Boy

September 13, 2023 by Kris Longwell 19 Comments

A person holding a large fried catfish po-boy that is stuffed with crispy fillet of catfish, coleslaw, hot sauce, pickles, and tomatoes.

This epic sandwich hailing from Louisiana is bursting with flavor and can be adapted to your liking.

When you head down to the Big Easy, and surrounding areas, the varied cuisine is steeped in tradition and some of the best we’ve ever had. This is our version of the classic New Orleans sandwich. The addition of homemade Cajun Remoulade puts it over the top!

A person holding a large fried catfish po-boy that is stuffed with crispy fillet of catfish, coleslaw, hot sauce, pickles, and tomatoes.

How to Make Fried Catfish Po-Boy


NOTE: If you liked this video, please subscribe to our YouTube channel. Remember to click the little ‘bell’ icon so you’ll never miss a new video. Thank you!

The Ingredients You Will Need

Most po-boy sandwiches include a protein. Fried oysters and fried shrimp are popular, as well as sliced beef. Catfish is a fresh-water fish that works amazingly well with the other components of the sandwich.

For our version, here’s what you’ll need to have on hand

For the Coleslaw:
Shredded cabbage and carrots – We just grab a bag of slaw mix from the produce section in our market. It’s easy and works perfectly.
Mayonnaise – You could make it from scratch, but quality store-bought is just fine.
Vinegar – We love apple cider vinegar, but you substitute white or red wine vinegar, Champagne vinegar, or plain distilled white vinegar.
Sugar – Granulated (don’t skip this!)
Seasonings – Salt, pepper, and celery seed.

For the Sandwich:
Catfish – We recommend cutting each fillet into fourths, but that’s a matter of taste. The smaller fillets create more of the delicious crispy batter.
Oil – Vegetable or peanut, for frying.
Seasoning – Salt and pepper (for the fish).
Milk – Whole
Eggs
Cornmeal – Medium or fine ground, not coarse.
Flour – All-purpose
Cayenne – Adds a little kick to the batter.

For the Sandwich:
Rolls – Soft French or Italian. Cut the ends off, if necessary. Hoagie rolls work, too. Baguettes are a little too tough. 
Cajun Remoulade – This can be made up to 2 to 3 days in advance. This makes these sandwiches even more incredible.
Pickles – Long, sliced dill sandwich pickles are our favorite, but go with whatever is your favorite.
Tomatoes – Sliced with a little salt and pepper sprinkled on top.
Hot sauce – Any kind of Louisiana-style is ideal, such as Crystals, Louisiana, or Tabasco.
Lemon wedges – For serving.

EXPERT TIP: You’ll need to set up a 2-pan dredging station. Simply add the milk and beaten eggs in one pan and the dry ingredients in another. Salt and pepper the fillets first, and then fully coat them with the milk mixture and then coat with the cornmeal mixture. Use your fingers to help the breading adhere to the fillet.

A person a wearing black nitrate glove dredging a fillet of catfish through a pan filled with a cornmeal and flour mixture.

Tips for a Perfect Fried Catfish Po-boy

Make the Coleslaw and Remoulade – Making these from scratch is easy and truly makes a huge difference in taste and texture. The coleslaw (recipe included) can be made hours in advance and the remoulade can be made days in advance.

Fry Until Crispy – Frying the fillets in vegetable (or peanut) oil in a sturdy skillet (at 350°F) will give you extra-crispy catfish fillets that deliver superior taste. See NOTES for air frying or baking.

Choose the Right Kind of Bread – The main objective when selecting the rolls is to find one that is soft on the inside and golden on the outside. Don’t get rolls (or loaves) that are too thick with too much bread for a sandwich. Hoagie rolls will work just fine.

EXPERT TIP: A candy thermometer will ensure your oil reaches 350°F. If you don’t have a thermometer, simply toss in a pinch of bread. The oil is ready when the bread lightly browns and becomes crisp in about 60 seconds. The fish will fry for about 2 to 3 minutes, until golden brown.

Two fried catfish fillets resting in a metal spider over a skillet filled with hot oil.

How To Serve

These sandwiches are large and filling. If you’re starting with a large sub roll, you can easily cut the sandwich into four pieces and each will be very filling.

Serve with plenty of Louisiana -tyle hot sauce and lemon wedges.

Kettle chips are the perfect side to this amazing po-boy.

EXPERT TIP: We can’t stress enough how much the homemade Cajun remoulade takes the sandwich to the next level. Add a liberal layer on the bottom half of the bun, and then half plenty more for guests to add more, if they wish.

A person transferring Cajun remoulade from a large silver spoon onto the lower half of an open French roll.

Other Classic Louisiana Recipes to Try

There are so many amazing dishes that originated in the great state of Louisiana. From New Orleans to Creole and Cajun country, the taste of these classic dishes is as good as they come. Making them at home is easier than you might think. Here are some of our all-time favorite recipes:

Classic Muffuletta Sandwich
Red Beans and Rice
Jambalaya
Crawfish Etouffée
Shrimp and Okra Gumbo
Sausage and Chicken Gumbo
Creole Chicken and Rice
Dirty Rice
Classic Beignets
Southern Crab Cakes

These are all classic and amazing in their own right. But, right now, isn’t this po-boy calling your name?

A close-up view of a fried catfish po-boy with homemade coleslaw and hot sauce sitting on top of the catfish, pickles, and sliced tomatoes, all on a soft roll.

If you love Louisiana cuisine as much as we do, then you are going to flip for this classic sandwich.

It’s perfect for a Sunday afternoon watching the big game, but it’s also fun to make a big batch of all the components, and then let guests build their own po-boy.

We can honestly say this is one of the most delicious sandwiches we’ve ever made or served, and we think you and your family will feel the same way!

A straight-on view of two baskets filled with a fried catfish po-boy sitting next to a tall glass of beer.

Ready to make the best sandwich this side of the Big Easy? Go for it!

And when you do, be sure to take a photo of it, post it on Instagram, and tag @HowToFeedaLoon and hashtag #HowToFeedaLoon!

A person holding a large fried catfish po-boy that is stuffed with crispy fillet of catfish, coleslaw, hot sauce, pickles, and tomatoes.
Print Recipe
5 from 8 votes

Fried Catfish Po-Boy

This Fried Catfish Po-Boy is about as classic New Orleans cuisine as it comes. You can of course go with fried shrimp, or whatever you like...but we love it with classic Southern fried catfish! Be sure to make the Cajun remoulade! It can be made several days in advance.
Prep Time20 minutes mins
Cook Time20 minutes mins
Remoulade prep and chill time1 hour hr 30 minutes mins
Total Time2 hours hrs 10 minutes mins
Course: lunch
Cuisine: Louisiana, New Orleans
Servings: 4 people
Calories: 427kcal
Author: Kris Longwell

Equipment

  • Large skillet for frying

Ingredients

Do Ahead

  • Cajun Remoulade sauce

For the Coleslaw

  • 3 cups coleslaw mix about 8 ounces
  • ¼ cup mayonnaise
  • 1 tablespoon apple cider vinegar
  • 2 teaspoon granulated sugar
  • ½ teaspoon Kosher salt
  • ¼ teaspoon black pepper
  • 1 teaspoon celery seed

For the Fried Catfish

  • vegetable oil Enough for 1 to 2 inches in a sturdy skillet
  • 4 7 oz catfish fillets skinned
  • Kosher salt and freshly ground black pepper
  • 1 cup milk
  • 2 large eggs lightly beaten
  • 1 cup cornmeal fine or medium ground, not too coarse
  • ½ cup all-purpose flour
  • ½ teaspoon cayenne pepper

For the Sandwich

  • 4 long soft-crust Italian rolls split
  • 1 cup Cajun remoulade
  • ½ cup sandwich pickles sliced
  • 3 large tomatoes sliced
  • Louisiana hot sauce for serving
  • Lemon wedges for serving

Instructions

Make the Cajun Remoulade Sauce

  • Prepare the Cajun remoulade sauce. Keep covered in the refrigerator until ready to use. Can be made 3 days in advance.

Make the Coleslaw

  • In a small bowl, whisk together the mayonnaise, vinegar, sugar, salt, pepper, and celery seed.
  • Place the slaw mix (dry ingredients only) in a medium-sized bowl. Add the dressing and stir until fully coated. Set aside. If not used within an hour, place in the refrigerator, covered, for up to 3 hours.

Prepare the Catfish

  • Heat the oil in a large sturdy skillet over medium-high heat, until reaches 350°F, or when a small piece of bread sizzles and browns in about 30 seconds when tossed in the oil.
  • Place the milk and eggs together in a medium bowl or pan, and whisk together.
  • In a separate bowl or pan, mix together the cornmeal, flour, 1 teaspoon salt, ½ teaspoon pepper, and cayenne (½ tsp).
  • One at a time, dip the catfish fillets into the wet mixture, then dredge in the corn meal/flour mixture, completely covering the fillets.
  • In batches, fry the fillets until golden brown, about 3 - 4 minutes. Drain on paper towels.

Assemble the Po-boy

  • If desired, cut the ends off of the rolls, and if they are long rolls, cut them in half.
  • Smear a good helping (about 2 tablespoons) of the remoulade sauce on the bottom of each roll. Then add a layer of pickles, tomato slices, then the catfish fillets, and top with coleslaw.
  • Add a good few squeezes of fresh lemon and several dashes of hot sauce. Top with bun.  Serve at once. 

Video

Notes

See the video near the top of the blog post for visual guidance. If you liked the video, please subscribe to our YouTube channel. 
The remoulade can be prepared up to 3 days in advance and the coleslaw can be made several hours before serving. Keep both covered in the fridge until ready to use. 
Frying the catfish fillets delivers a truly authentic taste, however, you can dredge the fillets and then bake them on a baking sheet in a 425°F oven for 15 to 20 minutes, until crispy. To air fry them, spray the breaded fish with olive oil. Air fry at 400°F for 10 minutes. Flip, and air fry for another 3 to 5 minutes until crispy. 
Although the sandwiches are good all day long, they are best served when the catfish is hot and still very crispy. The longer it sits after being fried, it will lose its crispness. 

Nutrition

Calories: 427kcal | Carbohydrates: 55g | Protein: 13g | Fat: 18g | Saturated Fat: 4g | Polyunsaturated Fat: 8g | Monounsaturated Fat: 5g | Trans Fat: 0.04g | Cholesterol: 107mg | Sodium: 458mg | Potassium: 706mg | Fiber: 7g | Sugar: 11g | Vitamin A: 1537IU | Vitamin C: 38mg | Calcium: 140mg | Iron: 3mg

POST UPDATE: This recipe was originally published in July 2015, but was updated with improved tweaks to the recipe with new tips and photography and a fabulous new video in September 2023!

Best-Ever Skillet Breakfast

September 10, 2023 by Kris Longwell 8 Comments

An overhead view of a skillet breakfast of cooked sausage mixed with crumbled biscuits, cherry tomatoes, and cheese all topped with five cooked eggs.

If it’s true that breakfast is the most important meal of the day, there’s no reason it can’t also be the most delicious, too.

There is just so much to love about this dish. Most of it can be made in advance, which makes bringing a scrumptious dish to the breakfast table a breeze. It’s a one-pot wonder, so very few dishes to clean. But, first and foremost, it is incredibly delicious. Fresh buttermilk biscuits make all the difference!

An overhead view of a skillet breakfast of cooked sausage mixed with crumbled biscuits, cherry tomatoes, and cheese all topped with five cooked eggs.

How to Make the Best-Ever Skillet Breakfast

The Ingredients You Will Need

The line-up of ingredients for this dish is straightforward, and many you’ll probably have in your fridge or pantry. We strongly recommend seeking out homemade biscuits or making your own!

Here’s What You’ll Need to Have on Hand

Breakfast Sausage – We love Jimmy Dean’s regular. If desired, try the spicy variety. We don’t recommend the sage variety since you’ll be adding fresh sage to the mixture.
Onion – Chopped, fresh is best.
Garlic – Minced, fresh is best.
Buttermilk biscuits – Pick some up from a local breakfast restaurant, or make your own! In a pinch, packaged biscuits will work.
Cheddar cheese – Shredded. Monterrey Jack, or Mexican blend, all work well, too.
Tomatoes – Cherry or grape tomatoes are great. Halve them.
Sage – Fresh is best, but if using dried, then cut the amount in half.
Maple syrup – Go with 100% pure (not pancake syrup).
Seasonings – Salt and pepper are all you need.
Eggs – Go with quality; it really does make a difference.

EXPERT TIP: After the sausage, onion, and garlic are fully cooked, you can transfer them to a large bowl and mix in the remaining ingredients (except the eggs), or, to save on cleaning, simply add the ingredients right into the skillet with the sausage. Carefully mix with a large spoon.

A person using two hands to crumble buttermilk biscuits into a large cast-iron skillet filled with cooked sausage, shredded cheese, chopped sage, and cherry tomatoes.

Tips for Best-Ever Breakfast Skillet

Homemade Biscuits – We understand that making the biscuits from scratch may be more than you want to take on, but if you seek out a local breakfast or brunch restaurant, they will sell you as many as you need. Don’t worry if they are more than a day old; they will soak up all the flavors during the baking process.

Fresh Sage – You can use dried, and be just fine. But fresh adds a depth of flavor that is just amazing. Fresh sage can be found in the produce section of most supermarkets.

Don’t Overcook – We recommend baking the skillet breakfast until the egg yolks are soft, but not rubbery. For yolky eggs, cook for 18 minutes, for soft egg yolks, bake for 20, and for fully cooked egg yolks, bake for 23 minutes.

EXPERT TIP: If you’re not comfortable transferring the eggs from the shell, simply crack the egg over a small bowl, and then transfer the egg from the bowl into the divot you create in the sausage mixture. The handle of a wooden spoon makes creating the divots easy.

A person transferring a whole egg from a cracked shell into a skillet filled with a mixture of cooked sausage, tomatoes, and cheese.

How To Serve

This dish is definitely served straight from the skillet.

All you need is a large spoon, and let family or guests serve themselves.

If serving more than 4 to 6 folks, then double the recipe and cook in a large baking dish (9×13″ or larger).

Because the dish has all you need in a meal (protein, bread, vegetables, and cheese), not much else is needed for serving. Fresh fruit is a great side, but that’s really about all!

A straight-on view of a skillet breakfast in a large cast-iron skillet filled with a breakfast sausage hash topped with cooked eggs.

Other Amazing Breakfast Recipes to Try

Breakfast truly can be the best meal of the day, especially if you go with one or all of these amazing recipes:

Caramel Banana Baked French Toast
Eggs Blackstone
Classic Biscuits and Gravy
Croque Madame
Huevos Rancheros
Best-Ever Eggs Benedict
Lemon Ricotta Pancakes with Vanilla
Buttermilk Waffles with Blueberry Sauce
Breakfast Potatoes

Classic Breakfast Casserole

These are all breakfast at its best, without a doubt, but isn’t this calling your name right about now?

A straight-on view of a cast-iron skillet filled with a sausage hash with cooked eggs on top, and a wooden spoon inserted where some of the breakfast mixture is missing.

This dish is so satisfying and so spectacularly delicious that we love to serve it for breakfast or dinner!

And leftovers, if there are any, are absolutely wonderful. Simply reheat in the microwave or in a low-temperature oven (300°F) until warmed.

And talk about the quintessential breakfast to serve to loved ones during the holiday season! It just doesn’t get much better than this!

An overhead view of a white bowl filled with a helping of skillet breakfast with a mug of black coffee nearby.

Ready to make the best one-pot breakfast in town? Go for it!

And when you do, be sure to take a photo of it, post it on Instagram, and tag @HowToFeedaLoon and hashtag #HowToFeedaLoon!

A straight-on view of a skillet breakfast in a large cast-iron skillet filled with a breakfast sausage hash topped with cooked eggs.
Print Recipe
5 from 1 vote

Best-Ever Skillet Breakfast

This Best-Ever Skillet Breakfast packs a ton of morning deliciousness in one easy skillet! It is so simple to put together and will really wow your family and/or guests as they wake up. Actually, it's so good, it's great any time of the day, or night! So good!
Prep Time15 minutes mins
Cook Time35 minutes mins
Total Time50 minutes mins
Course: Breakfast
Cuisine: American
Servings: 6 people
Calories: 495kcal
Author: Kris Longwell

Ingredients

  • 1 lb breakfast pork sausage ground
  • 1 medium onion chopped
  • 3 cloves garlic minced
  • 2 cups buttermilk biscuits crumbled, store-bought or homemade
  • 2 cups Cheddar cheese grated
  • 1 cup cherry tomatoes halved
  • 2 tablespoon fresh sage chopped (or 2 teaspoons dried sage)
  • ¼ cup pure maple syrup
  • ½ teaspoon Kosher salt
  • ¼ teaspoon freshly ground black pepper
  • 6 large eggs

Instructions

  • Preheat oven to 350°F.
  • In a sturdy skillet (preferably cast iron), cook the sausage, onion, and garlic over medium heat until the sausage is browned and the onion is soft, about 10 minutes.
    1 lb breakfast pork sausage, 1 medium onion, 3 cloves garlic
  • Add crumbled biscuits, cheese, tomatoes, sage, maple syrup, salt, and pepper. Stir until well blended.
    2 cups buttermilk biscuits, 2 cups Cheddar cheese, 1 cup cherry tomatoes, 2 tablespoon fresh sage, ¼ cup pure maple syrup, ½ teaspoon Kosher salt, ¼ teaspoon freshly ground black pepper
  • Make 6 indentations (using the handle of a long spoon works well) in the sausage mixture, and break an egg into each indentation.
    6 large eggs
  • Bake until eggs have just set, approx. 20 minutes (22 to 24 minutes for fully-cooked egg yolks).

Notes

See the video near the top of the blog post for visual guidance. If you liked the video, please subscribe to our YouTube channel. 
The entire dish can be assembled (except for the addition of the eggs) for hours (or up to the night before). Cover with foil and then add the eggs into the indentations before baking. 
Leftovers will keep in the fridge for up to 5 days. 

Nutrition

Calories: 495kcal | Carbohydrates: 52g | Protein: 14g | Fat: 18g | Saturated Fat: 9g | Polyunsaturated Fat: 5g | Monounsaturated Fat: 8g | Cholesterol: 38mg | Sodium: 1188mg | Potassium: 331mg | Fiber: 2g | Sugar: 12g | Vitamin A: 501IU | Vitamin C: 7mg | Calcium: 342mg | Iron: 3mg

POST UPDATE: This recipe was originally published in February 2018, but was updated with improved tweaks to the recipe with new tips and photography, and a fabulous new video in September 2023!

Creamy Salted Caramel Ice Cream

September 6, 2023 by Kris Longwell 2 Comments

A waffle cone with two scoops of salted caramel ice cream that has been inserted into a metal holder with two other cones in the background.

That taste of homemade caramel sauce is classic and is the perfect match for homemade ice cream.

We love all things caramel, from our grilled peaches with caramel sauce to homemade caramel apple pie. But there is just some extra special about the addition of caramel to home-churned ice cream. The coarse sea salt gives an added depth of flavor. This ice cream is always a huge hit.

A waffle cone with two scoops of salted caramel ice cream that has been inserted into a metal holder with two other cones in the background.

How To Make Creamy Salted Caramel Ice Cream

This ice cream isn’t difficult to make at all.

You just need to give yourself a little time for the custard to chill and then for the ice cream to freeze. Start a couple of days before you want to serve, and you’ll be golden!


NOTE: If you liked this video, please subscribe to our YouTube channel. Remember to click the little ‘bell’ icon so you’ll never miss a new video. Thank you!

The Ingredients You Will Need

There are just a handful of ingredients needed to make this incredible ice cream. Making the caramel sauce from scratch is easy and definitely the way to go.

Here’s What You’ll Need to Have on Hand

For the Caramel Sauce:
Sugar – Granulated
Cream – Heavy, whipping cream is best. In the U.K., go with double cream. Half and half can be substituted in a pinch.
Salt – Coarse sea salt, or finishing salt, such as Madlon’s is best.
Vanilla extract – Go with good quality.

For the Ice Cream Base:
Milk – Whole (you’ll use a combination of heavy cream and milk).
Maple syrup – Pure, please.
Eggs – Large.

EXPERT TIP: When you make the caramel, it may seem a little thin. This is normal. Allow it to chill in the refrigerator for at least 30 minutes. It will thicken as it cools. Pour directly into the custard and then whisk to combine.

Homemade caramel sauce being poured from a small white bowl into a ceramic bowl filled with an ice cream custard.

Tips for Making Perfect Creamy Salted Caramel Sauce

Make the Caramel Sauce from Scratch – Store-bought tends to be thicker and extremely sweet. Our version blends perfectly with the custard base and has just the right level of sweetness.

Stir in Your Favorite Blend-ins – The ice cream is incredibly delicious on its own. But stirring in your favorite blend-ins, such as toffee bits, butterscotch morsels, or even crushed peanuts, or all fantastic.

Freeze for Best Results – Once the ice cream reaches a thick, dense, creamy consistency, you could serve it straight out of the machine. But, we find that if you allow the ice cream to completely freeze in the freezer, you get best results.

EXPERT TIP: Follow the instructions for your ice cream maker once adding it to the canister. This recipe makes 1½ quarts. The ice cream we used in the video is a Cuisinart 1.5 Quart Electric Freezer.

A creamy custard being poured from a large ceramic bowl into the canister that is resting in an electric ice cream maker.

How to Serve

We love to serve this in ice cream bowls, sprinkled with crushed Heath bars, or toffee bits.

You can also add your favorite blend-in during the final 5 to 10 minutes of churning in the canister.

We also get rave reviews (especially from the kids) when we serve these in waffle cones or sugar cones (available in most the ice cream section of most supermarkets).

EXPERT TIP: Once the ice cream has reached the right thick and creamy consistency in the machine, we transfer it to an ice cream container (with lid) and keep in the freezer for 6 hours, or for best results, overnight.

Soft ice cream being transferred from an ice cream canister into a rectangular plastic ice cream container.

Other Classic Homemade Ice Cream Recipes To Try

There are seldom times that we met a bowl of homemade ice cream that we didn’t like. Following are some of the best we’ve ever made, and we’re sure you will love them, too!

Classic Homemade Vanilla Ice Cream
S’Mores Ice Cream
Blueberry Ice Cream
Strawberry Ice Cream
Peanut Butter Cup Ice Cream Cake

These are nothing short of amazing, without a doubt. But, isn’t this scoop of yumminess calling your name right now?

A person using an ice cream scooper to roll a scoop of salted caramel ice cream in a rectangular ice cream container.

How To Store

If desired, you can keep the ice cream in the canister and place it in the freezer.

Or, you can transfer the freshly churned ice cream from the canister into a freezer-safe container, such as our favorite ice containers from Tovolo, and then place in the freezer.

The ice cream will keep in the freezer for several weeks. If it’s left out and starts to melt, it will re-freeze with no problem. If it melts completely, you will lose the creamy smooth texture.

An overhead view of an ice cream waffle cone that is filled with salted caramel ice cream and topped with toffee bits.

Every time we serve this ice cream, family and friends are always amazed that we made it from scratch.

We’re always told that it’s so good, it tastes like ice cream you would get from a specialty ice cream shop, or a top-notch pint from one of the most popular ice manufacturers in the world.

It’s easy to prepare. The ingredients work beautifully together. And it just makes people happy. What could be better than that?

A person holding a waffle ice cream cone that is filled with salted caramel ice cream that has been topped with toffee bits.

Ready to make a batch of ice cream that will rival even the best ice cream shop in town? Go for it!

And when you do, be sure to take a photo of it, post it on Instagram, and tag @HowToFeedaLoon and hashtag #HowToFeedaLoon!

A waffle cone with two scoops of salted caramel ice cream that has been inserted into a metal holder with two other cones in the background.
Print Recipe
No ratings yet

Creamy Salted Caramel Ice Cream

This Creamy Salted Caramel Ice Cream is so decadently divine. The caramel is just slightly bitter and balances perfectly with the sweet custard. And the finishing salt puts it over the top. Amazing!
Prep Time3 hours hrs 15 minutes mins
Cook Time25 minutes mins
Chill, Churn, and Freeze Time8 hours hrs
Total Time11 hours hrs 40 minutes mins
Course: Dessert
Cuisine: American
Servings: 8 people
Calories: 596kcal
Author: Kris Longwell

Equipment

  • Ice cream maker This recipe makes 1.5 quarts

Ingredients

  • 1 cup sugar
  • ¼ cup water
  • 2 tablespoon unsalted butter
  • 2¼ cups heavy cream divided
  • 1 teaspoon coarse sea salt or finishing salt, such as Maldon
  • ½ teaspoon vanilla extract
  • 1 cup whole milk
  • ¼ cup pure maple syrup
  • 4 large eggs
  • 1 cup toffee bits for garnish, optional

Instructions

  • Heat the sugar and water in a large heavy skillet over medium heat until starts to bubble. Stop stirring and continue to cook, swirling the skillet periodically. Continue this process (without stirring) until it is deep amber in color, about another 8 to 12 minutes. Remove from the heat.
  • Meanwhile, warm 1¼ cup of the heavy cream.
  • Add the butter and the warmed cream into the sugar mixture, and stir constantly until smooth (it will bubble vigorously for a minute, but will calm down).
  • Transfer to a bowl and stir in the salt and vanilla.
  • Chill until no longer warm, about 15 to 20 minutes.
  • Meanwhile, bring milk, the remaining cup of cream, and the maple syrup to a boil in a small heavy saucepan, stirring occasionally.
  • In a medium bowl, whisk the eggs and then add half of the hot milk mixture in a slow stream, whisking constantly.
  • Pour all of the egg and milk mixture back into the saucepan and cook over medium heat, stirring constantly with a wooden spoon, until custard coats the back of the spoon, 4 - 5 minutes. (Don't let come to a boil). If it starts to scramble, take off the heat and stir continuously until smooth and thickened.
  • Pour custard through a fine-mesh sieve into a large bowl, then stir in cooled caramel.
  • Refrigerate the custard for 3 hours, or overnight.
  • Freeze custard in an ice cream maker (it will be soft), then transfer to an airtight container and place in freezer until firm, 4 hours, or overnight.
  • Serve with toffee bits sprinkled on top, if desired.

Video

Notes

See the video near the top of the blog post for visual guidance. If you liked the video, please subscribe to our YouTube channel. 
The caramel sauce may seem a little thin. Once you chill it in the fridge, it will thicken somewhat. It's not as thick as jarred caramel sauce. 
We love adding in our favorite add-ins during the last 10 minutes of churning. Our favorites are toffee bits, Heath Bar bits, butterscotch morsels, or chocolate chips. 
The ice cream can be frozen for up to several weeks. If it melts slightly, simply re-freeze and it will still be delicious. 

Nutrition

Calories: 596kcal | Carbohydrates: 54g | Protein: 6g | Fat: 29g | Saturated Fat: 14g | Polyunsaturated Fat: 2g | Monounsaturated Fat: 6g | Trans Fat: 0.3g | Cholesterol: 211mg | Sodium: 398mg | Potassium: 183mg | Sugar: 53g | Vitamin A: 1597IU | Vitamin C: 0.5mg | Calcium: 118mg | Iron: 1mg

POST UPDATE: This recipe was originally published in July 2016, but was updated with improved tweaks to the recipe with new tips and photography and a fabulous new video in September 2023!

Grilled Chicken Skewers with Alabama White Sauce

September 3, 2023 by Kris Longwell 4 Comments

An overhead view of grilled chicken skewers with Alabama sauce on a piece of crumpled brown wax paper.

If you like grilled chicken, you are going to fall in love with this recipe.

It’s simple and straightforward, but the smokiness from the grill, the crispy skin, and then the rich, tangy Alabama White Sauce put it over the top. This is one of those grilled dishes that your guests will truly rave about. It’s deeply flavorful and easy to prepare.

An overhead view of grilled chicken skewers with Alabama sauce on a piece of crumpled brown wax paper.

How to Make Grilled Chicken Skewers with White Alabama Sauce

The Alabama White Sauce can be made up to several days in advance.

The chicken can be prepped 24 hours in advance. This means all you have to do is grill them up and serve with extra sauce on the side!


NOTE: If you liked this video, please subscribe to our YouTube channel. Remember to click the little ‘bell’ icon so you’ll never miss a new video. Thank you!

The Ingredients You Will Need

Some butchers can provide you with boneless chicken thighs that still have the skin on. But, for most of us, that’s hard to come by. See below for the best results:

Here’s What You’ll Need to Have on Hand

Chicken Thighs – Simply pick up bone-in, skin-on chicken thighs and use a sharp knife to cut strips off of the bone. You could also use chicken breasts, but we find you get more flavor with the dark meat. The skin adds amazing flavor.
Oil – Olive oil or vegetable oil both work just fine.
Seasonings – All you need is salt and pepper
Alabama white sauce – Make the sauce 1 hour in advance, or up to 3 days. Homemade is easy and critical for making these skewers incredibly delicious.

EXPERT TIP: The addition of dark corn syrup to the sauce adds a bit of sweetness to the sauce that matches wonderfully with the tangy horseradish sauce and apple cider vinegar.

Dark corn syrup being poured from a small white bowl into a larger glass bowl filled with the ingredients for Alabama white sauce.

Tips for Perfect Grilled Chicken Skewers

Skin On! – We can’t stress this enough. When grilled over direct heat, the skin gets crispy and the coating of the sauce makes it irresistible. It takes a little effort to get the pieces on the skewers, but it can be done in advance.

Sauce from Scratch – The sauce is a unique blend of tangy with a touch of sweetness. Homemade is simple to make and truly puts them in a league of their own.

Direct Heat – These only take about 15 to 18 minutes to cook. Get your grill good and hot, and then place the skewers directly over the heat source. No need to close the grill lid. They will char a bit and the skin will get perfectly crisp.

EXPERT TIP: Use the sharpest knife that you have to carefully slice strips of chicken around the bone. If you have long strips of loose skin, cut it away. The skin will stay with the meat once you thread it onto the skewer. Remember, if using wooden skewers, soak them in water for about 20 minutes before adding the chicken and then grilling.

A person wearing black latex gloves using a large Japanese knife to cut strips of a chicken thigh from the bone.

How To Serve

We typically serve these stacked on a platter with lots of white sauce on the side. A nice sprinkle of finely snipped chives and some red pepper flakes make for tasty and beautiful garnishes.

You can also remove the chicken from the skewers and serve the grilled chicken family style.

A word of warning, these are usually the first to go when we serve these at a BBQ or any kind of gathering. We often double or triple the recipe. They are wonderful when served alongside other grilled proteins and/or vegetables.

EXPERT TIP: In the last 5 minutes of cooking, you’ll want to slather plenty of the white sauce onto the chicken. Carefully flip each skewer, and liberally add more of the sauce. Have a separate small bowl of the sauce to do this. Leave the rest for guests to add even more to the cooked chicken.

A person using a small kitchen brush to apply Alabama white sauce over skewered pieces of chicken that are on the grates of a gas grill.

Other Grilling Recipes to Try

If you’re like us, you’re always looking for something new to grill at your next outdoor gathering. Burger and hot dogs are wonderful, of course, but these grilled delights are always a hit and are sure to please.

Marinated Grilled Chicken Kabobs
Best Grilled Chicken
Grilled Beer Can Chicken
Amazing Grilled Buffalo Chicken Wings
Grilled BBQ Pulled Pork Pizza
Delmonico Pork Steaks with Homemade Steak Sauce
Grilled Tri-Tip with Santa Maria Salsa
Best-Ever BBQ Shrimp
Grilled Portobello Mushroom BLT “Pizzas”

If you love grilling as much as we do, then you will love all of the dishes linked above. But, for the moment, aren’t these babies calling your name?

Alabama white sauce transferring onto a piece of skewered grilled chicken from a large silver spoon.

There truly is something magical about this grilled chicken.

It’s approachable and yet has an elevated flavor profile.

Add this with the crispy skin, and you will be amazed at the reaction you’ll get when you set these out at your next BBQ or gathering. They are one of the best grilled dishes we have ever served. Honestly.

A close-up view of a grilled chicken skewers that have a layer of Alabama white sauce drizzled over the top.

Ready to take grilled chicken to the next level? Go for it!

And when you do, be sure to take a photo of it, post it on Instagram, and tag @HowToFeedaLoon and hashtag #HowToFeedaLoon!

An overhead view of grilled chicken skewers with Alabama sauce on a piece of crumpled brown wax paper.
Print Recipe
4.50 from 2 votes

Grilled Chicken Skewers with Alabama White Sauce

Grilled Chicken Skewers with Alabama White Sauce is absolutely a true crowd-pleaser. Leave the skin on for crispy delicious perfection. And the tangy white BBQ sauce is the perfect complement to the grilled meat. Always a huge hit!
Prep Time20 minutes mins
Cook Time18 minutes mins
White Sauce Prep and Chill1 hour hr
Total Time1 hour hr 38 minutes mins
Course: Appetizer or Entree, BBQ
Cuisine: American
Servings: 8 people
Calories: 139kcal
Author: Kris Longwell

Equipment

  • 5 skewers If wooden, soak in water for 20 minutes before using
  • Gas, charcoal, or electric grill

Ingredients

  • 2 cups Alabama white sauce
  • 4 chicken thighs skin-on
  • 1 tablespoon olive oil
  • 2 teaspoon Kosher salt and black pepper
  • 2 tablespoon chives snipped, for garnish (optional)
  • 1 tablespoon red pepper flakes for garnish (optional)

Instructions

Do Ahead

  • Prepare the white sauce and let chill for 1 hour or up to 3 days.

Prepare the Grilled Chicken

  • Cut the chicken into strips, around the bone.
  • Weave the strips onto the skewers.
  • Brush the chicken with the oil, and season with salt and pepper.
  • Heat your grill to medium-high heat.
  • When the grill is hot, place the skewers on the grill, over direct heat.
  • Grill until the skin is nice and crispy, about 12 -15 minutes, carefully flipping occasionally.
  • Brush some of the white sauce all over the chicken and cook for another minute. Flip, and brush more sauce. Cook for another minute and then remove from the grill.
  • Garnish with snipped chives and red pepper flakes, if desired. Serve at once with the remaining white sauce on the side.

Video

Notes

See the video near the top of the blog post for visual guidance. If you liked the video, please subscribe to our YouTube channel. 
You can substitute chicken breast for this recipe, but, the crispy skin is really what makes the grilled chicken so deeply flavorful. That and the homemade white sauce. 
The Alabama white sauce can be made up to 3 days in advance and will keep in the fridge for up to a week. 
The chicken can be skewered and seasoned up to 6 hours in advance. Cover with plastic wrap and keep in the fridge until ready to grill. 

Nutrition

Serving: 340g | Calories: 139kcal | Carbohydrates: 0.1g | Protein: 9g | Fat: 18g | Saturated Fat: 3g | Polyunsaturated Fat: 2g | Monounsaturated Fat: 5g | Trans Fat: 0.05g | Cholesterol: 55mg | Sodium: 44mg | Potassium: 116mg | Vitamin A: 44IU | Calcium: 5mg | Iron: 0.4mg

POST UPDATE: This recipe was originally published in July 2016, but was updated with improved tweaks to the recipe with new tips and photography and a fabulous new video in September 2023!

Lemon and Blueberry Jumbo Muffins

August 30, 2023 by Kris Longwell 8 Comments

A straight-on view of a lemon blueberry jumbo muffin sitting on a baking rack with other muffins in the background.

It may not be true that bigger is always better, but when it comes to homemade muffins, it is definitely the way to go!

These muffins have a lightness to them, and yet, by the same token, they also feel dense and super moist. Starting with a top-notch lemon-infused olive is essential, and everything else comes together in a snap. We’re giving you a foolproof jumbo muffin to treasure. We promise!

A straight-on view of a lemon blueberry jumbo muffin sitting on a baking rack with other muffins in the background.

How To Make Lemon and Blueberry Jumbo Muffins

It took us some time to get this recipe just right. We were inspired by the rows and rows of jumbo muffins in the windows of the many bakeries lining the streets of New York City, including Grand Central Station and Penn Station. 

We learned that muffins rise better, taste better, and feel better with each bite when we use olive oil as opposed to butter. Bonus: It’s better for you, too.


NOTE: If you liked this video, please subscribe to our YouTube channel. Remember to click the little ‘bell’ icon so you’ll never miss a new video. Thank you!

The Ingredients You Will Need

The ingredients for these jumbo muffins are straight-forward. The Lemon Olive Oil is critical in achieving the perfect taste and texture for the muffins. See below for the best place to get the lemon olive oil.

Here’s What You’ll Need to Have on Hand

Flour – All-purpose.
Baking powder – Check the ‘best used by’ date. If expired, get a new batch.
Salt – Go with regular table salt, not coarse Kosher.
Eggs – Room temperature.
Sugar – Cane sugar is best and can be found in the baking section of most supermarkets.
Lemon-infused olive oil – We get ours from Rancho Azul y Oro, and it truly takes the muffins to the next level.
Lemon zest – Fresh is always best
Ricotta cheese – Whole milk for a more dense muffin, skim ricotta (low fat) for a lighter muffin (Wesley prefers the slightly denser version).
Buttermilk – Whole or low-fat will work.
Vanilla extract – Get a good-quality brand, if possible. We like Neilsen-Massey.
Blueberries – Fresh is a must (frozen will work in an absolute pinch).
Sugar crystals – Turbinado is great and can be found in the baking section of most supermarkets.

EXPERT TIP: You’ll want to be gentle as you bring the batter together. A wooden spoon is all you need. Make a well with the flour mixture, then pour in the egg and oil mixture, top with the blueberries. Stir until the batter resembles the consistency of cookie batter.

A person transferring fresh blueberries from a small glass bowl into a large glass bowl filled with a flour mixture and egg and lemon batter in the middle of it all.

Tips for Making Perfect Lemon and Blueberry Jumbo Muffins

Use Lemon-Infused Oil, Not Butter – Even though we love butter as much as anyone, we have found that lemon-infused olive oil makes the best jumbo muffins. We can’t say enough about Rancho Azul y Oro’s Lemon Olive Oil. It’s the best!

Fill the Pans Almost Completely – First, you’ll need to make sure you have the correct jumbo muffin pans. Then, spray them all over with cooking spray (including the tops). And then, fill the batter almost to the rim of every hole in the pan. You’ll have just enough batter to make 6 jumbo muffins.

Start with a Super-Hot Oven – Make sure you’ve preheated your oven to 425°F for at least 15 minutes. As soon as you reach 6 minutes, lower the heat to 375°F. That may not seem like that much of a change, but the super hot temperature helps to create the height you are looking for.

A person using a large silver spoon to transfer lemon and blueberry muffin batter into a jumbo muffin pan.

How To Serve

These muffins are absolutely mouth-watering when served warm, and fresh from the oven.

However, you can prepare them a day in advance and then keep them in an airtight container. Place on baking rack and reheat in a 325°F for about 15 minutes, until lightly warmed. Or, serve them at room temperature.

The muffins are amazing on their own, but, they are really pretty spectacular with a spread of softened butter down the center of them after you’ve split one open.

They are perfect for a holiday breakfast feast, or baby shower, or just a fun weekend with the family.

EXPERT TIP: You can use a liner for the muffin pan if you desire. We’ve tried them with and without, and both are great. We do recommend getting them out of the pan as soon as you can. If they sit too long, they run the risk of getting soggy bottoms.

A close-up view of a lemon and blueberry jumbo muffin sitting a small white plate with a fork next to it.

Other Classic Baked Breakfast Pastries and Breads to Try

Breakfast just wouldn’t be breakfast without a delicious pastry or baked goods. Here are some of our favorite recipes that you will most likely love, too.

Blueberry Almond Coffee Cake
Honey Nut Muffins with Cheerios®
Banana Nut Bread
Homemade Monkey Bread
Zucchini Bread
Grandma’s Cinnamon Rolls
Homemade Kolaches
Orange Sweet Rolls
Apple Cider Doughnuts
Jelly and Custard Doughnuts

These are all amazing in their own right, but isn’t the jumbo muffin calling your name right about now?

A lemon and blueberry jumbo muffin that is sitting on a small white plate next to a glass mug full of coffee and cream.

These muffins are not only jumbo, they are absolutely delicious and always a hit with family and guests.

Follow the recipe as written, and you’ll be very happy with the results.

Make a double batch and enjoy them all week and weekend! Double jumbo!

A straight-on view of a lemon blueberry muffin that has been split in half on a small white plate sitting next to a glass mug full of coffee.

Ready to make the best jumbo muffins this side of New York City? Go for it!

And when you do, be sure to take a photo of them, post it on Instagram, and tag #HowToFeedaLoon and hashtag #HowToFeedaLoon!

A straight-on view of a lemon blueberry jumbo muffin sitting on a baking rack with other muffins in the background.
Print Recipe
4.50 from 2 votes

Lemon and Blueberry Jumbo Muffins

There is a lot to love about these jumbo muffins. A crunchy and sweet muffin top, and moist, and fluffy inside. Follow the recipe to the 'T' and you'll get fantastic results!
Prep Time15 minutes mins
Cook Time26 minutes mins
Rest time10 minutes mins
Total Time51 minutes mins
Course: Breakfast
Cuisine: Breakfast
Servings: 6 people
Calories: 397kcal
Author: Kris Longwell

Equipment

  • 1 Jumbo muffin pan

Ingredients

  • 3 cups all-purpose flour
  • 4 teaspoon baking powder
  • ½ teaspoon salt regular salt, not coarse
  • 2 large eggs room temperature
  • 1 cup cane sugar
  • ½ cup lemon-infused olive oil
  • Zest of 1 large lemon
  • ¼ cup ricotta cheese whole milk OR part-skim: See NOTES
  • ¾ cup buttermilk
  • 1 teaspoon vanilla extract
  • 1 cup fresh blueberries
  • Cooking spray
  • ¼ cup coarse sugar such as turbinado

Instructions

  • Preheat oven to 425°F.
  • In a large bowl, whisk together the flour, baking powder and salt until blended (about 30 seconds of gently blending with a whisk or fork).
    3 cups all-purpose flour, 4 teaspoon baking powder, ½ teaspoon salt
  • In a separate medium-sized bowl, use a fork or wooden spoon to mix the eggs with the sugar. Stir until blended. Add the oil, lemon zest, ricotta cheese, buttermilk, and vanilla, and mix until incorporated.
    2 large eggs, 1 cup cane sugar, ½ cup lemon-infused olive oil, Zest of 1 large lemon, ¼ cup ricotta cheese, ¾ cup buttermilk, 1 teaspoon vanilla extract
  • Using your hands, or a large wooden spoon, form a well in the center of the flour mixture.
  • Add the egg/oil mixture and the blueberries into the well area you created in the flour mixture.
    1 cup fresh blueberries
  • Using the wooden spoon, fold the dry ingredients into the wet, slowly, until all pockets of flour have been incorporated. About 1 to 2 minutes. The batter will be very thick and resemble moist cookie dough.
  • Spray a large muffin pan with cooking/baking spray, including the top of the pan.
    Cooking spray
  • Use a large spoon or ice cream scooper to fill each muffin holder nearly to the brim.
  • Top each muffin with a healthy pinch of sugar crystals.
    ¼ cup coarse sugar
  • Bake for 6 minutes and then reduce oven temperature to 375°F and continue baking for 22 - 25 minutes, or until tops are lightly brown, and an inserted toothpick comes out clean.
  • Carefully remove muffins from the tin as soon as possible. If left in the pans, the bottoms will become soggy.
  • Let cool for at least 10 minutes on a rack.

Video

Notes

See the video near the top of the blog post for visual guidance. If you liked the video, please subscribe to our YouTube channel. 
Lemon olive oil can be found in many well-stocked supermarkets. Our favorite lemon oil is from Rancho Azule y Oro. They are an amazing family-run olive oil producer from California. We HIGHLY recommend them. 
For the ricotta cheese, go with whole milk ricotta to achieve muffins that are slightly more dense, but not heavy. For lighter, fluffier muffins, use part-skim ricotta. 
The muffins will stay fresh in an air-tight container with a lid for up to 5 to 6 days. They are best freshly baked, but still delicious throughout the week. 
The muffins can be frozen (fully wrapped) for up to 2 months. 

Nutrition

Calories: 397kcal | Carbohydrates: 84g | Protein: 9g | Fat: 14g | Saturated Fat: 4g | Polyunsaturated Fat: 0.4g | Monounsaturated Fat: 1g | Cholesterol: 9mg | Sodium: 238mg | Potassium: 389mg | Fiber: 2g | Sugar: 35g | Vitamin A: 95IU | Calcium: 181mg | Iron: 3mg

POST UPDATE: This recipe was originally published in March 2018, but was updated with improved tweaks to the recipe with new tips and photography and a fabulous new video in August 2023!

Thai Beef with Red Curry Sauce

August 27, 2023 by Kris Longwell 36 Comments

An overhead view of Thai beef in a colorful bowl with the beef on one side and Jasmine rice on the other side.

We recently re-visited this recipe. We hadn’t made it in years. Wesley declared this is now his favorite beef dish. That’s saying something.

There is something so comforting about the combination of curry and coconut milk that is just incredible. We feel that way about Classic Shrimp Curry. With this recipe, you can do it on the stove, in the oven, or in your slow cooker. All deliver melt-in-your-mouth chunks of flavorful beef enveloped in an unforgettable sauce.

An overhead view of Thai beef in a colorful bowl with the beef on one side and Jasmine rice on the other side.

How to Make Thai Beef with Red Curry Sauce

The depth of flavor in this dish is truly amazing.

But, you will be amazed at how easy it is to prepare!


NOTE: If you liked this video, please subscribe to our YouTube channel. Remember to click the little ‘bell’ icon so you’ll never miss a new video! Thank you!

The Ingredients You Will Need

All of the ingredients in this incredible Thai dish can be found, nowadays, in the Asian section of most well-stocked supermarkets. If you don’t see them, you can easily order them online (or, visit your local Asian market!).

Here’s What You’ll Need to Have on Hand

Beef – Go with an inexpensive roast, such as chuck. It will get super tender as it slowly cooks.
Seasoning – Salt and pepper is what you need for the beef.
Oil – Olive oil or extra-virgin olive oil is best.
Onion – Finely chopped.
Cloves – Fresh, and finely minced.
Thai red curry paste – Found in the Asian section of many supermarkets, or online.
Unsweetened coconut milk – Be sure to get coconut milk and not coconut cream. Found in the Asian section of your market, or online.
Fish sauce – Found in the Asian section of your market or online. If you can’t get your hands on fish sauce, you can substitute soy sauce.
Lime juice – Fresh is best, but, bottled will work just fine.
Brown sugar – Light or dark, but we prefer dark.
Bamboo shoots – Found in the Asian section of your market, or online. We like to cut the shoot into strips with a knife. Just makes a nicer presentation and easier to eat.
Mint – Fresh is best. Don’t skip this. It’s a wonderful match to the savory sauce.
Jasmine rice – See recipe in NOTES of recipe card. If you don’t have Jasmine, go with your favorite steamed rice.

EXPERT TIP: Sear the chunks of meat in the oil until just browned all over. It won’t be cooked through, but will finish cooking during the slow simmer. After removing the seared meat, you’ll want to safely remove all but about 1 to 2 tbsps of the rendered grease from the beef.

An overhead view of bite-sized pieces of chuck roast that are being seared in an oval Dutch oven with a wooden spatula off to the side.

Tips for Perfect Thai Beef With Red Curry Sauce

Season the Beef – You won’t need to add any additional salt or pepper to the sauce, because the fish sauce is salty and the curry paste has plenty of pepper flavor. However, you want to the beef to be nicely seasoned. Don’t skimp when seasoning it with salt and pepper.

Stir Frequently – The coconut milk, when heated, will start to separate. You’ll see oil. This is normal, and tastes delicious (it’s not like grease from the beef). However, if you stir frequently, the sauce will stay mostly emulsified. Adding additional coconut cream about 15 minutes before serving makes the sauce nice and creamy.

Don’t Forget the Mint – Fresh mint adds a brightness to the finished dish that is wonderful. You can also stir the chopped mint into the cooked Jasmine rice.

EXPERT TIP: As mentioned, it is normal for the coconut milk to start to separate after it’s been cooking for a while. It may seem like there is excessive grease, but this okay. Stir frequently to keep the sauce combined and emulsified. The sauce is flavored wonderfully, and doesn’t taste greasy, at all.

A person pouring unsweetened coconut milk from a jar into an oval Dutch oven filled with sautéd onions coated with red curry paste.

Three Ways to Slow-Cook Thai Beef

We love the ease of slow simmering the beef and sauce on the stove for about 90 to 105 minutes. Just be sure to keep the heat very low, and stir often!

To prepare the dish in your slow-cooker, simply sear the beef with the onions and garlic, and then transfer to your slow cooker with the other ingredients (except the mint), and cook on LOW for 6 hours, or HIGH for 3 hours. Add the bamboo shoots about 10 minutes before serving!

For cooking in the oven, prepare the dish as written, but instead of simmering on the stove, place in an oven preheated to 325°F, covered, for 3 hours, stirring every now and then.

An overhead view of slow-cooked pieces of beef in a Thai red curry sauce in an oval Dutch oven.

Other Thai Recipes To Try

Thai cuisine is deep in tradition and even deeper in flavor. So often with that classic mix of a little sweet and a little heat. Add more heat, if desired! Here are a handful of our favorites!

Classic Chicken Pad Thai
Easy Shrimp Pad Thai
Thai Beef Salad
Classic Chicken Pad Thai
Thai Green Curry Chicken

These are all amazing, but isn’t this Thai dish calling your name right about now?

A close-up view of Thai beef with red curry sauce in an Asian bowl with Jasmine rice on the side.

This dish is truly comfort food at its very best.

Think of it kind of like a beef stew, over rice, with an Asian twist.

Every time we make this for guests, that simply can’t get over how delicious it is! And it’s easy enough to prepare for a weeknight dinner or a weekend get together!

Each and every bite is a melt-in-your-mouth taste sensation that you’ll want to make time and time again!

A fork that is being used to hold up a piece of Thai beef that has been slow-cooked in a red curry and coconut sauce.

Ready to make the best Thai beef dish in town? Go for it!

And when you do, be sure to take a photo of it, post it on Instagram, and tag @HowToFeedaLoon and hashtag #HowToFeedaLoon!

An overhead view of Thai beef in a colorful bowl with the beef on one side and Jasmine rice on the other side.
Print Recipe
5 from 9 votes

Thai Beef with Red Curry

This Thai Beef with Red Curry is so comforting and warms you to the bone.  A little bit of heat, a little bit of sweet, and HUGE amount of tender texture and incredible flavor.  Slow cooked to perfection.  
Prep Time20 minutes mins
Cook Time3 hours hrs
Total Time3 hours hrs 20 minutes mins
Course: Entree / Slow Cooker
Cuisine: Asian / Thai
Servings: 4 people
Calories: 728kcal
Author: Kris Longwell

Equipment

  • Large pot with lid or slow-cooker

Ingredients

  • 2½ lb beef lean chuck or round, cut into bite-size pieces
  • Kosher salt and freshly ground black pepper
  • 2 tablespoon olive oil
  • 1 yellow onion chopped
  • 4 cloves garlic minced
  • ¼ cup Thai red curry paste
  • 2 13 oz cans unsweetened coconut milk
  • 2 tablespoon fish sauce
  • 2 tablespoon fresh lime juice
  • 2 tablespoon dark brown sugar
  • 1 8 oz can bamboo shoots drained, cut into thin strips, if desired
  • 3 tablespoon fresh mint chopped
  • Cooked Jasmine rice for serving

Instructions

  • Sprinkle the beef with 1 teaspoon salt and pepper, each, all over.
    2½ lb beef, Kosher salt and freshly ground black pepper
  • Heat the oil in a large skillet, or Dutch oven, over medium-high heat.
    2 tablespoon olive oil
  • Working in batches (if necessary), sauté the beef until browned on all sides, about 5 to 6 minutes.  Use a slotted spoon to remove the seared (but not fully cooked) beef to a platter. Set aside.
  • Remove all but about 1 to 2 tablespoon of the oil from the pot. Add the onion and sauté over medium-high heat until soft, about 4 minutes.  Add the garlic and sauté for another 1 minute.
    1 yellow onion, 4 cloves garlic
  • Add the curry paste and stir until fragrant and coats the onion and garlic, about 1 minute.
    ¼ cup Thai red curry paste
  • Add 1½ cans of the coconut milk and stir with a wooden spoon, scraping up the browned bits on the bottom of the pan.  
    2 13 oz cans unsweetened coconut milk
  • Stir in the fish sauce, lime juice and brown sugar and bring to a boil. 
    2 tablespoon fish sauce, 2 tablespoon fresh lime juice, 2 tablespoon dark brown sugar
  • Place the beef into a large pot, or Dutch oven, and add the curry / coconut milk mixture.  
  • Partially cover and cook over low heat for 90 minutes, stirring frequently. until the meat is tender and the sauce has thickened somewhat. 
  • 15 minutes before the dish is done cooking, stir in the bamboo shoots and the remaining half can of coconut milk.
    1 8 oz can bamboo shoots
  • Spoon over cooked Jasmine rice and garnish with mint.
    3 tablespoon fresh mint, Cooked Jasmine rice

Video

Notes

See the video near the top of the blog post for visual guidance. If you liked the video, please subscribe to our YouTube channel.
As the coconut milk cooks, it is normal to separate and leave pools of oil. This is coconut oil and is not greasy tasting like grease from beef. Stirring frequently helps to keep the sauce together. However, the coconut oil is flavored with the curry paste and is delicious. 
Leftovers are delicious and will keep in the fridge for up to 5 days. Reheat on the stove over medium heat, or in the microwave in 1-minute increments until heated through.
How to Cook Jasmine Rice:
  1. Add 1 cup and 1¼ cups water with ¼ teaspoon salt into a medium saucepan.
  2. Bring to a boil. Cover and immediately lower the heat to low. 
  3. Simmer for about 12 minutes. Turn off the heat and let rest, covered, for 10 minutes.
  4. Remove the lid and fluff with a fork. Serve at once. 

Nutrition

Calories: 728kcal | Carbohydrates: 12g | Protein: 50g | Fat: 30g | Saturated Fat: 14g | Polyunsaturated Fat: 2g | Monounsaturated Fat: 14g | Trans Fat: 3g | Cholesterol: 201mg | Sodium: 901mg | Potassium: 874mg | Fiber: 1g | Sugar: 8g | Vitamin A: 2490IU | Vitamin C: 5mg | Calcium: 102mg | Iron: 6mg

POST UPDATE: This recipe was originally published in October 2015, but was updated with improved tweaks to the recipe with new tips and photography and a fabulous new video in August 2023.

Best-Ever Tuna Melt

August 23, 2023 by Kris Longwell 25 Comments

Four halves of tuna melt sandwiches that are stacked on top of each other with the interior of the sandwich visible.

This sandwich is in a league all of its own. And we just upped the ante!

The flavors of this nostalgic sandwich just go together in ways that are unmatched. But, what really puts this version over the top is the Best-Ever Tuna Salad. Serve this with a side of crosshatch sweet potato chips, a dill pickle spear, and a tall glass of iced tea, and you will be in lunch heaven.

Four halves of tuna melt sandwiches that are stacked on top of each other with the interior of the sandwich visible.

How To Make the Best-Ever Tuna Melt

Making the world’s best tuna melt is actually easier than you might think.

And you can make the tuna salad up to several days in advance! Heck, you’ll want to have one of these incredible sandwiches every day of the week!


NOTE: If you liked this video, please subscribe to our YouTube channel. Remember to click the little bell icon so you’ll never miss a new video. Thank you!

the Ingredients You Will Need

As mentioned, this sandwich is really all about the homemade tuna salad, but, choosing the best ingredients to take the sandwich to the next level is critical.

Here’s What You’ll Need to Have on Hand

Tuna Salad – We can’t stress this enough: Make the tuna salad from scratch. You can easily adapt it to your own tastes!
Butter – Unsalted, for getting an extra crispy, extra buttery exterior toast
Bread – We usually go with thick slices of sourdough, but see if you can find croissant bread. It’s even more buttery, decadent, and insanely good.
Cheese – We recommend good-quality sliced cheddar, sharp or mild. But, you could also go with Gouda, Fontina, Monterey Jack, or Colby.
Tomatoes – Red and juicy! Sliced nice and thick.
Seasoning – Salt and pepper directly onto the tomatoes.

EXPERT TIP: Adding a layer of cheese on the bottom slice of bread and then placing another slice so it touches the top slice of bread helps to hold everything in place once it gets nice and melty.

A person using a spoon to place homemade tuna salad on top of a slice of tomato that is sitting on a piece of bread with a slice of cheese on it.

Tips For Make the Best-Ever Tuna Salad

Use Quality Canned Tuna – We’ve said this in our tuna salad video, but, going with a top-notch tuna really does make a difference. We love Skipjack tuna from Wild Planet.

Season the Tomatoes – Liberally adding salt and pepper brings out their natural sweetness and acidity and works beautifully with the other components of the sandwich.

Don’t Skimp on the Bread and Cheese – Although the tuna salad is the star, the bread and cheese are critical in preparing the best-ever sandwich. For the bread, go with fresh, thick slices. For the cheese, melty and high-quality is best.

EXPERT TIP: Getting the perfectly grilled bread for the sandwich is critical. Toss the butter into the hot skillet and then gently place the prepared sandwich into the pan. Gently move the sandwich around so it fully absorbs the butter. When ready to flip, remove the sandwiches to a cutting board, add more butter to the pan, and flip on the board. Then, return to the skillet.

A close-up view of two tuna melt sandwiches in a skillet being browned in bubbling melted butter.

How To Serve

This sandwich is definitely served best fresh from the skillet.

Use a large sharp knife to cut the sandwich in half, if desired. For a classic look, wrap each half in sandwich waxed paper.

If serving a gathering of friends and/or family, consider grilling multiple sandwiches on a griddle and cutting the sandwiches into thirds.

We love to serve the melts with kettle chips, or homemade sweet potato fries, pickles, and iced tea.

But in the meantime, you’ve just got to make this Amazing Tuna Melt.

A view of several tuna melt sandwiches that have been cut in half. Capers and dried cranberries are visible along with the tuna.

Other Classic Sandwich Recipes to Try

There is just something special about a sandwich that is made with an extra dose of TLC. Here is a collection of some of our all-time favorites that we just know you will love, too!

Best-Ever Chicken Salad Sandwich
Incredible Egg Salad Sandwich
Grilled Honey Mustard Sandwich with Bacon
Crispy Fried Chicken Sandwich
Classic Pastrami Sandwich
Monte Cristo
Grilled Marinated Steak Sandwich
Best-Ever Fried Fish Sandwich
Fried Catfish Po-Boy
Classic Muffaletta

These are all classic and beyond delicious. But, for right now, isn’t this gem calling your name?

A close-up view of a person holding up a tuna melt sandwich that has been sliced in half.

If we had to rank our all-time favorite sandwiches of all time, this classic melt would be a real contender.

We’ve said it before, but the buttery crunchy bread matched with the melty cheese, seasoned tomatoes, and, of course, the best-ever tuna salad just works incredibly well together.

We love to make a double (or triple) batch of the tuna salad and have these sandwiches all week long! They are so good and we never get tired of them!

A tuna melt sandwich with a bite taken out of it sitting ona brown wax paper.

Ready to take the classic tuna melt to new levels of excellence? Go for it!

And when you do, be sure to take a photo of it, post it on Instagram, and tag @HowToFeedaLoon and hashtag #HowToFeedaLoon!

A close-up view of a person holding up a tuna melt sandwich that has been sliced in half.
Print Recipe
5 from 9 votes

Amazing Tuna Melt

It's time to take this iconic sandwich to heights you just can't imagine. It all starts with the Best-Ever Tuna Salad. Be sure to go with top-notch bread and cheese, and juicy red tomatoes. The rest comes together beautifully. Simple, straightforward, and unbelievably delicious!
Prep Time20 minutes mins
Cook Time12 minutes mins
Total Time32 minutes mins
Course: lunch, Sandwich
Cuisine: American
Servings: 4
Calories: 562kcal
Author: Kris Longwell

Equipment

  • 1 large skillet (12") preferably non-stick

Ingredients

  • 4 cups tuna salad click for recipe
  • 8 slices sourdough bread ¼" thick, or croissant bread
  • 8 slices cheddar cheese
  • 3 tomatoes sliced
  • Kosher salt and freshly ground black pepper
  • 8 tablespoon unsalted butter softened

Instructions

Do Ahead

  • Prepare the tuna salad (link to full recipes in Ingredients list)
    4 cups tuna salad

Make the Tuna Melts

  • Build the sandwiches by starting with 1 bread slice. Add 1 slice of cheese, then about ½ cup of the tuna salad, then 1 or 2 slices of tomato, a pinch of salt and pepper, another slice of cheese, and topped with another slice of bread. Repeat to build 3 more sandwiches.
    8 slices sourdough bread, 8 slices cheddar cheese, 3 tomatoes, Kosher salt and freshly ground black pepper
  • Heat a medium-sized skillet over medium-high heat and add 2 tablespoon of the butter. Swirl until completely melted.
    8 tablespoon unsalted butter
  • Carefully add 1 or 2 sandwiches into the hot skillet. Cook until lightly browned on the bottom, about 3 to 5 minutes.
  • Use a spatula to lift each sandwich from the skillet and place it on a cutting board. Carefully flip each sandwich over. Add more butter to the skillet. Once melted, use the spatula to place the sandwich in the skillet. Cook until nicely browned on the bottom, another 3 to 5 minutes. Remove from the skillet and repeat with the remaining two sandwiches.
  • Cut in half and serve at once.

Video

Notes

See the video near the top of the blog post for visual guidance. If you liked the video, please subscribe to our YouTube channel.
The tuna salad can be made up to 3 days in advance. The recipe can be doubled or tripled, easily. The salad can be frozen for up to 2 months. 


Nutrition

Calories: 562kcal | Carbohydrates: 71g | Protein: 23g | Fat: 24g | Saturated Fat: 12g | Polyunsaturated Fat: 2g | Monounsaturated Fat: 7g | Trans Fat: 1g | Cholesterol: 94mg | Sodium: 1001mg | Potassium: 401mg | Fiber: 4g | Sugar: 8g | Vitamin A: 1809IU | Vitamin C: 13mg | Calcium: 323mg | Iron: 5mg

POST UPDATE: This recipe was originally published in May 2018, but was updated with improved tweaks to the recipe with new tips and photography and a fabulous new video in August 2023!

Pesto-Stuffed Chicken with Tomato Relish

August 20, 2023 by Kris Longwell 2 Comments

A person using a spoon to transfer a chopped tomato relish over slice pieces of cooked rolled up chicken that's been stuffed with pesto sauce.

This dish is so easy to make, it’s perfect for a weeknight meal. But, it’s so amazing, it’s great for entertaining, too.

Cooking with boneless, skinless chicken breast can be a challenge to keep it moist and flavorful. This recipe is foolproof. The homemade pesto couldn’t be easier to make and the tomato relish comes together in minutes. A true winner winner!

A person using a spoon to transfer a chopped tomato relish over slice pieces of cooked rolled up chicken that has been stuffed with pesto sauce.

How To Make Pesto-Stuffed Chicken

We love this dish for a variety of reasons.

It’s easy. Gorgeous. But mostly, it’s absolutely scrumptious.


NOTE: If you liked this video, please subscribe to our YouTube channel. Remember to click the little ‘bell’ icon so you’ll never miss a new video. Thank you!

The Ingredients You Will Need

The pesto sauce is so easy to prepare, and after that, there are only a handful of ingredients needed. This dish is so deep in flavor, your guests will think you spent hours preparing it!

Here’s What You’ll Need to Have on Hand

For the Pesto and Chicken:
Garlic – No need to mince.
Basil – Fresh is a must.
Lemon – The juice from 1 fresh lemon.
Pine nuts – Be sure to toast them, but keep an eye on them, they can burn quickly!
Parmesan – Grated.
Mozzarella – Whole milk, shredded.
Chicken – Boneless, skinless, pounded to about ⅛ to ¼-inch in thickness. See NOTES.
Seasoning – Salt and pepper is all you need.
Oil – Olive oil works perfectly, as does extra-virgin olive oil.

For the Tomato Relish:
Tomatoes – You’ll need about 2 cups. Slice into wedges, and then remove the seeds, and then chop.
Oil – We go with extra-virgin, but regular olive oil works, too.
Balsamic vinegar – Aged is an excellent choice.
Seasoning – Salt and pepper.

EXPERT TIP: If your chicken breasts are extra large (as they usually are in most supermarkets), simply use a sharp knife to cut them in half, lengthwise. Place the cutlets in a large plastic baggie and pound the meat with a mallet (or the bottom of a measuring cup or wine bottle). Spread the pesto over the chicken and then top with the shredded chicken.

A person sprinkling shredded mozzarella cheese over the top of a thin uncooked chicken cutlet that has a layer of pesto on it.

Tips for Making Perfect Pesto-Stuffed Chicken

Thin Chicken Breasts – This is crucial in order to get fully cooked chicken and even cooking. A meat mallet makes this really easy.

Pesto Made From Scratch – This dish is still yummy with store-bought pesto sauce, but made-from-scratch is so easy and really elevates the dish even more.

Sear and then Bake – After rolling the chicken up and securing it with twine or toothpicks, you’ll want to sear the chicken in a medium-hot skillet with oil until browned all over. They add a depth of flavor and start the cooking process. Finish the chicken off in the oven, but don’t overcook the chicken! Internal temperature should be 165°F. This usually only takes about 15 minutes in a 400°F oven.

A person using a pair of metal tongs to turn a rolled up piece of chicken that is stuffed with pesto sauce and is being seared in a skillet.

How To Serve

We love to slice each piece of chicken, and then serve it over a nice pilaf and then topped with the tomato relish.

You can plate each guest’s plate, or, serve it family-style and let folks serve themselves.

How To Make a Wild Rice Pilaf

  1. Preheat your oven to 350°F.
  2. Heat 3 tablespoon olive oil over medium heat in an ovenproof saucepan.
  3. Sauté one minced shallot and 2 cloves of garlic, until soft.
  4. Add 1½ cups wild rice and toast in the pan for about 3 minutes, stirring often.
  5. Add 4½ cups chicken broth and bring to a boil.
  6. Cover the pan and bake in the oven for 35 minutes.
  7. Season with salt and pepper and fluff with a fork.

EXPERT TIP: As the stuffed chicken bakes, some of the oil may seep out from the pesto sauce. This is perfectly okay, and actually helps keep the chicken juicy and tender.

An overhead view of four chicken breasts that have been rolled up stuffed with pesto and baked in a dish.

Other Awesome Chicken Recipes to Try

Chicken is a universally loved protein. Here are some of our all-time favorite chicken recipes:

Creamy Tuscan Chicken
Chicken Fricassee
Chicken Florentine
Moroccan Chicken Tagine with Preserved Lemons
Authentic Chicken Curry
Caprese-Stuffed Chicken Breasts
Chicken Tinga Tacos
Chicken and Rice Casserole with Broccoli and Cheese

These are all absolutely delicious chicken dishes, but isn’t this plate full of yumminess calling your name right about now?

A close-up view of plate filled with sliced pesto-stuffed chicken with tomato relish all on a bed of rice pilaf.

If you love a good solid chicken dish as much as we do, we’re pretty certain you are going to absolutely love this recipe.

We’ve served it to family members as well as dinner party guests, all to rave reviews.

And in the rare event that you have leftovers, they are nothing short of amazing! Delicious!

Two white dinner plates filled with a helping of pesto-stuffed chicken with tomato relish that has been sliced and placed on rice pilaf.

Ready to make one of the best chicken dishes in town? Go for it!

And when you do, be sure to take a photo of it, post it on Instagram, and tag @HowToFeedaLoon and hashtag #HowToFeedaLoon!

A close-up view of plate filled with sliced pesto-stuffed chicken with tomato relish all on a bed of rice pilaf.
Print Recipe
5 from 1 vote

Pesto-Stuffed Chicken with Tomato Relish

This dish is loaded with amazing fresh flavor. Making the pesto sauce from scratch is a snap in your food processor. Store-bought pesto will work, too. Be sure to pound the chicken out to about ⅛ to ¼-inch in thickness. Easy and so delicious!
Prep Time20 minutes mins
Cook Time30 minutes mins
Total Time50 minutes mins
Course: Entree
Cuisine: American, American / Italian
Servings: 6
Calories: 723kcal
Author: Kris Longwell

Equipment

  • Kitchen twine or toothpicks to secure the chicken rolls

Ingredients

  • 2 cups pesto sauce click link for easy recipe

For the Tomato Relish

  • 2 cups tomatoes seeded and chopped
  • 1 tablespoon extra-virgin olive oil
  • 2 tablespoon balsamic vinegar
  • Kosher salt and black pepper

For the Chicken

  • 2½ lbs chicken breasts boneless, skinless, pounded to ⅛th-inch in thickness
  • Kosher salt and black pepper
  • 2 cups mozzarella whole milk shredded
  • 2 tablespoon olive oil
  • Cooking spray

Instructions

Do Ahead

  • Prepare the pesto sauce (see link in the Ingredients list)
    2 cups pesto sauce

Make the Tomato Relish

  • In a medium-sized bowl, mix together the tomatoes, oil, vinegar, and a healthy pinch of salt and pepper. This can be made up to 24 hours in advance (it's better if it has time to chill for at least an hour).
    2 cups tomatoes, 1 tablespoon extra-virgin olive oil, 2 tablespoon balsamic vinegar, Kosher salt and black pepper

Prepare the Chicken

  • Preheat oven to 400°F.
  • Place the thin chicken breasts on a cutting board. Season them all over with salt and pepper. Spread about 2 tbsps of the pesto sauce over the top of each cutlet. Top each cutlet with a couple of tablespoons of shredded mozzarella.
    2½ lbs chicken breasts, Kosher salt and black pepper, 2 cups mozzarella
  • Roll the breasts tightly and secure with kitchen twine or pierce through the chicken with toothpicks.
  • Heat the oil in a large skillet and sear the chicken until browned all over, about 10 to 15 minutes.
    2 tablespoon olive oil
  • Spray a shallow baking dish with the cooking spray and place the seared chicken in the dish. Bake for 15 minutes, or until the interior of the chicken is 165°F.
    Cooking spray
  • Remove the twine (or toothpicks) and slice the rolls of chicken with a sharp knife, making 3 to 4 medallions. Top with a spoonful of the tomato relish and serve at once.

Video

Notes

See the video near the top of the blog post for visual guidance. If you liked the video, please subscribe to our YouTube channel. 
We don't recommend chicken tenders for this recipe. If you can only find the large boneless, skinless chicken breasts, then get a sharp knife, and very carefully, cut the breast in half, lengthwise. Pounding them out so they are nice and thin is important. If they are somewhat thick, you'll need more cook time in the oven. Internal temperature should be 165°F. 
We love serving this with rice. See the blog post for a quick and easy recipe for making a nice rice pilaf. 
Leftovers will keep covered in the fridge for up to 5 days. (They are delicious!) Reheat leftovers in a dish, covered with foil, in the oven at 350°F for 15 to 20 minutes. Or, nuke them in the microwave on HIGH in 1-minute increments until heat through. 

Nutrition

Calories: 723kcal | Carbohydrates: 10g | Protein: 53g | Fat: 26g | Saturated Fat: 7g | Polyunsaturated Fat: 2g | Monounsaturated Fat: 5g | Trans Fat: 0.02g | Cholesterol: 157mg | Sodium: 1230mg | Potassium: 851mg | Fiber: 2g | Sugar: 5g | Vitamin A: 2389IU | Vitamin C: 9mg | Calcium: 338mg | Iron: 2mg

Best-Ever Tuna Salad

August 16, 2023 by Kris Longwell 77 Comments

Three tuna salad sandwiches sitting a white lunch plate next to a colorful napkin.

This Best-Ever Tuna Salad is an explosion of flavors, featuring the bright notes of fresh dill, the briny kick of capers, and the sweet tartness of dried cranberries, creating a truly amazing taste experience. The addition of homemade mayonnaise elevates the dish to new heights.

Three tuna salad sandwiches sitting a white lunch plate next to a colorful napkin.

🐟 The Ingredients

This recipe features a delightful mix of savory and sweet ingredients that harmoniously work together to create an incredible flavor profile that is both satisfying and refreshing. Find ingredient notes (including substitutions and variations) below.

The ingredients for gourmet tuna salad arranged on a wooden surface, including a can of tuna, capers, fresh dill, dried cranberries, mayonnaise, Dijon mustard, white wine vinegar, and a selection of seasonings, all neatly organized for easy preparation.

🌿 Substitutions and Variations

  • Tuna – Canned tuna is perfectly fine and the best choice. Our favorite choice is Skipjack Tuna packed in water, but almost any variety will work. We don’t recommend tuna packed in oil. Rotisserie chicken can be substituted for the tuna.
  • Cranberries and Capers – These add a depth of flavor and texture to the salad that helps to elevate the flavor profile. Raisins are an excellent substitute for the cranberries, and chopped dill pickles can be used in place of the capers.
  • Vegetables – The celery adds flavor and texture to the salad. Chop it finely if you don’t prefer much ‘crunch’ in the salad. Soaking the red onion in the vinegar adds a depth of flavor and mellows the onion’s taste. Scallions or chives can replace the red onions, or just omit them if you don’t like the taste of onions.
  • Flavor enhancers – Fresh dill and lemon are key ingredients in this tuna salad and brighten the flavor profile. Dried dill can be used in a pinch, but fresh is best. Freshly squeezed lemon juice is ideal, but bottled lemon juice is perfectly acceptable.

See the recipe card (with video) below for a full list of ingredients and measurements.

Expert Tip

The dressing can be made up to several days in advance. Once you’ve prepped all of the dry ingredients, simply pour in the dressing and mix to coat.

👩🏼‍🍳 How To Make Best-Ever Tuna Salad

A person pouring apple cider vinegar from a bottle into a small bowl filled with chopped red onion.
  1. Step 1: Soak the onions in apple cider vinegar for 15 minutes.
A bowl of un-mixed ingredients for a gourmet tuna salad.
  1. Step 2: Drain the onions and add them to a bowl with the tuna, cranberries, celery, capers, and herbs. 
A glass bowl filled with mayonnaise, Dijon mustard, salt, and pepper with halved lemons next to it on a cutting board.
  1. Step 3: In a separate bowl, mix the mayo, lemon juice, mustard, salt, and pepper
A mayonnaise and Dijon dressing being poured from a glass bowl into a large ceramic bowl filled with the ingredients for a gourmet tuna salad including dried cranberries, capers, and fresh dill.
  1. Step 4: Pour the dressing over the dry ingredients and stir to combine. 
A person holding a glass bowl filled with best-ever tuna salad on a wooden cutting board.
  1. Step 5: Chill the salad for at least 1 hour or up to overnight. 
A small sandwich slider of best-ever tuna salad resting on a layer of green leaf lettuce.
  1. Step 6: Serve on a bed of greens or as a sandwich.

🍽️ How To Serve

  • This tuna salad is ideal for serving at a special occasion, such as a bridal or baby shower, a potluck at the church, or just a lovely brunch with dear friends.
  • We often will double (or triple) the recipe and place it in a nice serving bowl. Be sure to have slider buns or dinner rolls so folks can build a sandwich.
  • For a beautiful presentation, make the sandwiches before guests arrive and place them on a large platter or cutting board. We add a layer of green leaf lettuce on the bottom of each sandwich.
  • You can also serve this wrapped in leaves of lettuce. Carb-free, beautiful, and so delicious!

🙋🏽‍♂️ Frequently Asked Questions

How far in advance can Best-Ever Tuna Salad be made?

Homemade tuna salad can be stored in an airtight container in the refrigerator for up to 4 to 6 days, making it a great option for meal prep or using up leftovers. It’s even better the days after you put it together.

Is Tuna Salad healthy?

Yes. Tuna is loaded with nutrients and is a great source of protein. Go with plain Greek yogurt in place of the mayonnaise to make it even healthier.

Why is my tuna salad runny?

It’s important to completely drain the canned tuna before mixing it with the other ingredients. Place it in a fine-mesh colander or sieve and press on the tuna with the back of a spatula or spoon. Sometimes the water will separate after the salad sits in the fridge. Give it a good stir before serving. If necessary, you can add another tablespoon of mayo or mustard.

A ceramic bowl filled with best-ever tuna salad with a wooden spoon inserted off to the side.

😋 Other Classic Mayo-Based Salads to Try

  • best-ever chicken salad recipe
    Best-Ever Chicken Salad
  • A shallow white bowl filled with best-ever ham salad surrounded by a plate of green leaf lettuces, slices of bread, plates, and glasses of iced tea.
    Best-Ever Ham Salad
  • Best-ever egg salad on a white plate with pickles nearby
    Best-Ever Egg Salad
  • An overhead view of an oval serving bowl filled with creamy horseradish potato salad.
    Creamy Horseradish Potato Salad

Ready to make the best tuna sandwich this side of the Atlantic Ocean? Go for it!

And when you do, be sure to take a photo of it, post it on Instagram, and tag @HowToFeedaLoon and hashtag #HowToFeedaLoon!

A slider sandwich stuffed with best-ever tuna salad and a piece of green leaf lettuce on a soft roll resting on a white lunch plate.
Print Recipe
5 from 36 votes

Best-Ever Tuna Salad

This is one of the most popular recipes on the blog. It's easy, beautiful, and the flavors work perfectly together. The slight sweetness of the cranberries matched against the salty, briny capers is perfect! We highly recommend using fresh dill. It really makes a big difference. You can easily double (or triple) the recipe if feeding a group.
Prep Time15 minutes mins
Chill time1 hour hr
Total Time1 hour hr 15 minutes mins
Course: Lunch / Dinner, Salad
Cuisine: American
Servings: 4 people
Calories: 405kcal
Author: Kris Longwell

Ingredients

  • ½ cup red onion finely chopped
  • ½ cup apple cider vinegar
  • 2 7 oz. cans tuna in water we love Wild Planet, drained
  • ½ cup dried cranberries
  • 2 celery ribs chopped
  • ¼ cup capers drained
  • 2 tablespoon dill fresh, chopped
  • 1 tablespoon parsley fresh, chopped
  • ¾ cup mayonnaise
  • 1 large lemon the juice from
  • 1 tablespoon Dijon mustard
  • 1 teaspoon Kosher salt start with ½ teaspoon, then add more, to taste
  • Freshly ground black pepper to taste

Instructions

  • Place the red onions in a small bowl and cover with apple cider vinegar. Set aside for 15 minutes, and then drain.
    ½ cup red onion, ½ cup apple cider vinegar
  • In a large bowl, add the drained tuna, pickled onions, cranberries, celery, capers, dill and parsley.
    2 7 oz. cans tuna in water, ½ cup dried cranberries, 2 celery ribs, ¼ cup capers, 2 tablespoon dill, 1 tablespoon parsley
  • In a medium bowl, mix together the mayonnaise, lemon juice, mustard, salt and pepper (add the salt in ½ teaspoon increments, to taste).
    ¾ cup mayonnaise, 1 large lemon, 1 tablespoon Dijon mustard, 1 teaspoon Kosher salt, Freshly ground black pepper
  • Add the mayo mixture to the tuna mixture, and using a large wooden spoon, stir the salad to fully incorporate all ingredients.
  • Refrigerate for at least 1 hours before serving. (Can be prepared 24 hours in advance of serving).
  • Serve on a bed of greens or as sandwiches.

Video

Notes

NOTE: Watch the video near the top of the recipe for visual guidance.
The dressing can be made up to 3 days in advance. You can assemble the salad up to 24 hours in advance. Give the salad a good stirring before serving. 
Leftovers will keep in the fridge for up to 4 to 6 days. It can be frozen for up to 2 months, although the dressing may lose its creamy texture after thawing. 

Nutrition

Calories: 405kcal | Carbohydrates: 30g | Protein: 1g | Fat: 18g | Saturated Fat: 4g | Cholesterol: 18mg | Sodium: 905mg | Potassium: 100mg | Fiber: 3g | Sugar: 22g | Vitamin A: 123IU | Vitamin C: 17mg | Calcium: 18mg | Iron: 1mg

POST UPDATE: This recipe was originally published in April 2018, but was updated with improved tweaks to the recipe with new tips and photography and a fabulous new video in August 2023!

Seared Pork Chops With Caper Sauce

August 13, 2023 by Kris Longwell 97 Comments

A front-on view of a black plate filled with mashed potatoes and a seared pork chop with caper sauce on top of it.

This is one of those dishes that has such an amazing “wow” factor. Yet, it’s so easy to make!

If Wesley (The Loon) had to pick his favorite dish from the blog, this recipe would be in serious contention. And folks, when you take that first bite, you’ll understand what he means. Perfect served over a bed of Best Mashed Potatoes! If you and your family love pork chops, you are in for a treat.

A front-on view of a black plate filled with mashed potatoes and a seared pork chop with caper sauce on top of it.

This dish hits all the right notes. And what’s so amazing about it is that it can be prepared in about 30 to 40 minutes.

The sauce is deeply flavorful and the perfect complement to the juicy chops.

The Ingredients You Will Need

Choosing the right pork chop is important, but, honestly, as long as you get good-quality pork, you can’t go wrong.

Here’s What You’ll Need To Have On Hand

Pork chops – We recommend center cut, bone-in for the best flavor. 1 to 2 inches thick is fantastic.
Oil – Olive oil for searing
Seasonings – Salt and pepper are all you need for the chops.
Shallots – You can substitute regular chopped yellow onion, but shallots are a little sweeter and perfect for the sauce.
Garlic – Freshly minced.
Vinegar – Sherry is our favorite, but white wine vinegar, red wine vinegar, or even apple cider vinegar will work just fine.
Dijon mustard – Just plain Dijon is wonderful. For a more pronounced mustard taste, go with grain mustard.
Stock – Chicken stock or broth is perfect.
Heavy cream – Don’t skip this. It adds a luxuriousness to the sauce that is amazing.

EXPERT TIP: If you’ve got extra-thick chops, you’ll want to sear them for about 8 minutes per side, until golden, and then transfer to a 325°F oven. An instant-read thermometer ensures you get the ideal internal temperature of 135°F.

A straight-on view of two center cut bone-in pork chops being seared in a stainless steel skillet.

Tips for Making Perfect Seared Pork Chops with Caper Sauce

This recipe is really foolproof, but there are a few good “rule of thumb” steps to keep in mind:

Choose Good Chops – Choose thick-cut, bone-in pork chops for the best flavor and juiciness. In this case, go with a nice thick cut (you may need to visit your butcher).

Season Generously – Add plenty of salt and pepper before searing them in a hot skillet of oil to create a crispy crust.

Let Them Rest – Allow the pork chops to rest for a few minutes before serving to allow the juices to redistribute, and then spoon the caper sauce over the top for added flavor.

EXPERT TIP: Once the sauce has reduced by about one third, turn off the heat and stir in the cream. You’ll want to do this just before serving.

A person pouring heavy cream from a small white bowl into a large stainless steel skillet filled with a caper sauce.

How To Serve

This dish truly is stunning in presentation. We recommend plating the dish before serving.

It truly delivers that “wow” moment when you bring it to the table.

The sauce is deeply flavorful, and you don’t need to drown the chops in it. Just a nice drizzle down the middle of the chop and then a little over the mashed potatoes delivers the goods, without a doubt!

A person using a silver spoon to drizzle on a creamy caper sauce over a seared pork chop on a black plate with mashed potatoes.

Other Amazing Pork Recipes To Try

If you like juicy pork, you are going to really love these tried and true recipes:

Italian-Style Smothered Pork Chops
Grilled Balsamic Glazed Pork Chops
Grandma’s Pork Loin Roast
Slow-Roasted Pork Shoulder
Italian Smothered Pork Chops
Cajun Pork Chops
Slow-Cooker Pulled Pork Sandwiches
Southern Fried Pork Chops with Cream Gravy
Pan-Fried Pork Cutlets with Peaches
Country-Style Pork Ribs

Oh, these are all classic in every possible way. But hasn’t this pork chop caught your eye?

An overhead view of two black plates filled with a pile of mashed potatoes and a seared pork chop with caper sauce poured over the top.

Folks, we’re not mincing words when we tell you this Seared Pork Chops with Caper Sauce is one of the best pork chop dishes you’ll ever make, serve, and eat.

The sauce is sublime and matches perfectly with the tender, juicy chops.

This is one of our all-time favorites, and when you try it, we think it will quickly move into your rotation, too!

A piece of pork chop being held up by a fork with capers on it.

Ready to make the best seared pork chop recipe in town? Go for it!

And when you do, be sure to take a photo of it, post it on Instagram, and tag @HowToFeedaLoon and hashtag #HowToFeedaLoon!

A front-on view of a black plate filled with mashed potatoes and a seared pork chop with caper sauce on top of it.
Print Recipe
4.91 from 33 votes

Seared Pork Chops with Caper Sauce

Seared Pork Chops with Caper Sauce recipe is just brimming with delicious flavor and juicy, tender meat. Searing the chops ensure locked-in flavor and the sauce puts it over the top. 
Prep Time15 minutes mins
Cook Time20 minutes mins
Total Time35 minutes mins
Course: Entree
Cuisine: American
Servings: 4
Calories: 300kcal
Author: Kris Longwell

Ingredients

  • 4 pork chops center cut, bone-in
  • Kosher salt and freshly ground black pepper
  • 2 tablespoon olive oil
  • 1 medium shallot diced
  • 3 cloves garlic minced
  • ⅓ cup capers drained
  • 2 tablespoon Sherry vinegar
  • ½ cup chicken stock
  • 1 ½ tablespoon Dijon mustard
  • ¼ cup heavy cream

Instructions

  • Preheat oven to 325°F.
  • Pat the pork chops dry with a paper towel, and then generously sprinkle both sides with salt and pepper.
    4 pork chops, Kosher salt and freshly ground black pepper
  • In a large skillet, heat the oil over medium-high heat.
    2 tablespoon olive oil
  • Add the chops and sear on one side for about 6 to 8 minutes, until golden brown on the bottom. Flip the chops over and sear the other sides for another 6 to 8 minutes. The chops won't be completely cooked through at this point.
  • Transfer the chops and cook until the internal temperature reaches 135°F. An instant-read thermometer ensures the perfect temperature.
  • Meanwhile, pour all but about 1 tablespoon of oil from the pan and reduce the heat to medium.
  • Add the shallots and sauté for 2 to 3 minutes, until soft. Stir in the garlic and sauté for another 30 seconds.  
    1 medium shallot, 3 cloves garlic
  • Add the capers and simmer for 1 minute.
    ⅓ cup capers
  • Add the vinegar, stock, and mustard and stir until combined. Simmer until slightly reduced, about 2 to 3 minutes.
    2 tablespoon Sherry vinegar, ½ cup chicken stock, 1 ½ tablespoon Dijon mustard
  • Stir in the cream and a healthy pinch of salt and pepper.
    ¼ cup heavy cream
  • Place chops on a plate or platter and pour sauce over them. Pass the remaining sauce at the table.

Video

Notes

For visual guidance, see the video near the top of the blog post. If you liked the video, please subscribe to our YouTube channel. 
This recipe will work with any type of pork chop. If you go with a boneless chop and one that is less than 1 inch in thickness, you probably won't need to finish the cooking off in the oven.  Preheat your oven to 200°F so you can keep the seared chops warm while you prepare the sauce. 
The sauce is extremely flavorful, and a little goes a long way. If desired, you can easily double the sauce recipe so you'll have plenty on hand (we do this often when serving this to guests). 
Leftovers will keep in the fridge for up to 5 days. Reheat in the microwave on HIGH for 30-second intervals, or heat in a 300°F oven for about 20 minutes, or until the chops are heated through. 

Nutrition

Calories: 300kcal | Carbohydrates: 4g | Protein: 31g | Fat: 15g | Saturated Fat: 5g | Polyunsaturated Fat: 2g | Monounsaturated Fat: 10g | Trans Fat: 0.1g | Cholesterol: 92mg | Sodium: 575mg | Potassium: 579mg | Fiber: 1g | Sugar: 1g | Vitamin A: 45IU | Vitamin C: 2mg | Calcium: 27mg | Iron: 1mg

POST UPDATE: This recipe was originally published in May 2016, but was updated with improved tweaks to the recipe with new tips and photography and a fabulous new video in August 2023!

Panzanella (Tuscan Tomato and Bread Salad)

August 11, 2023 by Kris Longwell Leave a Comment

A straight-on view of a large serving pasta bowl filled with panzanella that has been topped with shaved Parmesan cheese.

If you’re looking for a new recipe to use up farm-fresh vegetables, this is the one for you.

This is a Tuscan dish that is about as good as they come. Purists will go with extra-stale bread, but we find making our homemade croutons helps the bread keep some texture and works amazingly well with the vegetables. If possible, get fresh-from-the-garden heirloom tomatoes.

A straight-on view of a large serving pasta bowl filled with panzanella that has been topped with shaved Parmesan cheese.

How To Make Panzanella (Tuscan Tomato and Bread Salad)

Making the croutons from scratch is so much easier than you might think, and really help to take this dish to the next level.

As mentioned, farm-fresh veggies are ideal for this salad, especially tomatoes.


NOTE: If you liked this video, please subscribe to our YouTube channel. Remember to click the little ‘bell’ icon so you’ll never miss a new video. Thank you!

The Ingredients You Will Need

It’s about the bread, the veggies, and the simple vinaigrette for this epic salad.

Here’s What You’ll Need to Have on Hand

For the Salad:
Homemade Croutons – In Tuscany, the bread is usually just 2 or 3-day-old stale bread. We’ve tried both and love going with homemade croutons.
Tomatoes – Farm-fresh heirlooms are so good. Go with a variety of colors, if possible.
Cucumber – Peeled, seeded, and cubed.
Onion – Fine chopped red onion is recommended. You can soak them in apple cider for a milder taste.
Olives – Black, green, or Kalamata are all great choices. Make sure they are pitted. Slice them or leave them whole. We leave ours whole.
Capers – Drained.
Herbs – Fresh basil and parsley are fantastic.
Parmesan cheese – Grated from a block when serving is recommended.

For the Dressing:
Oil – Extra-virgin is recommended.
Vinegar – Red wine or balsamic are both excellent. We usually go with red wine vinegar.
Lemon juice – From 1 fresh lemon.
Seasoning – Salt and freshly ground black pepper.

EXPERT TIP: An easy way to emulsify the dressing is to place all of its ingredients in a jar with a tight-fitting lid. Affix the lid and then shake vigorously. If making the vinaigrette in advance, you’ll want to shake again before adding to the salad.

A person pouring a red wine vinaigrette over a bowl filled with croutons, chopped tomatoes, black olives, cubed cucumbers, and sliced red onions.

Tips for Making the Best Panzanella

Use High-Quality Ingredients – Go with a nice Italian loaf for the croutons, farm-fresh heirloom tomatoes, and a mix of colorful vegetables,for the best flavor and texture.

Make the Croutons From Scratch – Tossing cubed bread with oil, melted butter, minced garlic, salt, pepper, and dried oregano and then baking until golden and crispy is what makes this salad so special.

Let the Salad Rest (But Not Too Long) – After you’ve tossed the croutons and vegetables with the vinaigrette, allow a little time for it to be absorbed, about 15 minutes before serving. If you wait hours, the salad will become too soggy.

EXPERT TIP: The addition of freshly grated Parmesan cheese after the dish has been plated is not only beautiful, but adds a depth of flavor that you won’t get from pre-shredded cheese. It’s also beautiful, too.

A person using a microplane to grate a block of Parmesan cheese over a bowl filled with panzanella (bread and tomato salad).

How To Serve

This salad makes a wonderful “starter” salad before a nice Italian feast. Serve it before you serve Bistecca alla Fiorentina, Chicken Piccata, or Salmon Puttanesca.

It is also spectacular served family-style. Simply serve in a large pasta bowl and let guests serve themselves.

As mentioned, serve within 15 minutes of tossing the salad with the vinaigrette. It will stay delicious for 1 to 2 hours. It’s still amazing after the bread absorbs most of the dressing!

A person using two large wooden spoons to toss together chopped vegetables and homemade croutons in a large pasta bowl.

Other Classic Salad Dishes to Try

We love all types of salads that can be served before the main course, or as a side dish. Here are some of our all-time favorites:

Green Bean and Tomato Salad with Scallion Dressing
Thai Beef Salad with Vegetables
Greek Salad with Grilled Steak
Tzatziki Cucumber Salad
Stuffed Summer Tomatoes
Zucchini and Yellow Squash Salad with Tomato Relish
Horseradish Potato Salad

These are all amazing in their own right, but doesn’t this Tuscan masterpiece catching your eye?

An overhead view of a large pasta bowl filled with panzanella and flanked by a block of Parmesan cheese and a torn loaf of bread.

We can honestly say, this Tuscan salad is one of most favorite salads to make during the peak summer months.

The texture of the salad is unique, but so satisfying.

And the taste is truly unmatched. We get nothing but huge rave reviews every time we serve this to guests.

An overhead view a past bowl filled with a tomato and bread salad that has had some of it removed with a large wooden spoon that inserted into the side of the salad.

Ready to make the best Tomato and Bread Salad this side of, well, Tuscany? Go for it!

And when you do, be sure to take a picture, post it on Instagram, and tag @HowToFeedaLoon and hashtag #HowToFeedaLoon!

An overhead view of a large pasta bowl filled with panzanella and flanked by a block of Parmesan cheese and a torn loaf of bread.
Print Recipe
No ratings yet

Panzanella (Tuscan Tomato and Bread Salad)

Panzanella (Tomato and Bread Salad) is the perfect salad for peak-season tomatoes. You could go with stale bread pieces, but we find that making our homemade croutons put this salad over the top.
Prep Time20 minutes mins
Making the Croutons25 minutes mins
Total Time45 minutes mins
Course: Salad
Cuisine: Italian
Servings: 6 people
Calories: 253kcal
Author: Kris Longwell

Ingredients

For the Salad

  • 5 cups croutons click the link for easy recipe
  • 3 heirloom tomatoes cored, seeded, and cut into small cubes
  • 1 cucumber peeled, halved lengthwise, seeded, and cubed
  • ½ cup red onion chopped, or thinly sliced
  • ½ cup black olives pitted
  • ¼ cup capers drained
  • ¼ cup basil fresh, chopped
  • ¼ cup parsley flat-leaf, fresh, chopped
  • Parmesan cheese freshly grated, for garnish

For the Dressing

  • ⅓ cup extra-virgin olive oil
  • ⅓ cup red wine vinegar more to taste
  • 1 tablespoon lemon juice fresh, usually from 1 lemon
  • ¾ teaspoon Kosher salt
  • ½ teaspoon black pepper freshly ground

Instructions

Do Ahead

  • Make the croutons and set aside.
    5 cups croutons

Assemble the Salad

  • In a large mixing bowl, combine the croutons, tomatoes, cucumber, onion, olives, capers, basil, and parsley. Mix together with two large wooden spoons.
    3 heirloom tomatoes, 1 cucumber, ½ cup red onion, ½ cup black olives, ¼ cup capers, ¼ cup basil, ¼ cup parsley
  • Add the dressing ingredients to a large jar with a tight-fitting lid. Affix the lid and shake vigorously for about 30 seconds, until fully combined (alternately, whisk the ingredients in a bowl until fully combined).
  • Pour the dressing over the salad and toss continuously for a few minutes. Let rest for about 10 minutes, and then toss again.
  • Serve the salad at once, with grated Parmesan as a garnish.
    Parmesan cheese

Video

Notes

See the video near the top of the blog post for visual guidance. If you liked the video, please subscribe to our YouTube channel. 
The croutons can be made 24 hours in advance. Once cool, place in a baggie and seal shut. Leave on the counter for up to 4 or 5 days. 
This salad is best served about 15 to 20 minutes after tossing with the dressing. Though, it will continue to be wonderful for several hours. After a few hours, the bread will be quite soggy, but still yummy. Leftovers aren't so great as the bread turns to mush. 

Nutrition

Calories: 253kcal | Carbohydrates: 24g | Protein: 4g | Fat: 12g | Saturated Fat: 2g | Polyunsaturated Fat: 2g | Monounsaturated Fat: 11g | Sodium: 850mg | Potassium: 299mg | Fiber: 3g | Sugar: 3g | Vitamin A: 867IU | Vitamin C: 16mg | Calcium: 51mg | Iron: 2mg


Asian Slaw with Peanut-Ginger Dressing

August 11, 2023 by Kris Longwell 11 Comments

An overhead view of an oval white platter filled with an Asian slaw with Peanut Ginger Dressing.

This slaw really is amazing. The flavors are so bright and refreshing.

This salad is fantastic any time of the year, but, when farm-fresh vegetables are at their peak, this is about as good as it comes. Be sure to put this in your line-up for BBQs, parties, and get-togethers. It’s also amazing served next to Asian Braised Short Ribs!

An overhead view of an oval white platter filled with an Asian slaw with Peanut Ginger Dressing.

How To Make Asian Slaw with Peanut-Ginger Dressing

The preparation of this slaw is really quite simple, and so much of it can be done in advance.

And the dressing can be made in a food processor or in a bowl with a whisk. Also, in advance!


NOTE: If you liked this video, please subscribe to our YouTube channel. Remember to click the little ‘bell’ icon so you’ll never miss a new video. Thank you!

The Ingredients You Will Need

You may be wondering what makes this particular slaw considered Asian. We’re using a traditional Asian-style peanut dressing that compliments the vegetables perfectly.

This salad can also easily be adapted to your own likes. If there is a veggie you don’t like, leave it out! Or, add to your own tastes. 

Here’s What You’ll Need to Have on Hand

For the Dressing:
Garlic – Minced.
Ginger – Go with fresh and chop it finely.
Soy sauce – Regular or low-sodium.
Brown sugar – Light or dark.
Peanut butter – We recommend creamy rather than crunchy, but either will work.
Oil – Olive oil is best.

For the Slaw:
Cabbage – A combination of red and green is beautiful. Sliced and roughly chopped. Pre-shredded bagged slaw is an option, too.
Carrots – Use a mandolin to julienne them, or purchase matchstick carrots from your produce provider.
Bell peppers – We love a combination of red and yellow cut into strips.
Cilantro – Fresh, chopped.
Green onions – Also known as scallions.
Rice vinegar – Found in the Asian section of many supermarkets. Rice wine vinegar can be substituted, or white wine vinegar.
Salt and pepper – Just a pinch of each is all that’s needed. Salt to taste.

EXPERT TIP: All of the vegetables (except the cilantro and scallions) can be prepped up to 24 hours in advance. Store them in a container with the lid and refrigerate until ready to use.

An overhead view of a large square serving bowl filled with piles of shredded carrots, cabbage, red and yellow bell peppers, herbs, and chopped scallions.

Tips for Making a Perfect Asian Slaw

The vegetables in this slaw are vibrant and delicious, but you can’t go wrong with the whichever you choose, or leave out! Honestly, it’s all about the dressing that puts this slaw over the top!

Use a Mix of Crunchy Vegetables – Cabbage, carrots, and bell peppers add amazing crunch. The herbs and scallions add a depth of flavor. Slice the veggies thinly for a crisp and refreshing texture.

Make the Dressing In Advance – Allow the dressing to sit in the fridge for a few hours to allow the flavors to meld together.

Dress the Slaw Just Before Serving – If you toss too far in advance of serving, it will become soggy and will lose some of the vibrant colors. Taste, and adjust the seasoning to taste with additional salt or vinegar if needed.

A person pouring a peanut dressing from a small glass jar into a white bowl filled with an Asian slaw.

How To Serve

You can easily make the dressing up to 2 days ahead of serving.

Cut the veggies up and keep them in large airtight containers. Just before serving, place the veggies in a bowl, and then dress, and toss well.

We love serving this on a nice large platter with a couple of serving spoons. Give the slaw a little toss with a couple of spoons every hour or so.

An overhead view of a slaw made with diced red and green cabbage, red and yellow bell peppers, and scallions in a bowl with two wooden spatulas off to the side.

Other Classic Veggie Sides To Try

Sometimes a side dish can steal the show from the main dish! These classic recipes are certainly up to that task! Give them a try:

Classic Coleslaw
Avocado-Lime Slaw
Tzatziki Cucumber Salad
Dill and Cucumber Salad
Zesty Black Bean and Corn Salad
Zucchini and Yellow Squash Salad with Tomato Relish
Yellow Squash Casserole
Carrot and Raisin Salad

These are all amazing in their own way. But, for the moment, isn’t this Asian slaw catching your eye?

A close-up view of an Asian slaw with Peanut Ginger Dressing on a white platter with a golden serving spoon inserted into the side.

There is something truly special about this dish.

Guests always remark on how gorgeous it is. And, then, there’s that beautiful silence when they take their first bite.

The crisp, fresh vegetables enveloped with a deeply flavorful peanut ginger dressing are unforgettable. Simply the best.

A person lifting a large serving spoon of Asian slaw with peanut ginger dressing from a bowl of the same.

Ready to make the best slaw in town? Go for it!

And when you do, be sure to take a picture of it, post it on Instagram, and tag @HowToFeedaLoon and hashtag #HowToFeedaLoon!

An overhead view of an oval white platter filled with an Asian slaw with Peanut Ginger Dressing.
Print Recipe
5 from 2 votes

Asian Slaw with Peanut Ginger Dressing

Asian Slaw really is fantastic. Perfect for Summer BBQs and picnics. The veggies can be prepped well in advance and the dressing can, too! Mix veggies and dressing just before serving.
Prep Time30 minutes mins
Total Time30 minutes mins
Course: Salad
Cuisine: Asian / American, Asian cuisine
Servings: 8 people
Calories: 217kcal
Author: Kris Longwell

Ingredients

For the Dressing

  • 4 cloves garlic minced
  • 2 tablespoon ginger fresh, peeled and minced
  • 3 tablespoon soy sauce
  • 3 tablespoon brown sugar
  • 5 tablespoon peanut butter creamy
  • 6 tablespoon olive oil

For the Slaw

  • 2 cups red cabbage thinly sliced, and roughly chopped
  • 5 cups green cabbage thinly sliced, and roughly chopped
  • 2 large carrots peeled and julienned
  • 1 red bell pepper seeded, cut into strips
  • 1 yellow bell pepper seeded, cut into strips
  • ½ cup cilantro fresh, chopped
  • 8 green onions thinly sliced, green and white parts
  • 6 tablespoon rice vinegar
  • Salt and pepper to taste

Instructions

  • In a food processor, or, in a medium bowl, process (or whisk) together the dressing ingredients. Chill until ready to use. (It can be made and refrigerated up to 2 days before use)
    4 cloves garlic, 2 tablespoon ginger, 3 tablespoon soy sauce, 3 tablespoon brown sugar, 5 tablespoon peanut butter, 6 tablespoon olive oil
  • If the dressing has been in the fridge: Let dressing stand for at least 30 minutes at room temp before tossing with the slaw.
  • In a large bowl, combine the slaw ingredients, including the rice wine.
    2 cups red cabbage, 5 cups green cabbage, 2 large carrots, 1 red bell pepper, 1 yellow bell pepper, ½ cup cilantro, 8 green onions, 6 tablespoon rice vinegar
  • Add dressing and toss to coat well.
  • Season with salt and pepper (a good pinch of each).
    Salt and pepper

Video

Notes

See the video near the top of the blog post for visual guidance. If you liked the video, please subscribe to our YouTube channel. 
The veggies (except the cilantro and green onions) can be prepped up to 12 to 24 hours in advance. Keep covered in the fridge until ready to use. The dressing can be made up to 2 days in advance. 
Don't toss the salad with the dressing until soon before serving. 
Leftovers will be a bit soggy, but still yummy. Keep covered in the fridge for up to 3 days. 
 

Nutrition

Calories: 217kcal | Carbohydrates: 16g | Protein: 5g | Fat: 16g | Saturated Fat: 3g | Polyunsaturated Fat: 2g | Monounsaturated Fat: 10g | Sodium: 452mg | Potassium: 378mg | Fiber: 3g | Sugar: 10g | Vitamin A: 3981IU | Vitamin C: 79mg | Calcium: 59mg | Iron: 1mg

POST UPDATE: This recipe was originally published in April 2015, but was updated with improved tweaks to the recipe with new tips and photography and a fabulous new video in August 2023!

Zucchini and Yellow Squash Salad with Tomato Relish

August 10, 2023 by Kris Longwell Leave a Comment

A straight-on view of two white bowls filled with a serving of zucchini and yellow squash salad topped with a cherry tomato relish, pine nuts, and shave parmesan cheese.

Just because a dish is healthy, does not mean that it can’t be absolutely delicious. This recipe proves that point without a doubt.

There is something truly magical about this salad. The strips of squash and zucchini are softened and have a texture like cooked pasta. The cherry tomato relish, toasted pine nuts, and shaved Parmesan create one of the best salads we’ve ever made, served, or eaten. These give our zucchini fritters a run for the money!

A straight-on view of two white bowls filled with a serving of zucchini and yellow squash salad topped with a cherry tomato relish, pine nuts, and shave parmesan cheese.

How To Make Zucchini and Yellow Squash Salad

This dish is literally brimming with fresh garden flavors. And zucchini and squash are loaded with wonderful nutrients. Learn more about how great they are for good health here!

This dish is wonderful when the vegetables are in their prime during the spring and summer months, but it’s really good any time of the year!


NOTE: If you liked this video, please subscribe to our YouTube channel. Remember to click the little ‘bell’ icon so you’ll never miss a new video. Thank you!

The Ingredients You Will Need

This recipe is all about garden-fresh vegetables and a simple balsamic vinaigrette. Just a handful of ingredients to make a truly remarkable dish.

Here’s What You’ll Need To Have On Hand

Zucchini – No need to peel them.
Yellow Squash – No need to peel them, either. Try and get similar-sized zucchini and squash, but if you can’t, don’t worry.
Tomatoes – We love going with a variety of petite tomatoes. Cherry or grape tomatoes are wonderful. But, you can also cut up a large tomato, too. Preferably homegrown!
Onion – Finely chopped red onion is perfect. If desired, soak the onions in apple cider vinegar to pickle them a bit, and give them a more mild taste.
Garlic – Minced.
Basil – Fresh, please. Chopped.
Oil – Extra-virgin, or good-quality olive oil is best.
Balsamic vinegar – Aged is fantastic. We like Modena.
Pine nuts – Lightly toasted to bring out the best flavor.
Parmesan – Get a block of it and then shave a little for garnishing the salad. Grated works just fine, too.

EXPERT TIP: A mandolin makes slicing the vegetables a snap. If you don’t have a mandolin, then use a sharp knife and a steady hand. The yellow squash sometimes has a dense amount of seeds in the middle which will cause a few of the strips to fall apart. Just set those aside for another use.

A person using a mandolin slicer to cut a yellow squash into long thin strips that resemble sheets of yellow pasta.

Tips for Perfect Zucchini and Yellow Squash Salad

Use a Mandolin To Slice the Zucchini and Squash – Though a knife will work, too, a mandolin ensures pasta-like sheets of veggies. Tasty and beautiful.

Soften With Salt – Placing the sliced zucchini and squash in a colander, liberally sprinkling them with salt, and then allowing them to rest for 20 minutes brings out moisture and makes them very soft and tender. Be sure to rinse the salt off.

Toast the Pine Nuts – Though not completely necessary, toasting the pine nuts brings out a nutty flavor that compliments the flavors in the salad wonderfully. Keep an eye on them, though, they will burn quickly if left in too long!

EXPERT TIP: We recommend letting the relish rest for about 30 minutes (or longer) before spooning over the zucchini and squash. The tomato will absorb the extra-virgin olive oil and vinegar and become a wonderful texture and flavor profile.

A person spooning a tri-color cherry tomato relish on top of thin slices of softened zucchini and yellow squash in a white dinner bowl.

How To Serve and Store

The zucchini and squash can be sliced and softened up to a couple of hours before serving. Don’t rinse the salt off until close to serving time. The relish can be made up to 12 hours in advance. And the pine nuts can be toasted up to 2 days in advance.

Once softened, the zucchini and squash layers can be shaped into beautiful “waves” in serving bowls. See the video near the top of the blog post for visual guidance.

Garnishing with shaved Parmesan is elegant and delicious, too. But, grated Parmesan works well, too. The salty cheese and nutty pine nuts work beautifully with the vegetables and balsamic.

A straight-on view of a bowl filled with a zucchini and yellow squash salad with tomato relish and fresh Parmesan shavings.

Other Amazing Vegetable Recipes to Try

Preparing dishes with farm-fresh vegetables is wonderful for so many reasons: They are good for you, beautifully colorful, festive, but most of all – absolutely delicious! Here are some of our favorite recipes that you’ll want to try:

Panzanella (Tuscan Bread and Tomato Salad)
Mexican Street Corn Salad (Esquites)
Zucchini Fritters
Zucchini Bread
Yellow Squash Casserole
Green Bean and Tomato Salad with Scallion Dressing
Carrot and Raisin Salad
Slow-Cooker Asparagus Risotto
Pesto Pasta Salad with Potatoes and Green Beans

All of these dishes are a celebration of farm-fresh goodness. They are amazing, without a doubt. But, isn’t this salad right here catching your eye?

An overhead view of two bowls filled with a zucchini and yellow squash salad with tomato relish sitting next to another bowl filled with the tomato relish.

There is just something “ahhh” worthy about this salad.

When you first see it, it is truly awe-inspiring in its simple farm-fresh beauty. But, then you take that first bite.

It just doesn’t get much better! And, it’s good for you, too!

A person using a fork to hold up a softened strip of zucchini that is topped with tomato relish over a bowl of the same.

Ready to make the best veggie salad in town? Go for it!

And when you do, be sure to take a photo, post it on Instagram, and tag @HowToFeedaLoon and hashtag #HowToFeedaLoon!

A straight-on view of a bowl filled with a zucchini and yellow squash salad with tomato relish and fresh Parmesan shavings.
Print Recipe
No ratings yet

Zucchini and Yellow Squash Salad with Tomato Relish

This salad is a summertime favorite, for sure! After letting the zucchini and squash sit with the salt (which softens the veggies so they resemble sheets of cooked pasta), be sure to wash under cold water to remove the excess salt, and then dry using a kitchen cloth. So good! Especially when veggies are fresh from the garden!
Prep Time15 minutes mins
Toasting Pine Nuts and Salt Resting20 minutes mins
Total Time35 minutes mins
Course: Salad
Cuisine: American
Servings: 4 people
Calories: 267kcal
Author: Kris Longwell

Equipment

  • mandolin or a sharp knife and a steady hand

Ingredients

  • 2 zucchini
  • 2 yellow squash
  • Kosher salt and freshly ground black pepper
  • 2 cups cherry tomatoes halved, or 3 large tomatoes, cored and diced
  • ½ cup red onion chopped, or thinly sliced
  • 3 garlic cloves minced
  • ¼ cup basil fresh, chopped
  • 3 tablespoon extra-virgin olive oil
  • 1 tablespoon balsamic vinegar
  • ½ cup pine nuts toasted
  • Parmesan cheese for garnish

Instructions

  • Using a mandoline, or a sharp knife, cut each zucchini and squash lengthwise into slices about ⅛".
    2 zucchini, 2 yellow squash
  • Transfer slices to a large colander or bowl. Liberally sprinkle salt over the veggies, and toss to coat.
    Kosher salt and freshly ground black pepper
  • Let stand for 20 minutes.
  • Gently rinse the slices under cold running water for several minutes to remove the salt.
  • Pat the slices dry with a kitchen towel and arrange in a loose mound on a plate or medium bowl.
  • In a large bowl, combine the tomatoes and their juices, onion, garlic, and basil and toss gently to mix.
    2 cups cherry tomatoes, ½ cup red onion, 3 garlic cloves, ¼ cup basil
  • Stir 2 tablespoons of the oil, balsamic, and a pinch of salt and pepper into the tomato mixture.
    3 tablespoon extra-virgin olive oil, 1 tablespoon balsamic vinegar
  • Drizzle the remaining 1 tablespoon oil over the zucchini and squash and season with a few grinds of black pepper and a sprinkle of salt.
  • Spoon the tomato mixture over the zucchini and squash.
  • Top with toasted pine nuts and shaved Parmesan.
    ½ cup pine nuts, Parmesan cheese

Video

Notes

See the video near the top of the blog post for visual guidance. If you liked the video please subscribe to our YouTube channel. 
A mandolin works great for slicing the vegetables lengthwise, but be careful! A sharp knife and a steady hand will work, too. Try to slice them into ⅛-inch thickness. 
This salad is best served fresh. Leftovers are still tasty but will become very soft. 

Nutrition

Calories: 267kcal | Carbohydrates: 15g | Protein: 6g | Fat: 12g | Saturated Fat: 2g | Polyunsaturated Fat: 7g | Monounsaturated Fat: 11g | Sodium: 21mg | Potassium: 823mg | Fiber: 4g | Sugar: 9g | Vitamin A: 841IU | Vitamin C: 54mg | Calcium: 54mg | Iron: 2mg

POST UPDATE: This recipe was originally published in July 2016, but was updated with improved tweaks to the recipe with new tips and photography and a fabulous new video in August 2023!

Tzatziki Cucumber Salad

August 10, 2023 by Kris Longwell 5 Comments

An overhead view of a white bowl filled with Tzatziki Cucumber Salad that is flanked by a wooden spoon and freshly sliced cucumbers.

Cucumbers are known for keeping things cool. This salad is about as cool and refreshing as you’ll find.

A popular creamy cucumber salad includes sour cream and is sweetened with a little sugar. That is delicious, but we can’t get enough of the tang of the homemade tzatziki sauce that literally puts this salad over the top. Make the sauce up to 2 days in advance, and then assemble just before serving! And get ready for raves!

An overhead view of a white bowl filled with Tzatziki Cucumber Salad that is flanked by a wooden spoon and freshly sliced cucumbers.

How To Make Tzatziki Cucumber Salad

Making the tzatziki sauce from scratch is so easy and can be done several days in advance.

Then, it’s just a matter of slicing the cucumbers and onion and tossing it all together! Super easy!


NOTE: If you like this video, please subscribe to our YouTube Channel. Remember to click the little ‘bell’ icon so you’ll never miss a new video. Thank you!

The Ingredients You Will Need

The beauty of this salad is its simplicity. It’s just cucumbers and onions, seasoned with a little salt and pepper, and then bathed in the flavorful tzatziki sauce.

Here’s What You’ll Need to Have on Hand

Tzatziki Sauce – Homemade is simple and makes all the difference in the world.
Cucumbers – Peel the cukes in strips, for a decorative appearance. We use a mandolin to get even, thin slices, but a sharp knife and a steady hand work just fine, too. 
Red onion – Thinly sliced. The onion flavor becomes very mild as it mingles with the tzatziki sauce.
Salt and pepper – This salad benefits from a little extra seasoning. Add a little salt, take a bite, and then add more, if desired.

EXPERT TIP: The tzatziki sauce can easily be prepared by stirring together the ingredients in a medium-sized bowl. If not using immediately, cover the bowl with plastic wrap and refrigerate until ready to use.

A person holding a wooden spoon filled with homemade tzatziki sauce over a glass bowl filled with the sauce.

Tips For Perfect Tzatziki Cucumber Salad

This salad is a foolproof dish to prepare. But there are a few things to keep in mind before preparing it for guests.

Use Fresh Cucumbers – Look for large, dark green cucumbers. Slice them thinly for a refreshing and crunchy texture. A mandolin delivers slices that are all the same size and the ideal width (⅛th-inch thick).

Toss Just Before Serving – As the salad rests, the cucumbers will continue to release water. To keep the salad the best consistency, don’t dress the cucumbers with the dressing until just before you serve guests.

Make the Tzatziki Sauce from Scratch – We can’t stress this enough. Allow the sauce to chill for at least an hour before tossing with the vegetables.

EXPERT TIP: We recommend making two batches of our homemade tzatziki sauce recipe. It may seem as though you are adding too much of the sauce to the cucumbers. After you’ve added about ⅔ of the double batch of sauce, gently toss the cucumber with the tzatziki. We like this salad to be extra creamy. You add as much as you desire. If you don’t use all of it, save the rest for another use: Chicken Gyros!

A large amount of homemade tzatziki sauce being poured from a medium-sized glass bowl into another bowl filled with sliced cucumbers and thinly sliced red onion.

Other Veggie Side Dishes To Try

These dishes are scrumptious, healthy, and at their best when they are in peak season. But, they’re also delicious year-round!

Dill and Cucumber Salad
Watermelon, Cucumber, and Feta Salad
Zucchini and Yellow Squash Salad with Tomato Relish
Zucchini Fritters
Carrot and Raisin Salad
Summer Stuffed Tomatoes
Panzanella (Tuscan Bread and Tomato Salad)

These are all incredible in their own special way, but isn’t this cucumber salad calling your name?

A close-up side view of a white serving bowl filled with tzatziki cucumber salad with fresh cucumber slices sitting nearby.

If you like cucumbers, you are going to love this salad so much!

The homemade tzatziki gives the salad a nice tangy twist that will have guests coming back for seconds and thirds!

It really is the perfect salad for serving at your next BBQ, family gathering, or just an easy weeknight dinner side.

A close-up view of a wooden spoon filled with a pile of creamy tzatziki cucumber salad.

Ready to make the best summer salad on the block? Go for it!

And when you do, be sure to take a photo of it, post it on Instagram, and tag @HowToFeedaLoon and hashtag #HowToFeedaLoon!

An overhead view of a white bowl filled with Tzatziki Cucumber Salad that is flanked by a wooden spoon and freshly sliced cucumbers.
Print Recipe
5 from 3 votes

Tzatziki Cucumber Salad

Tzatziki Cucumber Salad is lighter than a cream-based cucumber salad thanks to the Greek yogurt. We do recommend going with whole milk yogurt for the tzatziki sauce. This salad is meant to be extra "creamy", but still, you may not use all of the double batch of homemade tzatziki.
Prep Time20 minutes mins
Total Time20 minutes mins
Course: Side Dish
Cuisine: Greek / American
Servings: 6
Calories: 193kcal
Author: Kris Longwell

Equipment

  • Mandolin (for slicing cucumbers) Or a large sharp knife with a steady hand

Ingredients

  • 3 cups tzatziki sauce click the link for easy recipe
  • 2 cucumbers peeled and thinly sliced
  • ½ large red onion thinly sliced
  • salt and pepper

Instructions

Do Ahead

  • Make the tzatziki sauce. If not using immediately, store covered in the refrigerator.

Prepare the Salad

  • In a large bowl, toss together the cucumbers with the onions, 1 teaspoon salt, and ½ teaspoon black pepper.
  • Pour the tzatziki sauce over the cucumbers and use two large wooden spoons to mix until fully coated. Serve at once.

Video

Notes

See the video near the top of the blog post for visual guidance. If you liked the video, please subscribe to our YouTube channel. 
The tzatziki sauce can be made several days in advance. 
After you coat the cucumbers with the sauce, you'll want to serve it immediately. The cucumbers will continue to release water and the salad will become increasingly watery. After an hour or so, you can spoon out some of the liquid, if desired. The salad is still delicious, even when it gets a little watery. 
Though this salad is best served right after it's prepared, you can store leftovers in a closed container for several days in the fridge. 

Nutrition

Calories: 193kcal | Carbohydrates: 11g | Protein: 5g | Fat: 8g | Saturated Fat: 2g | Polyunsaturated Fat: 0.01g | Monounsaturated Fat: 0.003g | Cholesterol: 20mg | Sodium: 592mg | Potassium: 149mg | Fiber: 1g | Sugar: 6g | Vitamin A: 466IU | Vitamin C: 4mg | Calcium: 173mg | Iron: 0.2mg

Crispy Hash Browns (Diner-Style)

August 6, 2023 by Kris Longwell 19 Comments

A close-up view of crispy diner-style hash brown on a plate next to a small metal container of ketchup.

This breakfast side dish is classic in every way. And now, you can make them with ease in your own kitchen.

A trip to your favorite breakfast nook just wouldn’t be the same without a delicious helping of these flavorful spuds. These are terrific next to a plate of scrambled eggs, crispy bacon, toast, or even classic eggs benedict. There are a few simple tricks to making them diner-style and irresistibly delicious.

A close-up view of crispy diner-style hash brown on a plate next to a small metal container of ketchup.

How To Make Crispy Hash Browns

The simple trick of quickly parboiling the russet potatoes ensures perfectly cooked, crispy hash browns every single time.

A food processor with a shredding attachment makes shredding a snap, but a standard box cutter does the trick, too.


NOTE: If you liked this video, please subscribe to our YouTube channel. Remember to click the little ‘bell’ icon so you’ll never miss a new video. Thank you!

The Ingredients You Will Need

There are very few ingredients needed to make this iconic side dish. But, choosing the right ingredients and how you prepare them is crucial.

Here’s What You’ll Need to Have on Hand

Potatoes – Russet potatoes are classic and the way to go.
Onion – White or yellow, finely chopped. They provide the classic taste and practically melt into the potatoes.
Seasonings – Salt and pepper is all you need.
Oil – For the classic taste, save some bacon grease. If you don’t have bacon grease, vegetable oil and butter will work, too.
Ketchup – For dipping. In our house, this is a must. But, of course, it’s optional.

EXPERT TIP: You don’t want to overcook the potatoes when parboiling. If you do this, they result in mushy, gummy potatoes. Place the potatoes in a large pot, cover with water, bring to a boil, and immediately turn off the heat. After exactly 10 minutes, remove and let cool. Peel and shred. They will be a little sticky, but easy to separate.

An overhead view of a food processor that is filled with shredded par-boiled russet potatoes.

Tips for Making Perfect Crispy Hash Browns

Use a Non-Stick Skillet and Plenty of Bacon Grease – You may need to cook them in batches if your non-stick skillet is small. Non-stick ensures the hash browns cook evenly and don’t stick to the pan.

Cook On Medium-High Heat – For a nice crispy exterior, the pan should be quite hot. You’ll flip them only a couple of times. They will take anywhere from 15 to 20 minutes per side.

Resist the Urge to Stir or Flip Too Often – This can prevent them from developing a crispy crust. Instead, let them cook undisturbed for a few minutes on each side before flipping. Using your spatula to cut the cooking potatoes into 4 triangle makes flipping them easier.

EXPERT TIP: After you toss the shredded potatoes with onion, salt, and pepper, you’ll want to add them to your hot skillet with melted grease (or oil). Use the back of a spatula or wooden spoon to compact the potatoes in the skillet.

A person dropping a handful of shredded partially cooked russets potatoes in a large non-stick skillet on a stove.

How To Serve

These are definitely best served piping hot right from the skillet.

We like to stack the quartered browns on a plate or platter and serve the family style.

If serving more than four people, use your spatula or wooden spoon to break the hash browns apart. Don’t worry if they look a bit messy, they’re supposed to. They’re homemade and diner-style!

An overhead view of a large non-stick skillet filled with diner-style crispy hash browns.

Other Classic Diner-Style Breakfast Recipes To Try

For many of us, breakfast is our favorite meal of the day. These tried and true breakfast classics are fun to make and always a huge hit with the family.

Classic Huevos Rancheros
Southern Biscuits and Gravy
Best-Ever Breakfast Quiche
Buttermilk Waffles with Blueberry Sauce
Lemon Ricotta Pancakes with Vanilla Sauce
Breakfast Potatoes
Italian-Style Skillet Scramble
Steak and Eggs
Grandma’s Homemade Cinnamon Rolls

These are amazingly wonderful in their own way. But aren’t these incredible hash browns calling your name? Talk about the perfect breakfast!

An overhead view of a platter of crispy hash brown next to a bowl of scrambled eggs, two cups of black coffee, a glass of orange juice, and a plate of cooked bacon.

There is just something addictively delicious about these potatoes.

Even if there any left over (which there usually isn’t), you and your loved ones will have a hard time not making trips back to the dish for more nibbles.

These truly are classic and we hope you enjoy them as much as we do! Every bite is a true taste sensation!

An overhead view of a plate filled with a half-eaten portion of hash browns with a small container of ketchup, crisp bacon, and sliced toast nearby

Ready to make the best breakfast side dish that will rival any diner in town? Go for it!

And when you do, be sure to take a photo of them, post it on Instagram, and tag @HowToFeedaLoon and hashtag #HowToFeedaLoon!

A close-up view of crispy diner-style hash brown on a plate next to a small metal container of ketchup.
Print Recipe
4.50 from 6 votes

Crispy Hash Browns (Diner-Style)

If you want to make hash browns at home that are as good as your favorite diner, follow these easy steps, and you will not be disappointed.  These are the real deal.  
Prep Time15 minutes mins
Cook Time30 minutes mins
Boiling and Cooling30 minutes mins
Total Time1 hour hr 15 minutes mins
Course: Breakfast
Cuisine: American
Servings: 4 people
Calories: 240kcal
Author: Kris Longwell

Equipment

  • Food processor with shredding attachment Or box grater
  • Non-stick skillet Preferably 12-inch

Ingredients

  • 4 medium russet potatoes
  • ½ cup onion finely chopped
  • 1 teaspoon Kosher salt
  • ½ teaspoon black pepper freshly ground
  • 2 to 3 tablespoon bacon grease or vegetable oil

Instructions

  • Place the unpeeled potatoes in a pot of water, covering them by about an inch. Bring the water to a boil over high heat, and then immediately remove them from the heat.  Let rest in the hot water for 10 minutes, and then, using tongs, remove from the hot water and rest until completely cooled. (This can be done up to 48 hours before cooking).
    4 medium russet potatoes
  • Peel the potatoes.
  • Using the shredding attachment of your food processor, or the large holes of a box grater, shred each of the potatoes.
  • Place the shredded potatoes in a large bowl and toss with the onion, salt, and pepper.
    ½ cup onion, 1 teaspoon Kosher salt, ½ teaspoon black pepper
  • Heat the grease (or oil) in a large non-stick skillet over medium-high heat.
    2 to 3 tablespoon bacon grease
  • Add the potatoes and move them around in the skillet with a wooden spoon, enough to coat them with the grease/oil.  Then, flatten with a spatula.
  • Let cook for 15 to 20 minutes, nudging the potatoes from time to time with the spoon to prevent sticking to the skillet (it's okay if they stick a little, this helps to form a crispy crust).
  • Use your spatula to cut the hash browns into 4 quarters, then, flip them, adding a little more grease as you do (about another teaspoon).  
  • Flatten again and let cook until nicely browned on both sides, about another 15 minutes. 
  • Transfer to individual plates or a platter and serve at once. 

Video

Notes

See the video near the top of the blog post for visual guidance. If you liked the video, please subscribe to our YouTube channel. 
If you choose to not parboil the potatoes, it is critical to squeeze as much of the liquid (water) from the shredded potatoes as possible. This can be done by squeezing/ringing them in a kitchen towel or using a potato ricer. If you parboil, no need to do this. 
The hash browns are done when they are nicely browned and crispy on the exterior. This may take longer than 15 minutes. The heat should be medium-high. Hot, but not so hot it burns the potatoes. You can use a spatula to lift a portion up to see the underside. It's okay to flip them over multiple times, if necessary.
Leftovers will keep covered in the fridge for up to 3 days. We don't recommend freezing them once cooked. 

Nutrition

Calories: 240kcal | Carbohydrates: 41g | Protein: 5g | Fat: 7g | Saturated Fat: 3g | Polyunsaturated Fat: 1g | Monounsaturated Fat: 3g | Cholesterol: 7mg | Sodium: 603mg | Potassium: 921mg | Fiber: 3g | Sugar: 2g | Vitamin A: 4IU | Vitamin C: 14mg | Calcium: 34mg | Iron: 2mg

POST UPDATE: This recipe was originally published in June 2018, but was updated with improved tweaks to the recipe with new tips and photography and a fabulous new video in August 2023!

  • « Previous Page
  • 1
  • …
  • 4
  • 5
  • 6
  • 7
  • 8
  • …
  • 21
  • Next Page »

Welcome!

Kris & Wesley (The Loon) live for fun, food, and fabulousness. "How to Feed a Loon" is a celebration of just that. Come join us on this joyous culinary ride.

More about us

Soups & Stews

  • Two sourdough bread bowls filled with Broccoli Cheddar Soup resting on small plates with a glass of iced tea nearby.
    Broccoli Cheddar Soup (Panera Copycat)
  • An overhead view of a white soup bowl filled with Classic Ham and Bean Soup (With Navy Beans) sitting on a white plate with a gold spoon resting nearby.
    Classic Ham and Bean Soup (with Navy Beans)
  • An overhead view of two bowls on a wicker placemat and that are filled with servings of homemade Chinese sweet and sour soup with wooden spoons flanking each bowl.
    Homemade Chinese Hot and Sour Soup
  • An overhead view of a large white pot filled with chorizo and bean soup with a wooden spoon in the middle of the soup.
    Chorizo and Bean Soup
  • Two soup bowls filled with creamy Irish potato soup topped with crumbled bacon and snipped chives.
    Creamy Irish Potato Soup
  • A straight-on view of two colorful Asian soup bowls filled with servings of udon soup with pork topped with hard boiled eggs and chopped scallions.
    Udon Noodle Soup with Pork
See more Soups →

Popular Recipes

  • A white soup filled with roasted tomato basil soup next to sliced grilled cheese sandwiches.
    Roasted Tomato Basil Soup
  • A close-up view crispy Southern crab beignets sitting on a white platter next to a small bowl of white remoulade sauce.
    Southern Crab Beignets
  • A lemon wedge being squeezed onto a platter of chicken francese
    Chicken Francese
  • this is a baked jumbo crab au gratin in mini cast iron skillets
    Jumbo Lump Crab Au Gratin
  • Sautéed white beans with garlic and sage in a large skillet with wooden spoon
    Sautéed White Beans with Garlic, Sage and Tomatoes
  • A large white bowl of freshly prepared Cajun Pasta Salad.
    Cajun Pasta Salad

Footer

↑ back to top

Explore

  • Recipe Index
  • About Us
  • Subscribe

About

  • Privacy Policy
  • Contact

Copyright © 2025 How to Feed a Loon • This website contains affiliate links, which means that if you click on a product link, we may receive a commission in return. How To Feed a Loon is a participant in the Amazon Services LLC Associates Program, an affiliate advertising program designed to provide a means for sites to earn advertising fees by advertising and linking to Amazon.com.

Rate This Recipe

Your vote:


A rating is required
A name is required
An email is required